This topic describes how to configure single sign-on (SSO) logon from Active Directory Federation Service (AD FS) to CloudSSO.
Background information
Assume that an enterprise uses Active Directory (AD) to manage local users and has built a multi-account structure in a resource directory. The enterprise wants to configure settings to implement SSO logon. This way, the AD users can directly access specific resources within the specified members in the resource directory.
In the following example, AD FS is deployed on an Elastic Compute Service (ECS) instance that runs Windows Server 2012 R2. AD FS is the identity provider (IdP). CloudSSO is the service provider (SP).
Preparations
Before you configure SSO logon, perform the following operations:
Deploy the following services on an ECS instance that runs Windows Server 2012 R2:
Active Directory Domain Service (AD DS): allows you to create, query, and modify objects, such as domain users and domain devices.
AD FS: allows you to configure the SSO relying party and performs SSO authentication for the configured relying party.
ImportantThe configuration of Microsoft AD described in this topic is for reference only and helps you understand the configuration procedure of SSO logon to Alibaba Cloud. Alibaba Cloud does not provide consultation services for the configuration of Microsoft AD.
Create users and assign access permissions to the users in the CloudSSO console.
Create users that have the same usernames as the users in AD FS in the CloudSSO console.
For more information, see Create a user.
NoteUsernames are used for user logons. When you configure SSO logon, the username of a CloudSSO user must be the same as the value of the field that is used for SSO logon in AD FS. For more information, see Step 3: Configure attributes in the SAML assertions in AD FS.
Create access configurations and specify policies in the CloudSSO console.
For more information, see Create an access configuration.
Assign access permissions on the accounts in your resource directory to the users.
For more information, see Assign access permissions on the accounts in a resource directory.
Step 1: Obtain the SP metadata file in the CloudSSO console
Log on to the CloudSSO console.
In the left-side navigation pane, click Settings.
In the SSO Logon section, download the service provider (SP) metadata file.
Step 2: Specify Alibaba Cloud as a relying party in AD FS
Log on to the ECS instance on which AD FS is deployed.
Start Server Manager.
In the left-side navigation pane, click AD FS.
In the upper-right corner, choose .
In the AD FS management tool, add Alibaba Cloud as a relying party.
In the left-side navigation pane, right-click Relying Party Trusts and select Add Relying Party Trust.
In Add Relying Party Trust Wizard, select Claims aware and click Start.
Select Import data about the relying party from a file and click Browse to import the metadata file that is obtained in Step 1: Obtain the SP metadata file in the CloudSSO console. Then, click Next.
Enter a display name for the relying party and click Next.
In this example, enter CloudSSODemo.
Select the required access control policy and click Next.
In this example, select Permit everyone.
Confirm the configuration and click Next.
Click Close.
Step 3: Configure attributes in the SAML assertions in AD FS
In this example, the value of the NameID attribute in the SAML assertions is set to the User Principal Name (UPN) of an AD user. This allows Alibaba Cloud to identify the required CloudSSO user by using a SAML response.
Right-click CloudSSODemo and select Edit Claim Issuance Policy.
Click Add Rule.
NoteAn issuance transform rule indicates how to transform a known user attribute and issue it as an attribute in the SAML assertions. You must issue the UPN of a user in AD FS as
NameID, which indicates that a new rule is required.In Add Transform Claim Rule Wizard, set Claim rule template to Transform an Incoming Claim and click Next.
Configure claim information.
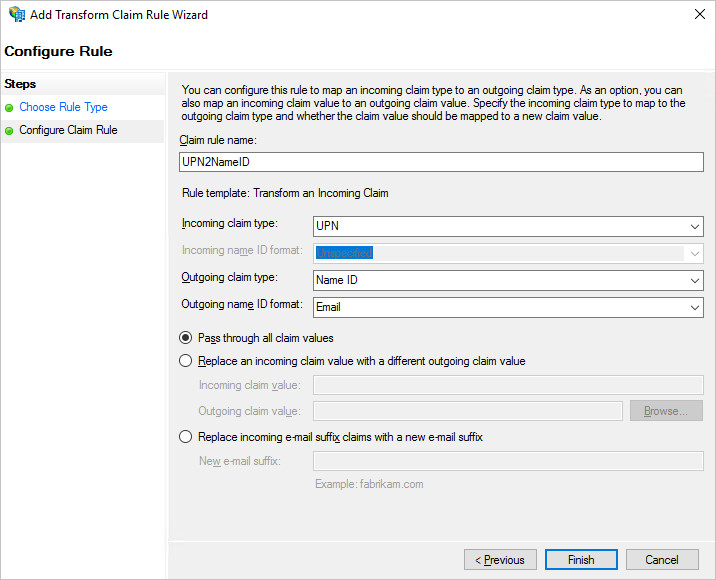
Enter a custom rule name.
In the Incoming claim type drop-down list, select UPN.
In the Outgoing claim type drop-down list, select Name ID.
In the Outgoing name ID format drop-down list, select Email.
Select Pass through all claim values.
Click Finish.
Click OK.
Step 4: Obtain the IdP metadata file in AD FS
Access https://<ADFS-server>/federationmetadata/2007-06/federationmetadata.xml from the ECS instance on which AD FS is deployed to obtain the IdP metadata file.
<ADFS-server> indicates the domain name or IP address of your AD FS server.
Step 5: Enable SSO logon in the CloudSSO console
In the left-side navigation pane of the CloudSSO console, click Settings.
In the SSO Logon section of the Settings page, click Configure IdP.
In the Configure IdP dialog box, select Upload Metadata File.
Click Upload to upload the IdP metadata file that is obtained in Step 4: Obtain the IdP metadata file in AD FS.
NoteIf the size of the IdP metadata file exceeds the upper limit, you can delete the content in the
<fed:ClaimTypesRequested>and<fed:ClaimTypesOffered>sections.Turn on the switch for SSO logon to enable SSO logon.
NoteAfter SSO is enabled, username-password logon is automatically disabled. SSO takes effect on all users. After you enable SSO, all users must use the SSO logon method.
Verify the configuration results
After you complete the preceding steps, you can initiate SSO logon from Alibaba Cloud or AD FS.
Initiate SSO logon from Alibaba Cloud
Log on to the CloudSSO console. Go to the Overview page and copy the URL used to log on to the user portal.
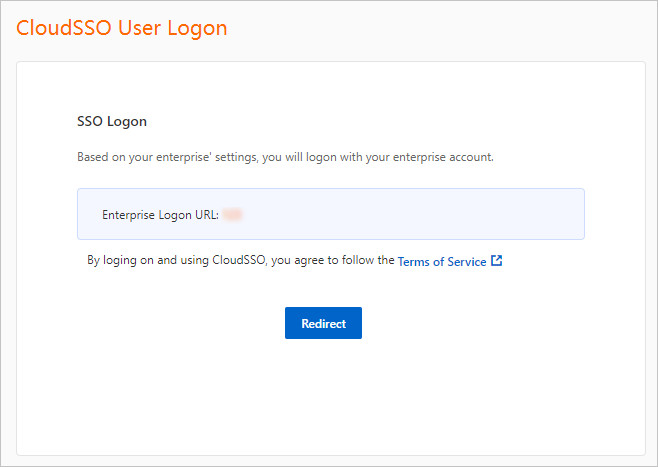
Open a browser, paste the copied URL, and then press Enter.
Click Redirect. You are redirected to the logon page of AD FS.
On the page that appears, enter the username and password of the required AD user.
After the logon succeeds, you are redirected to the user portal shown in the following figure.
On the Log on as RAM Role tab, find the required account in your resource directory and click Show Details in the Permissions column.
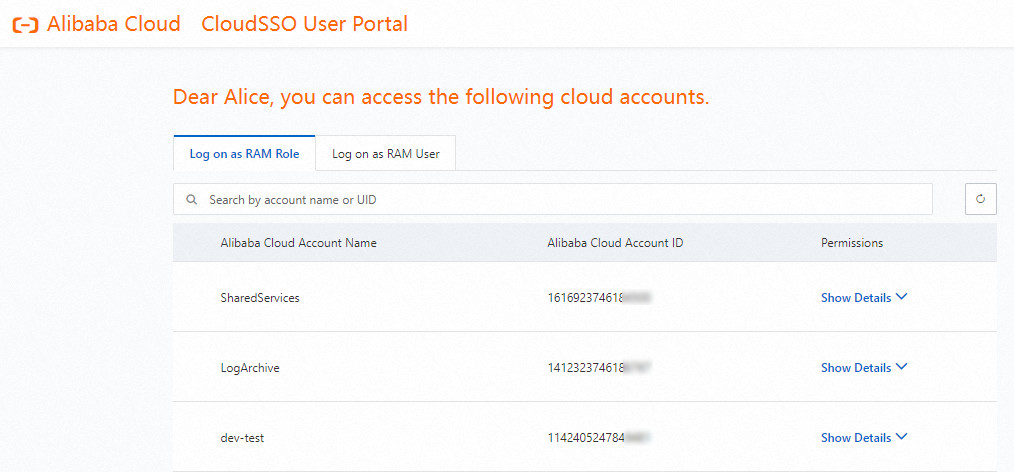
In the panel that appears, find the required access configuration and click Log On in the Actions column.
Access the Alibaba Cloud resources on which the account has permissions.
Initiate SSO logon from AD FS
Log on to the AD FS portal for SSO logon.
The portal URL is
https://<ADFS-server>/adfs/ls/IdpInitiatedSignOn.aspx.Note<ADFS-server> indicates the domain name or IP address of your AD FS server.
If the portal URL is unavailable, you can run the
Set-AdfsProperties -EnableIdpInitiatedSignonPage $Truecommand in PowerShell to open the page.
Select the CloudSSODemo application created in Step 2: Specify Alibaba Cloud as a relying party in AD FS and click Sign in.
Enter the username and password of the AD user. Then, click Sign in.
After the logon succeeds, you are redirected to the user portal shown in the following figure.
On the Log on as RAM Role tab, find the required account in your resource directory and click Show Details in the Permissions column.
In the panel that appears, find the required access configuration and click Log On in the Actions column.
Access the Alibaba Cloud resources on which the account has permissions.