Log on to OceanBase Developer Center (ODC) and click the name of the target connection to go to the corresponding connection management page. You can click Trigger in the left-side navigation pane to get a list of triggers. To create a trigger, click + in the upper-right corner of the trigger list or click Create in the navigation bar on the top of the page
To create a trigger, perform the following three steps:
Specify the basic information
This is Step 1. The Basic Information section contains the following parameters:
Trigger Name: specifies the name of the trigger.
Base Object Mode: specifies the schema where the object that the trigger works on is located.
Base Object Type: specifies the type of the object that the trigger works on. The current version supports only TABLE objects.
Base Object Name: specifies the name of the object that the trigger works on.
Trigger Status: specifies the state of the trigger. Valid value: On or Disable.
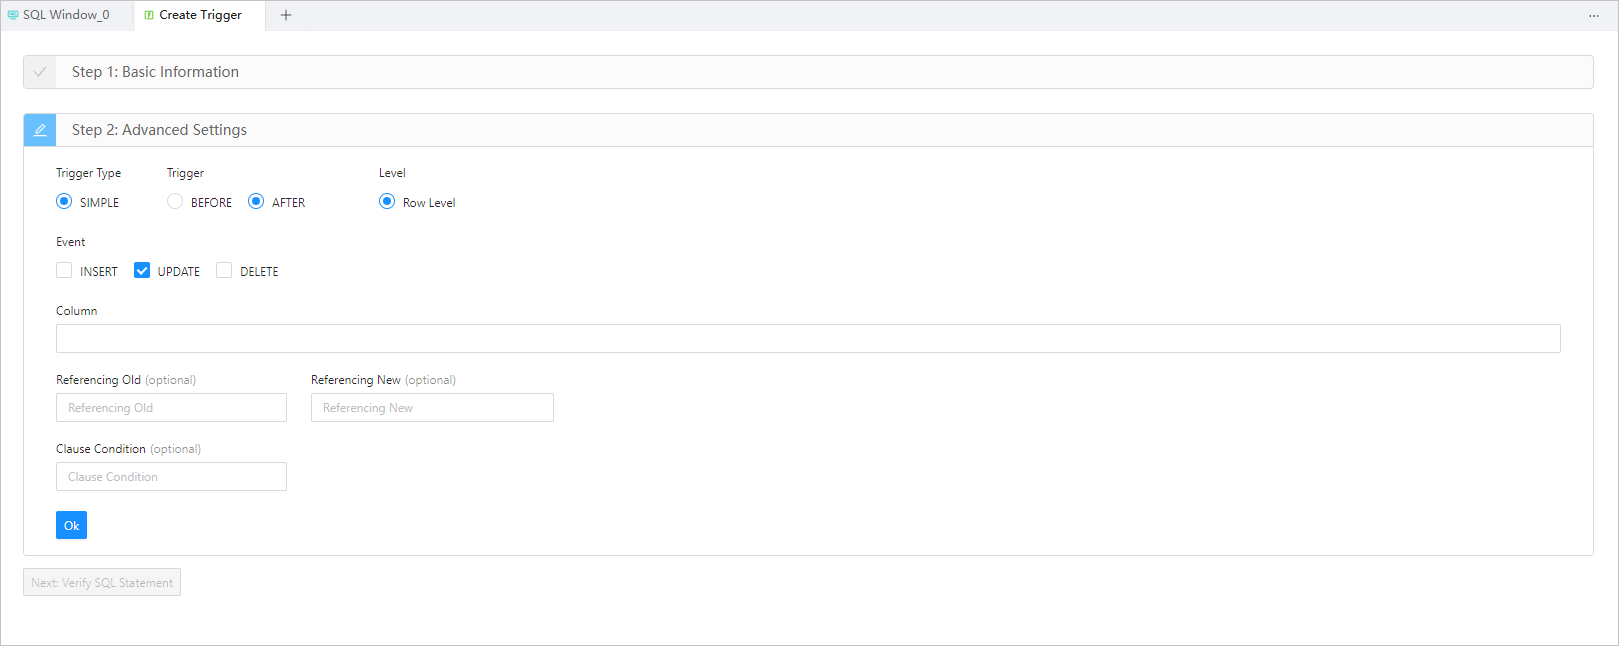
Configure the advanced settings
This is Step 2. The Advanced Settings section contains the following parameters:
Trigger Type: specifies the type of the trigger. The current version supports only SIMPLE triggers.
Trigger: specifies whether the trigger is activated before or after the triggering event. Valid value: BEFORE or AFTER.
Level: specifies the level of the trigger. The current version supports only row-level triggers.
Event: specifies the type of operation that activates the trigger. Valid value: INSERT, UPDATE, or DELETE.
Column (Optional): specifies the range that the event specified in Event applies to. This parameter is displayed when you set Event to UPDATE. The current version allows you to create only row-level triggers in a table. Therefore, the range here is the columns that the event applies to.
Referencing Old(Optional): specifies an alias for the referenced object that corresponds to the value specified for
REFERENCEING OLDin the trigger creation statement.Referencing New(Optional): specifies an alias for the referenced object that corresponds to the value specified for
REFERENCEING NEWin the trigger creation statement.Clause Condition(Optional): specifies a logical expression for the trigger. After you specify a clause condition, the action specified by the trigger is executed only if the value of the expression is True.
Verify the SQL statement
After you specify all the information in the Basic Info and Advanced Settings sections, click Next: Verify SQL Statement to go to the statement editing page.
The trigger definition statement is generated on the statement editing page based on the information that you specified in the Basic Info and Advanced Settings sections. You only need to complete the trigger body, which specifies the action to be executed. After you complete the trigger body, click the Create button in the upper-right corner of the page to complete the creation of the trigger.
In addition, the toolbar on the editing page provides the following buttons:
Button | Description |
Format | Click this button to apply formatting, such as indentation, line break, and keyword highlighting, to the selected SQL statements or all the SQL statements in the current SQL window. |
Find and Replace | You can specify search criteria in the search box to find specific content in the script and enter other content in the replacement box to replace the content found. |
Undo | Click this button to undo the last operation. |
Redo | Click this button to reverse an Undo operation. |
Case Sensitivity | The system supports three configurations: All Caps, All Lowercase, and Capitalize the first letter. Click this button to convert the selected statements in the script to the corresponding capitalization format. |
Indent | The Add Indents and Delete Indent options are provided, to allow you to add indents to or delete indents from the selected statements in the script. |
Comment | The Add Comments and Delete Comment options are provided, which respectively allow you to convert the selected statements in the script to comments and convert comments to SQL statements. |
Previous | Click this button to go back to the Create Trigger page, where you can continue to edit or modify the parameters in the Basic Information and Advanced Settings sections. |