TPC-DS is one of the most widely used benchmarks for measuring big data query performance. Alibaba Cloud E-MapReduce (EMR) has repeatedly achieved the best official results in TPC-DS benchmarks, and is the first big data system certified to run the TPC-DS 100 TB benchmark. This topic walks you through running all 99 TPC-DS SQL statements on an EMR cluster end-to-end.
Overview
The benchmark process has four stages:
| Stage | Description | Estimated time |
|---|---|---|
| 1. Set up the environment | Create an EMR cluster and download the Hive TPC-DS benchmark testing tool | Varies |
| 2. Build the data generator | Compile the TPC-DS toolset on the cluster | 2–3 minutes (with Alibaba Cloud Maven mirror) |
| 3. Generate and load data | Produce a TPC-DS dataset and load it into Hive | 40–50 minutes (SF=3) |
| 4. Run queries | Execute TPC-DS SQL statements using Hive or Spark | Within 5 minutes per query (SF=3) |
TPC-DS benchmark tests are resource-intensive and incur charges while the cluster is running. Release the cluster and clean up data after the test to avoid unnecessary costs.
Limitations
This workflow requires an EMR cluster of V4.8.0 or a later minor version, or V5.1.0 or a later minor version.
Usage notes
This topic uses a DataLake cluster, where the master node is named master-1-1. If you use a Hadoop cluster, replace master-1-1 with emr-header-1 in all commands.
Background
TPC-DS is a standard benchmark defined by the Transaction Processing Performance Council (TPC), the leading industry body for data management system benchmarks. The official TPC-DS tools include only a query generator and a standalone data generator—both unsuitable for big data environments. This topic uses the following tools and cluster configuration:
-
Hive TPC-DS benchmark testing tool: An industry-standard testing tool developed by Hortonworks that supports running TPC-DS or TPC-H benchmarks using Hive and Spark. The tool is built on Hortonworks HDP 3, which corresponds to Hive 3.1.
-
EMR V5.19.0
Prerequisites
Before you begin, make sure you have:
-
An EMR cluster of V4.8.0 or later (V4.x) or V5.1.0 or later (V5.x)
-
SSH access to the cluster master node
-
A bucket with OSS-HDFS enabled (or HDFS) configured as the root storage directory
Step 1: Set up the environment
Create an EMR cluster
Create an EMR V5.19.0 DataLake cluster. For details, see Create a cluster.
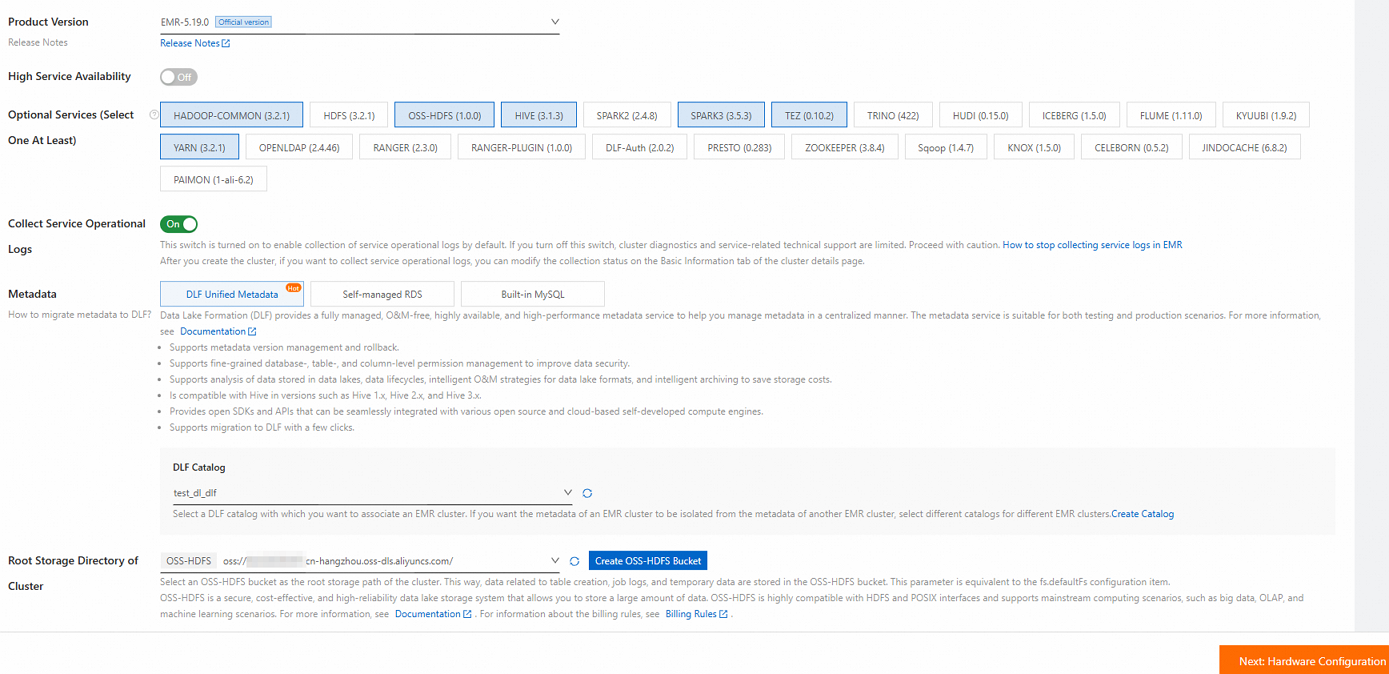
Use the following settings when creating the cluster:
| Setting | Value |
|---|---|
| Business scenario | Data Lake |
| Product version | EMR-5.19.0 |
| Optional services (select one at least) | Default settings |
| Node group (core nodes) | For best performance, select a big data or local SSD instance type. For a quick evaluation with a small dataset, a general-purpose instance with 4 vCPUs and 16 GiB of memory is sufficient. |
| Metadata | DLF Unified Metadata |
| Root storage directory of cluster | A bucket with OSS-HDFS enabled. If OSS-HDFS is unavailable in your region, switch to a supported region or select HDFS instead. |
| Assign public network IP | Enabled (in the master node group) |
The total data disk capacity of core nodes must be more than three times the size of the dataset. For dataset sizes, see Step 3: Generate and load data.

Log on to the master node
Log on to the master node via SSH. For details, see Log on to a cluster.
Install Git and Maven
-
Install Git:
sudo yum install -y git -
Download the latest Binary tar.gz archive from the Apache Maven Project page. This topic uses
apache-maven-3.9.10-bin.tar.gzas an example. -
Upload the archive to the master node, then decompress and configure it:
tar zxf apache-maven-3.9.10-bin.tar.gz
cd apache-maven-3.9.10

# Set Maven environment variables (effective only in the current terminal session)
export MAVEN_HOME=`pwd`
export PATH=`pwd`/bin:$PATH
Download the Hive TPC-DS benchmark testing tool
-
Download hive-testbench-hdp3.zip.
-
Upload the ZIP package to the master node. Replace
*.*.*.*with the public IP address of the master node (available on the Nodes tab of your cluster, under the master node group, by clicking the icon):
scp hive-testbench-hdp3.zip root@**.**.**.**:/root/ -
Decompress the package:
unzip hive-testbench-hdp3.zip
Step 2: Build the data generator
-
(Optional) Configure the Alibaba Cloud Maven mirror to speed up compilation. This is recommended in Chinese mainland regions and reduces build time to 2–3 minutes.
mkdir -p ~/.m2/
cp $MAVEN_HOME/conf/settings.xml ~/.m2/
Add the following mirror entry to
~/.m2/settings.xml:<mirror> <id>aliyun</id> <mirrorOf>central</mirrorOf> <name>Nexus aliyun</name> <url>http://maven.aliyun.com/nexus/content/groups/public</url> </mirror> -
Switch to the
hive-testbenchdirectory:cd hive-testbench -
Compile and package the data generator:
./tpcds-build.sh
Step 3: Generate and load data
Set the scale factor
The scale factor (SF) controls dataset size in GB. SF=1 produces a 1 GB dataset, SF=100 produces a 100 GB dataset, and SF=1000 produces a 1 TB dataset. This topic uses SF=3 for a quick walkthrough:
SF=3The total data disk capacity of core nodes must be more than three times the dataset size. For SF=3 (3 GB), make sure your core nodes have more than 9 GB of disk space.
Check and clean up the Hive database
-
Check whether the target database already exists:
hive -e "desc database tpcds_bin_partitioned_orc_$SF" -
If the database exists, drop it before proceeding. Skipping this step causes errors during data generation:
hive -e "drop database tpcds_bin_partitioned_orc_$SF cascade"
Fix the Hive service URL
The default Hive service URL in tpcds-setup.sh uses ZooKeeper service discovery, which is incompatible with the EMR cluster configuration. Replace it with the direct HiveServer2 URL:
sed -i 's/localhost:2181\/;serviceDiscoveryMode=zooKeeper;zooKeeperNamespace=hiveserver2?tez.queue.name=default/master-1-1:10000\//' tpcds-setup.shThe command makes the following change:
| Value | |
|---|---|
| Before | jdbc:hive2://localhost:2181/;serviceDiscoveryMode=zooKeeper;zooKeeperNamespace=hiveserver2?tez.queue.name=default |
| After | jdbc:hive2://master-1-1:10000/ |
Fix incompatible Hive parameters
Some parameters in the TPC-DS configuration are unsupported in open source Hive 2 and Hive 3. Replace the incompatible parameter to prevent job failures:
sed -i 's/hive.optimize.sort.dynamic.partition.threshold=0/hive.optimize.sort.dynamic.partition=true/' settings/*.sqlThe command makes the following change:
| Value | |
|---|---|
| Before | hive.optimize.sort.dynamic.partition.threshold=0 |
| After | hive.optimize.sort.dynamic.partition=true |
Generate and load data
Run the setup script to generate and load data into the tpcds_bin_partitioned_orc_$SF database. For SF=3, this takes approximately 40–50 minutes.
./tpcds-setup.sh $SFWhen the command completes successfully, the terminal output looks similar to the following screenshot. If you see this output, the data has been loaded successfully.
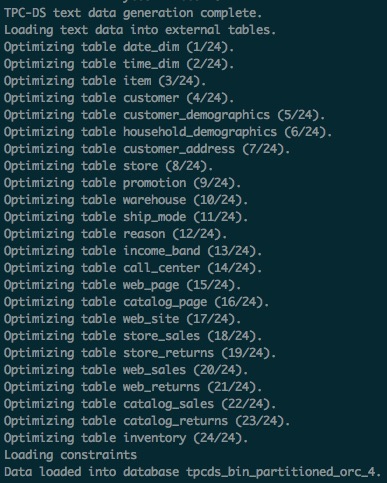
EMR's compute-storage separation architecture stores the generated data in OSS-HDFS automatically.
Collect Hive table statistics
Run the ANALYZE command to collect table statistics, which significantly speeds up subsequent SQL queries. For SF=3, this takes approximately 20–30 minutes.
hive -f ./ddl-tpcds/bin_partitioned/analyze.sql \
    --hiveconf hive.execution.engine=tez \
--database tpcds_bin_partitioned_orc_$SFData Lake Formation (DLF) stores the Hive table metadata. After data generation is complete, you can release the EMR cluster and query the TPC-DS data from any other EMR cluster in the same region.
Step 4: Run TPC-DS SQL statements
TPC-DS includes 99 SQL files located in the sample-queries-tpcds directory (for Hive) and spark-queries-tpcds directory (for Spark). Run them using Hive or Spark.
TPC-DS queries and data are randomly generated. Some SQL statements may return no records—this is expected.
Run queries with Hive
Run a single query
For SF=3, each query returns results within 5 minutes.
cd sample-queries-tpcds
hive --database tpcds_bin_partitioned_orc_$SF
set hive.execution.engine=tez;
source query10.sql;
After the query completes, exit Hive.
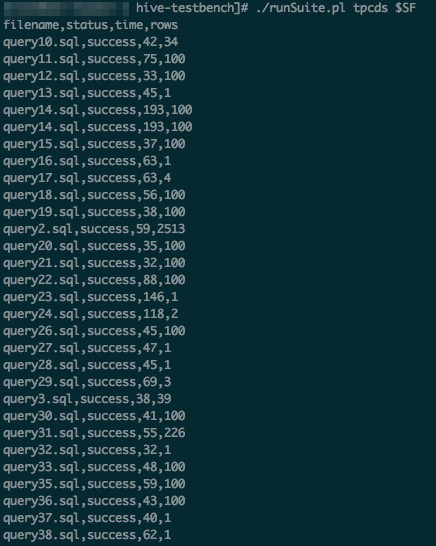
Run all 99 queries
Use the runSuite.pl script to run all queries in sequence:
cd ~/hive-testbench
# Set Hive execution engine to Tez
echo 'set hive.execution.engine=tez;' > sample-queries-tpcds/testbench.settings
./runSuite.pl tpcds $SF
When all queries complete, the output looks similar to the following screenshot.
Run queries with Spark
EMR Spark supports storing tables in HDFS or OSS and storing metadata in DLF.
This section uses Spark Beeline connected to Spark Thrift Server. The Spark SQL files are in the spark-queries-tpcds directory.
-
Collect Hive table statistics using Spark Beeline:
cd ~/hive-testbench spark-beeline -u jdbc:hive2://master-1-1:10001/tpcds_bin_partitioned_orc_$SF \ -f ./ddl-tpcds/bin_partitioned/analyze.sql -
Switch to the Spark SQL directory:
cd spark-queries-tpcds/ -
Run a single query:
spark-beeline -u jdbc:hive2://master-1-1:10001/tpcds_bin_partitioned_orc_$SF -f q1.sql -
Run all 99 queries in sequence. The TPC-DS toolset does not include a script for batch Spark execution—use the following script:
Important-
The
q30.sqlfile contains a known bug: the column namec_last_review_date_skis incorrectly written asc_last_review_date. As a result, the 30th SQL statement fails. -
If other errors occur when running all 99 queries, see Troubleshooting.
for q in `ls *.sql`; do spark-beeline -u jdbc:hive2://master-1-1:10001/tpcds_bin_partitioned_orc_$SF -f $q > $q.out done -