This topic describes how to migrate data from Amazon Redshift to MaxCompute over the Internet.
Prerequisites
Create an Amazon Redshift cluster and prepare data for migration.
For more information about how to create an Amazon Redshift cluster, see Amazon Redshift Cluster Management Guide.
Create an Amazon Redshift cluster. If you already have an Amazon Redshift cluster, skip this step.
Prepare the data that you want to migrate in the Amazon Redshift cluster.
In this example, a TPC-H dataset is available in public schema. The dataset uses the MaxCompute V2.0 data type edition and the DECIMAL data type in MaxCompute V2.0.
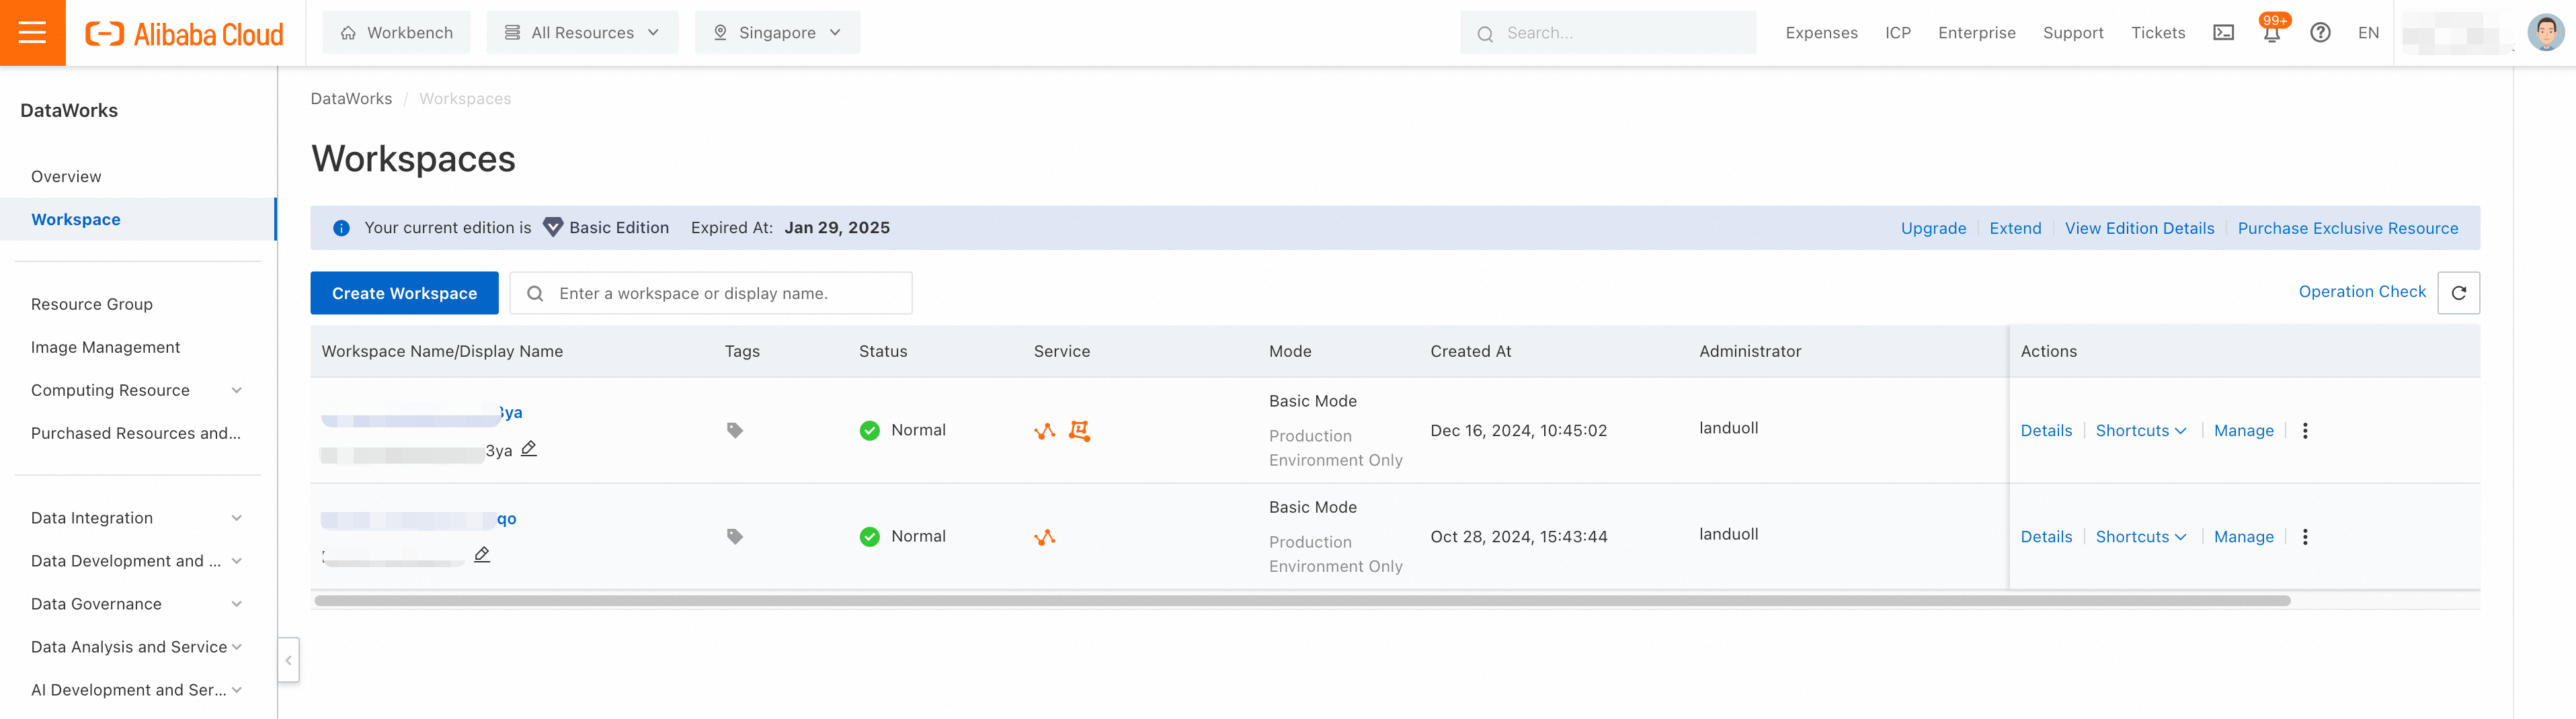
Prepare a MaxCompute project. For more information, see Create a MaxCompute project.
In this example, a MaxCompute project in the Singapore region is created as the migration destination. The project is created in MaxCompute V2.0 because the TPC-H dataset uses the MaxCompute V2.0 data type edition and the DECIMAL data type in MaxCompute V2.0.
Activate Alibaba Cloud Object Storage Service (OSS).
For more information, see Get started by using the OSS console.
Background information
The following figure shows how to migrate data from Amazon Redshift to MaxCompute.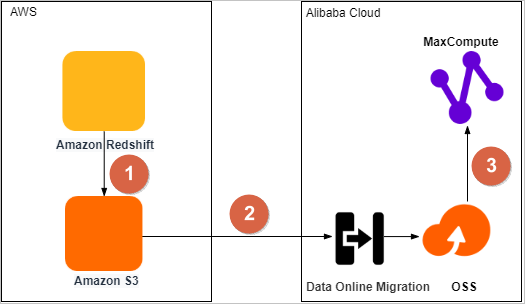
No | Description |
1 | Export the data from Amazon Redshift to a data lake on Amazon Simple Storage Service (S3). |
2 | Migrate the data from Amazon S3 to an OSS bucket by using the Data Online Migration service of OSS. |
3 | Migrate the data from the OSS bucket to a MaxCompute project in the same region, and then verify the integrity and accuracy of the migrated data. |
Step 1: Unload data from Amazon Redshift to Amazon S3
Amazon Redshift supports authentication based on Identity and Access Management (IAM) roles and temporary security credentials (AccessKey pairs). You can use the UNLOAD command of Amazon Redshift to unload data to Amazon S3 based on these two authentication methods. For more information, see Unloading data.
The syntax of the UNLOAD command varies based on the authentication method.
UNLOAD command based on an IAM role
-- Run the UNLOAD command to unload data from the customer table to Amazon S3.
UNLOAD ('SELECT * FROM customer')
TO 's3://bucket_name/unload_from_redshift/customer/customer_' -- The Amazon S3 bucket.
IAM_ROLE 'arn:aws:iam::****:role/MyRedshiftRole'; -- The Alibaba Cloud Resource Name (ARN) of the IAM role.
UNLOAD command based on an AccessKey pair
-- Run the UNLOAD command to unload data from the customer table to Amazon S3.
UNLOAD ('SELECT * FROM customer')
TO 's3://bucket_name/unload_from_redshift/customer/customer_' -- The Amazon S3 bucket.
Access_Key_id '<access-key-id>' -- The AccessKey ID of the IAM user.
Secret_Access_Key '<secret-access-key>' -- The AccessKey secret of the IAM user.
Session_Token '<temporary-token>'; -- The temporary access token of the IAM user.
The UNLOAD command allows you to unload data in one of the following formats:
Default format
Sample command:
UNLOAD ('SELECT * FROM customer')
TO 's3://bucket_name/unload_from_redshift/customer/customer_'
IAM_ROLE 'arn:aws:iam::****:role/redshift_s3_role';
After the command is run, data is unloaded to text files in which values are separated by vertical bars (|). You can log on to the Amazon S3 console and view the unloaded text files in the specified bucket.
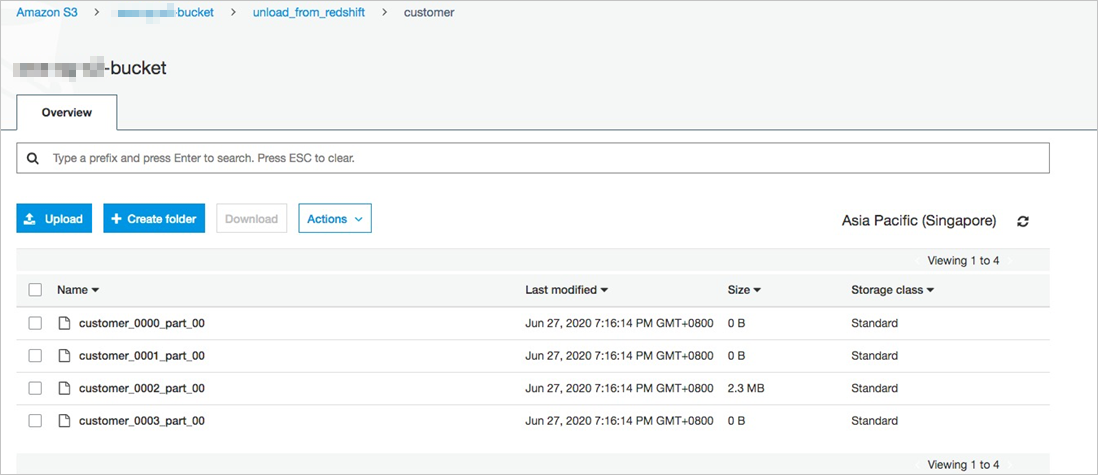 The following figure shows the unloaded text files in the default format.
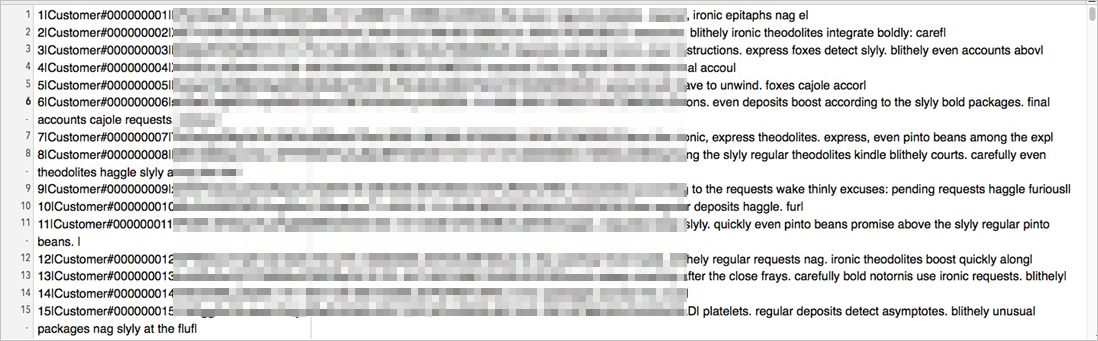
Apache Parquet format
Data unloaded in the Apache Parquet format can be directly read by other engines. Sample command:
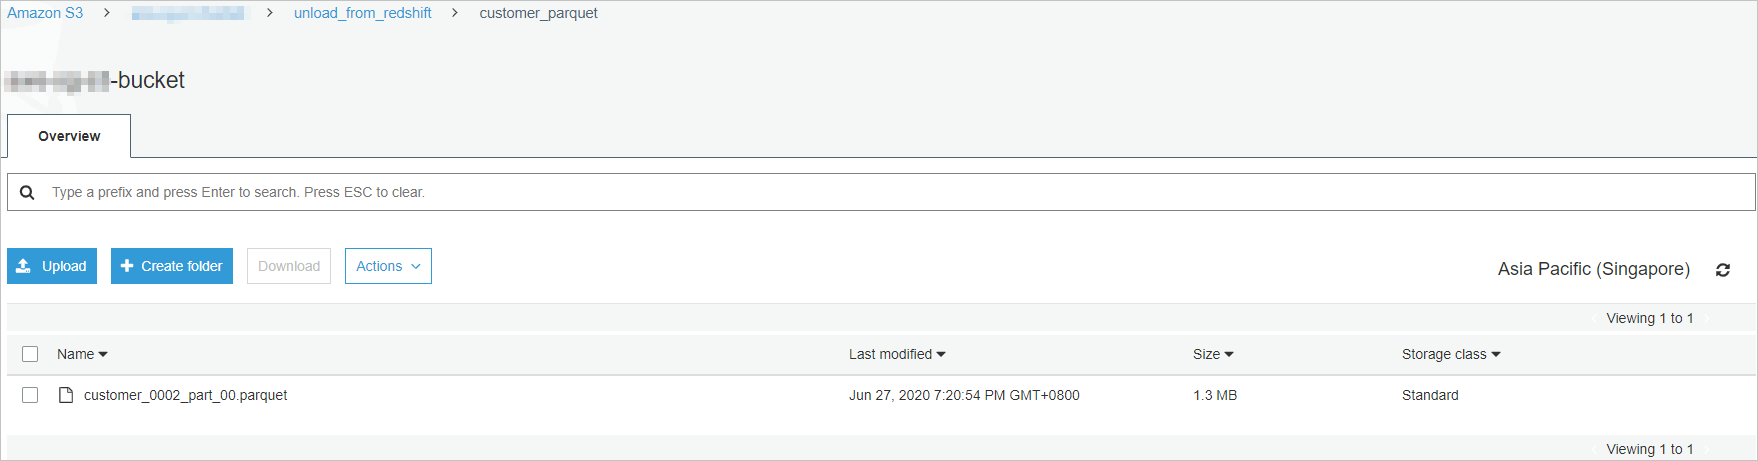
UNLOAD ('SELECT * FROM customer')
TO 's3://bucket_name/unload_from_redshift/customer_parquet/customer_'
FORMAT AS PARQUET
IAM_ROLE 'arn:aws:iam::xxxx:role/redshift_s3_role';
After the command is run, you can view the unloaded Parquet files in the specified bucket. Parquet files are smaller than text files and have a higher data compression ratio.
This section describes how to authenticate requests based on IAM roles and unload data in the Apache Parquet format.
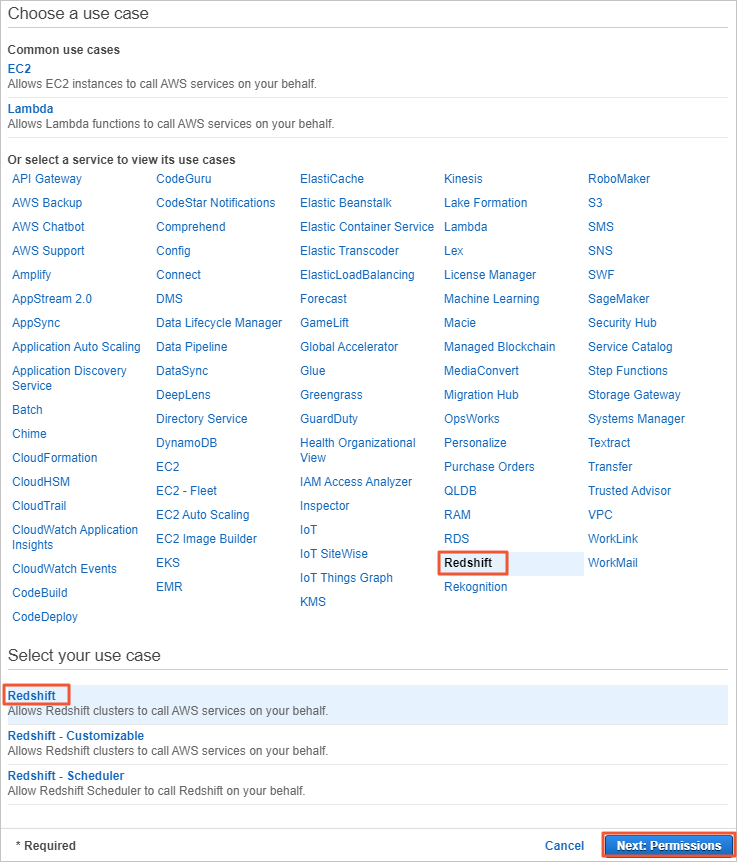
Create an IAM role for Amazon Redshift.
Log on to the IAM console. In the left-side navigation pane, choose Access Management > Roles. On the Roles page, click Create role.

In the Common use cases section of the Create role page, click Redshift. In the Select your use case section, click Redshift-Customizable, and then click Next: Permissions.
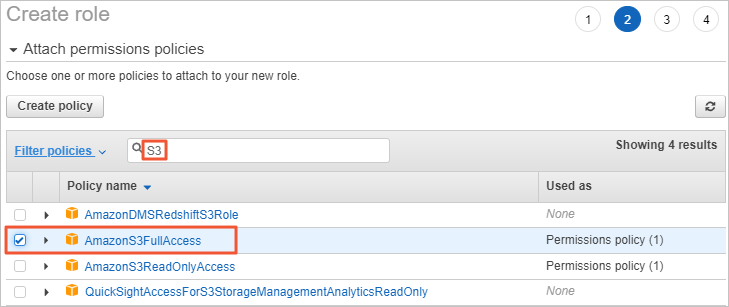
Add an IAM policy that grants the read and write permissions on Amazon S3. In the Attach permissions policies section of the Create role page, enter S3, select AmazonS3FullAccess, and then click Next: Tags.
Assign a name to the IAM role and complete the IAM role creation.
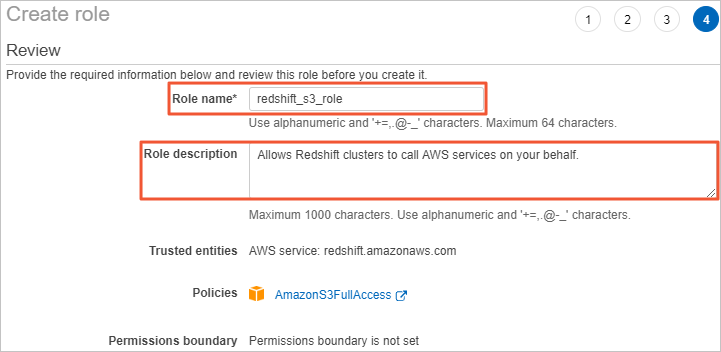
Click Next: Review. In the Review section of the Create role page, specify Role name and Role description, and click Create role. The IAM role is then created.
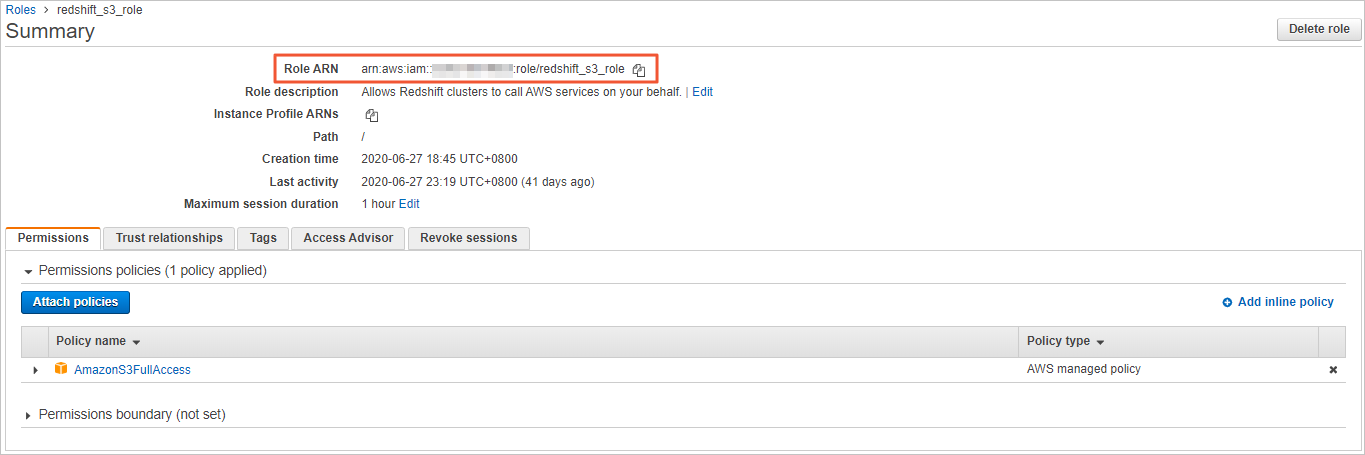
Go to the IAM console, and enter redshift_s3_role in the search box to search for the role. Then, click the role name redshift_s3_role, and copy the value of Role ARN.
When you run the UNLOAD command to unload data, you must provide the Role ARN value to access Amazon S3.
Associate the created IAM role with the Amazon Redshift cluster to authorize the cluster to access Amazon S3.
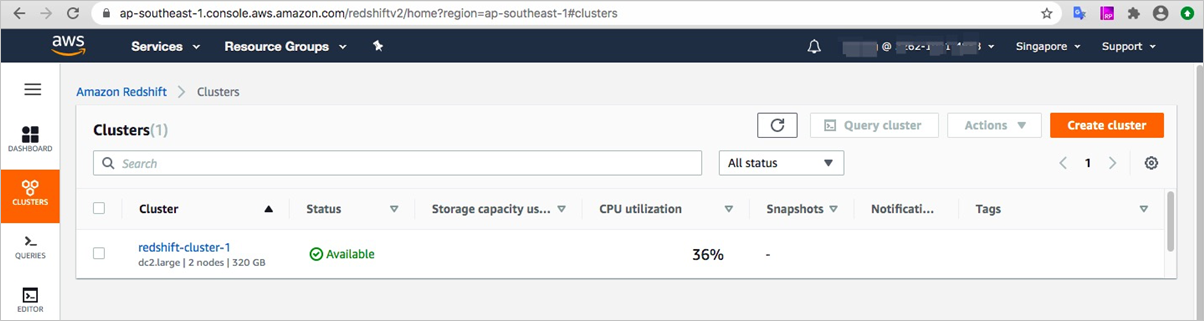
Log on to the Amazon Redshift console. In the upper-right corner, select Asia Pacific (Singapore) from the drop-down list.
In the left-side navigation pane, click CLUSTERS, find the created Amazon Redshift cluster, click Actions, and then click Manage IAM roles.
On the Manage IAM roles page, click the
 icon next to the search box, and select redshift_s3_role. Choose to associate the redshift_s3_role role with the Amazon Redshift cluster.
Unload data from Amazon Redshift to Amazon S3.
Go to the Amazon Redshift console.
In the left-side navigation pane, click EDITOR. Run the UNLOAD command to upload data from Amazon Redshift to each destination bucket on Amazon S3 in the Apache Parquet format.
Sample command:
UNLOAD ('SELECT * FROM customer') TO 's3://bucket_name/unload_from_redshift/customer_parquet/customer_' FORMAT AS PARQUET IAM_ROLE 'arn:aws:iam::xxxx:role/redshift_s3_role'; UNLOAD ('SELECT * FROM orders') TO 's3://bucket_name/unload_from_redshift/orders_parquet/orders_' FORMAT AS PARQUET IAM_ROLE 'arn:aws:iam::xxxx:role/redshift_s3_role'; UNLOAD ('SELECT * FROM lineitem') TO 's3://bucket_name/unload_from_redshift/lineitem_parquet/lineitem_' FORMAT AS PARQUET IAM_ROLE 'arn:aws:iam::xxxx:role/redshift_s3_role'; UNLOAD ('SELECT * FROM nation') TO 's3://bucket_name/unload_from_redshift/nation_parquet/nation_' FORMAT AS PARQUET IAM_ROLE 'arn:aws:iam::xxxx:role/redshift_s3_role'; UNLOAD ('SELECT * FROM part') TO 's3://bucket_name/unload_from_redshift/part_parquet/part_' FORMAT AS PARQUET IAM_ROLE 'arn:aws:iam::xxxx:role/redshift_s3_role'; UNLOAD ('SELECT * FROM partsupp') TO 's3://bucket_name/unload_from_redshift/partsupp_parquet/partsupp_' FORMAT AS PARQUET IAM_ROLE 'arn:aws:iam::xxxx:role/redshift_s3_role'; UNLOAD ('SELECT * FROM region') TO 's3://bucket_name/unload_from_redshift/region_parquet/region_' FORMAT AS PARQUET IAM_ROLE 'arn:aws:iam::xxxx:role/redshift_s3_role'; UNLOAD ('SELECT * FROM supplier') TO 's3://bucket_name/unload_from_redshift/supplier_parquet/supplier_' FORMAT AS PARQUET IAM_ROLE 'arn:aws:iam::xxxx:role/redshift_s3_role';NoteYou can submit multiple UNLOAD commands at a time in EDITOR.
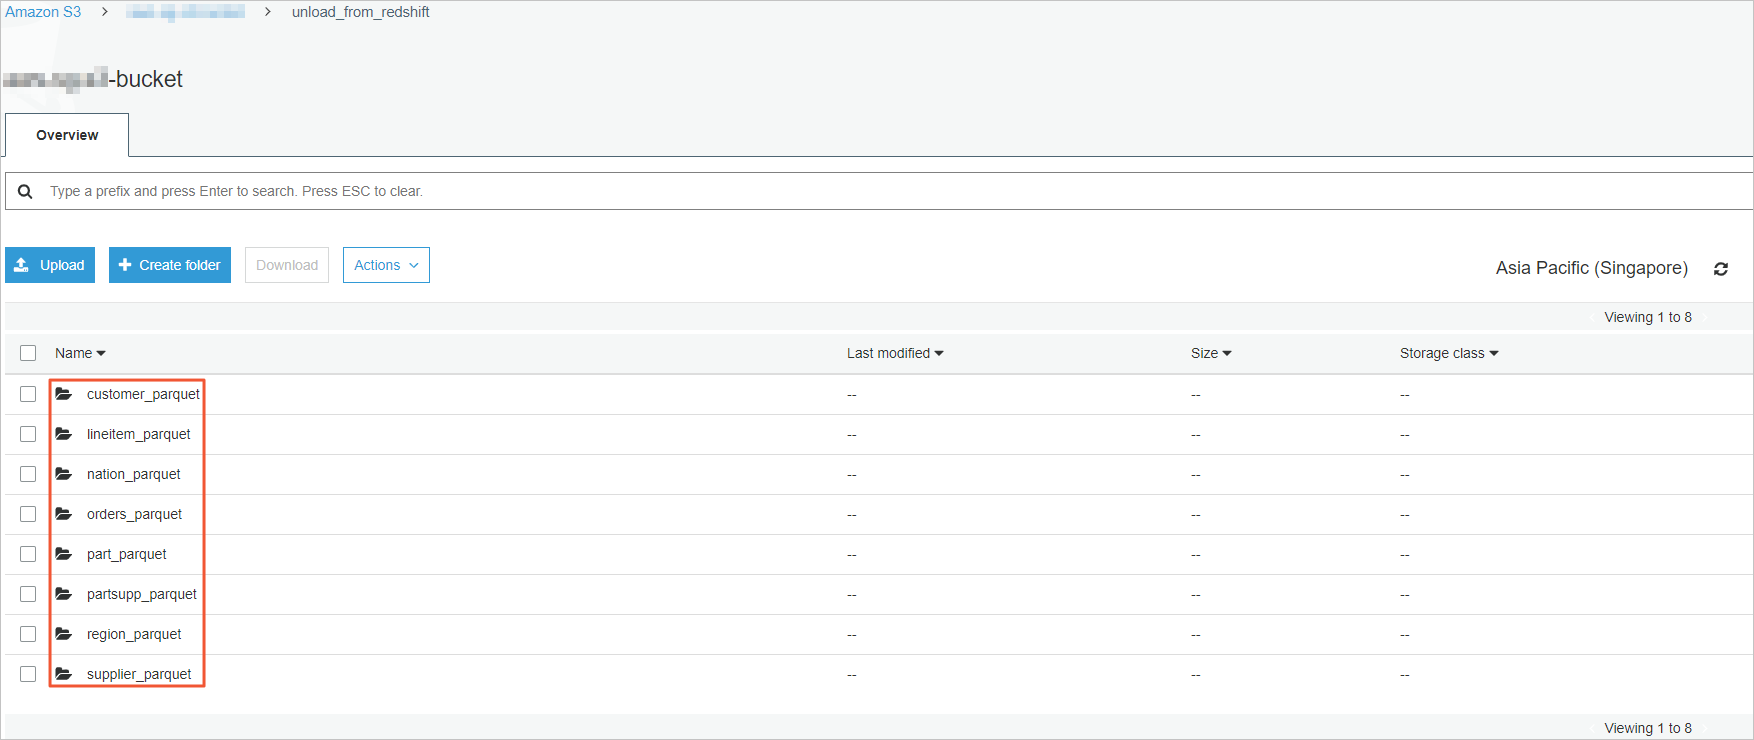
Log on to the Amazon S3 console and check the unloaded data in the directory of each destination bucket on Amazon S3.
The unloaded data is available in the Apache Parquet format.
Step 2: Migrate the unloaded data from Amazon S3 to OSS
MaxCompute provides the Data Online Migration service of OSS for you to migrate data from Amazon S3 to OSS. For more information, see Migrate data from Amazon Simple Storage Service (Amazon S3) to OSS.
Log on to the OSS console and create a bucket to store the migrated data. For more information, see Create buckets.

Create a RAM user and grant required permissions to the RAM user.
Log on to the RAM console and create a RAM user.
On the Identities > Users page, select the user logon name of the newly created user and click Add Permissions in the Actions column.
In the Grant Permission panel, grant the RAM user AliyunOSSFullAccess (bucket read and write permissions) and AliyunMGWFullAccess (online migration permissions), and click Grant permissions.
In the left-side navigation pane, click Overview. On the Overview page, in the Basic Information section, click the Login URL link to log on to the Alibaba Cloud Management Console with the newly created RAM user.
On the Amazon Web Services (AWS) platform, create an IAM user who uses the programmatic access method to access Amazon S3. For more information, see IMA users.
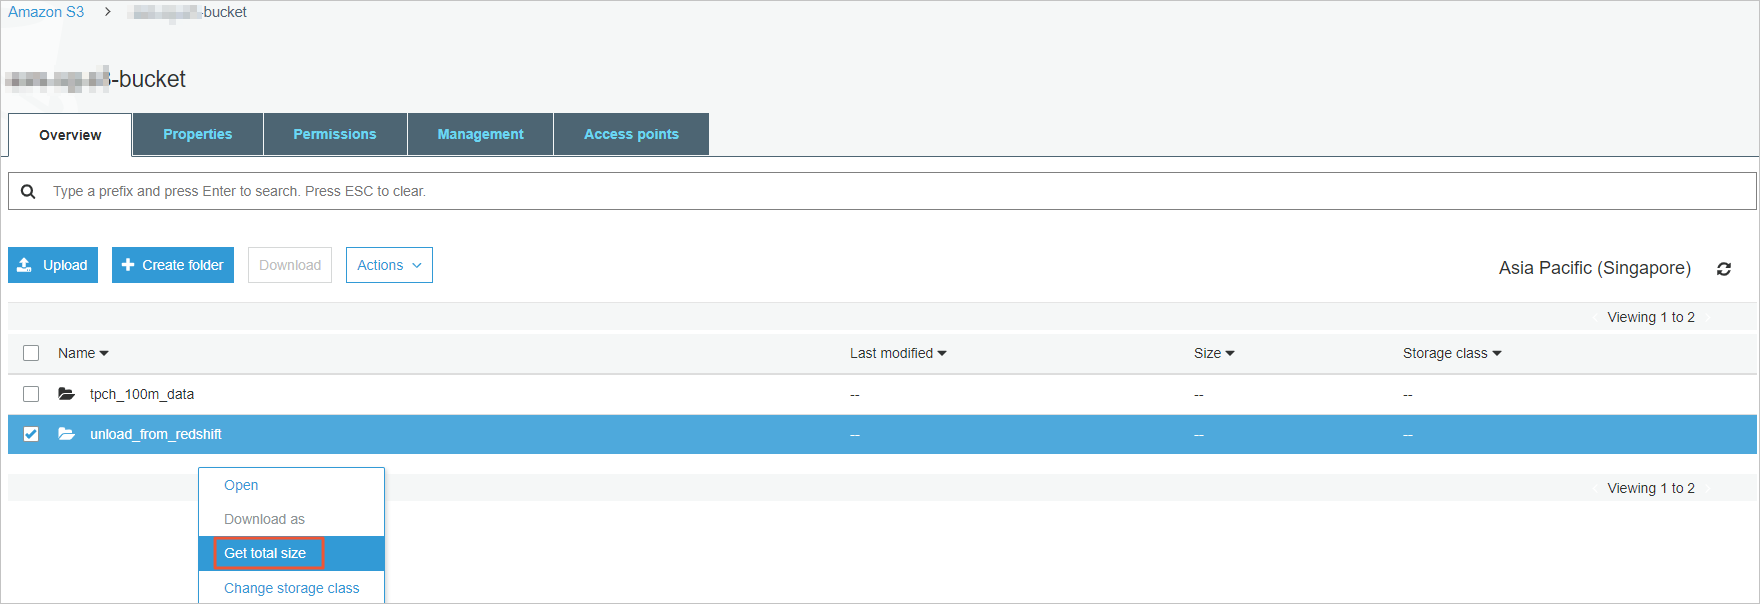
Log on to the Amazon S3 console.
Right-click the exported folder and select Get total size to obtain the total size of the folder and the number of files in the folder.
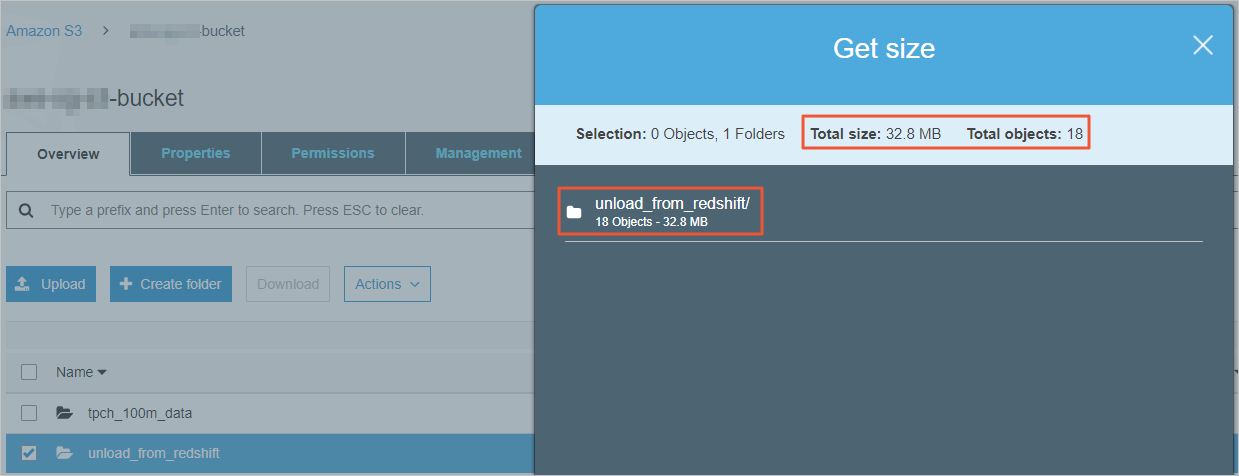
Obtain the total size.
Obtain the total size of the folder and the number of files in the folder.
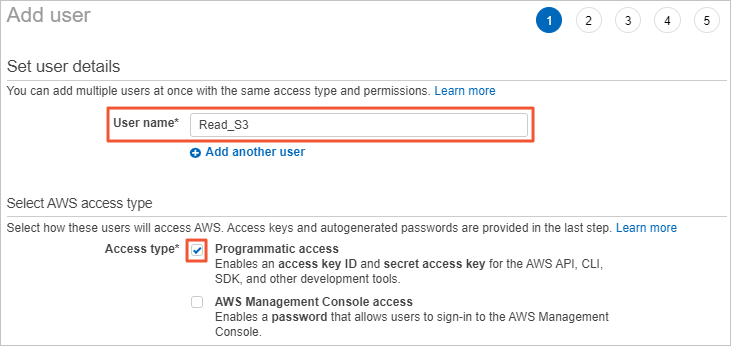
Log on to the IAM console and click Add user.

On the Add user page, specify the User name. In the Select AWS access type section, select Programmatic access and then click Next: Permissions.
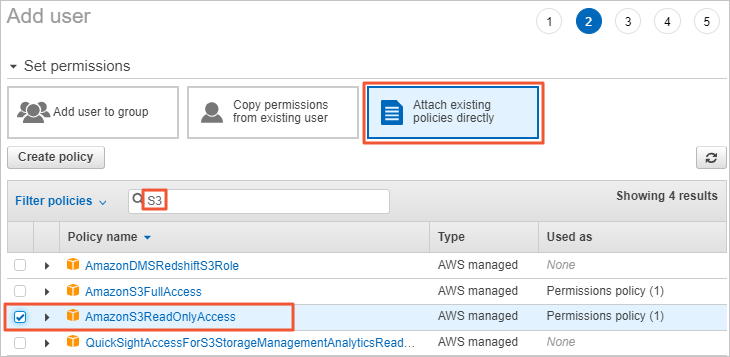
On the Add user page, click Attach existing policies directly. Enter S3 in the search box, select the AmazonS3ReadOnlyAccess policy, and then click Next: Tags.
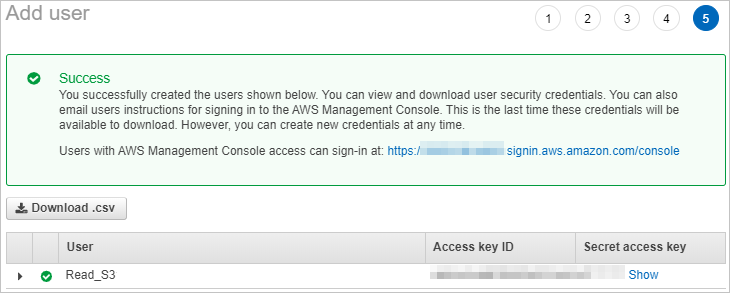
Choose to create an IAM user and obtain the AccessKey pair.
If you create an online migration job, you must provide this AccessKey pair.
Log on to the Alibaba Cloud Data Migration console and create a data address for online migration.
In the left-side navigation pane, choose . On the Address Management page, click Create Address.
In the Create Address panel, configure the parameters for the data source and destination data address. Then, click OK. For more information about the parameters, see Migrate data.
NoteEnter the AccessKey ID of the IAM user in the AccessKeyId field and enter the AccessKey secret in the SecretAccessKey field.
Log on to the Alibaba Cloud Data Migration console and create an online migration job.
In the left-side navigation pane, choose Data Online Migration > Migration Tasks. On the Migration Tasks page, click Create Task.
In the Select Address step,configure the parameters. The following table describes the parameters.
Parameter
Required
Description
Name
Yes
The name of the migration task. The name must meet the following requirements:
The name is 3 to 63 characters in length.
The name must be case-sensitive and can contain lowercase letters, digits, hyphens (-), and underscores (_).
The name is encoded in the UTF-8 format and cannot start with a hyphen (-) or an underscore (_).
Source Address
Yes
The source data address that you created.
Destination Address
Yes
The destination data address that you created.
In the Task Configurations step, configure the parameters. The following table describes the parameters.
Parameter
Required
Description
Migration Bandwidth
No
The maximum bandwidth that is available to the migration task. Valid values:
Default: Use the default upper limit for the migration bandwidth. The actual migration bandwidth depends on the file size and the number of files.
Specify an upper limit: Specify a custom upper limit for the migration bandwidth as prompted.
ImportantThe actual migration speed depends on multiple factors, such as the source data address, network, throttling at the destination data address, and file size. Therefore, the actual migration speed may not reach the specified upper limit.
Specify a reasonable value for the upper limit of the migration bandwidth based on the evaluation of the source data address, migration purpose, business situation, and network bandwidth. Inappropriate throttling may affect business performance.
Files Migrated Per Second
No
The maximum number of files that can be migrated per second. Valid values:
Default: Use the default upper limit for the number of files that can be migrated per second.
Specify an upper limit: Specify a custom upper limit as prompted for the number of files that can be migrated per second.
ImportantThe actual migration speed depends on multiple factors, such as the source data address, network, throttling at the destination data address, and file size. Therefore, the actual migration speed may not reach the specified upper limit.
Specify a reasonable value for the upper limit of the migration bandwidth based on the evaluation of the source data address, migration purpose, business situation, and network bandwidth. Inappropriate throttling may affect business performance.
Overwrite Method
Yes
Specifies whether to overwrite a file at the destination data address if the file has the same name as a file at the source data address. Valid values:
Do not overwrite: does not migrate the file at the source data address.
Overwrite All: overwrites the file at the destination data address.
Overwrite based on the last modification time:
If the last modification time of the file at the source data address is later than that of the file at the destination data address, the file at the destination data address is overwritten.
If the last modification time of the file at the source data address is the same as that of the file at the destination data address, the file at the destination data address is overwritten if the files differ from one of the following aspects: size and Content-Type header.
If you select Overwrite based on the last modification time, there is no guarantee that newer files won’t be overwritten by older ones, which creates a risk of losing recent updates.
If you select Overwrite based on the last modification time, make sure that the file at the source data address contains information such as the last modification time, size, and Content-Type header. Otherwise, the overwrite policy may become invalid and unexpected migration results may occur.
If you select Do not overwrite or Overwrite based on the last modification time, the system sends a request to the source and destination data addresses to obtain the meta information and determines whether to overwrite a file. Therefore, request fees are generated for the source and destination data addresses.
WarningMigration Report
Yes
Specifies whether to push a migration report. Valid values:
Do not push (default): does not push the migration report to the destination bucket.
Push: pushes the migration report to the destination bucket. For more information, see Subsequent operations.
ImportantThe migration report occupies storage space at the destination data address.
The migration report may be pushed with a delay. Wait until the migration report is generated.
A unique ID is generated for each execution of a task. A migration report is pushed only once. We recommend that you do not delete the migration report unless necessary.
Migration Logs
Yes
Specifies whether to push migration logs to Simple Log Service (SLS). Valid values:
Do not push (default): does not push migration logs.
Push: pushes migration logs to SLS. You can view the migration logs in the SLS console.
Push only file error logs: pushes only error migration logs to SLS. You can view the error migration logs in the SLS console.
If you select Push or Push only file error logs, Data Online Migration creates a project in SLS. The name of the project is in the aliyun-oss-import-log-Alibaba Cloud account ID-Region of the Data Online Migration console format. Example: aliyun-oss-import-log-137918634953****-cn-hangzhou.
ImportantTo prevent errors in the migration task, make sure that the following requirements are met before you select Push or Push only file error logs:
SLS is activated.
You have confirmed the authorization on the Authorize page.
Authorize
No
This parameter is displayed if you set the Migration Logs parameter to Push or Push only file error logs.
Click Authorize to go to the Cloud Resource Access Authorization page. On this page, click Confirm Authorization Policy. The RAM role AliyunOSSImportSlsAuditRole is created and permissions are granted to the RAM role.
File Name
No
The filter based on the file name.
Both inclusion and exclusion rules are supported. However, only the syntax of specific regular expressions is supported. For more information about the syntax of regular expressions, visit re2. Example:
.*\.jpg$ indicates all files whose names end with .jpg.
By default, ^file.* indicates all files whose names start with file in the root directory.
If a prefix is configured for the source data address and the prefix is data/to/oss/, you need to use the ^data/to/oss/file.* filter to match all files whose names start with file in the specified directory.
.*/picture/.* indicates files whose paths contain a subdirectory called picture.
ImportantIf an inclusion rule is configured, all files that meet the inclusion rule are migrated. If multiple inclusion rules are configured, files are migrated as long as one of the inclusion rules is met.
For example, the picture.jpg and picture.png files exist and the inclusion rule .*\.jpg$ is configured. In this case, only the picture.jpg file is migrated. If the inclusion rule .*\.png$ is configured at the same time, both files are migrated.
If an exclusion rule is configured, all files that meet the exclusion rule are not migrated. If multiple exclusion rules are configured, files are not migrated as long as one of the exclusion rules is met.
For example, the picture.jpg and picture.png files exist and the exclusion rule .*\.jpg$ is configured. In this case, only the picture.png file is migrated. If the exclusion rule .*\.png$ is configured at the same time, neither file is migrated.
Exclusion rules take precedence over inclusion rules. If a file meets both an exclusion rule and an inclusion rule, the file is not migrated.
For example, the file.txt file exists, and the exclusion rule .*\.txt$ and the inclusion rule file.* are configured. In this case, the file is not migrated.
File Modification Time
No
The filter based on the last modification time of files.
You can specify the last modification time as a filter rule. If you specify a time period, only the files whose last modification time is within the specified time period are migrated. Examples:
If you specify January 1, 2019 as the start time and do not specify the end time, only the files whose last modification time is not earlier than January 1, 2019 are migrated.
If you specify January 1, 2022 as the end time and do not specify the start time, only the files whose last modification time is not later than January 1, 2022 are migrated.
If you specify January 1, 2019 as the start time and January 1, 2022 as the end time, only the files whose last modification time is not earlier than January 1, 2019 and not later than January 1, 2022 are migrated.
Execution Time
No
ImportantIf the current execution of a migration task is not complete by the next scheduled start time, the task starts its next execution at the subsequent scheduled start time after the current migration is complete. This process continues until the task is run the specified number of times.
If Data Online Migration is deployed in the China (Hong Kong) region or the regions in the Chinese mainland, up to 10 concurrent migration tasks are supported. If Data Online Migration is deployed in regions outside China, up to five concurrent migration tasks are supported. If the number of concurrent tasks exceeds the limit, executions of tasks may not be complete as scheduled.
The time when the migration task is run. Valid values:
Immediately: The task is immediately run.
Scheduled Task: The task is run within the specified time period every day. By default, the task is started at the specified start time and stopped at the specified stop time.
Periodic Scheduling: The task is run based on the execution frequency and number of execution times that you specify.
Execution Frequency: You can specify the execution frequency of the task. Valid values: Every Hour, Every Day, Every Week, Certain Days of the Week, and Custom. For more information, see the Supported execution frequencies section of this topic.
Executions: You can specify the maximum number of execution times of the task as prompted. By default, if you do not specify this parameter, the task is run once.
ImportantYou can manually start and stop tasks at any point in time. This is not affected by the custom execution time of tasks.
Read Data Online Migration Agreement. Select I have read and agree to the Alibaba Cloud International Website Product Terms of Service. and I have understood that when the migration task is complete, the migrated data may be different from the source data. Therefore, I have the obligation and responsibility to confirm the consistency between the migrated data and source data. Alibaba Cloud is not responsible for the confirmation of the consistency between the migrated data and source data. Then, click Next.
Verify that the configurations are correct and click OK. The migration task is created.
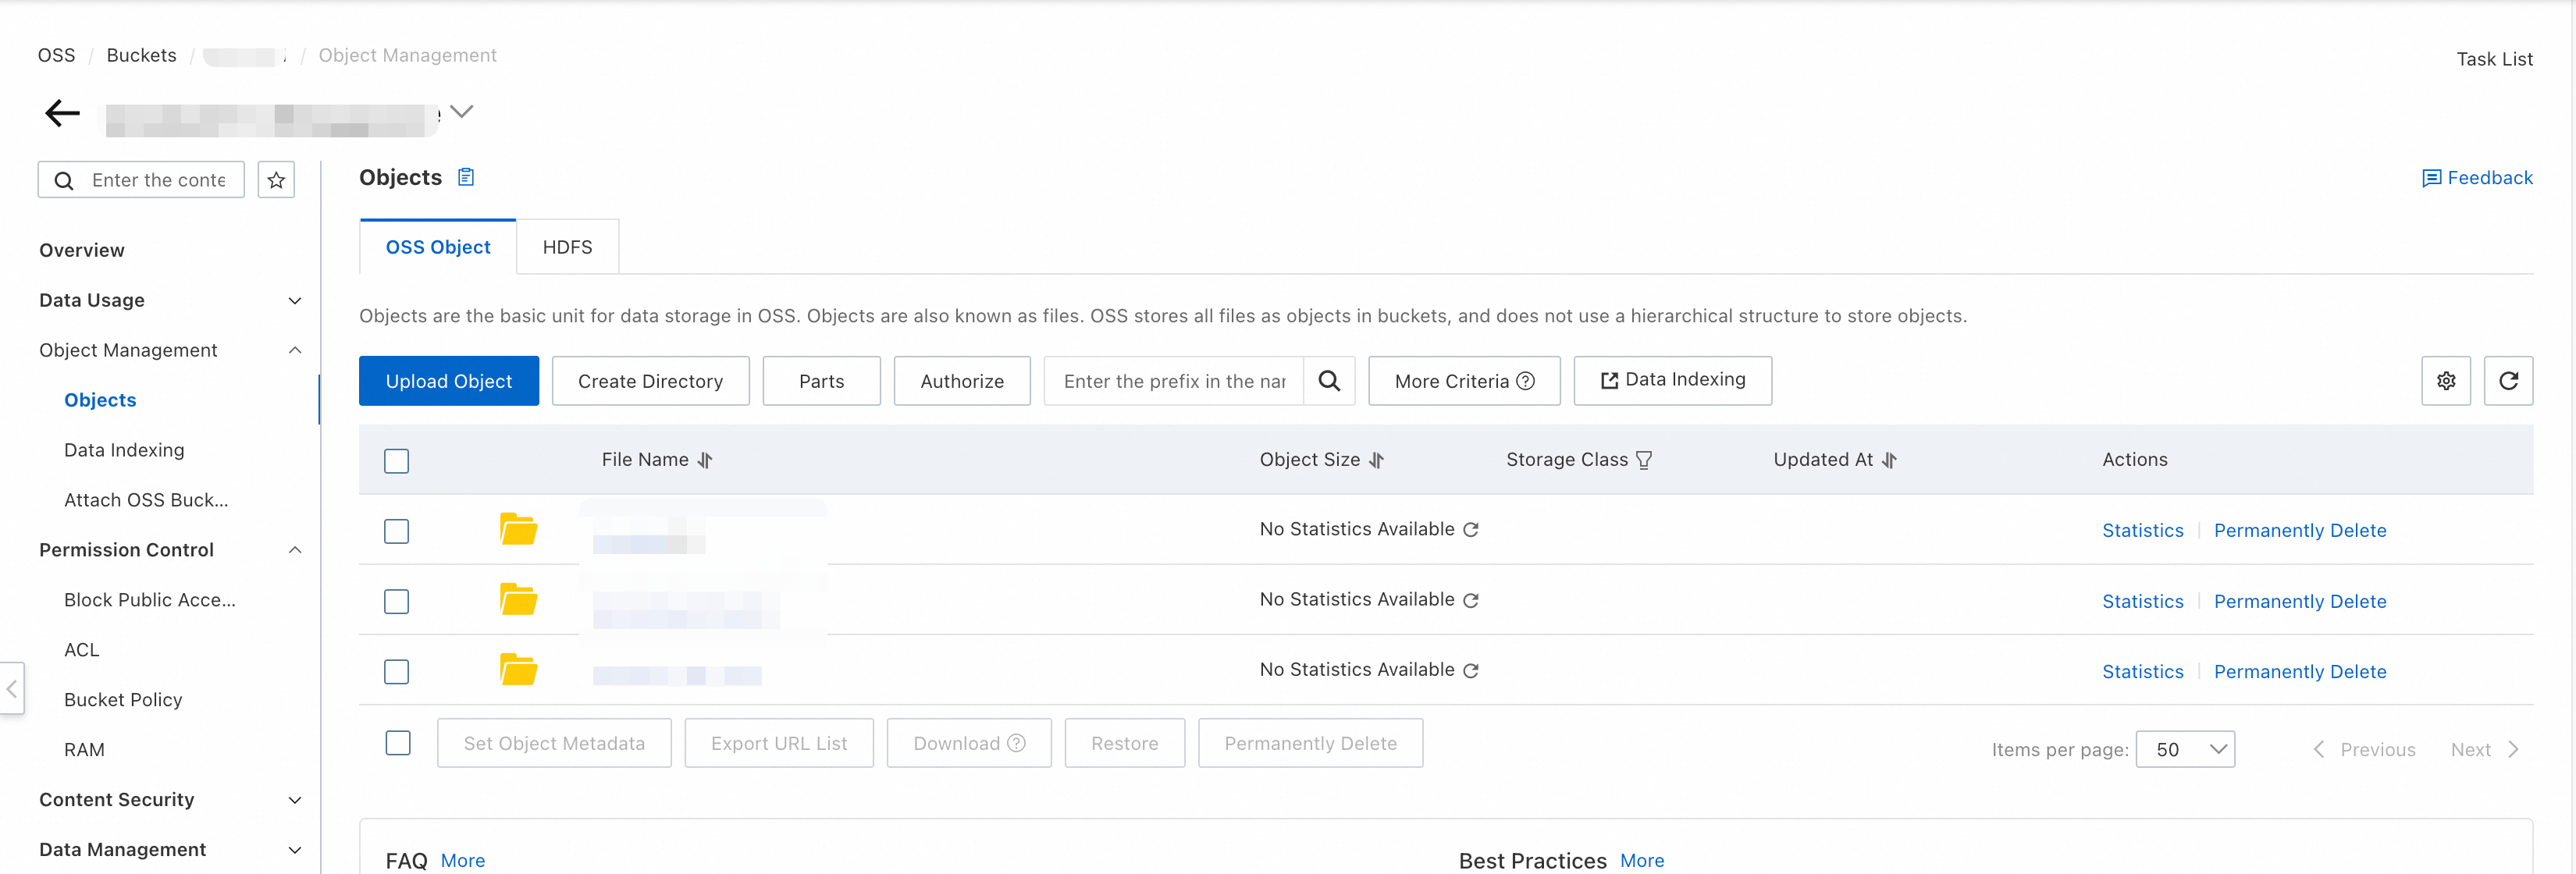
After you create an online migration job, if Finished is displayed in the Job Status column, the online migration job is complete. If you want to view the migration results, perform the following steps: Log on to the OSS console. In the left-side navigation pane, click Buckets. On the Buckets page, click the name of the desired bucket. In the left-side navigation pane of the bucket details page, choose Object Management > Objects.
Step 3: Migrate data from the OSS bucket to the MaxCompute project in the same region
You can run the LOAD command of MaxCompute to migrate data from an OSS bucket to a MaxCompute project in the same region.
The LOAD command supports authentication by using a Security Token Service (STS) token or an AccessKey pair. If you use AccessKey pairs for authentication, you must provide the AccessKey ID and AccessKey secret of your account in plaintext. STS authentication is highly secure because it does not expose the AccessKey pair. This section describes how to migrate data by using the STS authentication.
On the Ad Hoc Query page of the DataWorks console or on the MaxCompute client (odpscmd), execute the DDL statements of an Amazon Redshift cluster to create tables to store the migrated data in MaxCompute.
For more information about ad hoc queries, see Use the ad-hoc query feature to execute SQL statements (optional). Sample command:
CREATE TABLE customer(
C_CustKey int ,
C_Name varchar(64) ,
C_Address varchar(64) ,
C_NationKey int ,
C_Phone varchar(64) ,
C_AcctBal decimal(13, 2) ,
C_MktSegment varchar(64) ,
C_Comment varchar(120) ,
skip varchar(64)
);
CREATE TABLE lineitem(
L_OrderKey int ,
L_PartKey int ,
L_SuppKey int ,
L_LineNumber int ,
L_Quantity int ,
L_ExtendedPrice decimal(13, 2) ,
L_Discount decimal(13, 2) ,
L_Tax decimal(13, 2) ,
L_ReturnFlag varchar(64) ,
L_LineStatus varchar(64) ,
L_ShipDate timestamp ,
L_CommitDate timestamp ,
L_ReceiptDate timestamp ,
L_ShipInstruct varchar(64) ,
L_ShipMode varchar(64) ,
L_Comment varchar(64) ,
skip varchar(64)
);
CREATE TABLE nation(
N_NationKey int ,
N_Name varchar(64) ,
N_RegionKey int ,
N_Comment varchar(160) ,
skip varchar(64)
);
CREATE TABLE orders(
O_OrderKey int ,
O_CustKey int ,
O_OrderStatus varchar(64) ,
O_TotalPrice decimal(13, 2) ,
O_OrderDate timestamp ,
O_OrderPriority varchar(15) ,
O_Clerk varchar(64) ,
O_ShipPriority int ,
O_Comment varchar(80) ,
skip varchar(64)
);
CREATE TABLE part(
P_PartKey int ,
P_Name varchar(64) ,
P_Mfgr varchar(64) ,
P_Brand varchar(64) ,
P_Type varchar(64) ,
P_Size int ,
P_Container varchar(64) ,
P_RetailPrice decimal(13, 2) ,
P_Comment varchar(64) ,
skip varchar(64)
);
CREATE TABLE partsupp(
PS_PartKey int ,
PS_SuppKey int ,
PS_AvailQty int ,
PS_SupplyCost decimal(13, 2) ,
PS_Comment varchar(200) ,
skip varchar(64)
);
CREATE TABLE region(
R_RegionKey int ,
R_Name varchar(64) ,
R_Comment varchar(160) ,
skip varchar(64)
);
CREATE TABLE supplier(
S_SuppKey int ,
S_Name varchar(64) ,
S_Address varchar(64) ,
S_NationKey int ,
S_Phone varchar(18) ,
S_AcctBal decimal(13, 2) ,
S_Comment varchar(105) ,
skip varchar(64)
);
In this example, the project uses the MaxCompute V2.0 data type edition because the TPC-H dataset uses the MaxCompute V2.0 data type edition and the DECIMAL data type in MaxCompute V2.0. If you want to configure the project to use the MaxCompute V2.0 data type edition and the DECIMAL data type in MaxCompute V2.0, add the following commands at the beginning of the CREATE TABLE statements:
setproject odps.sql.type.system.odps2=true;
setproject odps.sql.decimal.odps2=true;
Create a RAM role that has the OSS access permissions and assign the RAM role to the RAM user. For more information, see STS authorization.
Run the LOAD command multiple times to load all data from OSS to the MaxCompute tables that you created, and execute the SELECT statement to query and verify the imported data. For more information about the LOAD command, see LOAD.
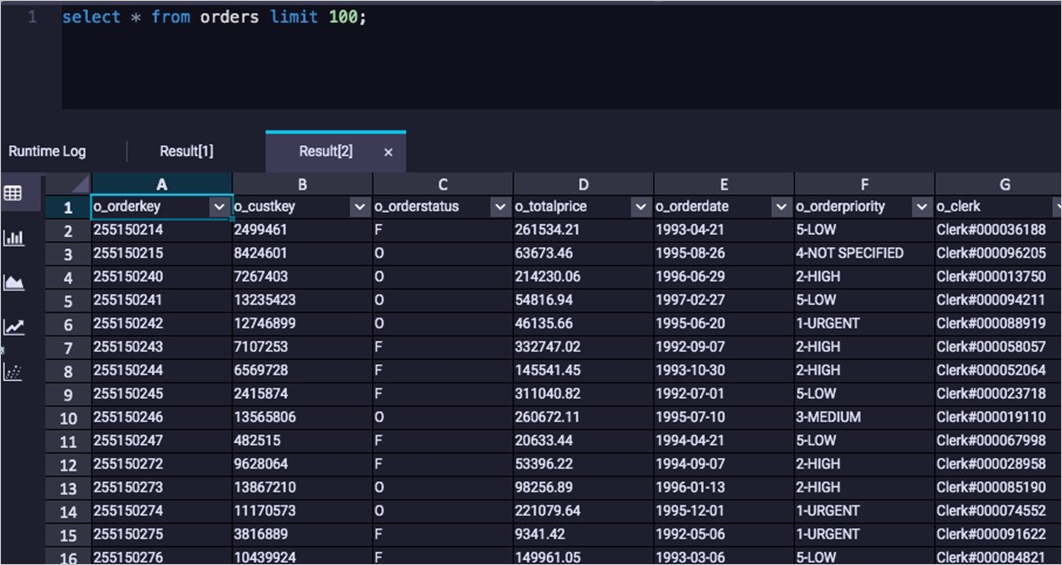
LOAD OVERWRITE TABLE orders
FROM LOCATION 'oss://endpoint/oss_bucket_name/unload_from_redshift/orders_parquet/' -- The endpoint of the OSS bucket.
ROW FORMAT SERDE 'org.apache.hadoop.hive.ql.io.parquet.serde.ParquetHiveSerDe'
WITH SERDEPROPERTIES ('odps.properties.rolearn'='acs:ram::xxx:role/xxx_role')
STORED AS PARQUET;
Execute the following statement to query and verify the imported data:
SELECT * FROM orders limit 100;The following result is returned:
Check whether the data that is migrated to MaxCompute is the same as the data in Amazon Redshift based on the number of tables, the number of rows in each table, and the query results of typical jobs.
Log on to the Amazon Redshift console. In the upper-right corner, select Asia Pacific (Singapore) from the drop-down list. In the left-side navigation pane, click EDITOR. Execute the following statement to query data:
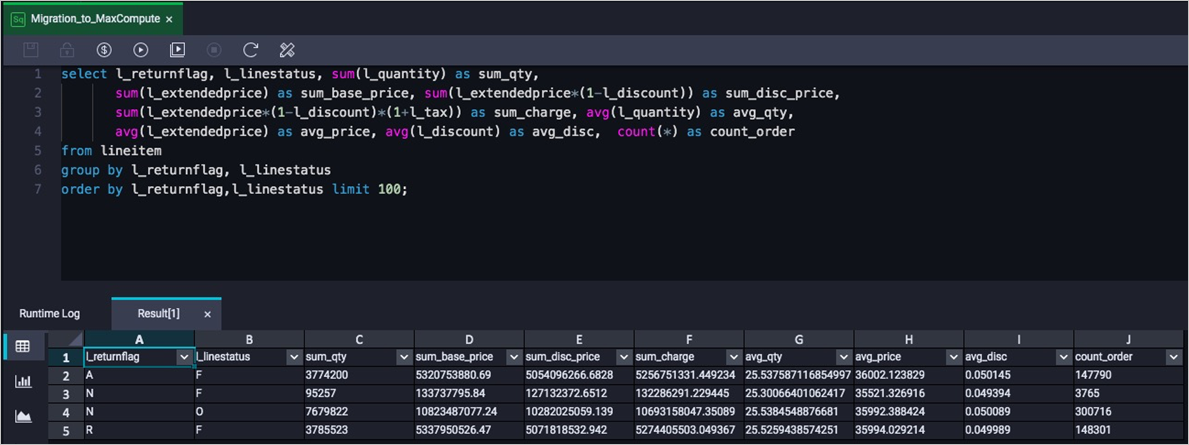
SELECT l_returnflag, l_linestatus, SUM(l_quantity) as sum_qty,
SUM(l_extendedprice) AS sum_base_price, SUM(l_extendedprice*(1-l_discount)) AS sum_disc_price,
SUM(l_extendedprice*(1-l_discount)*(1+l_tax)) AS sum_charge, AVG(l_quantity) AS avg_qty,
AVG(l_extendedprice) AS avg_price, AVG(l_discount) AS avg_disc,  COUNT(*) AS count_order
FROM lineitem
GROUP BY l_returnflag, l_linestatus
ORDER BY l_returnflag,l_linestatus;
The following result is returned:
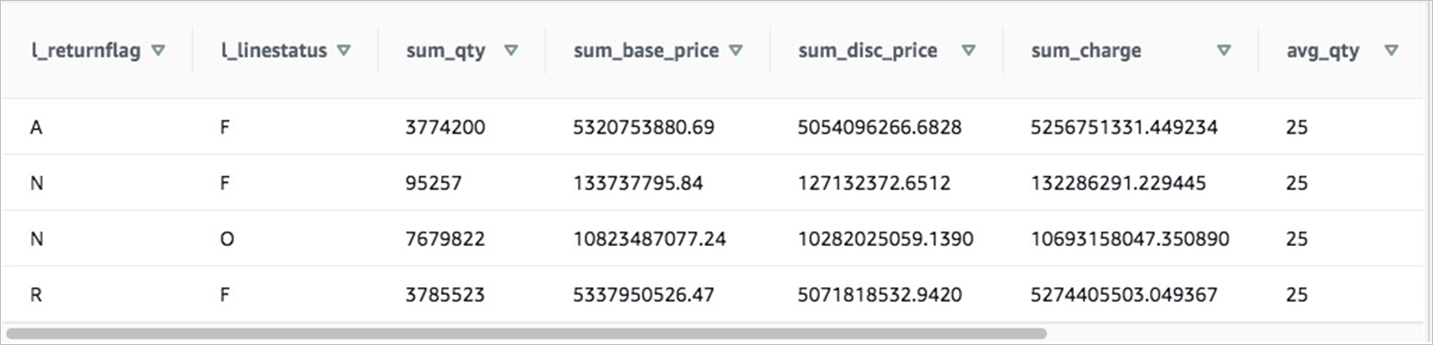
On the Ad Hoc Query page of the DataWorks console or on the MaxCompute client (odpscmd), execute the preceding statement and check whether the returned results are consistent with the queried data of the Amazon Redshift cluster.
The following result is returned: