Integrate Device Fraud Detection SDK to detect tampered devices, emulators, and malicious scripts in your iOS app. The SDK collects a device fingerprint, which you pass to the Fraud Detection service to query device risk information.
Prerequisites
Before you begin, make sure you have:
An iOS app targeting iOS 9.0 or later
Xcode 12 or later (required for IDFA permission handling on iOS 14+)
An app key from the Fraud Detection console — find it on the Device App Keys tab
Compliance requirements
Before using the SDK to collect device information, display the Fraud Detection SDK privacy policy and obtain explicit user consent. Do not assume users have agreed by default.
The privacy policy must disclose the following:
SDK name: Device Fraud Detection SDK
Purpose: Detection of abnormal devices such as tampered devices, emulators, and malicious scripts
Privacy policy link: Fraud Detection SDK privacy policy
Data collected:
Category Data points Basic device info Device manufacturer, brand, type and model, name, OS information, memory and storage capacity, sensor list, battery and battery usage, baseband information, boot time, screen brightness and resolution, CPU information, system time zone, system language, charging status, and system kernel information Identification (required) Identifier for vendors (IDFV) Identification (optional) International Mobile Equipment Identity (IMEI), International Mobile Subscriber Identity (IMSI), MAC address, Integrated Circuit Card Identifier (ICCID), hardware serial number, identifier for advertisers (IDFA), Android device ID, Open Anonymous Device Identifier (OAID), Google advertising ID (AID), and Bluetooth MAC address Network info IP address (optional), nearby Wi-Fi list (optional), Basic Service Set Identifier (BSSID) (optional), Service Set Identifier (SSID) (optional), carrier information, network type, network status, SIM card status, and network card information App info App name, app version, installation time, and app list (optional)
Display the privacy policy when users start the app for the first time. Only start collecting device information after the user agrees. Avoid collecting device information at app startup unless required for a specific risk scenario — this prevents excessive or premature data collection.
Add Info.plist permissions
Add the following entries to your app's Info.plist before publishing to App Store. Missing entries may cause App Store review rejection.
| Key | Required | Purpose |
|---|---|---|
NSLocalNetworkUsageDescription | No (recommended) | Detect local area network (LAN) connectivity to identify risks such as device farms and group control |
NSUserTrackingUsageDescription | No | Obtain the IDFA of the device for persistent device identification |
Install and configure the SDK
Download Device Fraud Detection SDK for iOS from the Fraud Detection console. On the Device App Keys tab, click Download Device SDK. iOS SDK versions start with
I.; Android SDK versions start withA..NoteIf the SDK version has an
idfasuffix, the SDK can collect sensitive identifier information (IDFA). Check the SDK download list for details.Copy
deviceiOS.frameworkfrom the SDK package into your iOS project directory.In Xcode, select your target, go to Build Phases > Link Binary With Libraries, and add
deviceiOS.frameworkplus the following dependencies:AppTrackingTransparency.framework CoreTelephony.framework libresolv.tbd Security.framework AdSupport.framework libz.tbd libc++.tbd deviceiOS.framework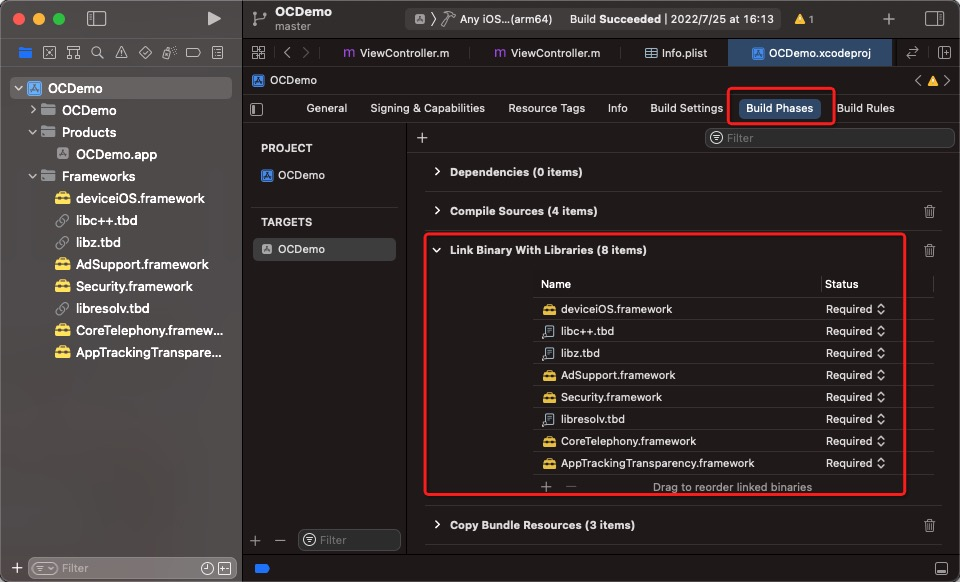
(Optional) Download the Objective-C demo package from the Developer Center page to use as a reference implementation.
Collect device data
Call initDevice as soon as possible in risk scenarios — for example, when the app launches or when a user reaches a registration or payment screen. The SDK is a SecurityDevice singleton.
@interface SecurityDevice : NSObject
- (void)initDevice:(NSString *)userAppKey
      withOptions:(NSMutableDictionary *)options
          callback:(void (^)(int))initCallback;
// ...
@end
Parameters
| Parameter | Description | Example |
|---|---|---|
userAppKey | Your app key. Get it from the Device App Keys tab in the Fraud Detection console. | — |
options | Optional settings for data collection. Pass nil to use defaults. | See table below |
initCallback | Callback that returns a status code (int) when data collection completes or fails. | — |
`options` parameters
| Key | Description | Example |
|---|---|---|
IPv6 | Whether to use IPv6 domain names to report device data. 0 = IPv4 (default), 1 = IPv6. | "1" |
CustomUrl | Domain name of a self-managed reporting server. | "https://cloudauth-device.aliyuncs.com" |
CustomHost | Host of a self-managed reporting server. | "cloudauth-device.aliyuncs.com" |
Return value: none.
If initCallback returns a code other than 10000, call initDevice again to retry data collection.
Get a device token
Obtain the client token and report it to your business server. Then, use server-side API operations to retrieve device threat information. For more information, see Device Fraud Detection events and response parameters.
After data collection succeeds, retrieve a token and pass it to your server. The server uses the token — along with event parameters — to query device risk information. For parameter and response details, see Service event parameters and response parameters for Device Fraud Detection.
@interface SecurityDevice : NSObject
// ...
- (SecurityToken *)getDeviceToken;
@end
Return value: a SecurityToken object.
@interface SecurityToken : NSObject

// Status code for the token retrieval call.
@property(atomic) int code;

// The token string to pass to your server.
@property(copy, atomic) NSString *token;

@end
Token timing guidelines
Call
getDeviceTokenonly afterinitCallbackreturns10000.If you cannot wait for the
initCallbackresult, wait at least 2 seconds after callinginitDevicebefore callinggetDeviceToken— data reporting may still be in progress.Retrieve a new token each time you query device risk information. Tokens are valid for seven days.
Status codes
| Code | Meaning | Action |
|---|---|---|
10000 | Data collection successful | Proceed to retrieve the token |
10001 | Data collection failed | Retry initDevice |
10002 | Required SDK permissions not fully granted | Verify the user has agreed to the privacy policy and that required permissions are granted |
10003 | Unknown system error | Retry initDevice; if the issue persists, contact support |
10004 | Network error | Check network connectivity and retry |
10005 | Network error — server returned an empty response | Check network connectivity and retry |
10006 | Invalid response format | Retry; if the issue persists, contact support |
10007 | Failed to parse server settings | Verify CustomUrl and CustomHost values if set |
10008 | Internal data collection not complete | Wait and retry getDeviceToken |
Sample code
The following example shows the complete integration flow: requesting IDFA permission on iOS 14+, initializing the SDK, and retrieving the token in a risk scenario such as account registration or a promotional activity.
Apple requires that IDFA usage be declared in Info.plist and that users grant permission via a system prompt. Xcode 12 or later is required.
typedef void (^IDFARequestBlock)(bool success);

API_AVAILABLE(ios(14))
static bool isATTrackingEnabled(ATTrackingManagerAuthorizationStatus status) {
    if (ATTrackingManagerAuthorizationStatusAuthorized == status) {
        return true;
    }
    return false;
}

- (void)helperRequestIDFAPermissionWithBlock:(IDFARequestBlock) complete {
    if (@available(iOS 14, *)) {
        ATTrackingManagerAuthorizationStatus authStatus = ATTrackingManager.trackingAuthorizationStatus;
        if (ATTrackingManagerAuthorizationStatusNotDetermined == authStatus) {
            [ATTrackingManager requestTrackingAuthorizationWithCompletionHandler:^(ATTrackingManagerAuthorizationStatus status) {
                if (nil != complete) {
                    return complete(isATTrackingEnabled(status));
                }
            }];
        } else if (nil != complete) {
            return complete(isATTrackingEnabled(authStatus));
        }
    }
}

- (void)initSecurityDevice {
    SecurityDevice *securityDevice = [SecurityDevice sharedInstance];
    [securityDevice initDevice:@"ALIYUN_APPKEY" withOptions:nil callback:^(int code) {
        NSString *initResult = [NSString stringWithFormat:@"init code: %d", code];
        NSLog(@"%@", initResult);
        if (10000 != code) {
            NSLog(@"init error.");
        } else {
            NSLog(@"init success");
        }
    }];
}

- (void)viewDidLoad {
    [super viewDidLoad];

    // For iOS 14 and later, request IDFA permission before initializing the SDK.
    if (@available(iOS 14, *)) {
        [self helperRequestIDFAPermissionWithBlock:^(bool success) {
            if (success) {
                NSLog(@"IDFA Permission OK.");
            } else {
                NSLog(@"No IDFA Permission.");
            }
            [self initSecurityDevice];
        }];
    } else {
        [self initSecurityDevice];
    }
}
In risk scenarios — such as account registrations or promotional activities — retrieve the token and send it to your server:
SecurityDevice *securityDevice = [SecurityDevice sharedInstance];
SecurityToken *deviceToken = [securityDevice getDeviceToken];
NSString *rs = [NSString stringWithFormat:@"[%d]%@", deviceToken.code, deviceToken.token];
NSLog(@"deviceToken: %@", rs);

// Send the token to your server and call the Device Fraud Detection operations.
// ...
What's next
Pass the deviceToken and event parameters to the Fraud Detection service: