You can configure the PostStart and PreStop lifecycle hooks in the Enterprise Distributed Application Service (EDAS) console. This way, you can add code to perform custom operations immediately after an application starts up or before an application stops running. You can also configure the Liveness and Readiness probes in the EDAS console to check the liveness and readiness of containers. This topic describes how to configure the lifecycle hooks of applications and the Liveness and Readiness probes of containers.
Background information
In most cases, you want to perform specific operations immediately before or after an application starts up or stops running. For example, you want to deploy resources before an application starts up, or to gracefully shut down an application or notify other services or applications before an application stops running. EDAS integrates the lifecycle hook feature of Kubernetes to allow you to configure the PostStart and PreStop lifecycle hooks for containers.
When you deploy an application in a Kubernetes cluster, you must check whether the pods are alive and ready to provide services. EDAS integrates the pod probe feature of Kubernetes. This feature allows you to configure the Liveness probe to determine the time to restart containers and configure the Readiness probe to check whether containers are ready to receive traffic.
Configure application lifecycle hooks and probes when you create an application
Log on to the EDAS console. In the left-side navigation pane, choose . The Applications page appears. In the top navigation bar, select a region. In the upper part of the page, select a namespace. In the upper-left corner, click Create Application.
In the Basic Information step, specify Cluster Type and Application Runtime Environment and click Next. The following table describes the parameters.
Parameter
Description
Cluster Type
The type of the cluster in which you want to deploy the application. Select Kubernetes Clusters.
Application Runtime Environment
The application runtime environment. Select an application runtime environment based on the type of the hosted application.
Java
Custom: Select this option if you want to use a custom image to deploy the application in a Kubernetes cluster.
Java: Select this option if you want to use a universal JAR package to deploy the application as a Dubbo or a Spring Boot application. You can set the Java Environment parameter after you select this option.
Tomcat: Select this option if you want to use a universal WAR package to deploy the application as a Dubbo or a Spring application. You can set the Java Environment and Container Version parameters after you select this option.
EDAS-Container (HSF): Select this option if you want to use a WAR or FatJar package to deploy the application as a High-speed Service Framework (HSF) application. You can set the Java Environment, Pandora Version, and Ali-Tomcat Version parameters after you select this option.
PHP: Select this option if the application is a PHP application that runs on Apache HTTP Server.
Node.js, C++, Go, and Other Languages: Select this option if you want to use a custom image to deploy the application in a Kubernetes cluster. The configuration process for multi-language applications is not described in this topic.
In the Configurations step, configure the environment information, basic information, and deployment method for the application, set the related resource parameters, and then click Next.
In the Advanced Settings step, expand the Application Life Cycle Management section and configure the following parameters.
Parameter
Description
PostStart
Specify a PostStart container hook. The hook is immediately triggered after a container is created. The hook notifies Kubernetes that the container is created. You do not need to pass parameters to the relevant hook handler. If the hook handler fails to be executed, the system stops the container and determines whether to restart the container based on the restart policy of the container. For more information, see Container Lifecycle Hooks.
PreStop
Specify a PreStop container hook. The hook is triggered before a container is deleted. The relevant hook handler must be executed before the request that is initiated to delete the container is sent to the Docker daemon. The Docker daemon sends a SIGTERM signal to itself to delete the container, regardless of the execution result of the hook handler. For more information, see Container Lifecycle Hooks.
TerminationGracePeriod configuration
Specify the timeout period that is allowed for the graceful shutdown of a pod. Make sure that the PreStop hook is completed and the application processes the SIGTERM signal within the timeout period. You can also adjust the timeout period to control the time period during which a pod is deleted.
Liveness
Specify a Liveness probe. The probe monitors the status of your container and checks whether the application is healthy. If the application is unhealthy, the container is deleted and recreated. For more information, see Pod Lifecycle.
Readiness
Specify a Readiness probe. The probe monitors the status of your container and checks whether the application is started and can run as expected. If the application cannot run as expected, the container status is updated. For more information, see Pod Lifecycle.
Click Create Application.
On the Creation Completed page, check the information in the Basic Information, Configurations, and Advanced Settings sections. Then, click Create Application.
In the upper part of the Application Overview page, click View Details. On the Change List page, view the application change process. Wait several minutes until the application is deployed. After the application change process is complete, view the status of the instance in the Basic Information section of the Application Overview page. If the status shows that a pod is running, the application is deployed.
Configure application lifecycle hooks and probes when you update an application
You can configure application lifecycle hooks and probes when you create an application, or configure or update the hooks and probes when you deploy an application.
Log on to the EDAS console.
In the left-side navigation pane, click . In the top navigation bar, select a region. In the upper part of the page, select a namespace. Select Container Service or Serverless Kubernetes Cluster from the Cluster Type drop-down list. Then, find the application that you want to deploy and click the application name.
On the Overview or Basic information page, choose in the upper-right corner.
On the Select Deployment Mode page, select a deployment mode and click Start Deployment in the upper-right corner of the specified deployment mode section.
Configure the environment and deployment package parameters of the application and expand the Application Life Cycle Management section. In the section, configure the parameters based on your business requirements. Then, click OK.
Parameter
Description
PostStart
Specify a PostStart container hook. The hook is immediately triggered after a container is created. The hook notifies Kubernetes that the container is created. You do not need to pass parameters to the relevant hook handler. If the hook handler fails to be executed, the system stops the container and determines whether to restart the container based on the restart policy of the container. For more information, see Container Lifecycle Hooks.
PreStop
Specify a PreStop container hook. The hook is triggered before a container is deleted. The relevant hook handler must be executed before the request that is initiated to delete the container is sent to the Docker daemon. The Docker daemon sends a SIGTERM signal to itself to delete the container, regardless of the execution result of the hook handler. For more information, see Container Lifecycle Hooks.
TerminationGracePeriod configuration
Specify the timeout period that is allowed for the graceful shutdown of a pod. Make sure that the PreStop hook is completed and the application processes the SIGTERM signal within the timeout period. You can also adjust the timeout period to control the time period during which a pod is deleted.
Liveness
Specify a Liveness probe. The probe monitors the status of your container and checks whether the application is healthy. If the application is unhealthy, the container is deleted and recreated. For more information, see Pod Lifecycle.
Readiness
Specify a Readiness probe. The probe monitors the status of your container and checks whether the application is started and can run as expected. If the application cannot run as expected, the container status is updated. For more information, see Pod Lifecycle.
ImportantAfter you click OK, the application is restarted. We recommend that you perform this operation during off-peak hours.
Configure application lifecycle management
Configure the PostStart and PreStop hooks
You can configure the PostStart hook in the same way as you configure the PreStop hook. You can configure the hooks in the following modes.
Mode | Description |
Exec | Runs a specific command in a container. If 0 is returned after the command is run, the command is run without errors. |
HttpGet | Sends an HTTP GET request to a specific container endpoint. If a status code that is greater than or equal to 200 but smaller than 400 is returned, the request is successful. In HttpGet mode, you can configure the following parameters:
|
The following examples show you how to configure the PostStart hook in Exec and HttpGet modes in EDAS:
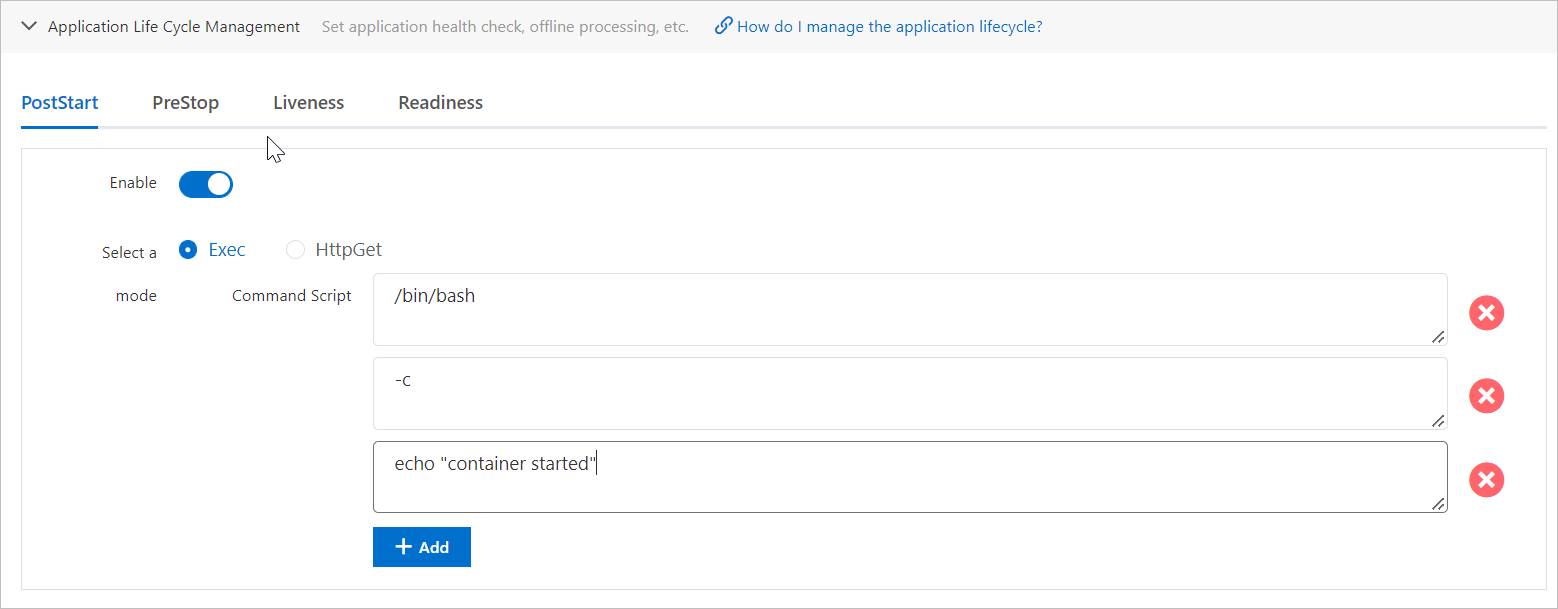
Exec mode
For example, you want to run the following command after a container is created:
echo "container started"You can configure the PostStart hook in Exec mode by using one of the following methods in EDAS:
Method 1: Split the command into different parameters. You can use this method if the command is short and contains a few parameters.

Method 2: Start a shell and run the command in the shell. You can use this method if the command is long and contains many parameters.
HttpGet mode
The following figure shows you how to configure the PostStart hook in HttpGet mode. After the container is started, an HTTP GET request is sent to
http://example.com:8080/healthz.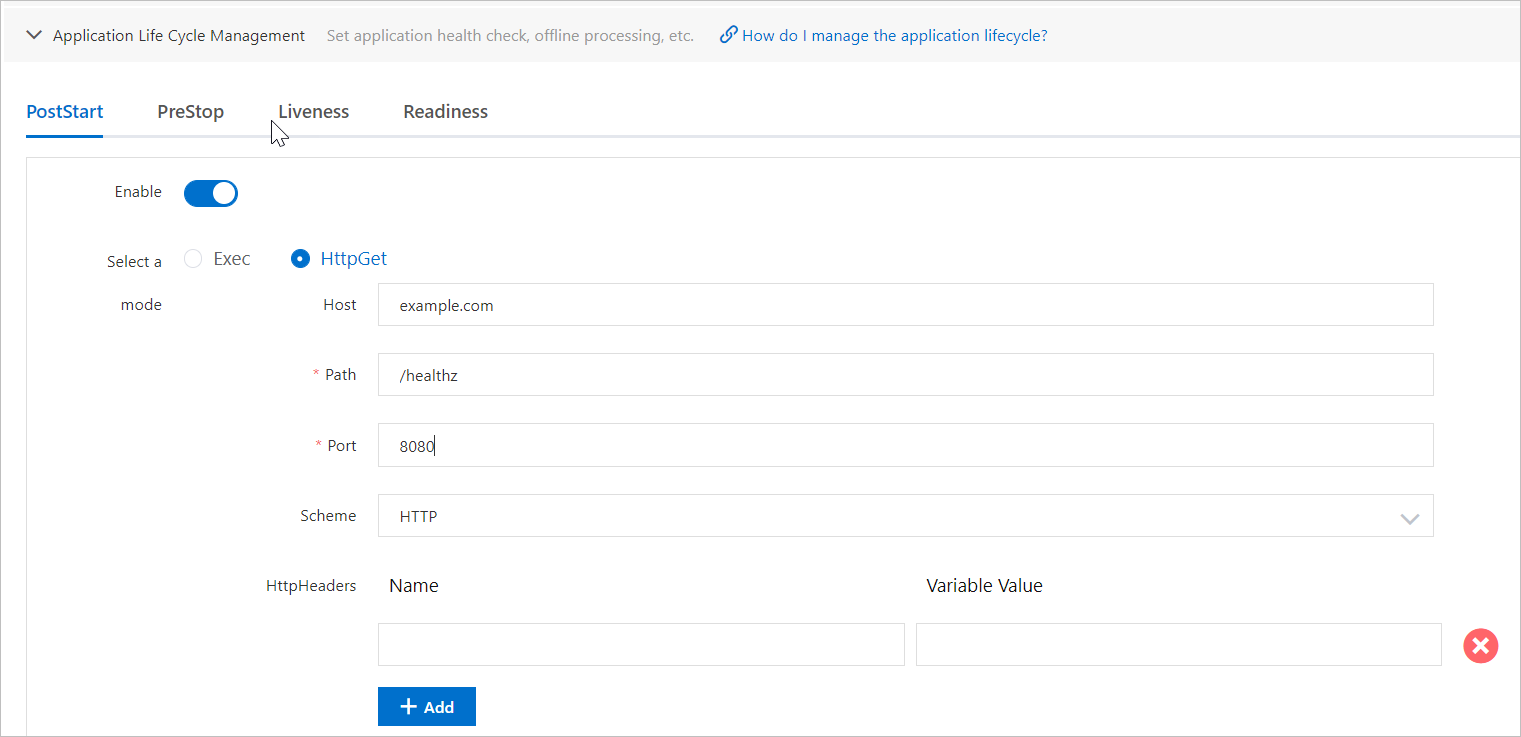 Note
NoteIf the PostStart or PreStop hook fails to run, the container is automatically restarted. You can query the information about the execution failure of the PostStart or PreStop hook in the change records of the application.
Configure the Liveness and Readiness probes
EDAS supports the following types of Kubernetes container probes.
Container probe | Description |
LivenessProbe | Checks whether a container is alive. If the check fails, Kubernetes automatically terminates the container and restarts the container based on the restart policy. |
ReadinessProbe | Checks whether a container is ready to receive traffic. If the check is successful, Kubernetes adds the pod to the service list to which the pod belongs so that the pod starts to receive traffic. |
You can configure the Liveness and Readiness probes in one of the following modes.
Mode | Description |
Exec | Runs a specific command in a container. If 0 is returned after the command is run, the check is successful. |
HttpGet | Sends an HTTP GET request to a specific container endpoint. If a status code that is greater than or equal to 200 but smaller than 400 is returned, the check is successful. |
TcpSocket | Checks whether the specified TCP port that corresponds to the IP address of the container is enabled. If the port is enabled, the check is successful. |
In the preceding modes, you can configure the following parameters for the Liveness or Readiness probe.
Parameter | Description |
InitialDelaySeconds | The delay from the startup of the container to the first check of the probe. Unit: seconds. Valid values: 1 to 1000. |
PeriodSeconds | The interval between two consecutive checks. Unit: seconds. Valid values: 1 to 1000. |
SuccessThreshold | The number of consecutive successful checks that must occur following a failed check before the check is declared successful. Valid values: 1 to 1000. Valid value for the Liveness probe: 1. |
TimeoutSeconds | The timeout period of a check. Unit: seconds. Valid values: 1 to 1000. |
FailureThreshold | The number of consecutive failed checks that must occur following a successful check before the check is declared failed. Valid values: 1 to 1000. |
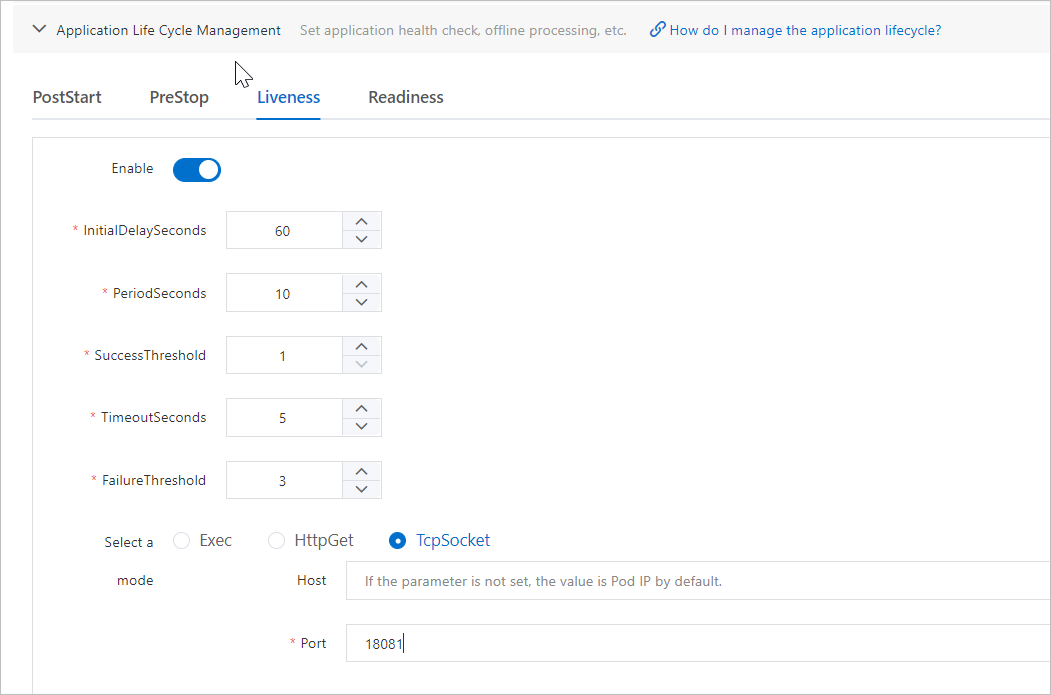
The following figure shows a sample configuration of the Liveness probe in TcpSocket mode. In this example, the Host parameter is left empty. Therefore, the IP address of the pod is used as the host address. The check is performed by using port 18081. The first check starts 60 seconds after the container is started. The system performs checks at an interval of 10 seconds. If one of the checks is successful, the pod is considered alive. The timeout period of each check is five seconds. If three consecutive checks fail, Kubernetes terminates the container, and restarts the container based on the restart policy.
Verify the result
After you configure an application lifecycle hook, you can perform the following steps to verify the configuration:
For example, you configured the Hello from the postStart handler script before you start an application. After the application is deployed, run the following command in your web shell:
cat /usr/share/messageCheck whether the Hello from the postStart handler script exists in your file. If the script exists, the configuration is valid.

DingTalk group for ACK and Serverless Kubernetes clusters in EDAS
If you have questions or suggestions when you use Container Service for Kubernetes (ACK) and Serverless Kubernetes clusters in EDAS, submit a ticket. To give feedback, you can also join the DingTalk group by searching for the DingTalk group ID 23197114.