Synchronize data to ApsaraDB RDS
Preparations
1.Create an ApsaraDB RDS instance and then a table in the instance in the ApsaraDB RDS console. You can create the ApsaraDB RDS instance in the classic network or a virtual private cloud (VPC). When you create a DataConnector, you must select the same network type as that of the ApsaraDB RDS instance. Data is synchronized based on the mappings between the data types of fields in DataHub and those in ApsaraDB RDS. The following table describes the data type mappings between DataHub and ApsaraDB RDS.
DataHub | ApsaraDB RDS |
TINYINT | TINYINT |
SMALLINT | SMALLINT |
INTEGER | INT |
BIGINT | BIGINT |
STRING | VARCHAR |
BOOLEAN | BOOLEAN or TINYINT |
FLOAT | FLOAT |
DOUBLE | DOUBLE |
TIMESTAMP | TIMESTAMP or BIGINT |
DECIMAL | DECIMAL |
The TINYINT, SMALLINT, INTEGER, and FLOAT data types in DataHub are supported by DataHub SDK for Java V2.16.1-public and later. 2.If you want to synchronize data from DataHub to ApsaraDB RDS, you must configure an IP address whitelist in the ApsaraDB RDS console so that DataHub can access your ApsaraDB RDS instance. For more information about the IP address whitelist for ApsaraDB RDS, see FAQ. To make sure that your instance can be connected, you must enter the internal endpoint of ApsaraDB RDS when you create a DataConnector. 3.Pay attention to the following points: (1) You can synchronize only data in TUPLE topics from DataHub to ApsaraDB RDS. (2) By default, the timestamp in DataHub is converted to the timestamp in ApsaraDB RDS based on the microsecond precision. Take note of the data precision. (3) To prevent lock contention caused by concurrent reads and writes on the data of the same primary key, you must write data of the same primary key to the same shard. (4) If you use a VPC, make sure that the topic in which data is to be synchronized and the ApsaraDB RDS instance to which data is to be synchronized reside in the same region.
Create a DataConnector
In the left-side navigation pane of the DataHub console, click Project Manager. On the Project List page, find a project and click View in the Actions column. On the details page of the project, find a topic and click View in the Actions column.
On the details page of the topic, click
Connectorin the upper-right corner. In the Create Connector panel, create a DataConnector as required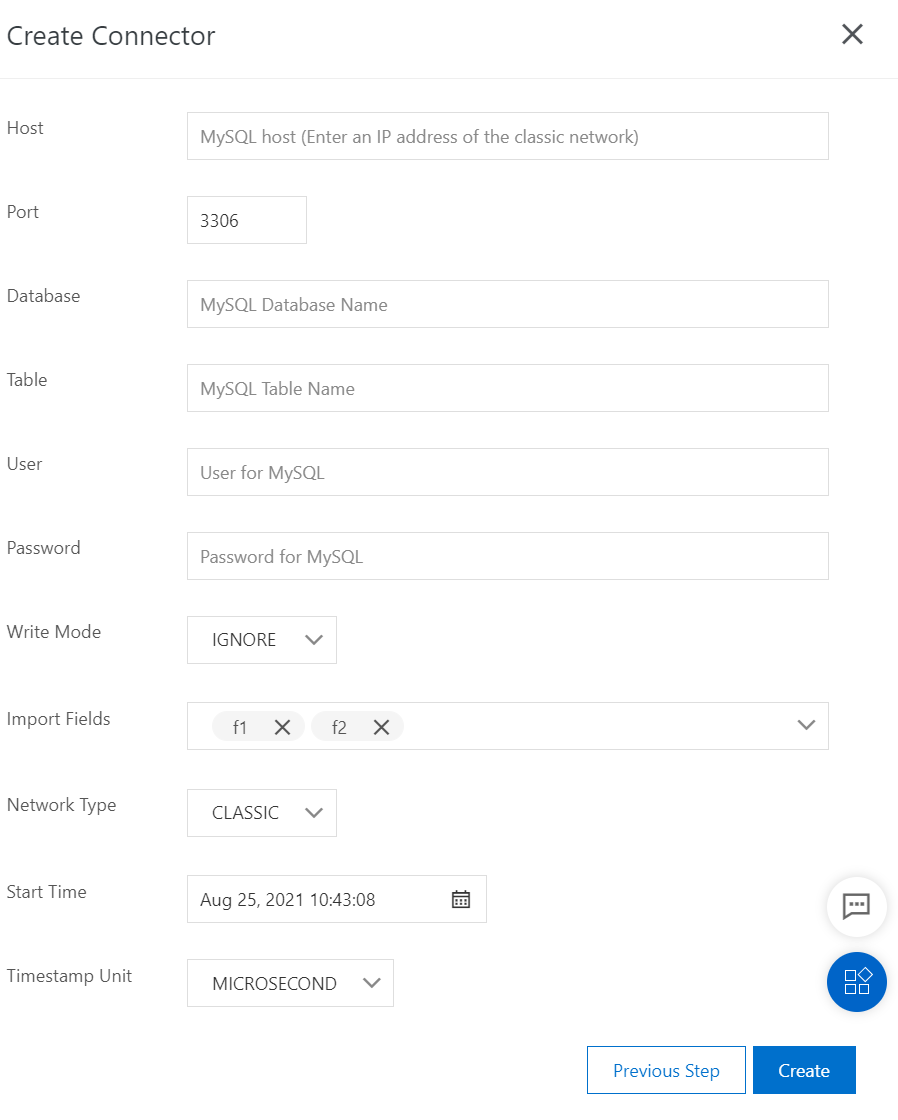
The following part describes partial parameters that are used to create a DataConnector in the DataHub console. For more information about DataConnector configurations, see the descriptions of SDKs.
Host: the endpoint of ApsaraDB RDS. To make sure that your instance can be connected, you must enter an
internal endpoint.Import Fields: the fields to be synchronized to ApsaraDB RDS. You can synchronize all or partial fields of the DataHub topic based on your business requirements.
Write Mode: the mode in which data is written. Valid values:
IGNORE: ignores duplicate data. The
INSERT IGNORE INTOstatement is executed to write data.OVERWRITE: updates duplicate data. The
REPLACE INTOstatement is executed to write data.
VPC ID: the ID of the VPC. Instance ID: the ID of the ApsaraDB RDS instance. If your ApsaraDB RDS instance resides in a VPC, you must set the VPC ID and Instance ID parameters.
Example
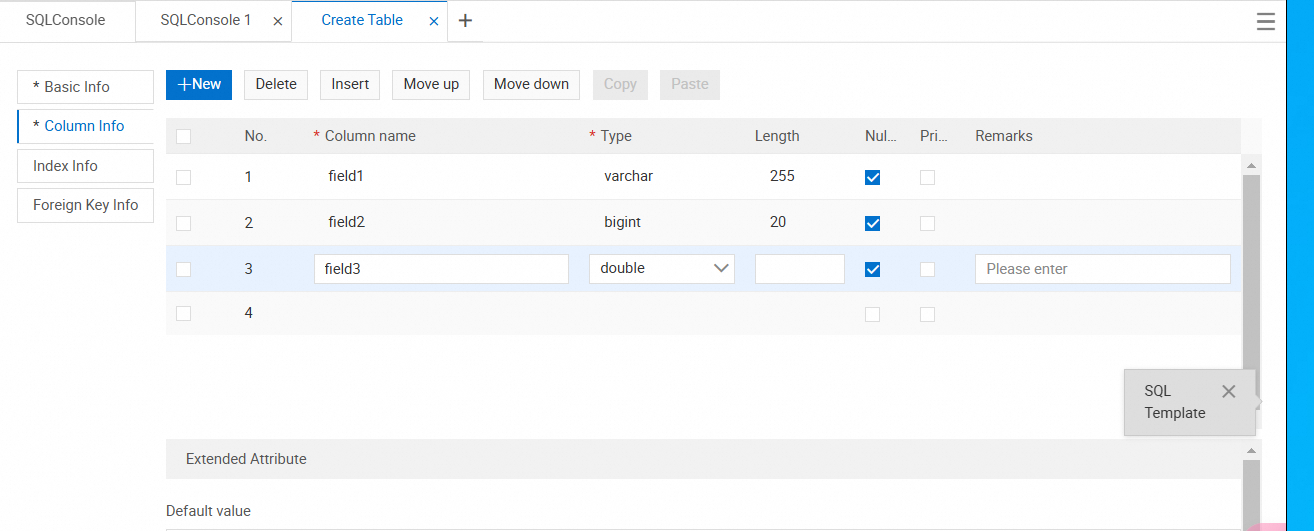
In the ApsaraDB RDS console, create an ApsaraDB instance and then a table in the ApsaraDB instance, as shown in the following figure.
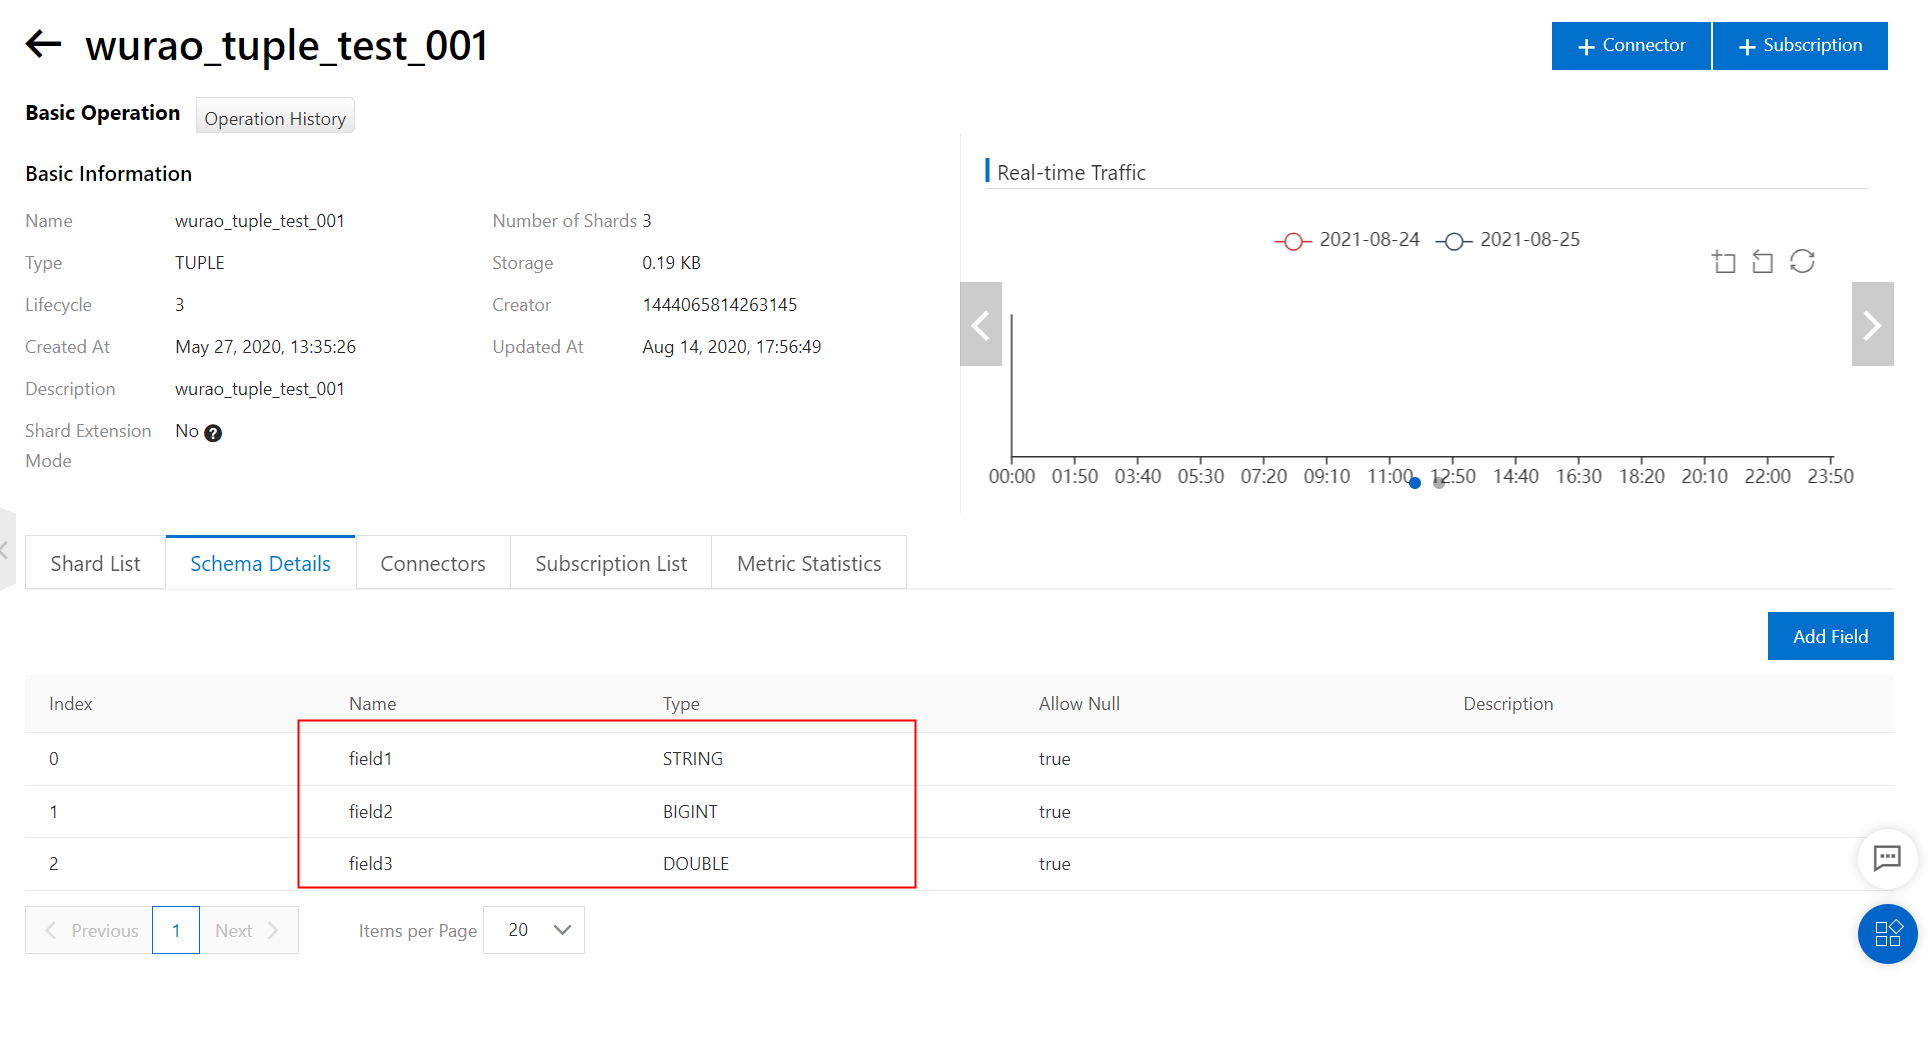
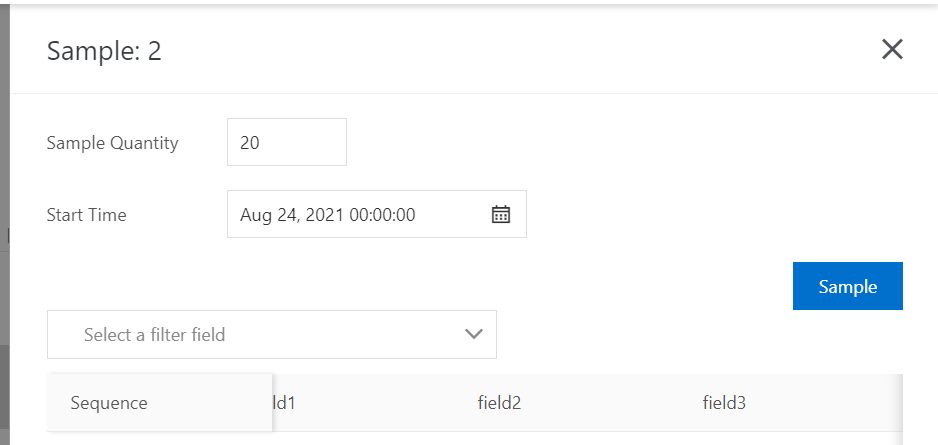
Create a topic in the DataHub console. In this example, the created topic is of the TUPLE type. The following figure shows the Schema Details tab of the created topic.
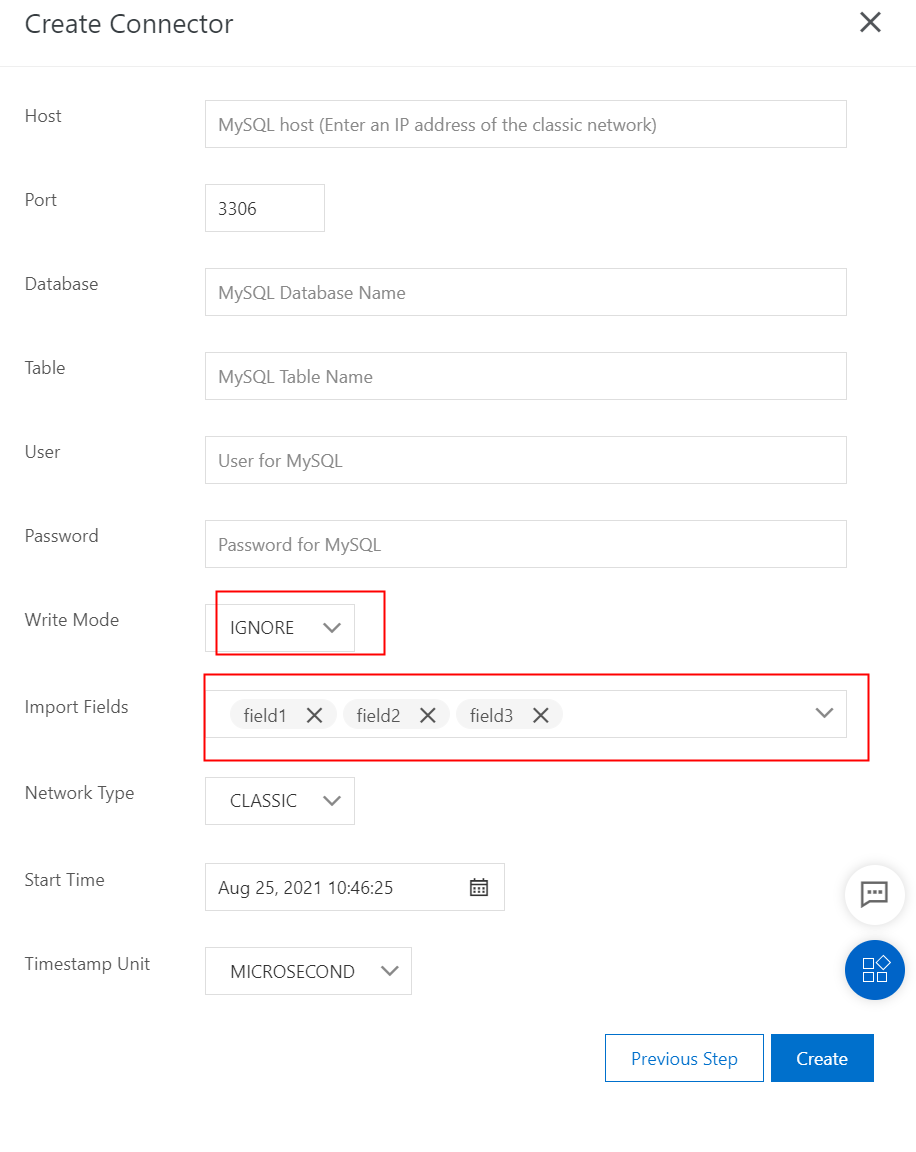
Create a DataConnector. In the Create Connector panel, select IGNORE from the Write Mode drop-down list and all fields from the Import Fields drop-down list.
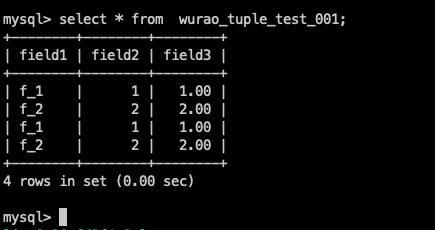
Write data to the created TUPLE topic. The following figure shows the written data. Four pieces of data records are written.
Connect to ApsaraDB RDS in the MySQL client to view the synchronized data, as shown in the following figure.
Synchronize data to ApsaraDB RDS for MySQL
Preparations
1.Create an ApsaraDB RDS for MySQL instance and then a table in the instance in the ApsaraDB RDS for MySQL console.
Data is synchronized based on the mappings between the data types of fields in DataHub and those in ApsaraDB RDS for MySQL. The following table describes the data type mappings between DataHub and ApsaraDB RDS for MySQL.
DataHub | MySQL |
TINYINT | TINYINT |
SMALLINT | SMALLINT |
INTEGER | INT |
BIGINT | BIGINT |
STRING | VARCHAR |
BOOLEAN | BOOLEAN / TINYINT |
FLOAT | FLOAT |
DOUBLE | DOUBLE |
TIMESTAMP | TIMESTAMP / BIGINT |
DECIMAL | DECIMAL |
The TINYINT, SMALLINT, INTEGER, and FLOAT data types in DataHub are supported by DataHub SDK for Java V2.16.1-public and later.
2.Pay attention to the following points: (1) You can synchronize only data in TUPLE topics from DataHub to ApsaraDB RDS for MySQL. (2) By default, the timestamp in DataHub is converted to the timestamp in ApsaraDB RDS for MySQL based on the millisecond precision. Take note of the data precision. (3) To prevent lock contention caused by concurrent reads and writes on the data of the same primary key, you must write data of the same primary key to the same shard.
Create a DataConnector
In the left-side navigation pane of the DataHub console, click Project Manager. On the Project List page, find a project and click View in the Actions column. On the details page of the project, find a topic and click View in the Actions column.
On the details page of the topic, click
Connectorin the upper-right corner. In the Create Connector panel, create a DataConnector as required.
The following part describes partial parameters that are used to create a DataConnector in the DataHub console. For more information about DataConnector configurations, see the descriptions of SDKs.
Host: the endpoint of ApsaraDB RDS for MySQL. To make sure that your instance can be connected, you must enter an
internal endpoint.Import Fields: the fields to be synchronized to ApsaraDB RDS for MySQL. You can synchronize all or partial fields of the DataHub topic based on your business requirements.
Write Mode: the mode in which data is written. Valid values:
IGNORE: ignores duplicate data. The
INSERT IGNORE INTOstatement is executed to write data.OVERWRITE: updates duplicate data. The
REPLACE INTOstatement is executed to write data.
Example
Create an ApsaraDB RDS for MySQL instance and then a table in the instance in the ApsaraDB RDS for MySQL console.
Create a topic in the DataHub console. In this example, the created topic is of the TUPLE type. The following figure shows the Schema Details tab of the created topic.


Synchronize data to AnalyticDB for MySQL V3.0
Preparations
1.Create an AnalyticDB for MySQL instance and then a table in the instance in the AnalyticDB for MySQL console. You can create the AnalyticDB for MySQL instance in the classic network or a VPC. When you create a DataConnector, you must select the same network type as that of the AnalyticDB for MySQL instance. Data is synchronized based on the mappings between the data types of fields in DataHub and those in AnalyticDB for MySQL. The following table describes the data type mappings between DataHub and AnalyticDB for MySQL.
DataHub | ADS |
TINYINT | TINYINT |
SMALLINT | SMALLINT |
INTEGER | INT |
BIGINT | BIGINT |
STRING | VARCHAR |
BOOLEAN | BOOLEAN / TINYINT |
FLOAT | FLOAT |
DOUBLE | DOUBLE |
TIMESTAMP | TIMESTAMP / BIGINT |
DECIMAL | DECIMAL |
The TINYINT, SMALLINT, INTEGER, and FLOAT data types in DataHub are supported by DataHub SDK for Java V2.16.1-public and later. 2.If you want to synchronize data from DataHub to AnalyticDB for MySQL, you must configure an IP address whitelist in the AnalyticDB for MySQL console so that DataHub can access your AnalyticDB for MySQL instance. For more information about the IP address whitelist for AnalyticDB for MySQL, see FAQ. To make sure that your instance can be connected, you must enter an internal endpoint of AnalyticDB for MySQL when you create a DataConnector. 3.Pay attention to the following points: (1) You can synchronize only data in TUPLE topics from DataHub to AnalyticDB for MySQL. (2) By default, the timestamp in DataHub is converted to the timestamp in AnalyticDB for MySQL based on the microsecond precision. Take note of the data precision. (3) To prevent lock contention caused by concurrent read and write on data of the same primary key, you must write data of the same primary key to the same shard. (4) If you use a VPC, make sure that the topic in which data is to be synchronized and the destination AnalyticDB for MySQL instance reside in the same region.
Create a DataConnector
In the left-side navigation pane of the DataHub console, click Project Manager. On the Project List page, find a project and click View in the Actions column. On the details page of the project, find a topic and click View in the Actions column.
On the details page of the topic, click
Connectorin the upper-right corner. In the Create Connector panel, create a DataConnector as required.
The following part describes partial parameters that are used to create a DataConnector in the DataHub console. For more information about DataConnector configurations, see the descriptions of SDKs.
Host: the endpoint of AnalyticDB for MySQL. To make sure that your instance can be connected, you must enter an
internal endpoint.Import Fields: the fields to be synchronized to AnalyticDB for MySQL. You can synchronize all or partial fields of the DataHub topic based on your business requirements.
Write Mode: the mode in which data is written. Valid values:
IGNORE: ignores duplicate data. The
INSERT IGNORE INTOstatement is executed to write data.OVERWRITE: updates duplicate data. The
REPLACE INTOstatement is executed to write data.
VPC ID: the ID of the VPC. Instance ID: the ID of the AnalyticDB for MySQL instance. You can view the IDs in the AnalyticDB for MySQL console, as shown in the following figure.
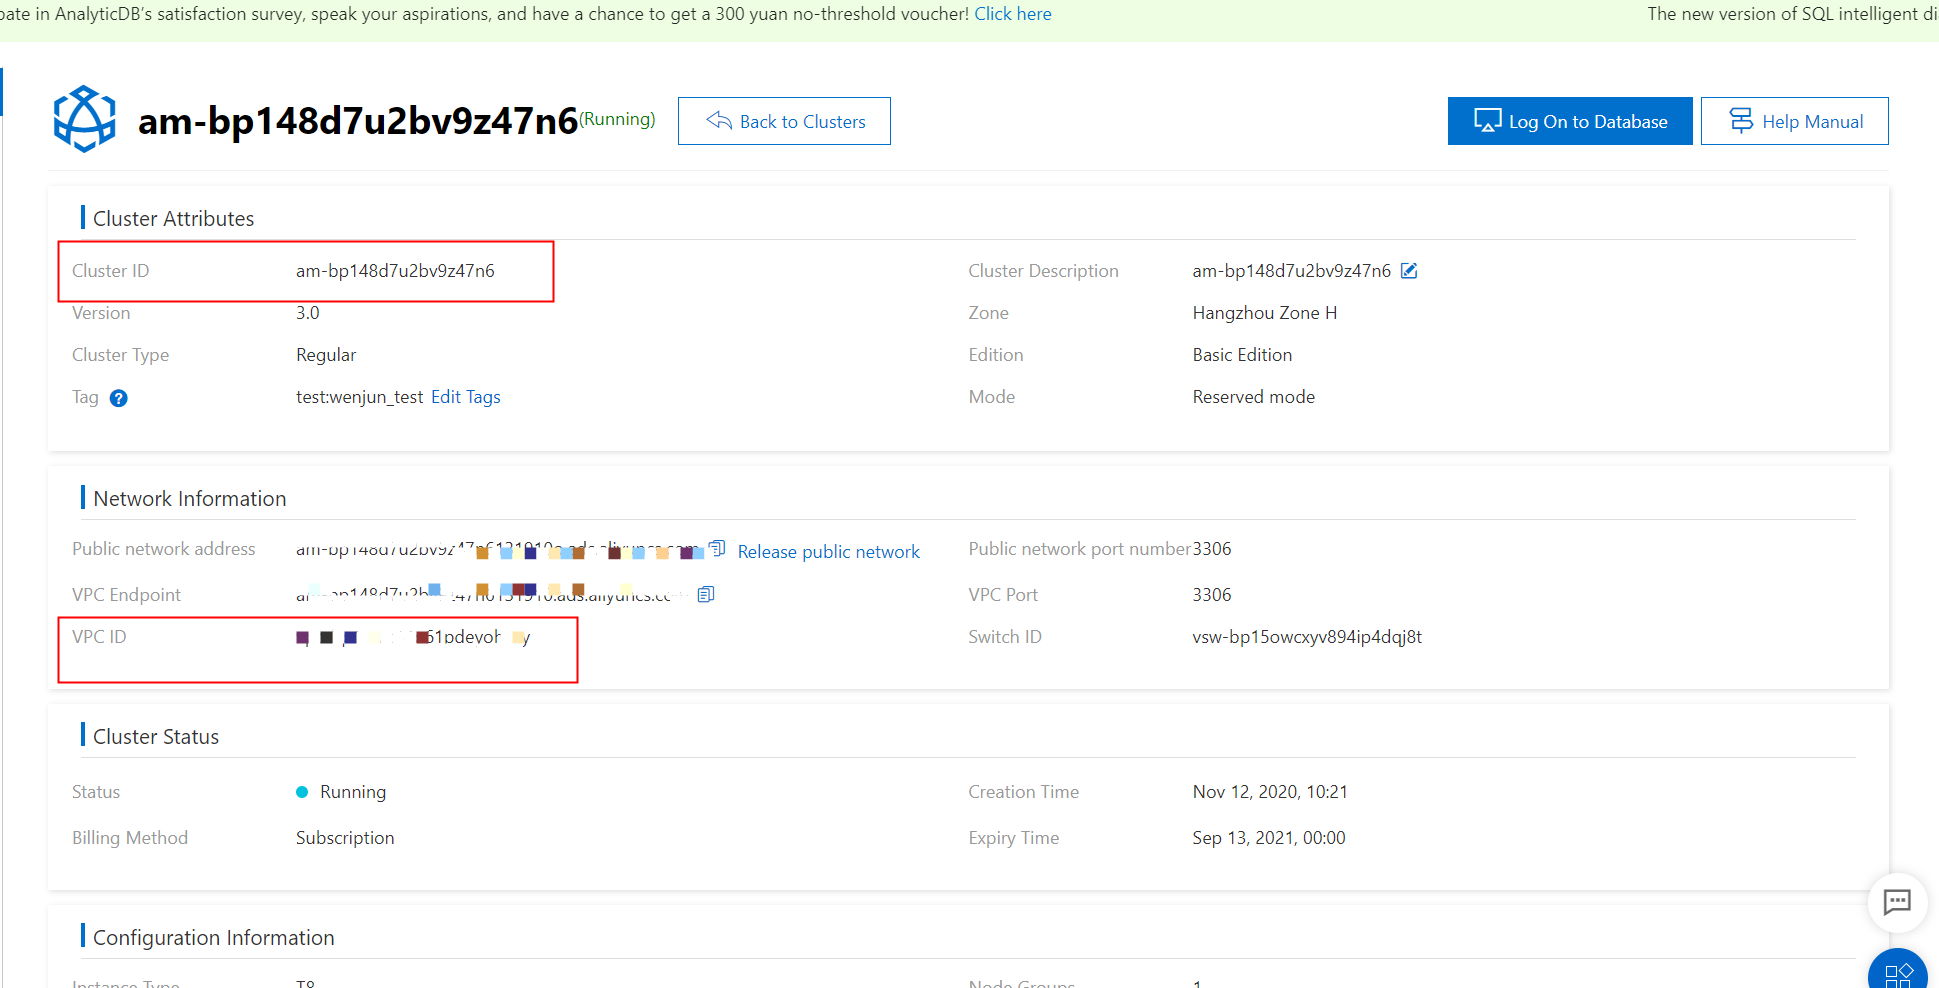
Note: The instance ID must be appended with -controller. In the preceding figure, the cluster ID is am-bp10732mzu7wd78x9. In this case, you must set the Instance ID parameter to am-bp10732mzu7wd78x9-controller.
Example
Create an AnalyticDB for MySQL instance and then a table in the instance.
Create a topic in the DataHub console. In this example, the created topic is of the TUPLE type. The following figure shows the Schema Details tab of the created topic.
Create a DataConnector. In the Create Connector panel, select IGNORE from the Write Mode drop-down list and all fields from the Import Fields drop-down list.
Write data to the created TUPLE topic. The following figure shows the written data. Four pieces of data records are written.
Connect to AnalyticDB for MySQL in the MySQL client to view the synchronized data, as shown in the following figure.
