By Sai Sarath Chandra, Alibaba Cloud Tech Share Author. Tech Share is Alibaba Cloud's incentive program to encourage the sharing of technical knowledge and best practices within the cloud community.
In this tutorial, we will learn how to set up continuous integration and continuous deployment (CI/CD) with GitLab on an Alibaba Cloud Elastic Compute Service (ECS) instance. Before we start the tutorial please log in to the console and get ready.
New to Alibaba Cloud? Sign up for a free account and try over 40 products for free worth up to $1200. Alternatively, visit Getting Started with Alibaba Cloud to learn more.
Once we get the requirements from the business team, the development team takes care of transforming the requirements into some form of functional code in the form of software. The whole activity is mostly performed within the development environment. The development might take months or years depending upon the requirement once this activity completes, the whole project is given to the operations team to test, deploy in the production environment.
Once the project is handed over to the operations team, this team is responsible for testing, deploying, maintaining the code in the production environment. Most of the times the production environment is not similar to the development environment. This difference results in many issues (such as dependency error, performance issues & environment issues), If the team recognizes the error is at the application level then it escalates to the development team and then the whole process cycle again. If there is an error due to the environment, then the operation team fixes it, deploy the project in finally make it available to business users.

Integration w/o CI/CD
This approach itself has many disadvantages:
Once we get the requirements from the business team, the development team and operations team together work on deciding different configuration parameters for the environment. This collaboration ensures that the development environment is similar to the production environment or at least no issue arises when the developed project moves to the production environment.
Using different tools like Gitlab for version control and many others, there are real-time reports for both the development team and operations team to see how the project is performing.
Using different services like resource orchestration service, the operations team able to create and manage the service using a simple configuration this reduces much overhead to the operation. This process also requires each team having a basic idea of what other teams were doing within the project.
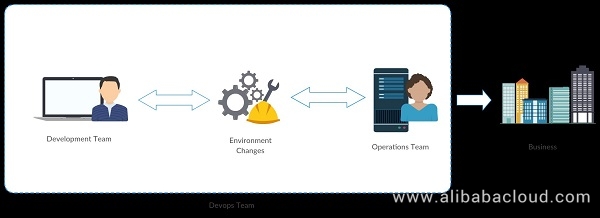
Integration with CI/CD
This approach has significant advantages:
GitLab Community Edition (CE) is an open source end-to-end software development platform with built-in version control, issue tracking, code review, CI/CD, and more.
Since we are working with Gitlab continuous integration, we need a Gitlab instance installed on an Ubuntu 16.04 server on Alibaba Cloud Elastic Compute Service (ECS) instance. GitLab recommends a server with at least 2 CPU cores and 4GB of RAM.
Follow this tutorial if you want to know how to setup Gitlab CE on Alibaba Cloud ECS instance: https://www.alibabacloud.com/blog/version-control-with-gitlab-on-alibaba-cloud_593276
Now let's see what is GitLab CI is all about,
GitLab CI/CD is a part of GitLab, a web application with an API that stores its state in a database. It manages projects/builds and provides a friendly user interface, besides all the features of GitLab.
Integrated: GitLab CI/CD is part of GitLab.
User Friendly: GitLab CI/CD offers the same great experience as GitLab. Familiar, easy to use, and beautiful.
Scalable: Tests run distributed on separate machines of which you can add as many as you want
Faster results: Each build can be split into multiple jobs that run in parallel on multiple machines
Continuous Delivery (CD): multiple stages, manual deploys, environments, and variables
Open source: CI/CD is included with both the open source GitLab Community Edition and the proprietary GitLab Enterprise Edition
As part of Gitlab CI/CD, we also install GitLab Runner,
GitLab Runner is an application which processes build. It can be deployed separately and works with GitLab CI/CD through an API.
Using Gitlab CI Runner, we automatically check out the code and execute the test to validate the new changes. To make the testing environment independent of the development environment. We run all our tests within Docker Containers. To do this, we set up the docker environment on where the Gitlab CI runner gets installed.
If you need help in setting up the docker environment in Ubuntu on Alibaba Cloud ECS instances, follow the article below: https://www.alibabacloud.com/blog/how-to-install-and-use-docker-on-ubuntu-16-04_470612
To confirm whether docker is installed or not, login into your Alibaba Cloud ECS instances
Saraths-MacBook-Pro:~ sarathchandrap$ ssh root@149.129.130.217
root@149.129.130.217's password:
Welcome to Ubuntu 16.04.4 LTS (GNU/Linux 4.4.0-117-generic x86_64)

 * Documentation:  https://help.ubuntu.com
 * Management:     https://landscape.canonical.com
 * Support:        https://ubuntu.com/advantage

Welcome to Alibaba Cloud Elastic Compute Service !

Last login: Sun Jul 15 04:06:56 2018 from 1.23.17.158
root@GITLABCICD:~#
Run the sudo systemctl status docker command to see the current status of the docker, you should see the status similar to the below
root@GITLABCICD:~# sudo systemctl status docker
● docker.service - Docker Application Container Engine
   Loaded: loaded (/lib/systemd/system/docker.service; enabled; vendor preset: enabled)
   Active: active (running) since Thu 2018-07-05 16:59:57 CST; 1 weeks 2 days ago
     Docs: https://docs.docker.com
 Main PID: 6102 (dockerd)
    Tasks: 26
   Memory: 826.4M
      CPU: 35min 35.798s
   CGroup: /system.slice/docker.service
           ├─6102 /usr/bin/dockerd -H fd://
           └─6126 docker-containerd --config /var/run/docker/containerd/containerd.toml
Run docker command to see all the available switches
root@GITLABCICD:~# docker

Usage:    docker COMMAND

A self-sufficient runtime for containers

Options:
      --config string      Location of client config files (default "/root/.docker")
  -D, --debug              Enable debug mode
  -H, --host list          Daemon socket(s) to connect to
  -l, --log-level string   Set the logging level ("debug"|"info"|"warn"|"error"|"fatal") (default "info")
      --tls                Use TLS; implied by --tlsverify
      --tlscacert string   Trust certs signed only by this CA (default "/root/.docker/ca.pem")
      --tlscert string     Path to TLS certificate file (default "/root/.docker/cert.pem")
      --tlskey string      Path to TLS key file (default "/root/.docker/key.pem")
      --tlsverify          Use TLS and verify the remote
  -v, --version            Print version information and quit

Management Commands:
  config      Manage Docker configs
  container   Manage containers
  image       Manage images
  network     Manage networks
  node        Manage Swarm nodes
  plugin      Manage plugins
  secret      Manage Docker secrets
  service     Manage services
  swarm       Manage Swarm
  system      Manage Docker
  trust       Manage trust on Docker images
  volume      Manage volumes

Commands:
  attach      Attach local standard input, output, and error streams to a running container
  build       Build an image from a Dockerfile
  commit      Create a new image from a container's changes
  cp          Copy files/folders between a container and the local filesystem
  create      Create a new container
  diff        Inspect changes to files or directories on a container's filesystem
  events      Get real time events from the server
  exec        Run a command in a running container
  export      Export a container's filesystem as a tar archive
  history     Show the history of an image
  images      List images
  import      Import the contents from a tarball to create a filesystem image
  info        Display system-wide information
  inspect     Return low-level information on Docker objects
  kill        Kill one or more running containers
  load        Load an image from a tar archive or STDIN
  login       Log in to a Docker registry
  logout      Log out from a Docker registry
  logs        Fetch the logs of a container
  pause       Pause all processes within one or more containers
  port        List port mappings or a specific mapping for the container
  ps          List containers
  pull        Pull an image or a repository from a registry
  push        Push an image or a repository to a registry
  rename      Rename a container
  restart     Restart one or more containers
  rm          Remove one or more containers
  rmi         Remove one or more images
  run         Run a command in a new container
  save        Save one or more images to a tar archive (streamed to STDOUT by default)
  search      Search the Docker Hub for images
  start       Start one or more stopped containers
  stats       Display a live stream of container(s) resource usage statistics
  stop        Stop one or more running containers
  tag         Create a tag TARGET_IMAGE that refers to SOURCE_IMAGE
  top         Display the running processes of a container
  unpause     Unpause all processes within one or more containers
  update      Update configuration of one or more containers
  version     Show the Docker version information
  wait        Block until one or more containers stop, then print their exit codes
Run 'docker COMMAND --help' for more information on a command.
Invoking "docker info" should produce the output similar to this
root@GITLABCICD:~# docker info
Containers: 3
 Running: 0
 Paused: 0
 Stopped: 3
Images: 3
Server Version: 18.03.1-ce
Storage Driver: overlay2
 Backing Filesystem: extfs
 Supports d_type: true
 Native Overlay Diff: true
Logging Driver: json-file
Cgroup Driver: cgroupfs
Plugins:
 Volume: local
 Network: bridge host macvlan null overlay
 Log: awslogs fluentd gcplogs gelf journald json-file logentries splunk syslog
Swarm: inactive
Runtimes: runc
Default Runtime: runc
Init Binary: docker-init
containerd version: 773c489c9c1b21a6d78b5c538cd395416ec50f88
runc version: 4fc53a81fb7c994640722ac585fa9ca548971871
init version: 949e6fa
Security Options:
 apparmor
 seccomp
  Profile: default
Kernel Version: 4.4.0-117-generic
Operating System: Ubuntu 16.04.4 LTS
This confirms that you have properly setup Docker on your instance. Now to start the GitLab CI setup, we need to have a repository. Let's start by cloning one from GitHub to GitLab.
I will be using the following repository for demonstrating the Gitlab CI. The below is a NodeJS application.
https://github.com/do-community/hello_hapi.git
You need to create one project before importing, create a project as shown in the below

Click on "New Project" and select "Import Project > Repo by URL" option in the below screen.
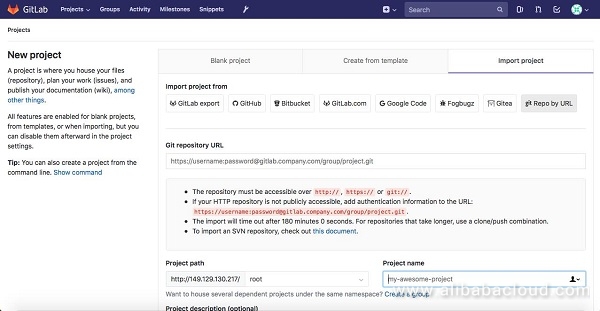
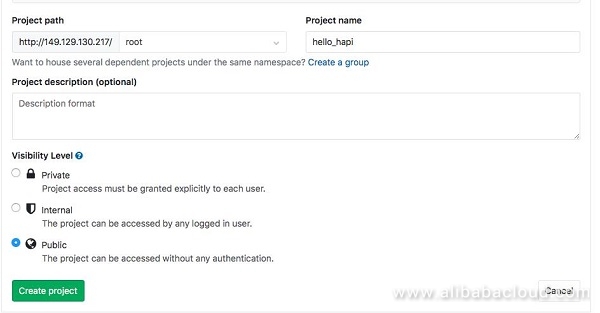
Paste the Git Repository by URL provided at the start of the section and update the "Project name," "Project description" & "Visibility Level" as required and choose Create Project.
Once the project is imported, you will see the screen similar to this
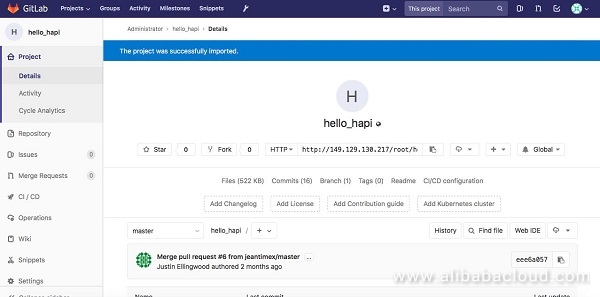
Now we will have to understand Gitlab-CI build descriptor works (.gitlab-ci.yml). The file is YAML format if you open the file in repository you will see similar to below
image: node:carbon

stages:
  - build
  - test

cache:
  paths:
    - node_modules/

install_dependencies:
  stage: build
  script:
    - npm install
  artifacts:
    paths:
      - node_modules/

test_with_lab:
  stage: test
  script: npm test


image: node:carbon
The above uses the latest nodeJS image while creating the docker container
stages:
  - build
  - test
These are the stages we will define while testing the code, the above definition reads to "Perform the build and once it is successful, then the test will be performed". Jobs with in the same stage are performed in parallel. These are just the tags we will create but the actual definition will follow next. There are 3 stages that Gitlab provides "build", "test" & "deploy"
cache:
  paths:
    - node_modules/
Then we will create a cache to store the node_modules (dependencies in a node project). So that we can use these files across the stages.
install_dependencies:
  stage: build
  script:
    - npm install
  artifacts:
    paths:
      - node_modules/
This is the first job (install_dependencies) will detail the steps for installing the node dependencies. The 'script' tag is used to specify the actual script in the job. The "paths" specify where the output of the job will be saved.
test_with_lab:
  stage: test
  script: npm test
The "test_with_lab" job will perform the test once the "install_dependencies" job is successful.
We will trigger a job in Gitlab by committing a new file to the repository.
Click on '+' icon > New File
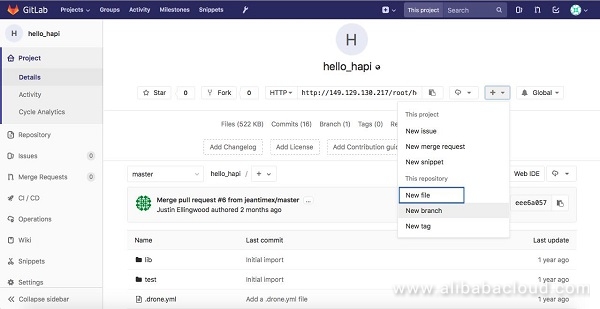
We will create a .txt file with some text and "Commit Changes."

Once the commit is done you will see that small pause icon showing in the pending state.

Once you click on the icon, you will see the detail status of the commit
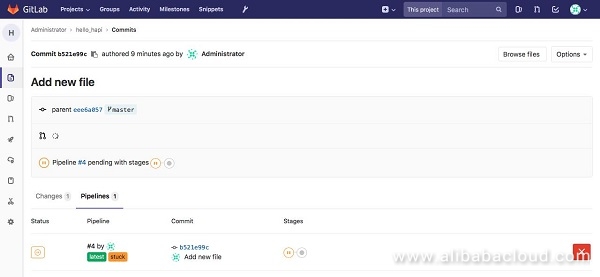
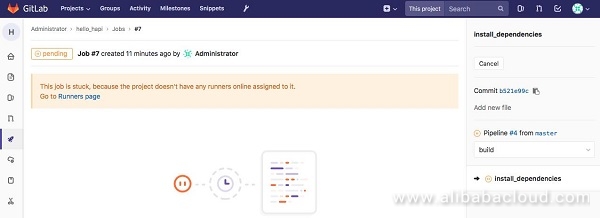
If you see the detail information of the job, "The job is stuck, because the project doesn't have any runners online assigned to it". Since we don't have any runners configured for the job we see the job in paused state.
Download the latest version of Gitlab CI Runner from the repository to the /tmp directory of the server by executing the follow command
curl -L https://packages.gitlab.com/install/repositories/runner/gitlab-runner/script.deb.sh -o /tmp/gl-runner.deb.shRun the installer from the downloaded script
sudo bash /tmp/gl-runner.deb.shThe above script will help manage the Gitlab Runner packages from the same repository. We can install the Gitlab runner once the script is successfully executed.
sudo apt-get install gitlab-runnerThis will install and start the Gitlab runner service.
There are two ways we can setup the Gitlab runner
We will see how we can setup the project specific service, before we do that we need to collect some information for the runner service, to do that we need to navigate to
Project -> Settings -> CI/CD -> Runners Settings -> Expand
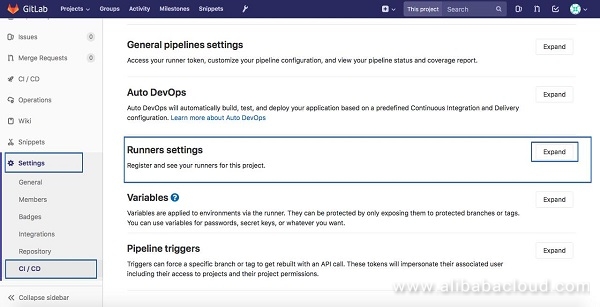
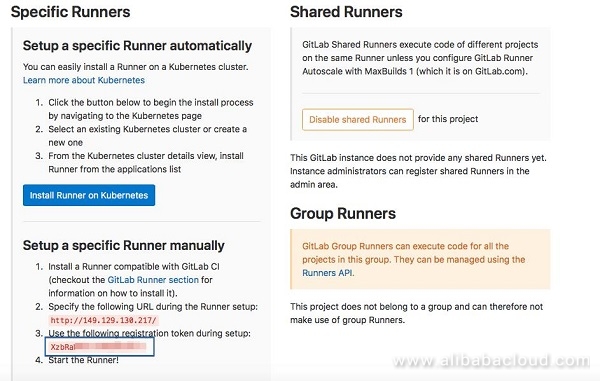
Save the URL and the token highlighted in the above picture as we need it while setting up the Runner.
Login to the server and run the following command
sudo gitlab-runner registerInput the variables similar to below
root@GITLABCICD:~# sudo gitlab-runner register
Running in system-mode.

Please enter the gitlab-ci coordinator URL (e.g. https://gitlab.com/):
http://149.129.130.217/
Please enter the gitlab-ci token for this runner:

Please enter the gitlab-ci token for this runner:
XzbRaWXE-ckWEwBJf4-b
Please enter the gitlab-ci description for this runner:
[GITLABCICD]: This to demonstrate the dedicated Gitlab CI Runner
Please enter the gitlab-ci tags for this runner (comma separated):

Registering runner... succeeded                     runner=XzbRaWPE
Please enter the executor: shell, ssh, virtualbox, docker+machine, docker-ssh+machine, kubernetes, docker, parallels, docker-ssh:
docker
Please enter the default Docker image (e.g. ruby:2.1):
alpine:latest
Runner registered successfully. Feel free to start it, but if it's running already the config should be automatically reloaded!
Now if you go back to the portal and see the commit status that should be in running state, similar to this:
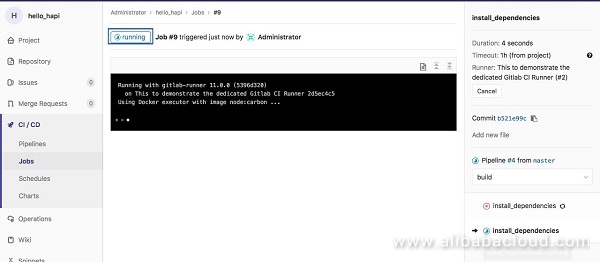
After some time you can see the job is succeeded with the following output:
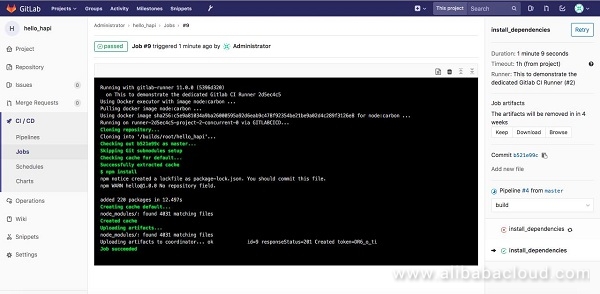
Congratulations! You have configured GitLab CI on an Alibaba Cloud Elastic Compute Service (ECS) instance along with your GitLab CE. This helps developers to run and test the features easily within the version control.
Deploying WSFC and the SQL Server Failover Cluster on Alibaba Cloud ECS

2,593 posts | 791 followers
FollowAlibaba Cloud Indonesia - August 22, 2022
Alibaba Cloud Community - July 18, 2022
Alibaba Cloud Community - August 3, 2022
Alibaba Cloud Indonesia - August 22, 2022
Haemi Kim - October 20, 2021
JDP - July 31, 2020

2,593 posts | 791 followers
Follow ECS(Elastic Compute Service)
Elastic and secure virtual cloud servers to cater all your cloud hosting needs.
Learn MoreLearn More
 Container Service for Kubernetes
Alibaba Cloud Container Service for Kubernetes is a fully managed cloud container management service that supports native Kubernetes and integrates with other Alibaba Cloud products.
Learn MoreMore Posts by Alibaba Clouder
5987796631122428 August 19, 2020 at 11:52 am
iam not able to run docker build . in the gitlab.yml file any reason?