By Alex, Alibaba Cloud Community Blog author.
In the current landscape, Drone is one of the most popular continuous integration and delivery platforms. Written in Go and based on Docker, Drone is intimately compatible with various version control services. It supports building, testing, and delivery of software automatically along with updates to codebase.
There are two options for running Drone, a hosted version of the folks or to run it on one's own servers, as shown in this tutorial later. This article illustrates how to use Drone for building and testing a sample project hosted in a Git repository on an Alibaba Cloud ECS instance running Ubuntu 16.04.
Drone optimizes the comprehensive environment for building, testing, and deploying applications. It functions as a bridge between Jenkins and TravisCI. The following elaborates Drone functionality in detail.
drone.yml file available in the app.In the next step, let's explore the requirements for this tutorial.
The first step is to install Drone and link it to a Git repository. As a prerequisite, ensure your Alibaba Cloud ECS instance that is running Ubuntu 16.04 is up and running. Next, install and configure Docker and Docker Compose on the ECS instance. Also, install Docker and Docker Compose, Nginx, and if necessary, use an SSL certificate for more security.
To begin with, install Docker on the server by running the command below.
sudo apt-get install docker.io
sudo service docker restart
Secondly, install Docker Compose as it supports multi-container applications and helps to build Docker images from Dockerfiles.
sudo apt-get install -y docker-compose Drone uses SQLite database to store data regarding configurations. Run the command below to setup SQLite drivers.
sudo apt-get install libsqlite3-devNow, install Drone by running the following commands.
wget downloads.drone.io/master/drone.deb
dpkg -i drone.deb
Next, install the Drone CLI as shown below.
curl -L https://github.com/drone/drone-cli/releases/download/v1.0.7/drone_linux_amd64.tar.gz | tar zx
sudo install -t /usr/local/bin drone
Note: The drone CLI enables you to interact with Drone via the command line. However, it's not necessary if you do not intend to use the command line for that purpose.
Now, visit Github to register an app for the Drone service. Fill out all the information in the form below, including a callback URL.
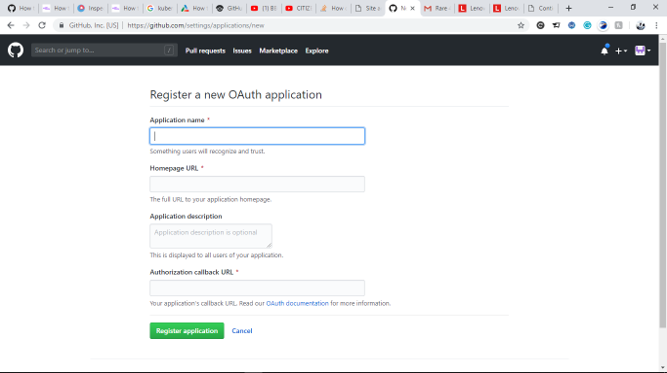
A callback URL is under the Drone configuration and receives the repository's secret key to pull updates. The URL would look like - http://IP_ADDRESS/api/auth/github.com.
Post app registration, two important fields that become accessible are Client ID and Client Secret.
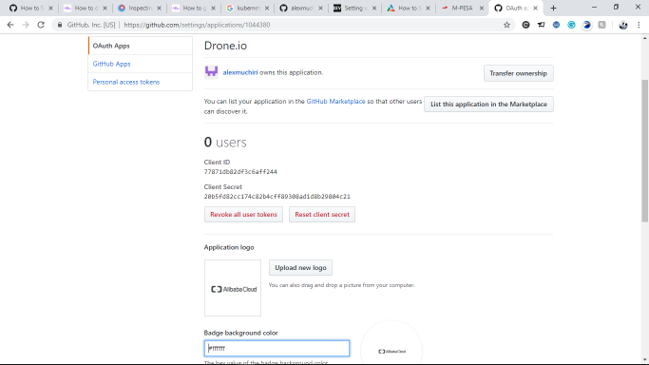
With both these fields, access the Drone configuration as shown below.
sudo nano /etc/drone/drone.toml Navigate to the specific section of the file with the following fields.
# [github]
# client="77871db82df3c6aff244"
# secret="8781fd562513b69932ff1b429fd4faf8c87637f5"
# orgs=[]
# open=false
Copy the Client ID and Client Secret from GitHub and paste them in the respective fields listed above. Save the changes and exit the editor.
To make Drone operational, you need several configurations on the server as well as Drone. Start with accessing the /etc/drone/drone.toml file as shown below.
sudo nano /etc/drone/drone.toml The drone web interface uses port 80 as the default port. Change it to a different value if required.
Next, configure an email or SMTP server to receive notifications via email. Also, install Postfix as the mail server.
apt-get install postfixIn the /etc/drone/drone.toml file, access the section with the following fields and insert respective values.
# [smtp]
# host=""
# port=""
# from=""
# user=""
# pass=""
Now, let's implement some configurations on the firewall. The objective is to make the port 80 accessible to other computers on the network via the HTTP protocol.
sudo ufw allow httpDrone uses Docker to build images thus, there is a need to configure a Docker worker for Drone. Again, access the Drone configuration by executing the following command.
sudo nano /etc/drone/drone.toml Navigate to the section shown below.
# [worker]
# nodes=[
#   "unix:///var/run/docker.sock",
#   "unix:///var/run/docker.sock"
# ]
Drone configuration is very easy as it requires pasting simple items in the file or commenting in some parts. In case of more than one build running concurrently, increase the comments in the section as shown below:
[worker]
nodes=[
  "unix:///var/run/docker.sock",
  "unix:///var/run/docker.sock",
  "unix:///var/run/docker.sock",
  "unix:///var/run/docker.sock",
  "unix:///var/run/docker.sock"
]
Note: There is no limit on the number of builds running concurrently.
After implementing all the necessary installations and configurations, restart Drone so that the changes are in effect.
service drone restartFinally, execute the following command to set Drone to run automatically at system boot.
update-rc.d drone defaultsFor this step, log in to the Drone account and click on the option to activate repositories. With this, all repositories saved in the respective Git account become accessible.
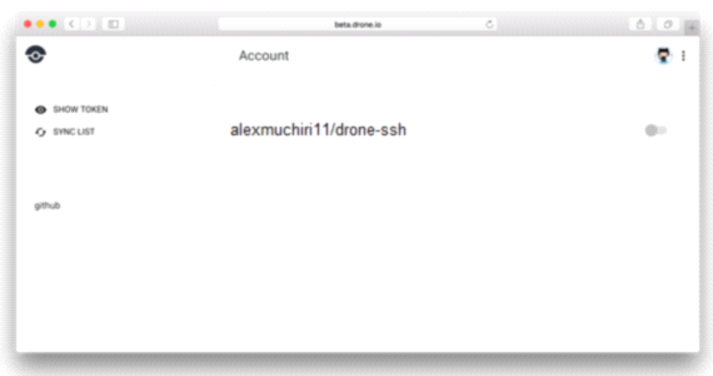
The above snapshot shows only one repository (created earlier in the tutorial) in the GitHub account. Activate it using the toggle on the right hand (it flips between grey and green). On opting to activate a repository, Drone checks for updates to the project base using the GitHub API.
After activating the repository above, go to the Dashboard for the next part of the tutorial. The newly activated repository reflects on the left-hand as below.

Next, for any status information to be available on the Drone Dashboard, you must run the build. Access the drone-ssh repo as shown in the screenshot below. This page provides access to numerous features and settings applicable to the Git repository.
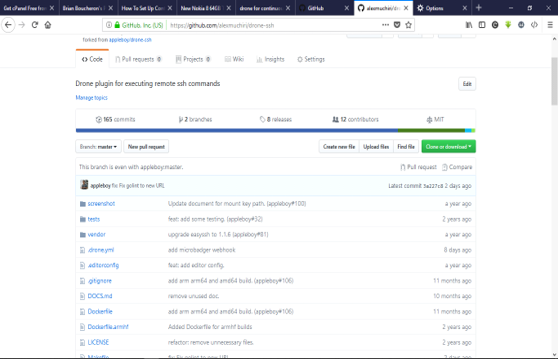
Trigger a new build by adding a project file using the Create new file button. Click on updates to assign the file name and write anything to it.

Now, commit the new file using the given button.
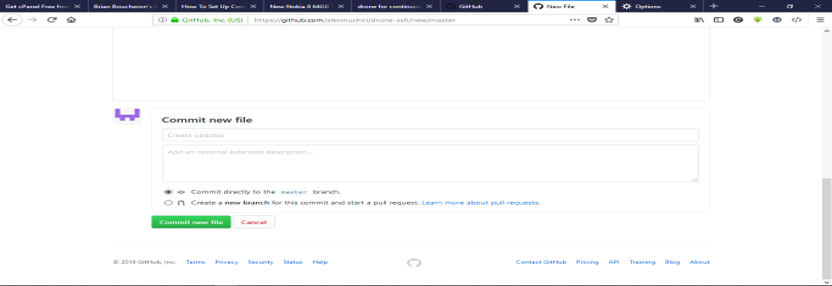
As you commit the new file, GitHub notifies Drone via the Git API, and initiate a new build process. The Drone Dashboard reflects the ongoing build process. The following screenshot shows the executed process.

With this, the build process for the drone-ssh project finishes successfully. The downward arrows have information regarding the particular step, if required. Also, refer to the Clone section to access information on how Drone fetches the build source code.
This successfully completes the continuous integration process with Drone.
Drone relies on the .drone.yml file in the repository root. Below is a sample file that shows a typical configuration.
pipeline:
  build:
    image: golang
    commands:
      - go build
      - go test
mem_limit: 1000000000Some positive aspects of using Drone for continuous integration include:
.drone.yml configuration file.The drone has the following two key negative aspects:
The tutorial covers some of the basic Drone methods ranging from configurations using (.drone.yml) file to building and testing GitHub repositories. It highlights the Drone's ease of use as compared to the other CI platforms. Unlike tedious and error-prone configurations of competing systems, Drone is clean and quite fluid. One of the other key elements is the ease of testing code owing to Docker integration, which makes it very important for continuous integration requirements. For more details, refer to the Drone documentation.
Don't have an Alibaba Cloud account? Sign up for an account and try over 40 products for free worth up to $1300. Get Started with Alibaba Cloud to learn more.
Using PyFilter on Alibaba Cloud to Filter SSH Login Attempts
JeffLv - December 2, 2019
digoal - January 22, 2021
Alibaba Cloud Project Hub - November 18, 2021
Alibaba Container Service - July 16, 2019
AsiaStar Focus - July 29, 2022
Alibaba Clouder - November 14, 2018
 Robotic Process Automation (RPA)
Robotic Process Automation (RPA) allows you to automate repetitive tasks and integrate business rules and decisions into processes.
Learn More MaxCompute
Conduct large-scale data warehousing with MaxCompute
Learn More Alibaba Cloud Flow
An enterprise-level continuous delivery tool.
Learn More RAM(Resource Access Management)
Secure your cloud resources with Resource Access Management to define fine-grained access permissions for users and groups
Learn MoreMore Posts by Alex