This tutorial shows you how to automatically deploy MongoDB on Alibaba Cloud in multiple regions using Terraform.
You can access all the tutorial resources, including deployment script (Terraform), related source code, sample data, and instruction guidance, from the GitHub project: https://github.com/alibabacloud-howto/opensource_with_apsaradb/tree/main/apache-superset
For more tutorials around Alibaba Cloud Database, please refer to: https://github.com/alibabacloud-howto/database
https://github.com/alibabacloud-howto/solution-mongodb-multiregion-sync
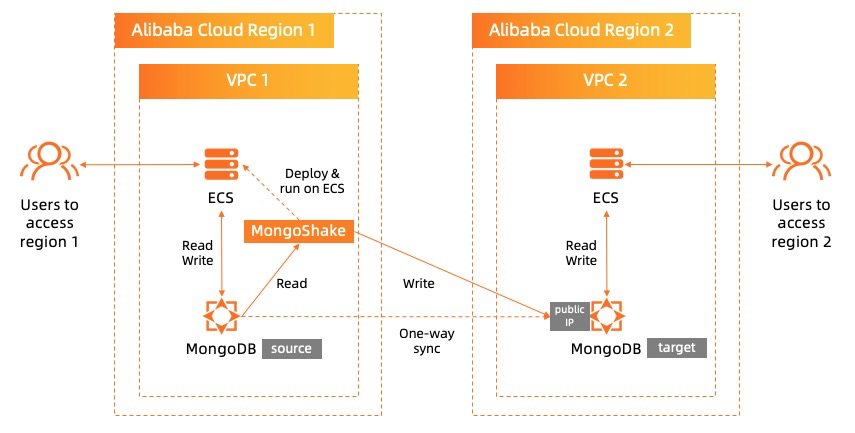
Use this Terraform script to provision the resource including VPC, ECS, MongoDB on 2 regions. Later public IP endpoint will be used for MongoShake on ECS to connect the MongoDB on another region.
If you do not specify the provider parameters in the environment, please set your Alibaba Cloud access key, secret key here.
provider "alicloud" {
  #   access_key = "${var.access_key}"
  #   secret_key = "${var.secret_key}"
  alias  = "region1"
  region = var.region1
}

provider "alicloud" {
  #   access_key = "${var.access_key}"
  #   secret_key = "${var.secret_key}"
  alias  = "region2"
  region = var.region2
}Set the MongoDB in the same security group with the ECS in the same region, which allows ECS accessing the MongoDB for read and write.
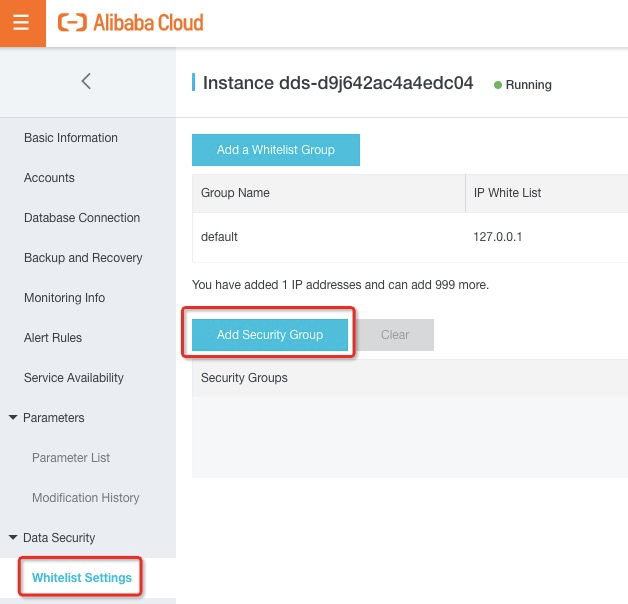
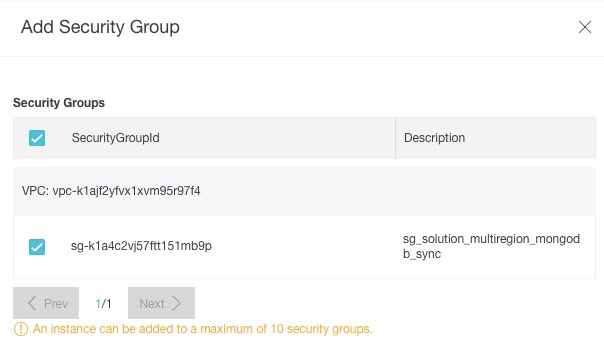
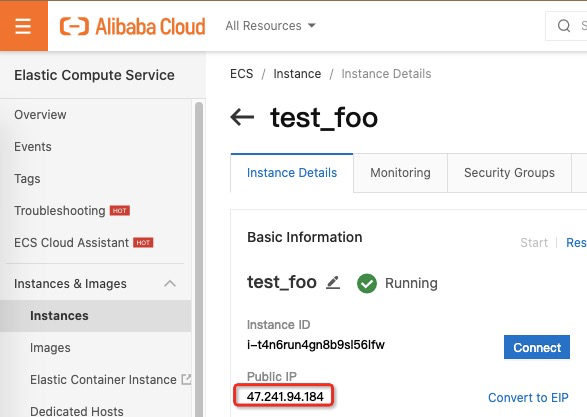
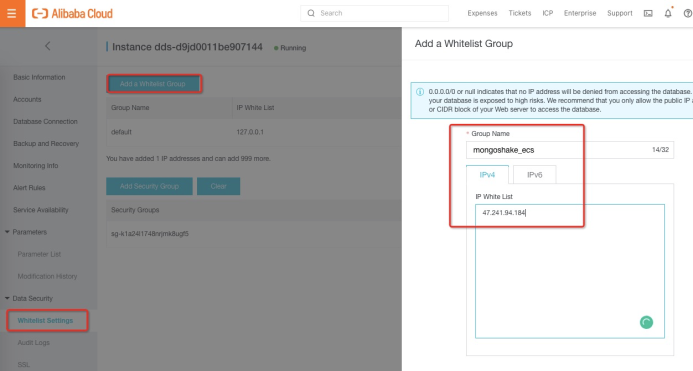
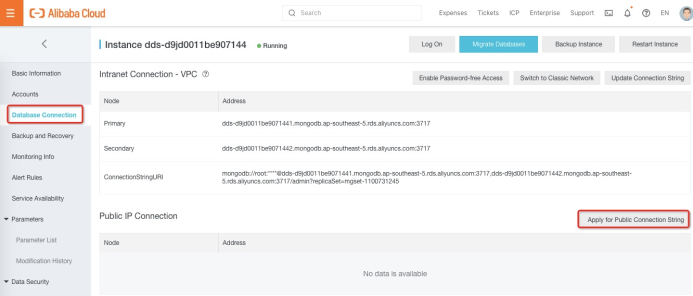
Copy the connection URL for later MongoShake setting, such as (Please replace the "**" with the provisioned password, here in this tutorial, it is "N1cetest")
mongodb://root:****@dds-d9jd0011be9071441896-pub.mongodb.ap-southeast-5.rds.aliyuncs.com:3717,dds-d9jd0011be9071442287-pub.mongodb.ap-southeast-5.rds.aliyuncs.com:3717/admin?replicaSet=mgset-1100731245ssh root@<EIP_ECS>wget https://github.com/alibaba/MongoShake/releases/download/release-v2.4.19-20210115/mongo-shake-v2.4.19.tar.gz
tar zxvf mongo-shake-v2.4.19.tar.gz && mv mongo-shake-v2.4.19 /root/mongoshake && cd /root/mongoshake Run the vim collector.conf command to modify the collector.conf configuration file of MongoShake. The following parameters describe the parameters that you must configure to synchronize data between ApsaraDB for MongoDB instances.
vim collector.confNote For more information about all parameters in the collector.conf file, see the https://www.alibabacloud.com/help/doc-detail/122621.htm?spm=a2c63.p38356.b99.149.83c95d51SHnDEP#section-zkn-lqg-z79 of this topic.
Then run the following command at MongoShake ECS to start MongoShake service.
sh start.sh collector.confWhen the incremental data synchronization starts, you can open a command line window to monitor MongoShake.
cd /root/mongoshake && ./mongoshake-stat --port=9100Now you can run the sample python program to check with the MongoDB one-way synchronization behavior.
| Source code | Description | Source code file URL |
|---|---|---|
| mongodb_insert_source.py | MongoDB writer run on ECS in region 1. It will continuously insert document data into source MongoDB. | https://github.com/alibabacloud-howto/solution-mongodb-multiregion-sync/raw/main/source/mongodb_insert_source.py |
| mongodb_read_source.py | MongoDB reader run on ECS in region 1. It will continuously read document data from source MongoDB. | https://github.com/alibabacloud-howto/solution-mongodb-multiregion-sync/raw/main/source/mongodb_read_source.py |
| mongodb_read_target.py | MongoDB reader run on ECS in region 2. It will continuously read document data from target MongoDB. | https://github.com/alibabacloud-howto/solution-mongodb-multiregion-sync/raw/main/source/mongodb_read_target.py |
First, log on both ECS in region 1 and region 2, run the following command to install pymongo python module.
pip install pymongoOn the ECS in region 2, log on via SSH, download the target mongodb reader script.
wget https://github.com/alibabacloud-howto/solution-mongodb-multiregion-sync/raw/main/source/mongodb_read_target.pyWithin the source code, modify the MongoDB URL to replace with the target MongoDB VPC URL accordingly:
vim mongodb_read_target.pycl = pymongo.MongoClient(
'mongodb://root:xxxx@<replace with the target MongoDB VPC URL>')Then run the script:
python mongodb_read_target.pyOn the ECS in region 1, log on via SSH, download the source mongodb writer script.
wget https://github.com/alibabacloud-howto/solution-mongodb-multiregion-sync/raw/main/source/mongodb_insert_source.pyWithin the source code, modify the MongoDB URL accordingly:
vim mongodb_insert_source.pycl = pymongo.MongoClient(
'mongodb://root:xxxx@<replace with the source MongoDB VPC URL>')Then run the script:
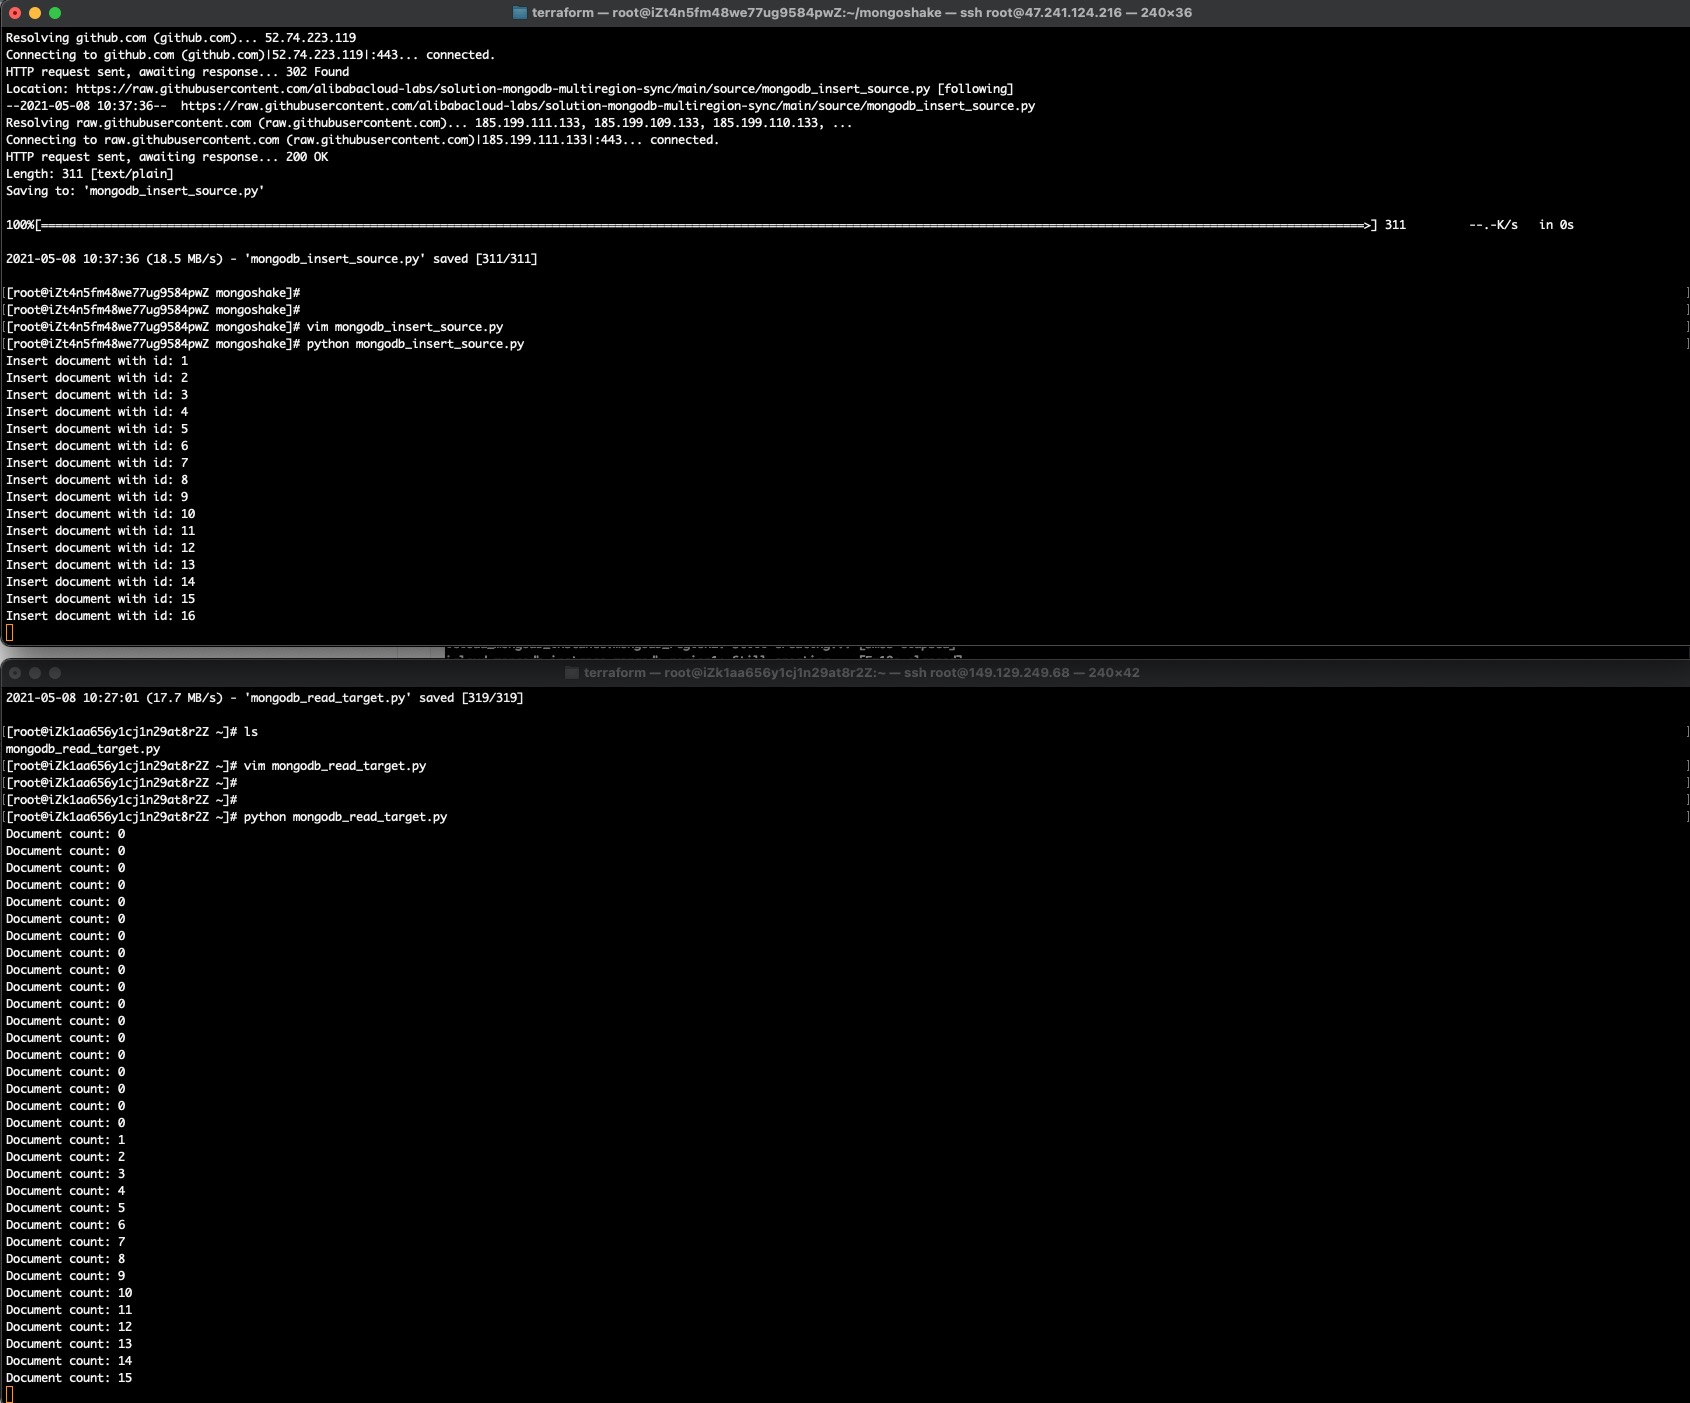
python mongodb_insert_source.pyThen on ECS in region 1, you will see the MongoDB writer writes the document data into the source MongoDB. While on ECS in region 2, you will see the MongoDB reader reads the newly synchronized data on the target MongoDB.
Deploy and Run Superset on Alibaba Cloud with ApsaraDB RDS for PostgreSQL
Redis Data Synchronization with RDS MySQL Using Canal & Kafka
ApsaraDB - November 1, 2021
ApsaraDB - December 15, 2021
ApsaraDB - September 7, 2021
ApsaraDB - October 14, 2021
ApsaraDB - October 28, 2021
Alibaba Clouder - August 12, 2021
 ApsaraDB for MongoDB
A secure, reliable, and elastically scalable cloud database service for automatic monitoring, backup, and recovery by time point
Learn More DevOps Solution
Accelerate software development and delivery by integrating DevOps with the cloud
Learn More Cloud Governance Center
Set up and manage an Alibaba Cloud multi-account environment in one-stop mode
Learn More Database for FinTech Solution
Leverage cloud-native database solutions dedicated for FinTech.
Learn MoreMore Posts by ApsaraDB