By Bo Yang, Alibaba Cloud Community Blog author.
In this tutorial, you will learn how to migrate a Cassandra cluster installation to Alibaba Cloud. During the process of migration to Alibaba Cloud, you will take advantage of Cassandra multi-data center support to avoid any service downtime. This tutorial covers all of the steps required to perform the migration and also provides information on how to monitor the infrastructure using JConsole.
Before you begin migration, you will configure the Cassandra cluster in such a way that it will be enlarged, and you will also install new nodes on the Alibaba Cloud. After that, the nodes in your on-premises data center will be decommissioned and uninstalled, leaving the new ones up and running in the cloud. This will help to avoid any downtime for the users of your services, and at the same time the data structures used in the backend will connect in the same way to the Cassandra cluster did originally.
Before you begin with the migration and monitoring processes outlined in this tutorial, first make sure that you address the following prerequisites.
The Cassandra clusters to be migrated are installed with the following operating system and specifications:
To ensure a smooth migration process, it is necessary to create the nodes in the Alibaba Cloud before you begin migration. These nodes will belong to the original cluster, and will be the final nodes, after the ones in the local data center have been decommissioned. To do this, follow these steps.
To install the necessary software for the Java JDK, run the following command in a newly created instance:
$ sudo apt-get update && sudo apt-get -u dist-upgrade --yes && sudo apt-get install openjdk-8-jre --yesThen install the Apache Cassandra. In this example, the package has been previously uploaded to a bucket:
$ sudo cd /opt
$ sudo su -
$ ossutil cp oss://bucket/apache-cassandra-3.9-bin.tar.gz . && tar xvfz apache-cassandra-3.9-bin.tar.gz && chown -R user:user apache-cassandra-3.9
Set the environment variables to configure the root profile:
$ sudo echo '# Expand the $PATH to include /opt/apache-cassandra-3.9/bin
PATH=$PATH:/opt/apache-cassandra-3.9/bin' > /etc/profile.d/cassandra-bin-path.sh
After installing the Cassandra nodes, you will modify the cassandra.yaml file in each one in order to set the parameters for the cluster.
Edit your configuration file for each node. To do so, open the nano text editor by running:
$ sudo nano /opt/apache-cassandra-3.9/conf/cassandra.yamlThe information you'll need to edit can be the same for all nodes (cluster_name, seed_provider, rpc_address and endpoint_snitch) or different for each one (listen_address). Choose a node to be your seed node. Then look in the configuration file for the lines that refer to each of these attributes, and modify them as needed:
cluster_name: 'Cluster Name'
seed_provider:
    - seeds:  "Seed IP"
listen_address: <Droplet's IP>
rpc_address: <machine´s IP>
endpoint_snitch: SimpleSnitch
To check the nodes in the cluster, run the command 'nodetool':
$ nodetool status

Datacenter: {your-existing-datacenter}
=======================
Status=Up/Down
|/ State=Normal/Leaving/Joining/Moving
--  Address     Load       Tokens       Owns (effective)  Host ID                               Rack
UN  10.132.0.6  140.01 KB  256          100.0%            cf83fd8a-efa0-4798-a6f7-599d5eb7a6cb  rack1
U
{List of nodes}
You need to create your keyspace and also set the network topology strategy:
$ sudo cqlsh {listener-address}
Connected to Test Cluster at 10.132.0.6:9042.
[cqlsh 5.0.1 | Cassandra 3.0.9 | CQL spec 3.4.0 | Native protocol v4]
Use HELP for help.
cqlsh> CREATE KEYSPACE {your-keyspace} WITH REPLICATION = {'class' : 'SimpleStrategy', 'replication_factor' : 2};
cqlsh> ALTER KEYSPACE "{your-keyspace}" WITH REPLICATION = {'class' : 'NetworkTopologyStrategy', 'datacenter1' : 2};
At this point, you will add endpoint_snitch just as SimpleSnitch, for one local data center ('datacenter1').
In most scenarios, Cassandra is preconfigured with data center awareness turned off. Cassandra multi–data center deployments require an appropriate configuration of the data replication strategy (per keyspace) and also the configuration of the snitch. By default, Cassandra uses SimpleSnitch and the SimpleStrategy replication strategy. The following sections explain what these terms actually mean.
Snitches are used by Cassandra to determine the topology of the network. The snitch also makes Cassandra aware of the data center and the rack it's in. The default snitch (SimpleSnitch) gives no information about the data center and the rack where Cassandra resides. This snitch only works for single data center deployments. SimpleSnitch reads the cassandra-topology.properties file to know the topology of your data center.
The CloudstackSnitch is required for deployments on Alibaba Cloud that spans across more than one region. The region is treated as a data center and the availability zones are treated as racks within the data center. All communication occurs over private IP addresses within the same logical network. The region name is treated as the data center name, and zones are treated as racks within a data center. For example, if a node is in the US-west-1 region, US-west is the data center name and 1 is the rack location. Racks are important for distributing replicas, but not for data center naming. This snitch can work across multiple regions without additional configuration.
Replication strategies determine how data is replicated across the nodes. The default replication strategy is SimpleStrategy. By using SimpleStrategy, data can be replicated across all nodes in the cluster. This doesn't work for multi–data center deployments given latency constraints. For multi–data center deployments, the right strategy to use is NetworkTopologyStrategy. This strategy allows you to specify how many replicas you want in each data center and rack.
For example:
cqlsh> ALTER KEYSPACE "{your-keyspace}" WITH REPLICATION ={ 'class' : 'NetworkTopologyStrategy'['{your-existing-datacenter}' : 3, '{your-AlibabaCloud-Zone}' : 2]};Defines a replication policy where the data is replicated on 3 nodes for the data center '{your-existing-datacenter}' and on 2 nodes for the data center '{your-AlibabaCloud-Zone}'.
As you can see, the snitch and replication strategy work closely together. The snitch is used to group nodes per data center and rack. The replication strategy defines how data should be replicated amongst these groups. If you run with the default snitch and strategy, you will need to change these two settings in order to get to a functional multi–data center deployment.
Changing the snitch alters the topology of your Cassandra network. After making this change, you need to run a full repair. Making the wrong changes can lead to serious issues. In our case, we started a clone of our production Cassandra cluster from snapshots and tested every single step to make sure we got the entire procedure right.
1. Configure PropertyFileSnitch
The first step is to change from SimpleSnitch (the default setting) to PropertyFileSnitch. The property file snitch reads a property file to determine which data center and rack it's in. This configuration is in the following file:
$ sudo nano /opt/apache-cassandra-3.9/conf/cassandra-topology.propertiesAfter changing this setting, you should run a Cassandra rolling restart. Make sure that you have the same property file on every node of the cluster. Here is an example of what a property file for two data centers looks like:
# {your-existing-datacenter}
175.56.12.105 =DC1:RAC1
175.50.13.200 =DC1:RAC1
175.54.35.197 =DC1:RAC1
# {your-AlibabaCloud-Zone}
45.56.12.105 =DC2:RAC1
45.50.13.200 =DC2:RAC1
45.54.35.197 =DC2:RAC1
In the new one, configure the same cluster name, and use 'CloudstackSnitch' for auto discovery of data center and rack.
Then configure the cassandra.yaml file:
"auto_bootstrap: false" And in the console:
cqlsh> ALTER KEYSPACE "{your-keyspace}" WITH REPLICATION =
   { 'class' : 'NetworkTopologyStrategy', '{your-existing-datacenter}' : 2, 'us-east-1' : 2 };
Where 'us-east-1' is your ECS data center.
2. Update Your keyspaces to Use a NetworkTopologyStrategy
Once the new data center is up and running, alter the keyspaces ('{your-keyspace}' in all your keyspaces):
cqlsh> ALTER KEYSPACE "{your-keyspace}" WITH REPLICATION =
   { 'class' : 'NetworkTopologyStrategy', '{your-existing-datacenter}' : 2, 'us-east-1' : 2 };
And the system ones:
cqlsh> ALTER KEYSPACE "system_distributed" WITH REPLICATION =
   { 'class' : 'NetworkTopologyStrategy', '{your-existing-datacenter}' : 2, 'us-east-1' : 2 };

cqlsh> ALTER KEYSPACE "system_auth" WITH REPLICATION =
   { 'class' : 'NetworkTopologyStrategy', '{your-existing-datacenter}' : 2, 'us-east-1' : 2 };

cqlsh> ALTER KEYSPACE "system_traces" WITH REPLICATION =
   { 'class' : 'NetworkTopologyStrategy', '{your-existing-datacenter}' : 2, 'us-east-1' : 2 };
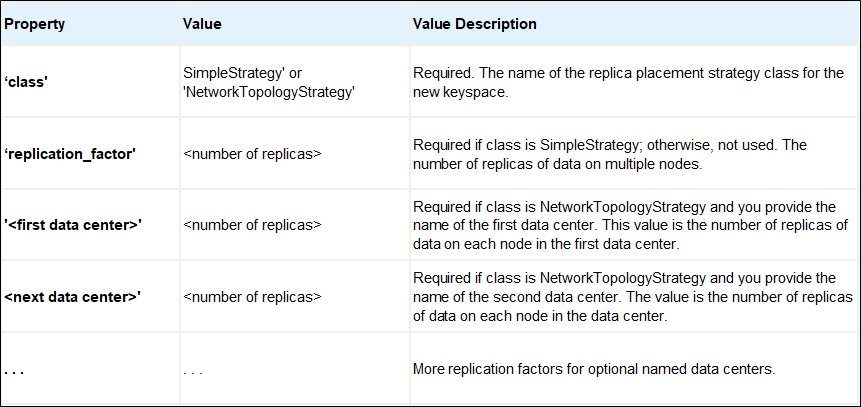
This table shows the different parameters:
{ 'class' : 'SimpleStrategy', 'replication_factor' : <integer> };
{ 'class' : 'NetworkTopologyStrategy'[, '<data center>' : <integer>, '<data center>' : <integer>] . . . };
3. Set Client Connection
Update your client connection policy to DCAwareRoundRobinPolicy and set the local data center to '{your-existing-datacenter}'. This ensures that your client will only read/write from the local data center and not from the Alibaba Cloud cluster we're going to create in the next step.
These three steps don't have an impact on how replicas are placed in your existing data center or how your clients connect to your cluster. The purpose of these three steps is to make sure we can add the second Cassandra data center safely.
Now, in each node in the ECS datacenter, run:
$ sudo nodetool rebuild {your-existing-datacenter}When it finishes, run in all your keyspaces:
cqlsh> ALTER KEYSPACE "{your-keyspace}" WITH REPLICATION =
   { 'class' : 'NetworkTopologyStrategy', 'us-east-1' : 2 };
And in the system ones:
cqlsh> ALTER KEYSPACE "system_distributed" WITH REPLICATION =
   { 'class' : 'NetworkTopologyStrategy', 'us-east-1' : 2 };

cqlsh> ALTER KEYSPACE "system_auth" WITH REPLICATION =
   { 'class' : 'NetworkTopologyStrategy', 'us-east-1' : 2 };

cqlsh> ALTER KEYSPACE "system_traces" WITH REPLICATION =
   { 'class' : 'NetworkTopologyStrategy', 'us-east-1' : 2 };
At this point, you should change the client configuration to point to the IP of a node in the Alibaba Cloud Data Center, for instance 'us-east-1'. This step will avoid downtime.
To perform this task, you need to follow these three steps:
1. Decommission the Seed Nodes
Remove the IPs of nodes in the seed list in DC1 and run a rolling restart after modifying the cassandra.yaml file.
2. Update Your Client Settings
To update the connection settings in the client side:
This assures that your client will only be able to read/write from the Alibaba Cloud Data Center.
3. Decommission the old data center
To decommission the DC1 data center, following these steps:
Make sure that you update your keyspace to stop replicating to the old data center after you run the full repair:
cqlsh> ALTER KEYSPACE "stream_data" WITH REPLICATION = { 'class' 'NetworkTopologyStrategy', 'us-east-1' : 3 };And then in the console:
$ sudo nodetool decommission && killall -15 java && shutdown -h now1. Starting JConsole
The jconsole executable is in JDK_HOME/bin, where JDK_HOME is the directory where the JDK is installed.
If this directory is on your system path, you can start the tool by simply typing jconsole in a command (shell) prompt (Linux). Otherwise, you have to type the full path to the executable file (most Windows environments). You can use jconsole to monitor both local applications (those running on the same system as jconsole) and remote applications (those running on other systems).
2. Necessary Configurations
First, edit /etc/cassandra/cassandra-env.sh file with sudo powers, and do the following changes on it:
JVM_OPTS="$JVM_OPTS -Dcom.sun.management.jmxremote.ssl=false"
JVM_OPTS="$JVM_OPTS -Dcom.sun.management.jmxremote.authenticate=false"
JVM_OPTS="$JVM_OPTS -Djava.rmi.server.hostname=PUBLIC_IP_OF_YOUR_SERVER"
By default Cassandra allows JMX accessible only from localhost; in order to enable remote JMX connection, you need to change "LOCAL_JMX=yes" to "LOCAL_JMX=no" on cassandra-env.sh file.
Optionally if you want to enable authentication, you can set the properties related to authentication and also keep them commented or with False values.
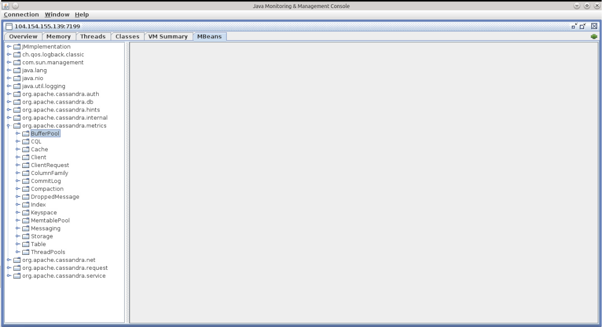
If you go to the MBeans tab on JConsole main window, you'll see a nested folder tree containing different classes isolated by metric type inside 'org.apache.cassandra.metric' category:

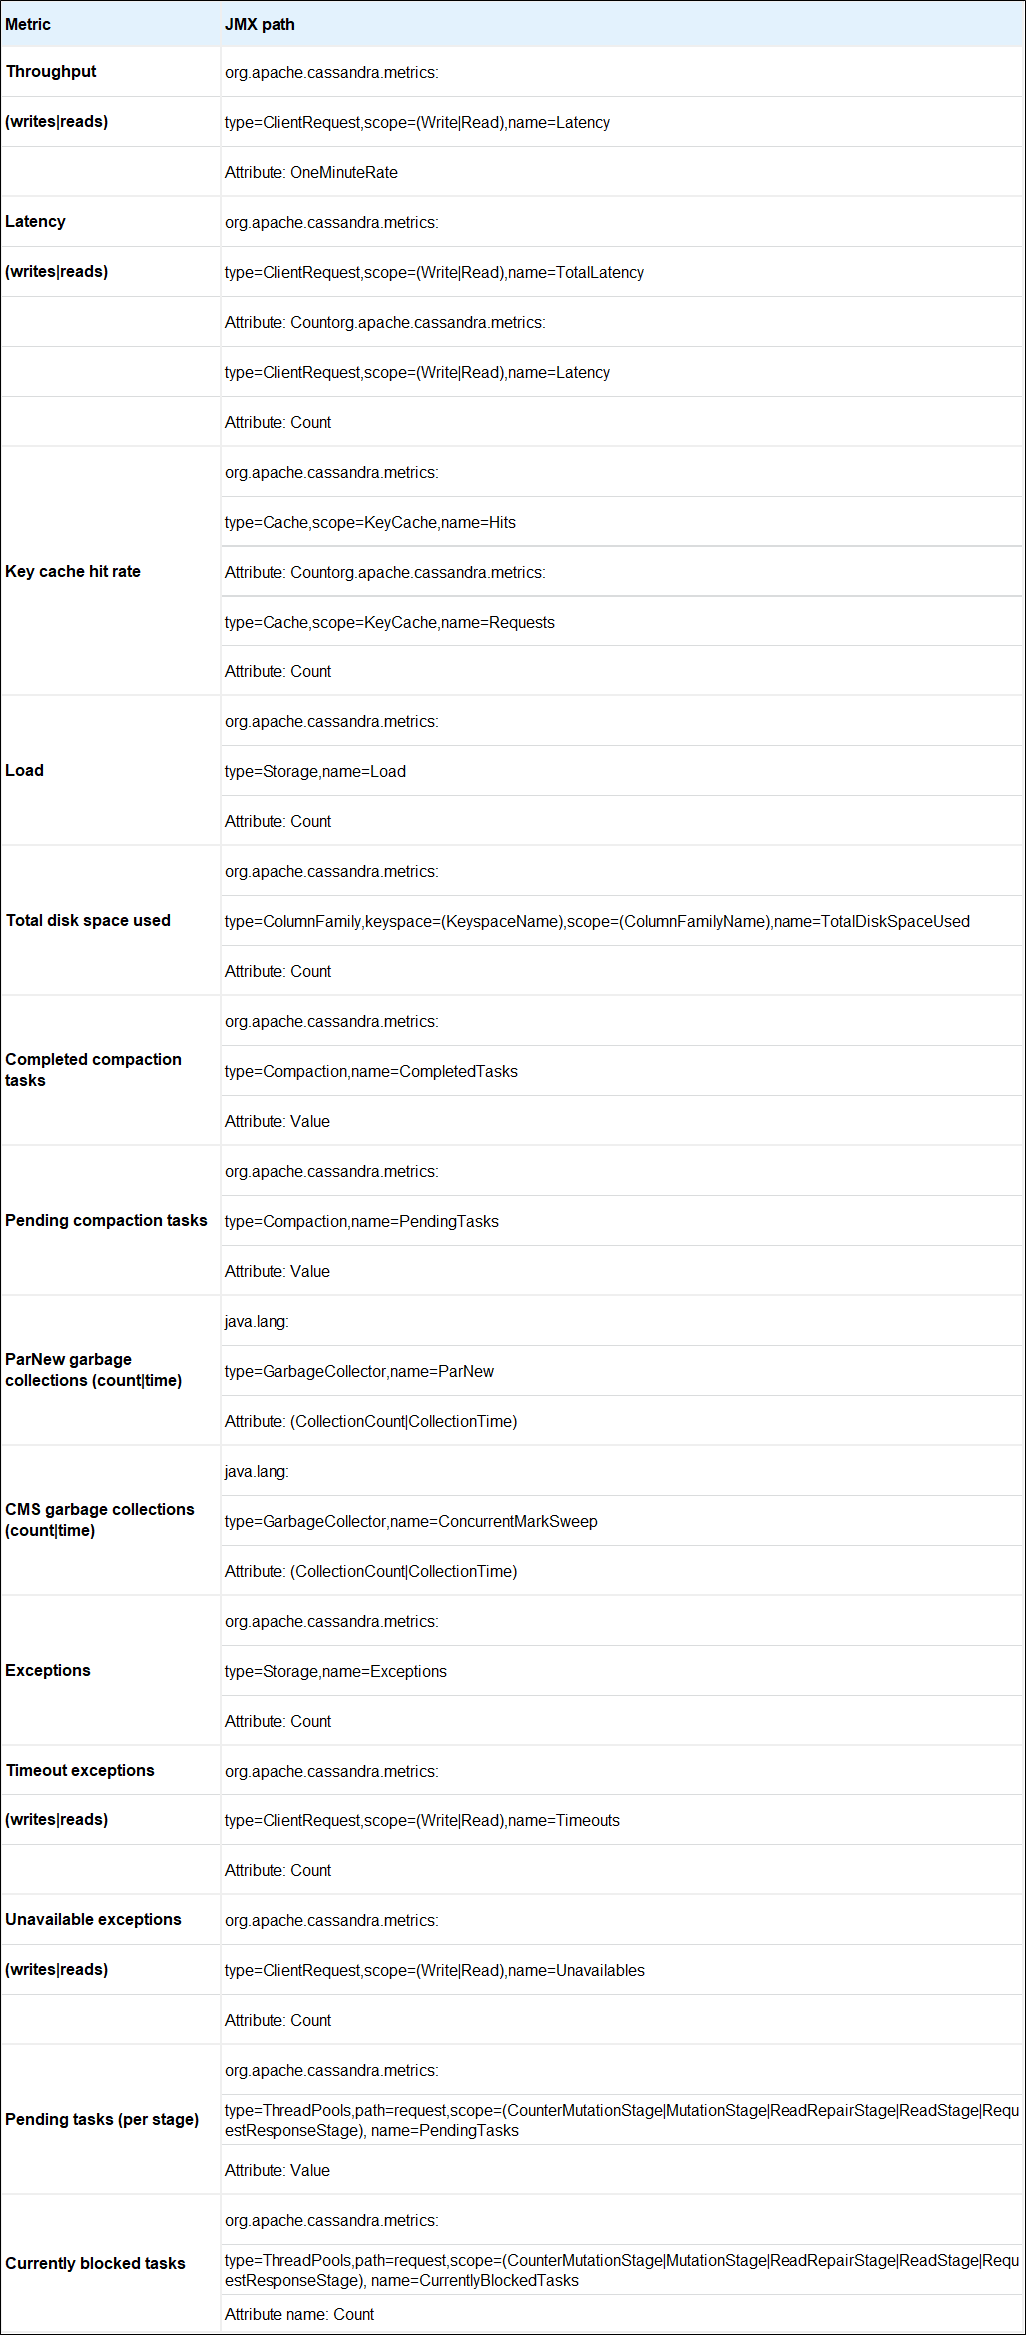
The list is the following:

Deploying Redis on Alibaba Cloud Container Server for Kubernetes

2,593 posts | 791 followers
FollowApsaraDB - January 26, 2021
ApsaraDB - January 25, 2022
Alibaba Clouder - July 21, 2020
Alibaba Clouder - December 19, 2016
Alibaba Clouder - February 7, 2018
Alex - January 22, 2020

2,593 posts | 791 followers
Follow Data Transmission Service
Supports data migration and data synchronization between data engines, such as relational database, NoSQL and OLAP
Learn More ApsaraDB for MongoDB
A secure, reliable, and elastically scalable cloud database service for automatic monitoring, backup, and recovery by time point
Learn More ApsaraDB RDS for MySQL
An on-demand database hosting service for MySQL with automated monitoring, backup and disaster recovery capabilities
Learn MoreMore Posts by Alibaba Clouder