By Alexandru Andrei, Alibaba Cloud Tech Share Author. Tech Share is Alibaba Cloud's incentive program to encourage the sharing of technical knowledge and best practices within the cloud community.
Comprehensive security requires in-depth knowledge about the software (and sometimes hardware) used on a system. With this understanding, you can correctly configure your environment, avoid using or inserting weak points and create different layers of defense against entry points an attacker might try. Defending against highly skilled attackers is very hard, but most users don't face such threats. For example, a financial institution is a very valuable target, thus it will attract a larger number of sophisticated attempts at gaining unauthorized access, while a small to medium website selling t-shirts will usually have to deal with fewer and simpler forms of attacks which are easier to block. What this means is that even a reasonable set of security measures may help a server stay safe for months or years, depending on quality of mechanisms employed and plain old luck at avoiding unwanted attention.
By far, the most common threat on the Internet is represented by bots scanning for known vulnerabilities. This type of attack is cheap, because instead of spending hours or days to crack the defenses of a single target, an attacker can just scan millions of devices, in the same amount of time, and try the same exploit on all of them. This way, he can get access to thousands of devices, with almost zero effort, since after the bot is programmed, everything is automated. For this reason, it is an absolute requirement to protect against these exploitation attempts, since it's guaranteed your instance will often be exposed to them. For a practical example, if you have an Alibaba Cloud Elastic Compute Service (ECS) instance that has been running for at least a few hours, try this command:
cat /var/log/auth.logYou will notice messages such as:
Aug 11 06:18:42 debug010000002015 sshd[3400]: Invalid user admin from 186.47.174.116
Aug 11 06:18:42 debug010000002015 sshd[3400]: input_userauth_request: invalid user admin [preauth]
Aug 11 06:18:43 debug010000002015 sshd[3400]: Connection closed by 186.47.174.116 port 40271 [preauth]
Such status messages signal that a bot tried to log in as the user "admin" to the SSH server and got rejected.
Most of the exploits that these bots are trying come from publicly disclosed vulnerabilities. When a security problem is discovered, after the software is patched, the vulnerability is posted as public knowledge. This way, developers and administrators can understand the problem and take appropriate measures. This especially happens in open-source development but there are many other ways such exploits are discovered and used by attackers. Luckily, it takes a while until these are integrated into scanning bots, at a large scale, so there is a window of opportunity. As long as you apply patches to your operating system as soon as they become available, you stand a very good chance of preventing your instance to be exploited in these scan sweeps.
But it's easy to forget to upgrade packages, especially if you have lots of instances to administrate. So it makes sense to automate this task, which besides being more reliable, can also shorten the time it takes from patch release to patch being applied on your system(s). In Debian and Debian based operating systems, such as Ubuntu, there is a tool fit for this job, called unattended-upgrades.
Note: This tutorial will be based on Debian since in the subjective experience of the writer, automatic security upgrades have been much more stable when compared to other distributions (after years of use, reliability has been around the 99% mark). However, the steps should be almost identical for Debian based distributions such as Ubuntu but reliability may differ. We will be running the Debian server on an Alibaba Cloud Elastic Compute Service instance.
Install unattended-upgrades:
apt update && apt install unattended-upgradesThe needrestart package has a bug in Debian 9 (Stretch), giving you errors like:
Unable to get Terminal Size. The TIOCGWINSZ ioctl didn't work. The COLUMNS and LINES environment variables didn't work. The resize program didn't work. The stty program didn't work. at /usr/share/perl5/NeedRestart/UI.pm line 50.On Alibaba ECS instances running Debian 9, backports are enabled by default, allowing us to install a newer version of needrestart which has this bug fixed. The purpose of needrestart will be explained later in the tutorial.
Only on Debian 9 (codename Stretch), run:
apt -t=stretch-backports install needrestartOn Debian 10 (Buster) or greater, you can just install from the regular repositories:
apt install needrestartEdit needrestart's configuration file:
nano /etc/needrestart/needrestart.confScroll down to this block:
# Restart mode: (l)ist only, (i)nteractive or (a)utomatically.
#
# ATTENTION: If needrestart is configured to run in interactive mode but is run
# non-interactive (i.e. unattended-upgrades) it will fallback to list only mode.
#
#$nrconf{restart} = 'i';
Uncomment the last entry by deleting the preceding "#" sign, and change 'i' to 'a', so the line #$nrconf{restart} = 'i'; becomes $nrconf{restart} = 'a';.
The resulting block will look like this:
# Restart mode: (l)ist only, (i)nteractive or (a)utomatically.
#
# ATTENTION: If needrestart is configured to run in interactive mode but is run
# non-interactive (i.e. unattended-upgrades) it will fallback to list only mode.
#
$nrconf{restart} = 'a';
Press CTRL+X then y and then ENTER to save your changes.
(Optional) If you plan on configuring the instance to send emails with the status of automatic upgrade jobs, install ssmtp.
apt install ssmtpOn Debian, automatic security upgrades are enabled by default after installing the package. But this may change in the future and on some other distributions, the defaults are different. For example some Ubuntu distros don't enable the upgrades automatically. You can check (and enable) with:
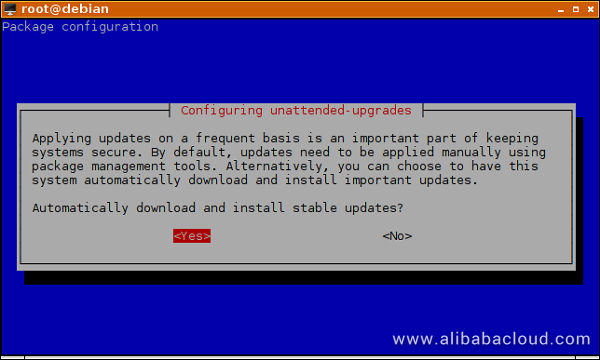
dpkg-reconfigure unattended-upgradesIf by default, the pre-selected answer is "No", press the left arrow or the TAB key and select "Yes", then press ENTER.

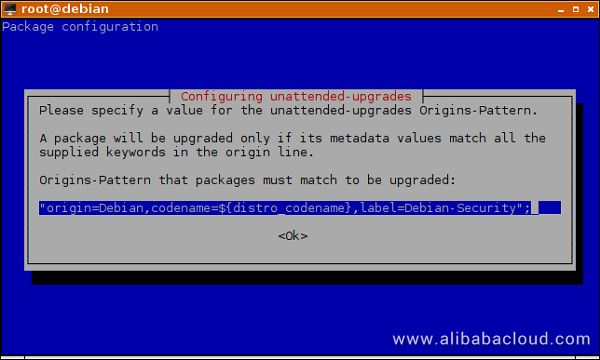
In the next step, press ENTER to select the default, pre-configured Origins-Pattern. This will be explained in the next section, where you can more easily edit the preference.

Edit unattended-upgrades configuration file:
nano /etc/apt/apt.conf.d/50unattended-upgradesEvery variable is explained within the file itself but we'll go over some of the more important settings. Lines starting with two slashes "//" denote a comment. If a variable is preceded by two slashes, it means it has no effect in the configuration file. Besides editing the variable and configuring the desired value, you will also have to remove the preceding slashes to "activate" that setting.
Scroll down until you find the following lines:
//      "o=Debian,a=stable";
//      "o=Debian,a=stable-updates";
//      "o=Debian,a=proposed-updates";
        "origin=Debian,codename=${distro_codename},label=Debian-Security";
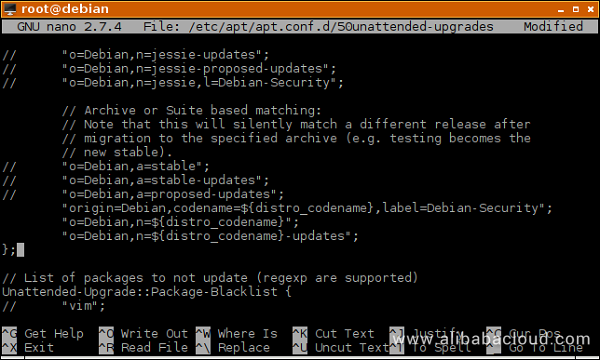
By default, the last line is uncommented, which means that only security upgrades will be automatically installed on your instance. This is what most people want and is the safest option. Security upgrades are very conservative, only changing code that is required to patch a security vulnerability. The purpose of this conservative approach is to never change the way a program works (whenever possible), because this might lead to unexpected behavior after an update. For example, some scripts or utilities may rely on an external feature, and when that feature changes, the scripts/utilities may fail, until manually changed to work with the program that was upgraded, where the feature was included. On Debian, even regular, non-security updates are pretty conservative, usually only containing important bug fixes or upgrades to packages that really need some changes, e.g. the web browser or timezone data. But even so, it's not recommended to automate these types of upgrades since more risk is involved. You usually want to apply these manually, read changelogs and intervene where needed, to make sure your services continue to run normally. Furthermore, usually for an instance purposed a server, these functionality upgrades are not essential. It's enough to just wait for Debian Point Releases and apply these every 2, 3 months manually, with a simple apt update && apt upgrade. If in spite of the additional risks, you want bug fixes and functionality upgrades applied automatically, add these two lines in the same configuration block:
(optional and not recommended)
"o=Debian,n=${distro_codename}";
"o=Debian,n=${distro_codename}-updates";
The final result would then look like this:

(Optional) The next variable that may be of interest is //Unattended-Upgrade::Mail "root";. Uncomment it and add your email address if you want to receive status reports from unattended-upgrades. The uncommented line would look like this:
Unattended-Upgrade::Mail "your_username@example.com";(Optional) However, this might send you too many emails and after a while it might get tiring to read them all. With the next variable you can configure unattended-upgrades to only email you in case there is a problem, which makes more sense. This way, you only get notified when you have to intervene. Those that prefer daily mails, can just leave the line as it is (commented). You can also temporarily skip this step and come back to it after you've completed all the steps in the tutorial. This would allow you to test if email delivery works correctly, before switching.
Uncomment the line until it looks like this:
Unattended-Upgrade::MailOnlyOnError "true";Most packages don't require a reboot after an upgrade because the needrestart package will automatically reload specific programs and libraries when necessary. However, a few important system components cannot be reloaded without rebooting the entire operating system. Until you reboot, even if the package is upgraded, the old, unpatched, vulnerable code will still be present in system memory and running on your instance. By default, unattended-upgrades won't reboot your instance automatically, but if your workload allows it, you can configure it to do so by changing the line //Unattended-Upgrade::Automatic-Reboot "false"; to:
Unattended-Upgrade::Automatic-Reboot "true";This would reboot the instance, immediately after all of the packages have been upgraded. Again, depending on the workload, that may be fine. But some people may have, let's say, a website hosted on that server. In such a case they may want a reboot to happen when the website has the least activity. You can set a reboot time by changing //Unattended-Upgrade::Automatic-Reboot-Time "02:00"; to something like:
Unattended-Upgrade::Automatic-Reboot-Time "04:00";Press CTRL+X then y and then ENTER to save the configuration file.
To make sure the variables are set according to your preferences:
apt-config dump | grep UnattIf you opted for emails to be sent by the upgrading utility, you will also have to configure a connection to an SMTP server. So the following section can be skipped by users that don't want emails.
If you wanted upgrade status reports emailed to you, you installed an utility called ssmtp. This offers a simple way to send emails to your inbox without configuring a complicated email server on your own instance. It does this by forwarding (relaying) local email to an external SMTP (Simple Mail Transfer Protocol) server which does the rest of the work. Since each user has his own preference for email providers, you may have to adapt some steps to conform with the requirements of your provider. They will usually have a dedicated page with instructions on how to set up SMTP connection details. Some may require your_username@example.com as an username, others may require only the part before the "@", "your_username"; some may use different ports, others may have strict policies on "From:" field rewriting and finally, some may require/support TLS and STARTTLS while others may not. If you're having difficulties, you might be able to ask their support team for some help on how to adapt the following steps.
You can either use a free or paid public email provider that hosts emails on their own domain or buy your personal domain name and use it with Alibaba's DirectMail service. You can read this tutorial for reference: https://www.alibabacloud.com/blog/WordPress-with-LEMP-on-Alibaba-Cloud-%E2%80%93-Part-5-Using-DirectMail-for-WordPress-Transactional-Email_287645
To configure ssmtp, first, edit the alias file, which maps usernames on the local instance to the usernames which will be sent to the SMTP server:
nano /etc/ssmtp/revaliasesAdd the end of the file add the following line, replacing your_username@example.com with the actual email address/account you're going to use:
root:your_username@example.comSave the file. Now edit ssmtp's configuration file:
nano /etc/ssmtp/ssmtp.confChange root=postmaster to:
root=Now consult the page of your email provider that contains instructions on how to connect to their SMTP server and change mailhub=mail to something like:
mailhub=smtp.example.com:465Adapt the line according to your provider's requirements. Replace "465" if necessary, in case they use an alternate port number. Example: when using Alibaba's SMTP servers, this might look like mailhub=smtpdm-ap-southeast-2.aliyun.com:465
Uncomment #rewriteDomain= by deleting the preceding "#" and change it to reflect the domain name of the email address you are using:
rewriteDomain=example.comAdapt the domain name as necessary. Some providers may require subdomains, such as mail.example.com. You can leave the hostname value as it is, but again, some SMTP operators may refuse hostnames such as "myserver" and require a fully qualified domain name such as myserver.mydomain.com.
Uncomment #FromLineOverride=YES by deleting the preceding "#" and change YES to NO:
FromLineOverride=NOAt the end of the file add the following lines, adapting them as necessary:
AuthUser=your_username@example.com
AuthPass=your_password
UseTLS=YES
#UseSTARTTLS=YES
The last line is commented/inactive to let you easily enable STARTTLS if your provider requires it.
When you're using multiple servers, it's useful to know which one sent an email. You can differentiate between them by changing your root user's full name. This will then be used by ssmtp in the "From:" email field. Change Web Server 1 to whatever is representative for you.
chfn -f 'Web Server 1' rootNow you can test if everything is working correctly. Replace your_name@example.com with the email address on which you want to receive the test email.
ssmtp -v your_name@example.comNow type the content of your email, something like "This is a test" for example. When you're done writing the message, press ENTER and then CTRL+D.
If everything is working alright, you will see at the end of the output:
[<-] 250 Message received
[->] QUIT
If not, you will need to change some settings. The status messages in this output usually tell you what the problem is.
After running this test, you may encounter a message such as Received SIGHUP or SIGTERM when trying to run nano to edit a file. This is somewhat of a bug caused by ssmtp, and as a quick fix you can logout of your SSH session and log back in again.
Another thing that can go wrong is that the program hangs and you can't exit it, even with CTRL+C. In this case you would need to press CTRL+Z to suspend the application and get back to your terminal and then force kill the utility with pkill -KILL ssmtp. This has been observed to happen when UseSTARTTLS=YES is enabled and the SMTP server doesn't support STARTTLS.
If ssmtp connects successfully but you can't find the email in your inbox, check the spam folder.
When you're done configuring everything, instead of waiting for the automatic upgrade to happen at its scheduled time, you can force it to run now by executing:
unattended-upgrades -vYou will sometimes have to wait 30-60 seconds until the script starts to upgrade packages.
Every time unattended-upgrades runs, it will log its activity in files you can find with:
ls /var/log/unattended-upgrades/You can view logs with:
less /var/log/unattended-upgrades/unattended-upgrades.logDetailed logs generated by the package manager can be seen with:
less /var/log/unattended-upgrades/unattended-upgrades-dpkg.logAnd when logs will be archived, if their extension ends with .gz, you can view them with zless instead of less.
You may get messages such as Warning: A reboot is required to complete this upgrade. or Restarting the system to load the new kernel will not be handled automatically, so you should consider rebooting. from needrestart in your emails. However, if you've configured unattended-upgrades to automatically reboot, these will usually be false alarms. You can check the last time your instance booted with:
uptime -sAnd compare with:
dateUsing Data Lake Analytics to Analyze Data in Table Store Instances

2,603 posts | 747 followers
FollowAlibaba Clouder - September 30, 2018
OpenAnolis - January 24, 2024
Alibaba Cloud Community - February 18, 2022
Alibaba Cloud Community - November 14, 2022
OpenAnolis - July 14, 2022
Alibaba Cloud Native Community - January 26, 2024

2,603 posts | 747 followers
Follow ECS(Elastic Compute Service)
Elastic and secure virtual cloud servers to cater all your cloud hosting needs.
Learn More WAF(Web Application Firewall)
A cloud firewall service utilizing big data capabilities to protect against web-based attacks
Learn MoreLearn More
More Posts by Alibaba Clouder