By Hitesh Jethva, Alibaba Cloud Tech Share Author. Tech Share is Alibaba Cloud’s incentive program to encourage the sharing of technical knowledge and best practices within the cloud community.
CockroachDB is a free and open source distributed SQL database that is designed to store copies of data in multiple locations in order to deliver requested data when needed. CockroachDB is a cloud-native SQL database for building global, scalable cloud services that survive disasters. It is built to automatically replicate, rebalance, and recover with minimal configuration and operational overhead. You can install CockroachDB on your local computer, a single server, a corporate development cluster, or a private or public cloud.
In this tutorial, we will be learning how to setup a CockroachDB cluster on an Alibaba Cloud Elastic Compute Service (ECS) instance with Ubuntu 16.04.
First, log in to your https://ecs.console.aliyun.com">Alibaba Cloud ECS Console. Create a new ECS instance, choosing Ubuntu 16.04 as the operating system with at least 2GB RAM. Connect to your ECS instance and log in as the root user.
Once you are logged into your Ubuntu 16.04 instance, run the following command to update your base system with the latest available packages.
apt-get update -yBefore starting, you will need to configure hosts file and hostname on each server, so each server can communicate with each other using the hostname
On Node1, run the following command:
hostnamectl set-hostname Node1On Node2, run the following command:
hostnamectl set-hostname Node2On Node3, run the following command:
hostnamectl set-hostname Node3Next, open /etc/hosts file on each Node and add the following lines:
nano /etc/hostsAdd the following lines:
192.168.0.103 Node1
192.168.0.104 Node2
192.168.0.105 Node3
Save and close the file when you are finished.
First, you will need to download the latest version of the CockroachDB binary. On Node1, run the following command to download the binary:
wget https://binaries.cockroachdb.com/cockroach-latest.linux-amd64.tgzOnce the download is completed, extract the downloaded file using the following command:
tar -xvzf cockroach-latest.linux-amd64.tgzNext, copy the binary from extracted directory to the /usr/local/bin so it is accessible from the command line:
cp cockroach-latest.linux-amd64/cockroach /usr/local/bin/Next, check the version of the CockroachDB using the following command:
cockroach versionYou should see the following output:
Build Tag:    v2.0.2
Build Time:   2018/05/21 14:55:20
Distribution: CCL
Platform:     linux amd64 (x86_64-unknown-linux-gnu)
Go Version:   go1.10
C Compiler:   gcc 6.3.0
Build SHA-1:  fa2b2bfd802ebe8150030a14b0a36c25fef90b91
Build Type: releaseNote: Run all of the above command on Node2 and Node3 to install CockroachDB.
CockroachDB is now installed, it's time to start your Cluster.
Run the following command on Node1 to start Cluster:
cockroach start --insecure --background --advertise-host=192.168.0.103You should see the following output:
*
* WARNING: RUNNING IN INSECURE MODE!
*
* - Your cluster is open for any client that can access <all your IP addresses>.
* - Any user, even root, can log in without providing a password.
* - Any user, connecting as root, can read or write any data in your cluster.
* - There is no network encryption nor authentication, and thus no confidentiality.
*
* Check out how to secure your cluster: https://www.cockroachlabs.com/docs/v2.0/secure-a-cluster.html
*
CockroachDB node starting at 2018-06-02 16:07:35.672730869 +0000 UTC (took 3.7s)
build:               CCL v2.0.2 @ 2018/05/21 14:55:20 (go1.10)
admin:               http://Node1:8080
sql:                 postgresql://root@192.168.0.103:26257?sslmode=disable
logs:                /root/cockroach-data/logs
temp dir:            /root/cockroach-data/cockroach-temp482291951
external I/O path:   /root/cockroach-data/extern
store[0]:            path=/root/cockroach-data
status:              initialized new cluster
clusterID:           e16c6cb0-fc8e-47d7-85c3-30b4b671302e
nodeID:              1


--insecure : It specify that node runs without SSL.
--background : It specify that node runs in background.
--advertise-host : It specify the IP address of Node1.
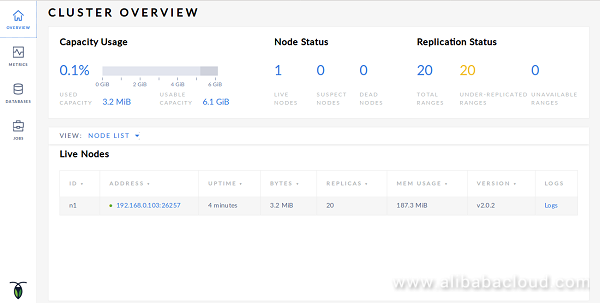
Your CockroachDB cluster is now live. You can access its Dashboard by visiting the URL http://192.168.0.103:8080 on your web browser. You should see the following image:

Your Cluster is now live. Next, you will need to add other two Nodes to this Cluster.
On the Node2, run the following command to add Node2 on Cluster:
cockroach start --insecure --background --advertise-host=192.168.0.104 --join=192.168.0.103:26257On the Node3, run the following command to add Node3 on Cluster:
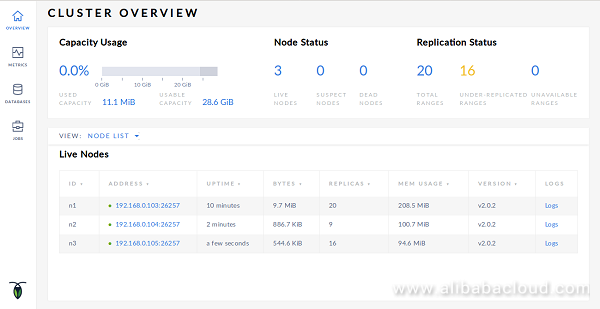
cockroach start --insecure --background --advertise-host=192.168.0.105 --join=192.168.0.103:26257You can now access the Cluster dashboard from any Node by visiting the URL http://192.168.0.104 on your web browser.

Now, all nodes are connected through the Cluster.
All of the Nodes are now live, it's time to test whether replication is working or not between all the Nodes.
First, generate example data on Node1:
cockroach gen example-data startrek | cockroach sql --insecureThe above command will create a sample database called startrek.
Now, launch SQL client on Node1 and list the databases in your Cluster.
cockroach sql --insecureOutput:
# Welcome to the cockroach SQL interface.
# All statements must be terminated by a semicolon.
# To exit: CTRL + D.
#
# Server version: CockroachDB CCL v2.0.2 (x86_64-unknown-linux-gnu, built 2018/05/21 14:55:20, go1.10) (same version as client)
# Cluster ID: e16c6cb0-fc8e-47d7-85c3-30b4b671302e
#
# Enter \? for a brief introduction.
#
warning: no current database set. Use SET database = <dbname> to change, CREATE DATABASE to make a new database.
Next, list out the databaseusing the following command:
root@:26257/> SHOW DATABASES;You should see the startrek database in the following output:
+----------+
| Database |
+----------+
| startrek |
| system   |
+----------+
(2 rows)

Time: 181.107653ms
Now, go to the Node2 and launch SQL client to list the databases on Node2:
cockroach sql --insecure
root@:26257/> SHOW DATABASES;
You should see that startrek database is replicated from Node1 to Node2:
+----------+
| Database |
+----------+
| startrek |
| system   |
+----------+
(2 rows)

Time: 181.107653ms
Startrek database is now distributed among all the Nodes.
Here, we will remove Node2 from the Cluster and show that all of the cluster's data is still available.
First, go to the Node2 and launch SQL client:
cockroach sql --insecureNext, count the number of rows in the quotes table of the startrek database:
root@:26257/> SELECT COUNT(*) FROM startrek.quotes;Output:
+-------+
| count |
+-------+
|   200 |
+-------+
(1 row)

Time: 1.598875038s
You should see that the table has 200 rows.
Now, exit from the SQL client by pressing CTRL+C.
Next, remove the Node2 from the Cluster by running the following command on Node2:
cockroach quit --insecureNow, go to the Node3 and launch SQL client:
cockroach sql --insecureNow, run the following command to count the number of rows in the quotes table of the startrek database:
root@:26257/> SELECT COUNT(*) FROM startrek.quotes;Output:
+-------+
| count |
+-------+
|   200 |
+-------+
(1 row)

Time: 1.598875038s
You should see that the Cluster still have 200 rows of data. That means CockroachDB has successfully tolerated a system failure and maintained the integrity of your data.
Congratulations! You have successfully installed and configured a highly available CockroachDB cluster in Ubuntu 16.04 server. You can now easily scale your cluster at any time if your requirements grow.
Data Transport is a PB-level, point-to-point, offline data migration service. You can use secure equipment to upload large amounts of data to Alibaba Cloud. Data Transport can help you resolve common problems associated with data migration to Alibaba Cloud. Common issues include expensive dedicated lines, lengthy transmission times, and potential security risks. Data Transport allows you to upload large amounts of data securely and efficiently all while reducing costs.
Compared to traditional techniques of data transmission, either over the Internet or using a high-speed leased line, this solution improves efficiency by up to 20 times and reduces costs by up to 60%.
Data Transport allows a large volume of data to be migrated offline in a single batch, significantly reducing logistics and network costs.
Each device supports data migration capabilities of 100 TB or 480 TB. By using multiple devices concurrently, Data Transport can quickly scale to migrate data at the PB level.
E-HPC is a HPCaaS cloud platform providing an all-in-one high-performance public computing service to meet increasing demand for HPC capability. Based on existing infrastructure, this product provides users with an all-in-one high-performance computing service cloud platform.
Alibaba Cloud E-HPC supports:
E-HPC is applicable to organizations in education and scientific research fields with the demand for large-scale computing capabilities. E-HPC supports applications such as HPC, AI, and large-scale data analysis.
E-HPC allows you to create ECS/EGS computing clusters and cluster managers and deploy high-performance computing environments and application programs with one-click. This allows users to quickly develop applications with superior computing capability and ease their computing burden.
Compared with traditional supercomputing centers and self-built HPC clusters, E-HPC provides an accessible, elastic, secure, interconnectable high-performance computing service on the public cloud.

2,593 posts | 793 followers
FollowAlibaba Clouder - February 13, 2019
Alibaba Clouder - July 9, 2018
Alibaba Clouder - May 10, 2019
Alibaba Clouder - May 22, 2019
Alibaba Clouder - May 23, 2019
Alibaba Clouder - May 14, 2018

2,593 posts | 793 followers
FollowLearn More
 Tair (Redis® OSS-Compatible)
A key value database service that offers in-memory caching and high-speed access to applications hosted on the cloud
Learn More ECS(Elastic Compute Service)
Elastic and secure virtual cloud servers to cater all your cloud hosting needs.
Learn MoreMore Posts by Alibaba Clouder