By Bineli Manga, Alibaba Cloud Community Blog author.
During the time of DevOps and Microservices, every application is abstracted and served as services through containers. There are many container providers available today for use, including Docker, containerd, coreos, among other options. In this tutorial, we are going to look into how Docker engines can be used to leverage Jenkins as a service through containerization. That is, we are going to show you how to install and set up docker, how to install and set up Jenkins and also how to launch Jenkins through a Docker image. Because Docker is a cross-platform capable technology, you can use it on Windows, Mac, or Linux, but for the sake of simplicity, we will show you how to install in on a Linux Virtual Machine.
Jenkins is the most used open-source DevOps tool available nowadays, and Docker is the first open-source containerization platform. So, we think that running Jenkins on Docker will enable us to have better performance while also opening us up to the support of the open-source community for both products.
This tutorial will be organized as follows:
•Installing docker on the virtual machine
•Getting the Jenkins docker image from Docker hub
•Running Jenkins in a Docker Container
•A virtual machine running on an Alibaba Cloud ECS instance with Ubuntu 18.04 or higher installed.
•A reliable Internet connection.
•A computer where you have administrator rights.
The first step is to make sure that you have Docker properly installed on your host machine. To make sure that Docker is installed, follow the steps below on your machine:
1.Update the packages local repository
$ sudo apt-get update2.Install the packages: apt-transport-https to enable the downloading of HTTPS encrypted packages, ca-certificates to enable the downloading of security certificates when you will try to download and install Docker images, curl to be able to query remote http endpoints, and gnupg-agent and software-properties-agent, which are packages required to install Docker:
$ sudo apt-get install apt-transport-https ca-certificates curl gnupg-agent Software-properties-common3.Add Docker's offcial PGP key. This is to make sure that communications with docker registry remain secured through encryption. You can do so with the following command:
$ curl -fsSL https://download.docker.com/linux/ubuntu/gpg | sudo apt-key add -4.Set up the Docker's stable repository:
$ sudo add-apt-repository "deb [arch=amd64] https://download.docker.com/linux/ubuntu $(lsb_release -cs) Stable"5.Update apt packages index:
$ sudo apt-get update6.Install the latest version of Docker engine and docker-compose:
$ sudo apt-get install docker docker-compose7.Verify that you have correctly installed Docker by running the following command:
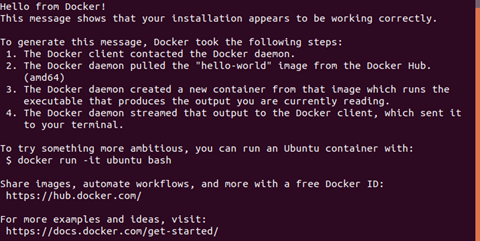
$ sudo docker run hello-worldThis command will download a test image for docker and run that image. If the operation is success full, you should receive an image similar to the one in the image below:
The Docker repository contains the images for a lot of different software, including Jenkins, Jira, Java, and NodeJS. In the case of Jenkins, we are going to need to download Jenkins's Docker images from the official Docker repository to be able to run Jenkins in a containerized environment. So, rather than building the image ourselves, we are going to pull it from the Docker's registry, install and run it locally.
1.Run the docker pull command to get the Jenkins' image:
$ docker pull jenkinsAfter running this command, you should get similar text in your shell:
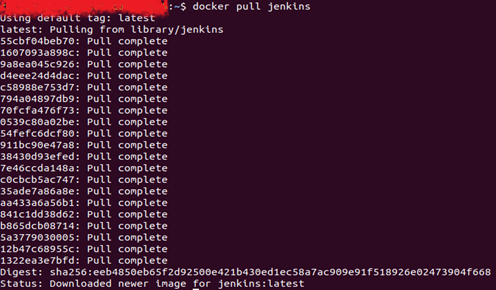
2.To check that the pull command has completed successfully, you can run the docker images command on your terminal and verify that jenkins images is already listed:
$ docker imagesAfter running this command, you should get a print in your terminal similar to this one, where you can clearly identify the Jenkins image locally installed :

By running the previous commands we have set up Docker and installed Jenkins's docker image in the local computer. Now we are going to use the jenkins image that we have already installed and run it inside a docker image.
1.Check if our jenkins docker's image is not running yet, by typing the docker ps command:
$ docker psAfter running this command in your terminal, you should have an output similar to this one:

In the above image, you can see the MySQL and wordpress docker images that are running, but no image of Jenkins.
We already have the docker image of Jenkins. But to run this image in a container, we have to build and run the Jenkins' docker's image.
2.To run the Jenkins' docker image, you have to run the following command:
$ docker run -p 8080:8080 -p 50000:50000 jenkins/jenkins:ltsThe above command will run Jenkins in a container and make it available on port 8080 of localhost.
Note: The above command does not provide persistent storage for Jenkins, which means that once the container is stopped or deleted, all the data will be deleted. During production, though, we don't want something like that to happen. In order to avoid such behavior, we will attach a storage device to our docker instances.
Docker provides volumes, which enable us to add storage for a docker container
3.Run the following command to run Jenkins without loosing the data when the container is stopped or deleted:
$ docker run -p 8080:8080 -p 50000:50000 -v jenkins_home:/var/jenkins_home jenkins/jenkins:ltsWhen this command is executed, it will also create a jenkins folder in the following path:
$ /var/jenkins_home jenkins/4.While the docker container was created for jenkins, jenkins also automatically generated a password which can be found at the terminal as shown below or in a file found in the file:
$ /var/jenkins_home/secrets/initialAdminPasswordHere after is a screen capture of a sample of the content of initialAdminPassword file:
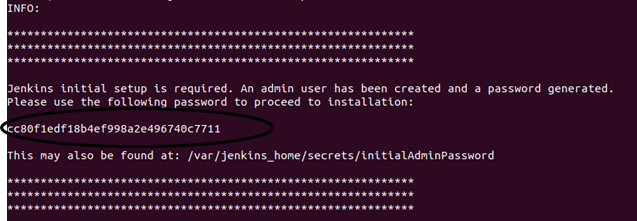
Note: The password will be different from the one showed there. You'll need to know your password. You can copy your passport for your terminal to use it later.
5.Access Jenkins via your browser. To do this, Open your browser to the address localhost:8080, and you should see a web page similar to the one below:
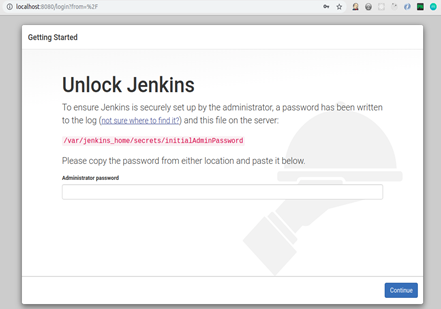
6.You have to enter the administrator password you copied from the terminal, or get it from the file /var/jenkins_home/secrets/initialAdminPassword, then you will be taken to the install page.
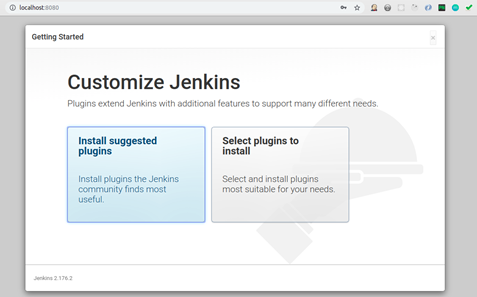
7.Then, click Install suggested plugins to install plugins directly or Select plugins to install if you wish to install some particular Jenkins plugins before proceeding. Next, select the desired plugins and click install.
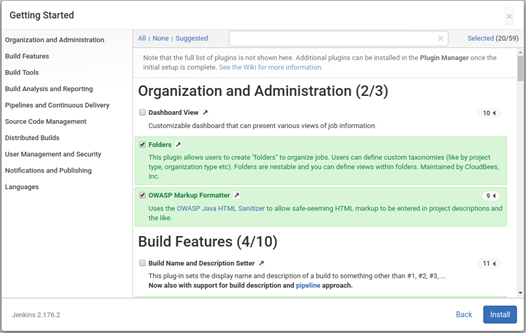
8.The installation process can take some time then you are redirected to the Create First Admin User page.
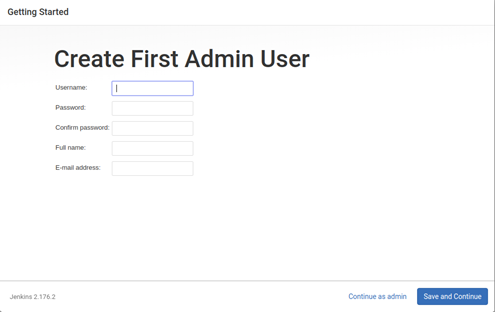
9.You chose to create another admin user or just continue with the admin user created by Jenkins. Here we would just continue with the default admin user. Click Continue as admin button. After that, you will be taken to the configuration page as show below.
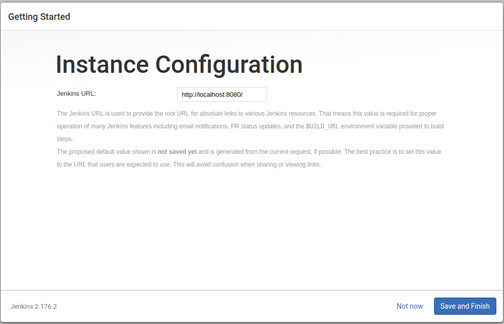
You do not have to change these default settings, but you can simply click the Save and Finish button to save these settings.
10.After that, you will be directed to the last setup page, which simply tells you the credentials to use for login to Jenkins. Here is an example of such page, with admin as the default username and the administrative password you copied from the file initialPassword as the admin password:
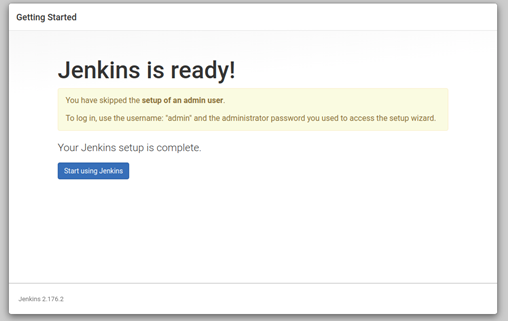
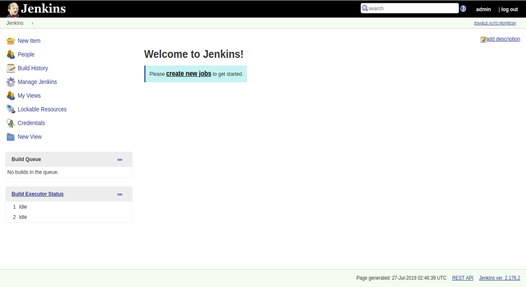
11.Next, just click on Start Using Jenkins and you will be taken to the Jenkins Dashboard. There you will be able to create Jenkins jobs to run. Here is a screen capture of the Jenkins' Dashboard:
You have now come to the end of this tutorial. Through this tutorial, we learned how to install and setup docker on a Linux Virtual Machine running Ubuntu, how to install and setup a Jenkins Image, then how to run it inside a containerized virtual machine.

2,599 posts | 769 followers
FollowAlibaba Clouder - February 21, 2020
Alibaba Clouder - July 3, 2019
Alibaba Clouder - July 27, 2020
JDP - July 31, 2020
Alibaba Clouder - April 12, 2019
Alibaba Clouder - June 3, 2020

2,599 posts | 769 followers
Follow Platform For AI
A platform that provides enterprise-level data modeling services based on machine learning algorithms to quickly meet your needs for data-driven operations.
Learn More VPC
VPC
A virtual private cloud service that provides an isolated cloud network to operate resources in a secure environment.
Learn More ACK One
Provides a control plane to allow users to manage Kubernetes clusters that run based on different infrastructure resources
Learn More Machine Translation
Relying on Alibaba's leading natural language processing and deep learning technology.
Learn MoreMore Posts by Alibaba Clouder