网卡多队列是指在网络接口上配置多个发送和接收队列,每个队列可以由不同的CPU核心进行处理,其主要目的是通过允许多个CPU核心同时处理网络数据包来提升网络I/O吞吐量和降低延迟。
为什么需要网卡多队列
传统单队列因依赖单核处理全部数据包易导致CPU过载、延迟增加及丢包,而现代服务器多为多核CPU,多队列可将网络流量分发至多核CPU的不同核心,从而实现对多核计算资源的高效利用。
根据测试结果,在相同的网络PPS和网络带宽条件下,相较于单个队列,使用两个队列的网络性能提升50%~100%,而使用四个队列的性能提升则更加显著:
更好地利用多核CPU架构:多队列可以将网络流量分散到多个CPU核心上处理,这样可以更均匀地分配负载,提高CPU的利用率。
提高吞吐量:多队列允许多个数据包同时被处理,这可以显著提高网络的吞吐量,尤其是在高负载情况下。
降低延迟:由于数据包可以分散到不同的队列中处理,减少了单个队列的拥堵,从而降低了延迟。
减少丢包:在高流量情况下,多队列可以减少因单个队列过载而导致的丢包。
虽然多队列通常能够带来上述好处,但不当的配置也可能导致性能下降或其他问题。例如,网卡队列和CPU亲和性设置不当,可能会引起不必要的上下文切换开销;而网卡队列数目设置过少则不能充分利用硬件资源。
通常弹性网卡在附加到特定实例规格的实例上后,网卡的队列数即实例规格默认的网卡队列数,且在系统内部自动生效。如果您需要手动调整网卡的队列数,在调整前应该根据具体的使用场景和硬件条件仔细考虑如何合理地配置弹性网卡的多队列参数。
多队列的核心机制
队列划分
弹性网卡支持多个队列,指的是支持多个Combined队列,每个Combined队列由独立的CPU核心处理,实现并行处理数据包,减少锁竞争,充分利用多核性能。
RX(Receive)队列和TX(Transmit)队列是网卡处理数据包时使用的两种不同类型的队列,每个Combined队列包含一个RX队列和一个TX队列:
RX队列(RX Queue):RX队列主要用于处理从网络接收到的数据包。当数据包到达网卡时,会根据一定的RSS规则(如轮询、基于流的分配等策略)被分发到不同的RX队列中。
部分实例规格族支持网卡自定义RSS功能,即支持通过哈希算法将网络流量智能分发到不同的RX队列中,详细信息,请参见网卡自定义RSS。
TX队列(TX Queue):TX队列负责管理待发送的数据包。应用程序产生的输出请求首先会被放入相应的TX队列里,然后由网卡按照顺序或者优先级等因素进行发送。
支持中断亲和性
每个队列关联独立的中断,通过中断亲和性将中断处理分散到不同的CPU核心,避免单一核心过载。
除Red Hat Enterprise Linux以外的镜像已默认支持网络中断亲和性,无需再配置。详细信息,请参见配置网络中断亲和性。
约束和限制
目前部分实例规格支持网卡多队列,详细信息,请参见实例规格族。当多队列数值大于1时,表示支持网卡多队列。
对于支持多队列的实例规格,网卡在绑定到实例规格后多队列自动生效。
实例规格文档中的队列数,表示该实例规格所允许的单块网卡最大队列数。
您可以通过调用DescribeInstanceTypes接口,查询指定InstanceTypeFamily对应的目标实例规格族的网卡队列数相关指标:
网卡默认队列数
返回的PrimaryEniQueueNumber为主网卡的默认队列数,SecondaryEniQueueNumber为辅助网卡的默认队列数。
单块网卡最大队列数
返回的MaximumQueueNumberPerEni为规格族允许的单块网卡最大队列数。
队列数总配额
返回的TotalEniQueueQuantity为规格族允许的队列数总配额。
一些早期上架的公共镜像(内核版本小于2.6)可能不支持网卡多队列,建议您使用最新的公共镜像。
查看弹性网卡的队列数
在控制台查看
访问ECS控制台-弹性网卡。
在页面左侧顶部,选择目标资源所在的资源组和地域。

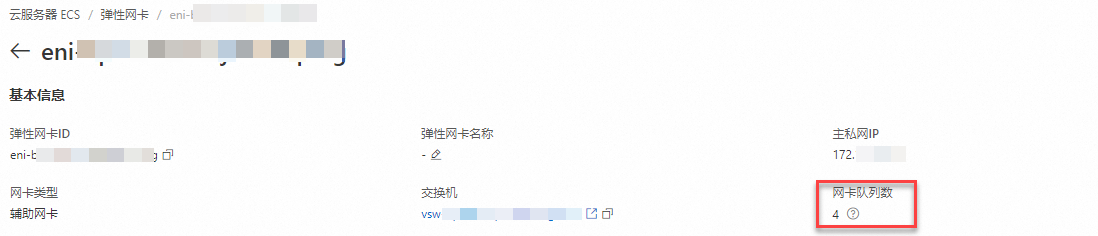
单击目标辅助弹性网卡的ID,进入弹性网卡详情页。
在基本信息部分,可以看到网卡队列数,具体数值表示当前该弹性网卡的队列数。
如果弹性网卡修改过队列数,则返回修改后的队列数。
如果弹性网卡未修改过队列数:
如果弹性网卡未绑定到实例,则返回值为空。
如果弹性网卡已绑定到实例上,则返回实例规格默认的网卡队列数。
通过API查看
您可以通过DescribeNetworkInterfaceAttribute查看网卡的队列数属性,返回的QueueNumber表示该网卡的队列数。
如果弹性网卡修改过队列数,则返回修改后的队列数。
如果弹性网卡未修改过队列数:
如果弹性网卡未绑定到实例,则返回值为空。
如果弹性网卡已绑定到实例上,则返回实例规格默认的网卡队列数。
在实例内部查看
远程连接Linux实例。
说明Windows实例的网卡队列数您可以在控制台或通过API查看。
具体操作,请参见使用Workbench登录Linux实例。
执行
ip a命令,查看网络配置相关信息。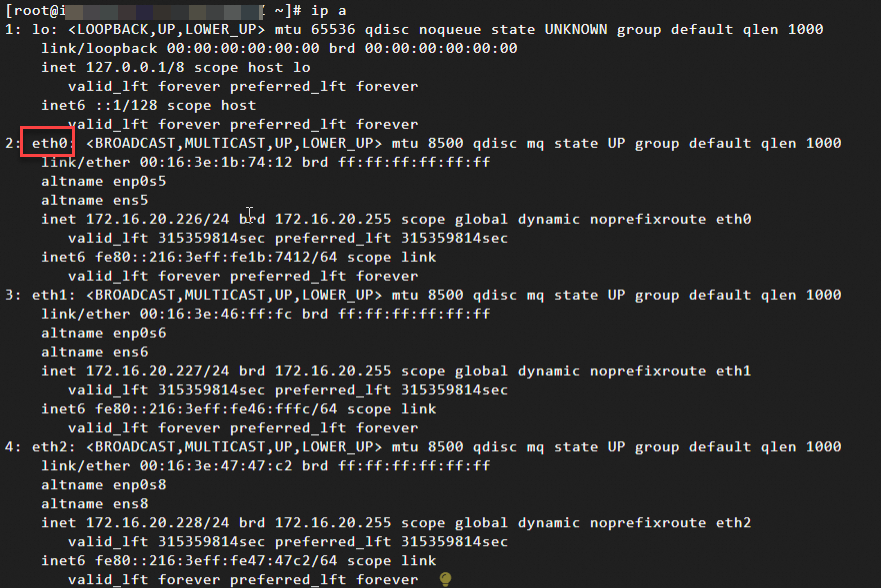
执行以下命令,查看主网卡eth0支持多队列的情况。
本例以主网卡为例说明,如果是辅助网卡,修改网卡标识即可,如eth1、eth2。
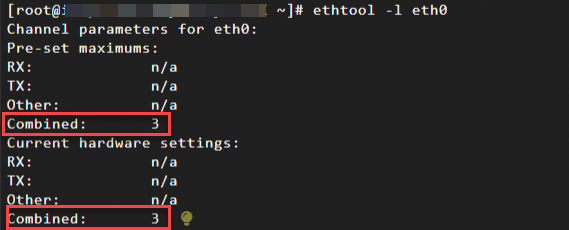
ethtool -l eth0根据返回结果查看是否支持网卡多队列:
如果 "Pre-set maximums" 下的 "Combined" 值大于1,表示网卡支持多队列。该值表示该弹性网卡支持的最大队列数。
“Current hardware settings”下的“Combined”值表示当前使用的队列数。
本例中返回表示最多支持3个组合队列(RX+TX),且当前使用的是3个队列。
如果您要修改网卡最多支持的队列数,请参见修改弹性网卡队列数。
如果您要修改使用的网卡队列数,请参见修改操作系统使用的网卡队列数。
修改弹性网卡队列数
通常弹性网卡在附加到特定实例规格的实例上后,网卡的队列数即实例规格默认的网卡队列数,且在系统内部自动生效。如果您需要手动调整网卡的队列数,您可以通过控制台或API修改。注意事项如下:
只允许修改处于待绑定状态,或者已绑定至实例且实例为已停止状态的弹性网卡的队列数。
网卡队列数不能超过实例规格允许的单块网卡最大队列数。
实例的所有网卡累加队列数不能超过实例规格允许的队列数总配额。
在控制台修改
访问ECS控制台-弹性网卡。
在页面左侧顶部,选择目标资源所在的资源组和地域。
单击目标辅助弹性网卡的ID,进入弹性网卡详情页。
点击修改网卡队列数。
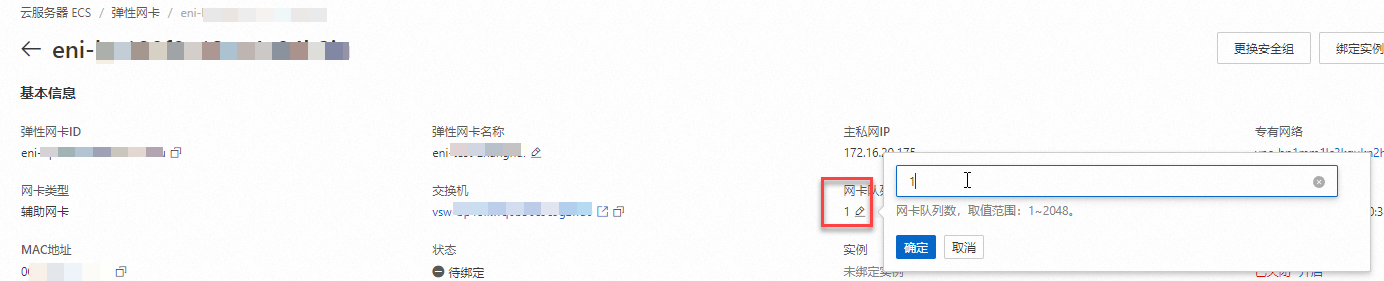
点击“确定”,完成队列数修改。
通过API修改
您可以通过调用ModifyNetworkInterfaceAttribute,设置QueueNumber参数的值实现修改弹性网卡队列数。
已绑定至实例的弹性网卡修改队列数后,新的网卡队列数在实例启动后生效。
修改操作系统使用的网卡队列数
您通过控制台或API完成修改弹性网卡队列数后,系统内部自动生效,即当前在系统内部,该网卡使用的队列数为您设置的网卡队列数。
您还可以根据实际情况,调整系统内部网卡实际使用的网卡队列数,使其小于设置的网卡队列数。
在实例内部修改的系统使用的网卡队列数不会影响网卡当前支持的最大队列数,不会显示在控制台或API的返回数据中。
此修改为临时修改,实例重启后修改失效。
下面以支持多队列的Alibaba Cloud Linux 3操作系统为例,介绍如何调整网卡使用的队列数。
远程连接Linux实例。
具体操作,请参见使用Workbench登录Linux实例。
执行
ip address show命令,查看网络配置相关信息。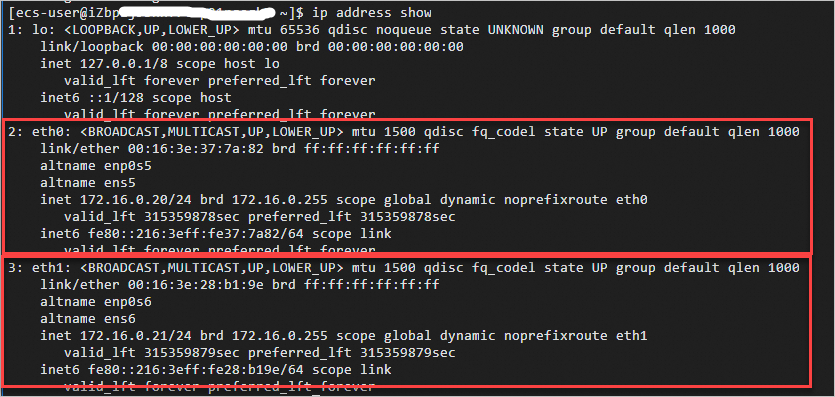
执行以下命令,查看主网卡eth0支持多队列的情况。
本例以主网卡为例说明,如果是辅助网卡,修改网卡标识即可,如eth1、eth2。
ethtool -l eth0根据返回结果查看是否支持网卡多队列:
如果 "Pre-set maximums" 下的 "Combined" 值大于1,表示网卡支持多队列。该值表示该弹性网卡支持的最大队列数。
“Current hardware settings”下的“Combined”值表示当前使用的队列数。
本例中返回表示最多支持3个组合队列(RX+TX),且当前使用的是3个队列。
执行以下命令,调整主网卡eth0生效的队列数为2。
本例以主网卡为例说明,如果是辅助网卡,修改网卡标识即可,如eth1、eth2。
sudo ethtool -L eth0 combined NN是您希望网卡使用的队列数,且N应该小于或等于 "Pre-set maximums" 下的 "Combined" 值。本示例中,设置主网卡使用2个队列:
sudo ethtool -L eth0 combined 2
配置网络中断亲和性
在使用网卡多队列时,通常需要配置网络中断亲和性(IRQ Affinity),将不同的队列中断分配给特定的CPU处理,而不是由任意的CPU处理,这有助于减少CPU之间的争用并提高网络性能。
除Red Hat Enterprise Linux以外的镜像已默认支持网络中断亲和性,无需再配置。
Red Hat Enterprise Linux镜像支持但未开启网卡多队列的网络中断亲和性,您需要参考本文进行配置。
下述操作以Red Hat 9.2镜像系统为例,介绍如何通过ecs_mq脚本自动配置网卡多队列的网络中断亲和性。如果您的系统镜像并非Red Hat Enterprise Linux,已默认开启,则无需再配置。
远程连接Linux实例。
具体操作,请参见使用Workbench登录Linux实例。
(可选)关闭irqbalance服务。
由于irqbalance服务会动态调整IRQ Affinity,配置
ecs_mq脚本会和irqbalance产生冲突,建议关闭irqbalance服务。systemctl stop irqbalance.service执行以下命令,下载最新版本的网卡多队列的自动配置脚本
ecs_mq。wget https://ecs-image-tools.oss-cn-hangzhou.aliyuncs.com/ecs_mq/ecs_mq_latest.tgz执行以下命令,解压
ecs_mq脚本。tar -xzf ecs_mq_latest.tgz执行以下命令,更换工作路径。
cd ecs_mq/执行以下命令,运行
ecs_mq脚本。bash install.sh redhat 9说明请您根据实际环境替换命令中的 redhat 和 9为您自己的
<操作系统名称>和<操作系统主版本号>。执行以下命令,启动
ecs_mq脚本。systemctl start ecs_mq启动脚本后,系统自动启动网络中断亲和性。
修改网卡多队列数和配置网络中断亲和性是用于优化网络性能的不同方法,您需要根据系统的实际负载情况,通过测试不同的配置组合,观察系统性能(如吞吐量、延迟等指标),合理分配多队列到不同的CPU核心,并相应地设置中断亲和性,确保负载均衡。