本文介绍视频直播服务端Java SDK的使用方法和示例代码。
前提条件
创建RAM用户并授权。访问视频直播API需要RAM用户拥有对应的权限,具体授权操作可参见创建RAM用户并授权。
已获取访问密钥(AccessKey)。服务端接口通过访问密钥进行身份验证,为RAM用户生成访问密钥请参见创建AccessKey。
已完成Java 环境配置,需要Java 1.8及以上版本。
使用SDK
安装
此处以Maven安装方式进行举例,在项目pom.xml文件中引入SDK:
<dependency>
  <groupId>com.aliyun</groupId>
  <artifactId>alibabacloud-live20161101</artifactId>
  <version>2.0.1</version>
</dependency>
使用
以下示例代码实现了使用SDK查询直播截图配置的功能。
// This file is auto-generated, don't edit it. Thanks.
package demo;

import com.aliyun.auth.credentials.Credential;
import com.aliyun.auth.credentials.provider.StaticCredentialProvider;
import com.aliyun.core.http.HttpClient;
import com.aliyun.core.http.HttpMethod;
import com.aliyun.core.http.ProxyOptions;
import com.aliyun.httpcomponent.httpclient.ApacheAsyncHttpClientBuilder;
import com.aliyun.sdk.service.live20161101.models.*;
import com.aliyun.sdk.service.live20161101.*;
import com.google.gson.Gson;
import darabonba.core.RequestConfiguration;
import darabonba.core.client.ClientOverrideConfiguration;
import darabonba.core.utils.CommonUtil;
import darabonba.core.TeaPair;

//import javax.net.ssl.KeyManager;
//import javax.net.ssl.X509TrustManager;
import java.net.InetSocketAddress;
import java.time.Duration;
import java.util.*;
import java.util.concurrent.CompletableFuture;
import java.io.*;

public class DescribeLiveSnapshotConfig {
    public static void main(String[] args) throws Exception {

        // HttpClient Configuration
        /*HttpClient httpClient = new ApacheAsyncHttpClientBuilder()
                .connectionTimeout(Duration.ofSeconds(10)) // Set the connection timeout time, the default is 10 seconds
                .responseTimeout(Duration.ofSeconds(10)) // Set the response timeout time, the default is 20 seconds
                .maxConnections(128) // Set the connection pool size
                .maxIdleTimeOut(Duration.ofSeconds(50)) // Set the connection pool timeout, the default is 30 seconds
                // Configure the proxy
                .proxy(new ProxyOptions(ProxyOptions.Type.HTTP, new InetSocketAddress("<YOUR-PROXY-HOSTNAME>", 9001))
                        .setCredentials("<YOUR-PROXY-USERNAME>", "<YOUR-PROXY-PASSWORD>"))
                // If it is an https connection, you need to configure the certificate, or ignore the certificate(.ignoreSSL(true))
                .x509TrustManagers(new X509TrustManager[]{})
                .keyManagers(new KeyManager[]{})
                .ignoreSSL(false)
                .build();*/

        // Configure Credentials authentication information, including ak, secret, token
        StaticCredentialProvider provider = StaticCredentialProvider.create(Credential.builder()
                // Please ensure that the environment variables ALIBABA_CLOUD_ACCESS_KEY_ID and ALIBABA_CLOUD_ACCESS_KEY_SECRET are set.
                .accessKeyId(System.getenv("ALIBABA_CLOUD_ACCESS_KEY_ID"))
                .accessKeySecret(System.getenv("ALIBABA_CLOUD_ACCESS_KEY_SECRET"))
                //.securityToken(System.getenv("ALIBABA_CLOUD_SECURITY_TOKEN")) // use STS token
                .build());

        // Configure the Client
        AsyncClient client = AsyncClient.builder()
                .region("<Your RegionId>") // Region ID
                //.httpClient(httpClient) // Use the configured HttpClient, otherwise use the default HttpClient (Apache HttpClient)
                .credentialsProvider(provider)
                //.serviceConfiguration(Configuration.create()) // Service-level configuration
                // Client-level configuration rewrite, can set Endpoint, Http request parameters, etc.
                .overrideConfiguration(
                        ClientOverrideConfiguration.create()
                                  // Endpoint 请参考 https://api.aliyun.com/product/live
                                .setEndpointOverride("live.aliyuncs.com")
                        //.setConnectTimeout(Duration.ofSeconds(30))
                )
                .build();

        // Parameter settings for API request
        DescribeLiveSnapshotConfigRequest describeLiveSnapshotConfigRequest = DescribeLiveSnapshotConfigRequest.builder()
                .domainName("<Your DomainName>")
                .appName("<Your AppName>")
                // Request-level configuration rewrite, can set Http request parameters, etc.
                // .requestConfiguration(RequestConfiguration.create().setHttpHeaders(new HttpHeaders()))
                .build();

        // Asynchronously get the return value of the API request
        CompletableFuture<DescribeLiveSnapshotConfigResponse> response = client.describeLiveSnapshotConfig(describeLiveSnapshotConfigRequest);
        // Synchronously get the return value of the API request
        DescribeLiveSnapshotConfigResponse resp = response.get();
        System.out.println(new Gson().toJson(resp));
        // Asynchronous processing of return values
        /*response.thenAccept(resp -> {
            System.out.println(new Gson().toJson(resp));
        }).exceptionally(throwable -> { // Handling exceptions
            System.out.println(throwable.getMessage());
            return null;
        });*/

        // Finally, close the client
        client.close();
    }

}您可以使用该示例代码进行测试,测试时需将“<>”内容替换成实际使用的值。
<regionId>为地域ID,地域ID获取可参见服务接入点。
<ALIBABA_CLOUD_ACCESS_KEY_ID>与<ALIBABA_CLOUD_ACCESS_KEY_SECRET>为访问密钥,如果您还未拥有访问密钥,请参见本文档前提条件相关内容。
DescribeLiveSnapshotConfigRequest为查询截图配置对应请求类。
DescribeLiveSnapshotConfigResponse为查询截图配置对应响应类。
请求参数以及响应内容说明可参见API查询域名下的截图配置。
调用API有QPS限制,关于API的QPS限制说明请参见流控信息。
在以上示例中DescribeLiveSnapshotConfigResponse为反序列化后的响应对象,某些时候您可能需要直接获取响应结果HttpResponse,不需要进行反序列化,在此情况下只需更换调用方法即可。
HttpResponse httpResponse=client.doAction(describeLiveStreamSnapshotInfoRequest);
int status=httpResponse.getStatus();
使用说明:
当HTTP status大于等于200且小于300时,表示API调用成功。
当HTTP status大于等于300且小于500时,服务端SDK会提示ClientException,表示客户端错误。
当HTTP status大于等于500时,服务端SDK会提示ServerException,表示服务器端错误。
client.getAcsResponse与client.doAction两个方法都可以使用,您可以根据您业务的实际情况采用。
在使用视频直播SDK时遵循API加Request为API请求类,API加Response为API响应类。
此处列举几个常用API。
API | 请求类 | 响应类 |
DescribeLiveSnapshotConfig | DescribeLiveSnapshotConfig | |
AddLiveAppRecordConfig | AddLiveAppRecordConfig | |
DescribeLiveRecordConfig | DescribeLiveRecordConfig | |
AddLiveStreamTranscode | AddLiveStreamTranscode | |
DescribeLiveStreamTranscodeInfo | DescribeLiveStreamTranscodeInfo | |
BatchSetLiveDomainConfigs | BatchSetLiveDomainConfigs | |
DescribeLiveDomainConfigs | DescribeLiveDomainConfigs | |
更多API可参见API概览。 | ||
资源控制
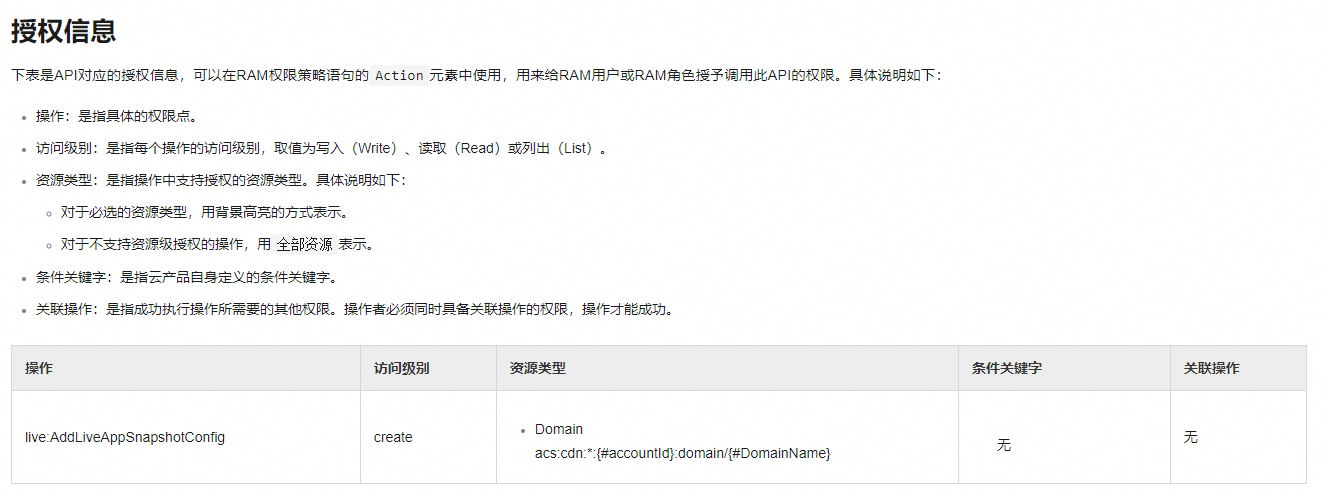
在您查看API的过程中,可能已留意到API有关授权信息的说明,比如在添加直播截图配置API中,有以下关于授权信息的内容。
在为RAM用户授权的过程中,您已为RAM用户授予了API的访问权限。但有些时候您可能需要更细的权限控制,比如调用同一个API,RAM用户A只能操作DomainA域名,RAM用户B只能操作DomainB域名。如果您有这样的业务需求就可以通过资源控制进行实现,实现资源控制授权可参考文档自定义授权。
各API支持的资源控制说明请参见API授权信息总览。