本文以包含服務提供者和服務消費者的Spring Cloud應用為例,讓您快速體驗如何在本地開發、調試Spring Cloud應用並部署到SAE,實現應用的服務註冊與發現,以及消費者對提供者的調用。
背景資訊
-
如果您對Spring Cloud很陌生,僅瞭解Spring和Maven基礎知識,那麼閱讀本文後,您將掌握如何通過Spring Cloud Alibaba Nacos Discovery實現Spring Cloud應用的服務註冊與發現,以及實現消費者對提供者的調用。
-
如果您熟悉Spring Cloud中的Eureka、Consul和ZooKeeper等服務註冊組件,但未使用過Spring Cloud Alibaba的服務註冊組件Nacos Discovery,那麼您僅需將服務註冊組件的服務依賴關係和服務配置替換成Spring Cloud Alibaba Nacos Discovery,無需修改任何代碼。
Spring Cloud Alibaba Nacos Discovery同樣實現了Spring Cloud Registry的標準介面與規範,與您之前使用Spring Cloud接入服務註冊與發現的方式基本一致。
-
如果您熟悉如何使用開源版本的Spring Cloud Alibaba Nacos Discovery實現Spring Cloud應用的服務註冊與發現,那麼您可以將應用直接部署到SAE,即可使用到SAE提供的商業版服務註冊與發現的能力。更多資訊,請參見應用託管概述。
為什麼使用SAE服務註冊中心
SAE服務註冊中心提供了開源Nacos Server的商用版本,使用開源版本Spring Cloud Alibaba Nacos Discovery開發的應用可以直接使用SAE提供的商業版服務註冊中心。
SAE服務註冊中心與Nacos、Eureka和Consul相比,具有以下優勢:
-
共用組件,節省了部署、營運Nacos、Eureka或Consul的成本。
-
在服務註冊和發現的調用中都進行了鏈路加密,保護您的服務,無需再擔心服務被未授權的應用發現。
-
SAE服務註冊中心與SAE其他組件緊密結合,為您提供一整套的微服務解決方案,包括環境隔離、灰階發布等。
您在SAE部署應用時,SAE服務註冊中心以高優先順序自動化佈建Nacos Server服務端地址和服務連接埠,以及命名空間、AccessKey、Context-path等資訊,無需進行任何額外的配置。
當您的微服務應用較多時,註冊中心按推薦程度由高到低依次排序如下。

使用MSE的Nacos作為服務註冊中心的具體操作,請參見使用MSE的Nacos註冊中心。

搭建並部署自建Nacos註冊中心時,您需要確認以下內容。
確保SAE的網路與自建Nacos的網路互連。
確保
-D和-XX參數未交替使用,以免命令失效。範例程式碼如下:修改前:
java -Dalicloud.deployment.mode=EDAS_MANAGED -XX:+UseContainerSupport -XX:InitialRAMPercentage=70.0 -XX:MaxRAMPercentage=70.0 -XX:+UnlockExperimentalVMOptions -XX:+UseWisp2 -Dio.netty.transport.noNative=true -XX:+UseG1GC -Dspring.profiles.active=yace -Dnacos.use.endpoint.parsing.rule=false -Dnacos.use.cloud.namespace.parsing=false -jar /home/admin/app/xx-server.jar修改後:
java -XX:+UseContainerSupport -XX:InitialRAMPercentage=70.0 -XX:MaxRAMPercentage=70.0 -XX:+UnlockExperimentalVMOptions -XX:+UseWisp2 -Dio.netty.transport.noNative=true -XX:+UseG1GC -Dspring.profiles.active=yace -Dnacos.use.endpoint.parsing.rule=false -Dnacos.use.cloud.namespace.parsing=false -jar /home/admin/app/xx-server.jar
建議在部署應用時,使用鏡像或者JAR包方式,並配置啟動參數
-Dnacos.use.endpoint.parsing.rule=false和-Dnacos.use.cloud.namespace.parsing=false。重要啟動參數需要放在
-jar之前,否則可能會導致無法使用非SAE內建的註冊中心。如果採用鏡像方式,請將
-Dnacos.use.endpoint.parsing.rule=false和-Dnacos.use.cloud.namespace.parsing=false配置在鏡像檔案的程式啟動命令中。Docker鏡像製作方法,請參見製作鏡像樣本。範例程式碼如下:
RUN echo 'eval exec java -Dnacos.use.endpoint.parsing.rule=false -Dnacos.use.cloud.namespace.parsing=false -jar $CATALINA_OPTS /home/admin/app/hello-edas-0.0.1-SNAPSHOT.jar'> /home/admin/start.sh && chmod +x /home/admin/start.sh如果採用JAR包方式,請在控制台啟動命令設定地區的options設定文字框輸入
-Dnacos.use.endpoint.parsing.rule=false -Dnacos.use.cloud.namespace.parsing=false。圖示為Open JDK 8運行環境下的Java應用。具體操作,請參見設定啟動命令。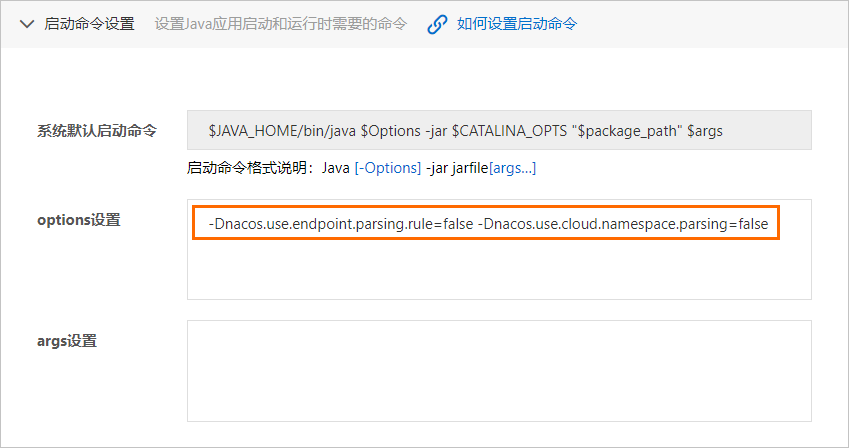

SAE提供Java微服務自動定址的Nacos Server能力,您可以通過SAE的服務註冊發現功能配置。具體操作,請參見使用SAE內建Nacos註冊中心。
準備工作
-
下載Maven並設定環境變數。
-
啟動Nacos Server。
下載並解壓Nacos Server。
進入nacos/bin目錄,啟動Nacos Server。
Linux、Unix、macOS系統:執行命令
sudo sh startup.sh -m standalone。Windows系統:執行命令
startup.cmd -m standalone。
說明standalone表示單機模式運行,非叢集模式。startup.cmd檔案預設以叢集模式啟動,因此您在使用Windows系統時,如果直接雙擊執行startup.cmd檔案會導致啟動失敗,此時需要在startup.cmd檔案內設定MODE="standalone"。 更多資訊,請參見Nacos快速開始。
步驟一:建立服務提供者
在本地建立服務提供者應用工程,添加依賴,開啟服務註冊與發現功能,並將註冊中心指定為Nacos Server。
-
建立命名為
nacos-service-provider的Maven工程。 -
在
pom.xml檔案中添加依賴。具體樣本,請參見nacos-service-provider。本文以Spring Boot 2.1.4.RELEASE和Spring Cloud Greenwich.SR1為例,依賴如下:
說明不支援Spring Boot 2.4及以上版本。支援Spring Cloud Alibaba2.2.6.RELEASE版本(1.4.2用戶端版本)。
<parent>
    <groupId>org.springframework.boot</groupId>
    <artifactId>spring-boot-starter-parent</artifactId>
    <version>2.1.4.RELEASE</version>
    <relativePath/>
</parent>

<dependencies>
    <dependency>
        <groupId>com.alibaba.cloud</groupId>
        <artifactId>spring-cloud-starter-alibaba-nacos-discovery</artifactId>
        <version>2.1.0.RELEASE</version>
    </dependency>
    <dependency>
        <groupId>org.springframework.boot</groupId>
        <artifactId>spring-boot-starter-web</artifactId>
    </dependency>
</dependencies>

<dependencyManagement>
    <dependencies>
        <dependency>
            <groupId>org.springframework.cloud</groupId>
            <artifactId>spring-cloud-dependencies</artifactId>
            <version>Greenwich.SR1</version>
            <type>pom</type>
            <scope>import</scope>
        </dependency>
    </dependencies>
</dependencyManagement>

<build>
    <plugins>
        <plugin>
            <groupId>org.springframework.boot</groupId>
            <artifactId>spring-boot-maven-plugin</artifactId>
        </plugin>
    </plugins>
</build>
樣本中使用的版本為Spring Cloud Greenwich,對應Spring Cloud Alibaba版本為2.1.1.RELEASE。
-
如果使用Spring Cloud Finchley版本,對應Spring Cloud Alibaba版本為2.0.1.RELEASE。
-
如果使用Spring Cloud Edgware版本,對應Spring Cloud Alibaba版本為1.5.1.RELEASE。
說明Spring Cloud Edgware版本的生命週期已結束,不推薦使用該版本開發應用。
-
-
在
src\main\java下建立Packagecom.aliware.edas。 -
在Package
com.aliware.edas中建立服務提供者的啟動類ProviderApplication,並添加以下代碼。其中
@EnableDiscoveryClient註解表明此應用需開啟服務註冊與發現功能。package com.aliware.edas; import org.springframework.boot.SpringApplication; import org.springframework.boot.autoconfigure.SpringBootApplication; import org.springframework.cloud.client.discovery.EnableDiscoveryClient; @SpringBootApplication @EnableDiscoveryClient public class ProviderApplication { public static void main(String[] args) { SpringApplication.run(ProviderApplication.class, args); } } -
在Package
com.aliware.edas中建立EchoController。EchoController中,指定URL mapping為/echo/{string},指定HTTP方法為GET,從URL路徑中擷取方法參數,並回顯收到的參數。package com.aliware.edas; import org.springframework.web.bind.annotation.PathVariable; import org.springframework.web.bind.annotation.RequestMapping; import org.springframework.web.bind.annotation.RequestMethod; import org.springframework.web.bind.annotation.RestController; @RestController public class EchoController { @RequestMapping(value = "/echo/{string}", method = RequestMethod.GET) public String echo(@PathVariable String string) { return string; } } -
在
src\main\resources路徑下建立檔案application.properties,在application.properties中添加如下配置,指定Nacos Server的地址。spring.application.name=service-provider server.port=18081 spring.cloud.nacos.discovery.server-addr=127.0.0.1:8848其中
127.0.0.1為Nacos Server的地址。如果您的Nacos Server部署在另外一台機器,則需要修改成對應的IP地址。如果有其它需求,可以在application.properties檔案中增加配置。更多資訊,請參見配置項參考。 -
驗證結果。
-
執行
nacos-service-provider中ProviderApplication的main函數,啟動應用。 -
登入本地啟動的Nacos Server控制台
http://127.0.0.1:8848/nacos。本地Nacos控制台的預設使用者名和密碼同為nacos。
-
在左側導覽列,選擇服务管理 > 服务列表。
可以看到服務列表中已經包含了
service-provider,且在详情中可以查詢該服務的詳情。
-
步驟二:建立服務消費者
本節除介紹服務註冊的功能,還將介紹Nacos服務與RestTemplate和FeignClient兩個用戶端如何配合使用。
-
建立命名為
nacos-service-consumer的Maven工程。 -
在
pom.xml中添加依賴。具體樣本,請參見nacos-service-consumer。
<parent> <groupId>org.springframework.boot</groupId> <artifactId>spring-boot-starter-parent</artifactId> <version>2.1.4.RELEASE</version> <relativePath/> </parent> <dependencies> <dependency> <groupId>com.alibaba.cloud</groupId> <artifactId>spring-cloud-starter-alibaba-nacos-discovery</artifactId> <version>2.1.0.RELEASE</version> </dependency> <dependency> <groupId>org.springframework.boot</groupId> <artifactId>spring-boot-starter-web</artifactId> </dependency> <dependency> <groupId>org.springframework.cloud</groupId> <artifactId>spring-cloud-starter-openfeign</artifactId> </dependency> </dependencies> <dependencyManagement> <dependencies> <dependency> <groupId>org.springframework.cloud</groupId> <artifactId>spring-cloud-dependencies</artifactId> <version>Greenwich.SR1</version> <type>pom</type> <scope>import</scope> </dependency> </dependencies> </dependencyManagement> <build> <plugins> <plugin> <groupId>org.springframework.boot</groupId> <artifactId>spring-boot-maven-plugin</artifactId> </plugin> </plugins> </build> -
在
src\main\java下建立Packagecom.aliware.edas。 -
在Package
com.aliware.edas中配置RestTemplate和FeignClient。-
在Package
com.aliware.edas中建立一個介面類EchoService,添加@FeignClient註解,並配置對應的HTTP URL地址及HTTP方法。package com.aliware.edas; import org.springframework.cloud.openfeign.FeignClient; import org.springframework.web.bind.annotation.PathVariable; import org.springframework.web.bind.annotation.RequestMapping; import org.springframework.web.bind.annotation.RequestMethod; @FeignClient(name = "service-provider") public interface EchoService { @RequestMapping(value = "/echo/{str}", method = RequestMethod.GET) String echo(@PathVariable("str") String str); } -
在Package
com.aliware.edas中建立啟動類ConsumerApplication並添加相關配置。-
使用
@EnableDiscoveryClient註解啟用服務註冊與發現。 -
使用
@EnableFeignClients註解啟用FeignClient。 -
添加
@LoadBalanced註解將RestTemplate與服務發現整合。
package com.aliware.edas; import org.springframework.boot.SpringApplication; import org.springframework.boot.autoconfigure.SpringBootApplication; import org.springframework.cloud.client.discovery.EnableDiscoveryClient; import org.springframework.cloud.client.loadbalancer.LoadBalanced; import org.springframework.cloud.openfeign.EnableFeignClients; import org.springframework.context.annotation.Bean; import org.springframework.web.client.RestTemplate; @SpringBootApplication @EnableDiscoveryClient @EnableFeignClients public class ConsumerApplication { @LoadBalanced @Bean public RestTemplate restTemplate() { return new RestTemplate(); } public static void main(String[] args) { SpringApplication.run(ConsumerApplication.class, args); } } -
-
-
在Package
com.aliware.edas中建立類TestController以示範和驗證服務發現功能。package com.aliware.edas; import org.springframework.beans.factory.annotation.Autowired; import org.springframework.web.bind.annotation.PathVariable; import org.springframework.web.bind.annotation.RequestMapping; import org.springframework.web.bind.annotation.RequestMethod; import org.springframework.web.bind.annotation.RestController; import org.springframework.web.client.RestTemplate; @RestController public class TestController { @Autowired private RestTemplate restTemplate; @Autowired private EchoService echoService; @RequestMapping(value = "/echo-rest/{str}", method = RequestMethod.GET) public String rest(@PathVariable String str) { return restTemplate.getForObject("http://service-provider/echo/" + str, String.class); } @RequestMapping(value = "/echo-feign/{str}", method = RequestMethod.GET) public String feign(@PathVariable String str) { return echoService.echo(str); } } -
在
src\main\resources路徑下建立檔案application.properties,在application.properties中添加以下配置,指定Nacos Server的地址。spring.application.name=service-consumer server.port=18082 spring.cloud.nacos.discovery.server-addr=127.0.0.1:8848其中
127.0.0.1為Nacos Server的地址。如果您的Nacos Server部署在另外一台機器,則需要修改成對應的IP地址。如果有其它需求,可以在application.properties檔案中增加配置。更多資訊,請參見配置項參考。 -
驗證結果。
-
執行
nacos-service-consumer中ConsumerApplication的main函數,啟動應用。 -
登入本地啟動的Nacos Server控制台
http://127.0.0.1:8848/nacos。本地Nacos控制台的預設使用者名和密碼同為nacos。
-
在左側導覽列,選擇服务管理 > 服务列表,可以看到服務列表中已經包含了
service-consumer,且在詳情中可以查詢該服務的詳情。
-
步驟三:本地測試
在本地測試消費者對提供者的服務調用結果。
-
Linux、Unix、macOS系統:運行以下命令。
curl http://127.0.0.1:18082/echo-rest/rest-rest curl http://127.0.0.1:18082/echo-feign/feign-rest -
Windows系統:在瀏覽器中輸入http://127.0.0.1:18082/echo-rest/rest-rest和http://127.0.0.1:18082/echo-feign/feign-rest。
步驟四:將應用部署到SAE
在本地完成應用的開發與測試後,便可將應用打包並部署到SAE。
nacos-service-provider和nacos-service-consumer分別部署為2個應用,並且需要部署在同一個地區的同一個命名空間下。具體步驟,請參見部署Java應用。
-
如果使用JAR包部署,在應用部署配置時選擇应用运行环境為标准Java应用运行环境。
-
如果使用WAR包部署,在應用部署配置時应用运行环境為apache-tomcat-XXX。
當您將應用部署到SAE時,SAE服務註冊中心會以更高優先順序去設定Nacos Server服務端地址和服務連接埠,以及命名空間、AccessKey、Context-path資訊。您無需進行任何額外的配置,原有的配置內容可以選擇保留或刪除。
步驟五:結果驗證
-
為部署到SAE的應用
nacos-service-consumer綁定公網CLB。配置公網 CLB 訪問時,网络协议選擇HTTP,HTTP 端口設定為80,容器端口設定為18082。具體步驟,請參見為應用綁定CLB。 -
在瀏覽器中輸入應用的公網訪問地址並斷行符號,格式為
http://<公網訪問IP>/echo-rest/rest-rest或http://<公網訪問IP>/echo-feign/feign-rest。頁面上返迴響應結果,表示應用部署成功。
配置項參考
|
配置項 |
Key |
預設值 |
說明 |
|
服務端地址 |
spring.cloud.nacos.discovery.server-addr |
無 |
Nacos Server啟動監聽的IP地址和連接埠。 |
|
服務名 |
spring.cloud.nacos.discovery.service |
${spring.application.name} |
當前服務的名稱。 |
|
網卡名 |
spring.cloud.nacos.discovery.network-interface |
無 |
當未配置IP地址時,註冊IP為此網卡所對應的IP地址。如果網卡名也未配置,則預設取第一塊網卡的地址。 |
|
註冊的IP地址 |
spring.cloud.nacos.discovery.ip |
無 |
高優先順序。 |
|
註冊的連接埠 |
spring.cloud.nacos.discovery.port |
-1 |
預設情況下不用配置,系統會自動探測。 |
|
命名空間 |
spring.cloud.nacos.discovery.namespace |
無 |
不同環境的註冊邏輯隔離,例如開發測試環境和生產環境的資源(如配置、服務)隔離等。 |
|
Metadata |
spring.cloud.nacos.discovery.metadata |
無 |
使用Map格式配置,您可以根據自己的需求自訂和服務相關的中繼資料資訊。 |
|
叢集 |
spring.cloud.nacos.discovery.cluster-name |
DEFAULT |
配置Nacos叢集名稱。 |
|
存取點 |
spring.cloud.nacos.discovery.endpoint |
無 |
地區的某個服務的入口網域名稱。通過此網域名稱可以動態地擷取服務端地址,此配置在部署到SAE時無需填寫。 |
|
是否整合Ribbon |
ribbon.nacos.enabled |
true |
如果沒有明確需求,不需要修改。 |
更多關於Spring Cloud Alibaba Nacos Discovery的資訊,請參見開源版本的Nacos Discovery。