本文介紹如何使用開發人員中心進行ComfyUI API整合驗證。
點擊登入PAI ArtLab控制台。
ComfyUI API整合驗證
API版
ComfyUI API版本主要⽤於多ComfyUI執行個體下的API調⽤, ⾯向開發人員整合使⽤,⽆Web圖形界⾯。 由於ComfyUI是屬於具狀態服務,因此多ComfyUI執行個體情況下,需要通過EAS非同步佇列服務才能正常調⽤ComfyUI服務。
前提條件
已搭建Python環境,並安裝EAS SDK依賴(非同步隊列依賴):pip install eas_prediction
操作步驟
登入PAI ArtLab控制台,在開發人員中心頁面的自訂服務頁簽,單擊建立自訂服務。
其中,服務版本選擇ComfyUI(API版)。
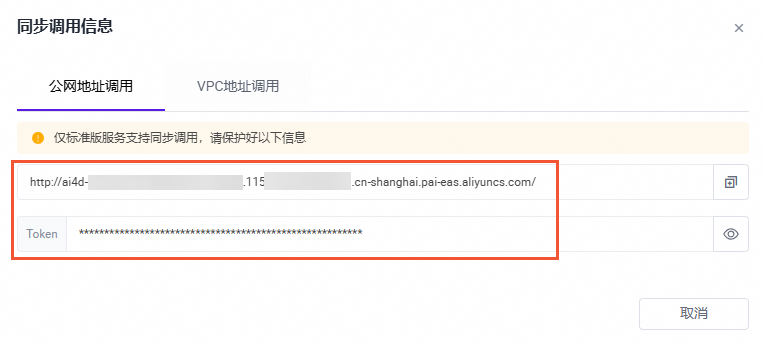
待服務狀態變為運行中,單擊調用資訊,在公網輸出請求地址頁簽擷取請求URL、Token、Endpoint和服務ID。

使用已獲得的調用資訊替換代碼中的對應內容,然後運行代碼。
程式碼範例
import requests

##### 根據調試資訊,替換以下參數 #####
input_url = "http://115************.cn-shanghai.pai-eas.aliyuncs.com/api/predict/ai4d_comfyuiapi_1u38************"
token = "Yjha************"
endpoint = "115************.cn-shanghai.pai-eas.aliyuncs.com"
service_name = "ai4d_comfyuiapi_1u38************/sink"
################################

session = requests.session()
session.headers.update({"Authorization": f"{token}"})

work_flow = {
    "3": {
        "inputs": {
            "seed": 156680208700286,
            "steps": 20,
            "cfg": 8,
            "sampler_name": "euler",
            "scheduler": "normal",
            "denoise": 1,
            "model": [
                "4",
                0
            ],
            "positive": [
                "6",
                0
            ],
            "negative": [
                "7",
                0
            ],
            "latent_image": [
                "5",
                0
            ]
        },
        "class_type": "KSampler",
        "_meta": {
            "title": "K採樣器"
        }
    },
    "4": {
        "inputs": {
            "ckpt_name": "3dAnimationDiffusion_v10.safetensors"
        },
        "class_type": "CheckpointLoaderSimple",
        "_meta": {
            "title": "Checkpoint載入器(簡易)"
        }
    },
    "5": {
        "inputs": {
            "width": 512,
            "height": 512,
            "batch_size": 1
        },
        "class_type": "EmptyLatentImage",
        "_meta": {
            "title": "空Latent"
        }
    },
    "6": {
        "inputs": {
            "text": "beautiful scenery nature glass bottle landscape, , purple galaxy bottle,",
            "clip": [
                "4",
                1
            ]
        },
        "class_type": "CLIPTextEncode",
        "_meta": {
            "title": "CLIP⽂本編碼器"
        }
    },
    "7": {
        "inputs": {
            "text": "text, watermark",
            "clip": [
                "4",
                1
            ]
        },
        "class_type": "CLIPTextEncode",
        "_meta": {
            "title": "CLIP⽂本編碼器"
        }
    },
    "8": {
        "inputs": {
            "samples": [
                "3",
                0
            ],
            "vae": [
                "4",
                2
            ]
        },
        "class_type": "VAEDecode",
        "_meta": {
            "title": "VAE解碼"
        }
    },
    "9": {
        "inputs": {
            "filename_prefix": "ComfyUI",
            "images": [
                "8",
                0
            ]
        },
        "class_type": "SaveImage",
        "_meta": {
            "title": "儲存映像"
        }
    }
}

for i in range(1):
    payload = work_flow
    response = session.post(url=f'{input_url}/api_prompt?task_id=txt2img_test', json=payload)
    if response.status_code != 200:
        exit(f"send request error:{response.content}, response code:{response.status_code}")
    else:
        print(f"send {i} success, index is {response.content}")


from eas_prediction import QueueClient

sink_queue = QueueClient(f'{endpoint}', f'{service_name}')
sink_queue.set_token(f'{token}')
sink_queue.init()

watcher = sink_queue.watch(0, 1, auto_commit=False)
for x in watcher.run():
    if 'task_id' in x.tags:
        print('index {} task_id is {}'.format(x.index, x.tags['task_id']))
        print(f'index {x.index} data is {x.data}')
        sink_queue.commit(x.index)
運行完後,在產生結果中擷取檔案名稱。

在PAI ArtLab頁面,滑鼠移至上方右上方
 ,單擊儲存,訪問OSS Bucket,擷取儲存路徑。
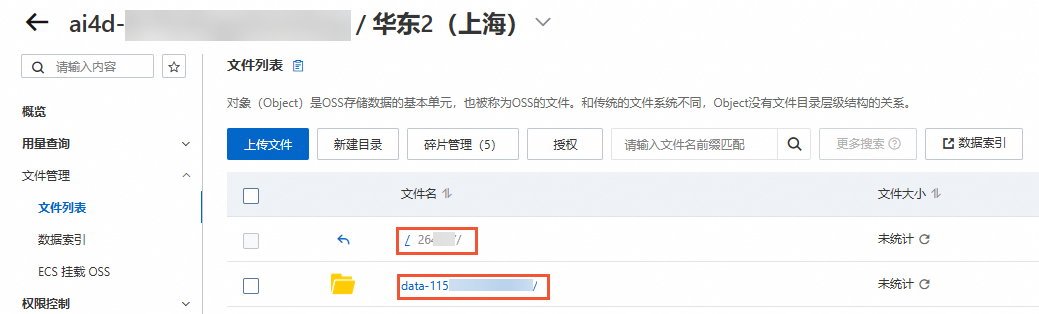
拼接OSS圖片地址並訪問,格式為:OSS Bucket路徑/output/檔案名稱
例如,26****/data-115****************/output/ComfyUI_00000000_174427782695938_599ffc33-edea-4e64-bb60-28e834940f5c_.png
專享版
ComfyUI專享版同時⽀持API調⽤和Web調試, 測實驗證流程參考API版。
前提條件
已搭建Python環境。
操作步驟
登入PAI ArtLab控制台,在開發人員中心頁面的自訂服務頁簽,單擊建立自訂服務。
其中,服務版本選擇ComfyUI(專享版)。
待服務狀態變為運行中,單擊調用資訊,在公網地址調用頁簽擷取請求URL和Token。
使用已獲得的調用資訊替換代碼中的對應內容,然後運行代碼。
程式碼範例
import requests

##### 根據調試資訊,替換以下參數 #####
url = "http://ai4d_comfyuiapi_1u38************.115************.cn-shanghai.pai-eas.aliyuncs.com/"
token = "Yjha************"
################################

payload = {
    "prompt": {
        "3": {
            "inputs": {
                "seed": 156680208700286,
                "steps": 20,
                "cfg": 8,
                "sampler_name": "euler",
                "scheduler": "normal",
                "denoise": 1,
                "model": [
                    "4",
                    0
                ],
                "positive": [
                    "6",
                    0
                ],
                "negative": [
                    "7",
                    0
                ],
                "latent_image": [
                    "5",
                    0
                ]
            },
            "class_type": "KSampler",
            "_meta": {
                "title": "K採樣器"
            }
        },
        "4": {
            "inputs": {
                "ckpt_name": "3dAnimationDiffusion_v10.safetensors"
            },
            "class_type": "CheckpointLoaderSimple",
            "_meta": {
                "title": "Checkpoint載入器(簡易)"
            }
        },
        "5": {
            "inputs": {
                "width": 512,
                "height": 512,
                "batch_size": 1
            },
            "class_type": "EmptyLatentImage",
            "_meta": {
                "title": "空Latent"
            }
        },
        "6": {
            "inputs": {
                "text": "beautiful scenery nature glass bottle landscape, , purple galaxy bottle,",
                "clip": [
                    "4",
                    1
                ]
            },
            "class_type": "CLIPTextEncode",
            "_meta": {
                "title": "CLIP⽂本編碼器"
            }
        },
        "7": {
            "inputs": {
                "text": "text, watermark",
                "clip": [
                    "4",
                    1
                ]
            },
            "class_type": "CLIPTextEncode",
            "_meta": {
                "title": "CLIP⽂本編碼器"
            }
        },
        "8": {
            "inputs": {
                "samples": [
                    "3",
                    0
                ],
                "vae": [
                    "4",
                    2
                ]
            },
            "class_type": "VAEDecode",
            "_meta": {
                "title": "VAE解碼"
            }
        },
        "9": {
            "inputs": {
                "filename_prefix": "ComfyUI",
                "images": [
                    "8",
                    0
                ]
            },
            "class_type": "SaveImage",
            "_meta": {
                "title": "儲存映像"
            }
        }
    }
}

# 發起請求
session = requests.session()
session.headers.update({"Authorization": f"{token}"})
prompt_url = url + "prompt"

response = session.post(url=f'{prompt_url}', json=payload)
if response.status_code != 200:
    raise Exception(response.content)

data = response.json()
prompt_id = data['prompt_id']
print(f"get data: {data}, get prompt id: {prompt_id}")


# 擷取結果
# 構造請求URL
history_url = f"{url}history/{prompt_id}"

session = requests.session()
session.headers.update({"Authorization": f"{token}"})

response = session.get(url=f'{history_url}')

if response.status_code != 200:
    raise Exception(response.content)

data = response.json()
print(data)

# 解析 JSON 資料,擷取所有 outputs 的圖片資訊
for prompt_id, prompt_data in data.items():
    outputs = prompt_data.get("outputs", {})
    for node_id, node_data in outputs.items():
        images = node_data.get("images", [])
        for image in images:
            filename = image.get("filename")
            print(f"節點號: {node_id}, 圖⽚⽂件名: {filename}")
運行完後,在產生結果中擷取檔案名稱。

在PAI ArtLab頁面,滑鼠移至上方右上方
,單擊儲存,訪問OSS Bucket,擷取儲存路徑。拼接OSS圖片地址並訪問,格式為:OSS Bucket路徑/output/檔案名稱
例如,26****/data-115****************/output/ComfyUI_00000000_174427782695938_599ffc33-edea-4e64-bb60-28e834940f5c_.png