本文檔將介紹如何在您的iOS專案中整合 ARTC SDK, 快速實現一個簡單的即時音視頻互動App,適用於互動直播和視訊通話等情境。
功能簡介
在開始之前,瞭解以下幾個關鍵概念會很有協助:
-
ARTC SDK:這是阿里雲的即時音視頻產品,協助開發人員快速實現即時音視頻互動的SDK。
-
GRTN:阿里雲全球即時傳輸網路,提供超低延時、高音質、安全可靠的音視頻通訊服務。
-
頻道:相當於一個虛擬房間,所有加入同一頻道的使用者都可以進行即時音視頻互動。
-
主播:可在頻道內發布音視頻流,並可訂閱其他主播發布的音視頻流。
-
觀眾:可在頻道內訂閱音視頻流,不能發布音視頻流。
-
使用者需要調用
setChannelProfile(設定頻道情境),後調用joinChannel加入頻道:-
視訊通話情境:所有使用者都是主播角色,可以進行推流和拉流。
-
互動直播情境:需要調用
setClientRole(設定角色),在頻道內推流的使用者佈建主播角色;如果使用者只需要拉流,不需要推流,則設定觀眾角色。
-
-
加入頻道後,不同角色的使用者有不同的推拉流行為:
-
所有加入頻道內的使用者都可以接收頻道內的音視頻流。
-
主播角色可以在頻道內推音視頻流。
-
觀眾如果需要推流,需要調用
setClientRole方法,將使用者角色切換成主播,便可以推流。
-
樣本專案
阿里雲ARTC SDK提供了開源的即時音視頻互動樣本專案供客戶參考,您可以前往下載或查看樣本源碼。
前提條件
在運行樣本專案之前,請確保開發環境滿足以下要求:
開發工具:Xcode 14.0 及以上版本,推薦使用最新正式版本。
配置推薦:CocoaPods 1.9.3 及以上版本。
測試裝置:iOS 9.0 及以上版本的測試裝置。
推薦使用真機測試,類比機可能存在功能缺失。
網路環境:需要穩定的網路連接。
應用準備:擷取即時音視頻應用的AppID和AppKey,詳情請參見建立應用。
建立專案(可選)
本節將介紹如何建立專案並為專案添加體驗音視頻互動必須的許可權。如果已有專案可跳過。
-
開啟 Xcode,選擇 File->New->Project,選擇App的模板,下一步後Interface 選擇 Storyboard,Language 選擇 Swift。
-
根據需要,修改工程配置,包括
Bundle Identifier、Signing、Minimum Deployments等。
設定項目
步驟一:匯入SDK
CocoaPods 自動整合(推薦)
-
開啟終端,在您的開發裝置上安裝 CocoaPods 工具,如果您已經完成安裝,可以跳過此步驟。
sudo gem install cocoapods-
開啟終端,進入專案根目錄,在終端視窗中輸入以下命令,建立 Podfile 檔案。
pod init-
開啟並編輯產生的 Podfile檔案,添加RTC SDK依賴,最新版本7.11.0。
target 'MyApp' do
  use_frameworks!
  # 將${latest version}替換為具體的版本號碼
  pod 'AliVCSDK_ARTC', '~> ${latest version}'
end-
在終端視窗中輸入以下命令更新專案中的CocoaPods依賴庫。
pod install-
成功執行後,專案檔夾下將產生一個尾碼為
.xcworkspace的工程檔案,雙擊該檔案通過 Xcode開啟專案即可載入工作區自動整合 CocoaPods 依賴。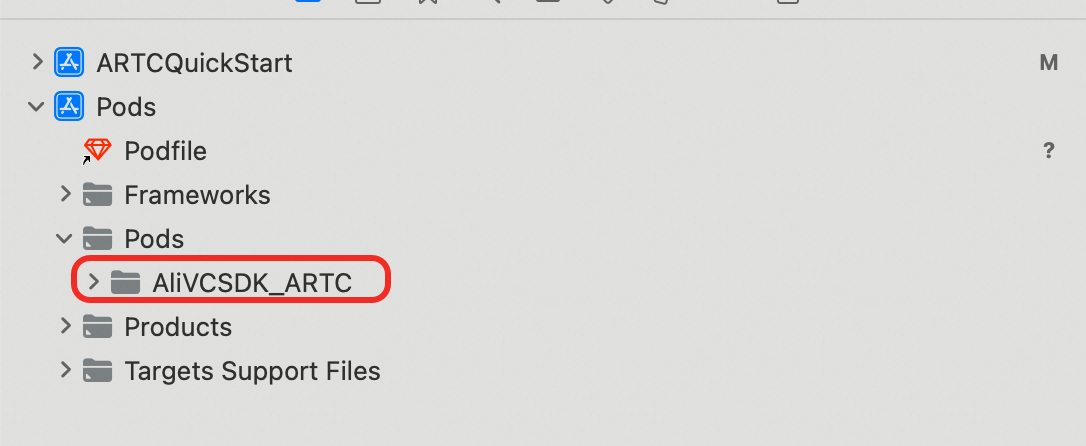
下載SDK手動整合
-
在SDK下載中,擷取最新的 ARTC SDK 檔案並解壓。
-
將解壓後的 SDK 包內的 framework 檔案拷貝到專案目錄下。
-
使用 Xcode 開啟專案,選擇
File -> Add Files to "xxx",菜單,添加 SDK 的庫檔案到專案。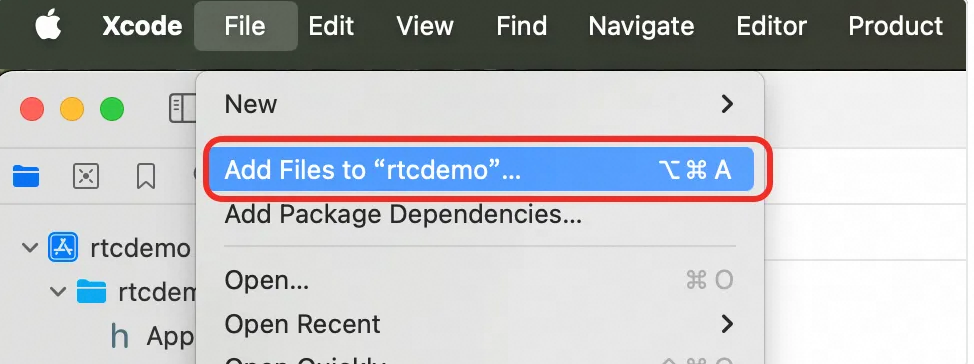
-
選擇目標,將匯入的 framework 檔案設定為
"Embed & Sign"。

步驟二:設定許可權
-
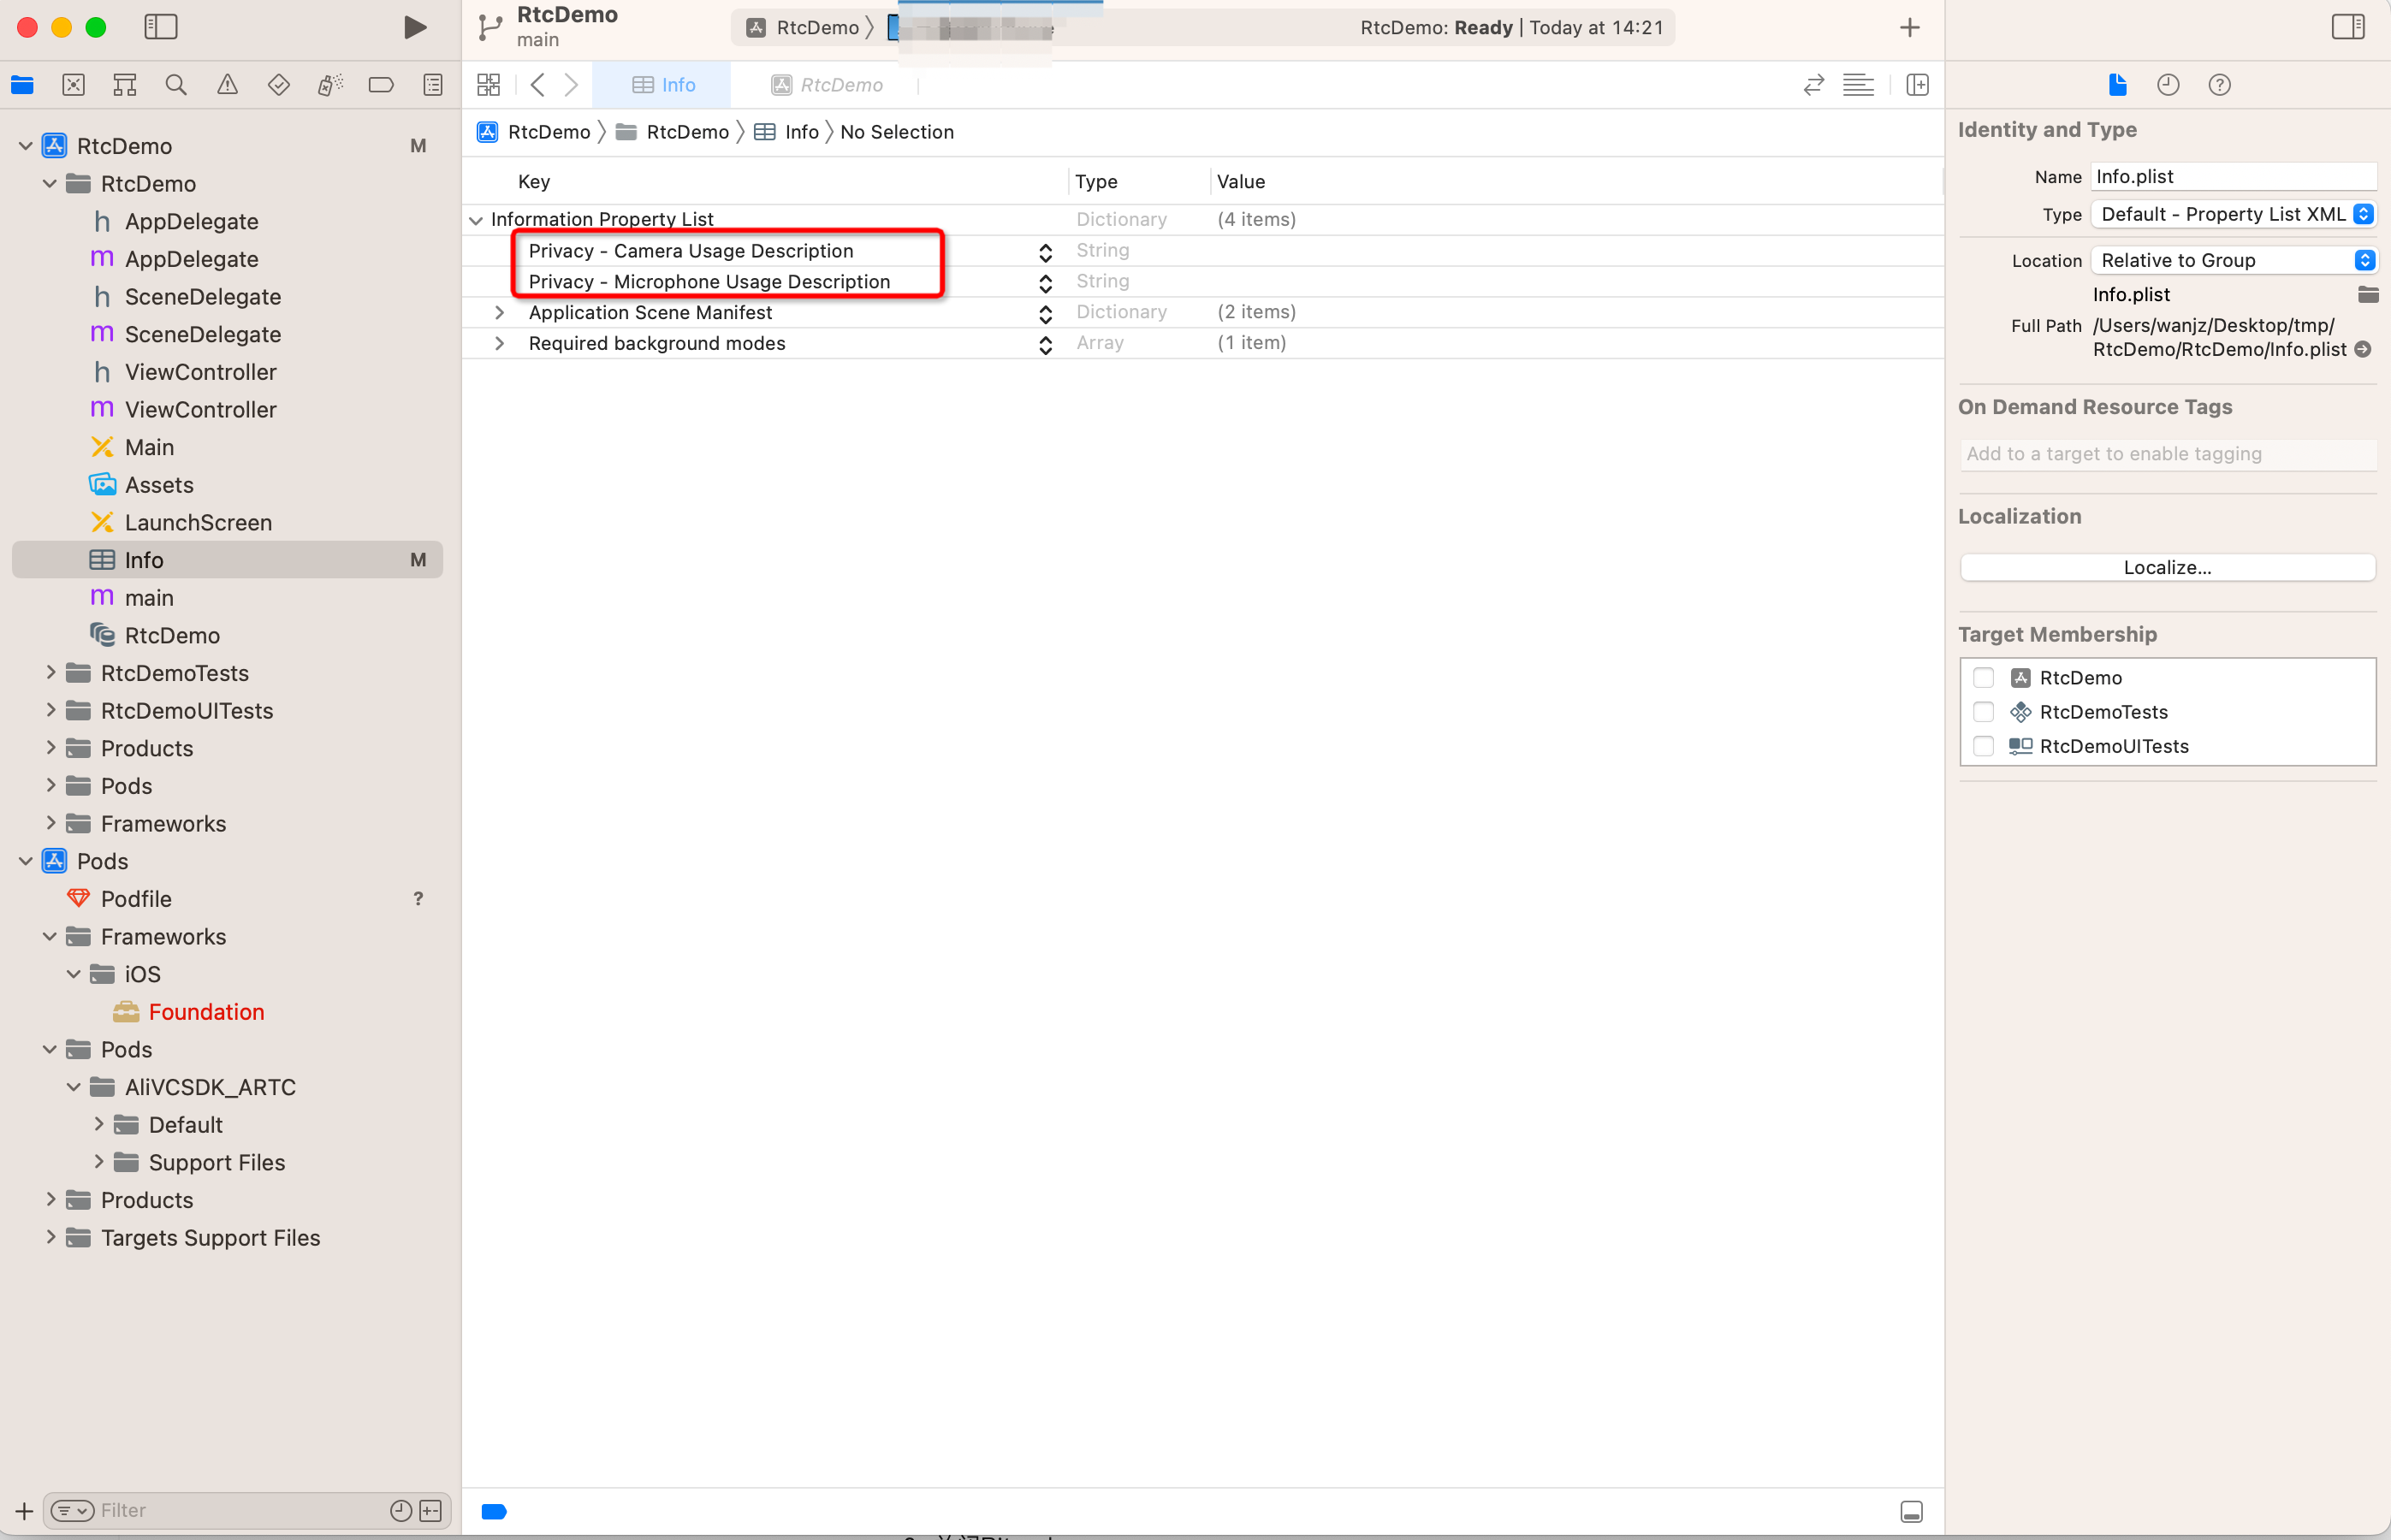
務必添加錄音許可權和相機許可權
在Info.plist檔案中添加網路攝影機和麥克風許可權Privacy - Camera Usage Description、Privacy - Microphone Usage Description。
-
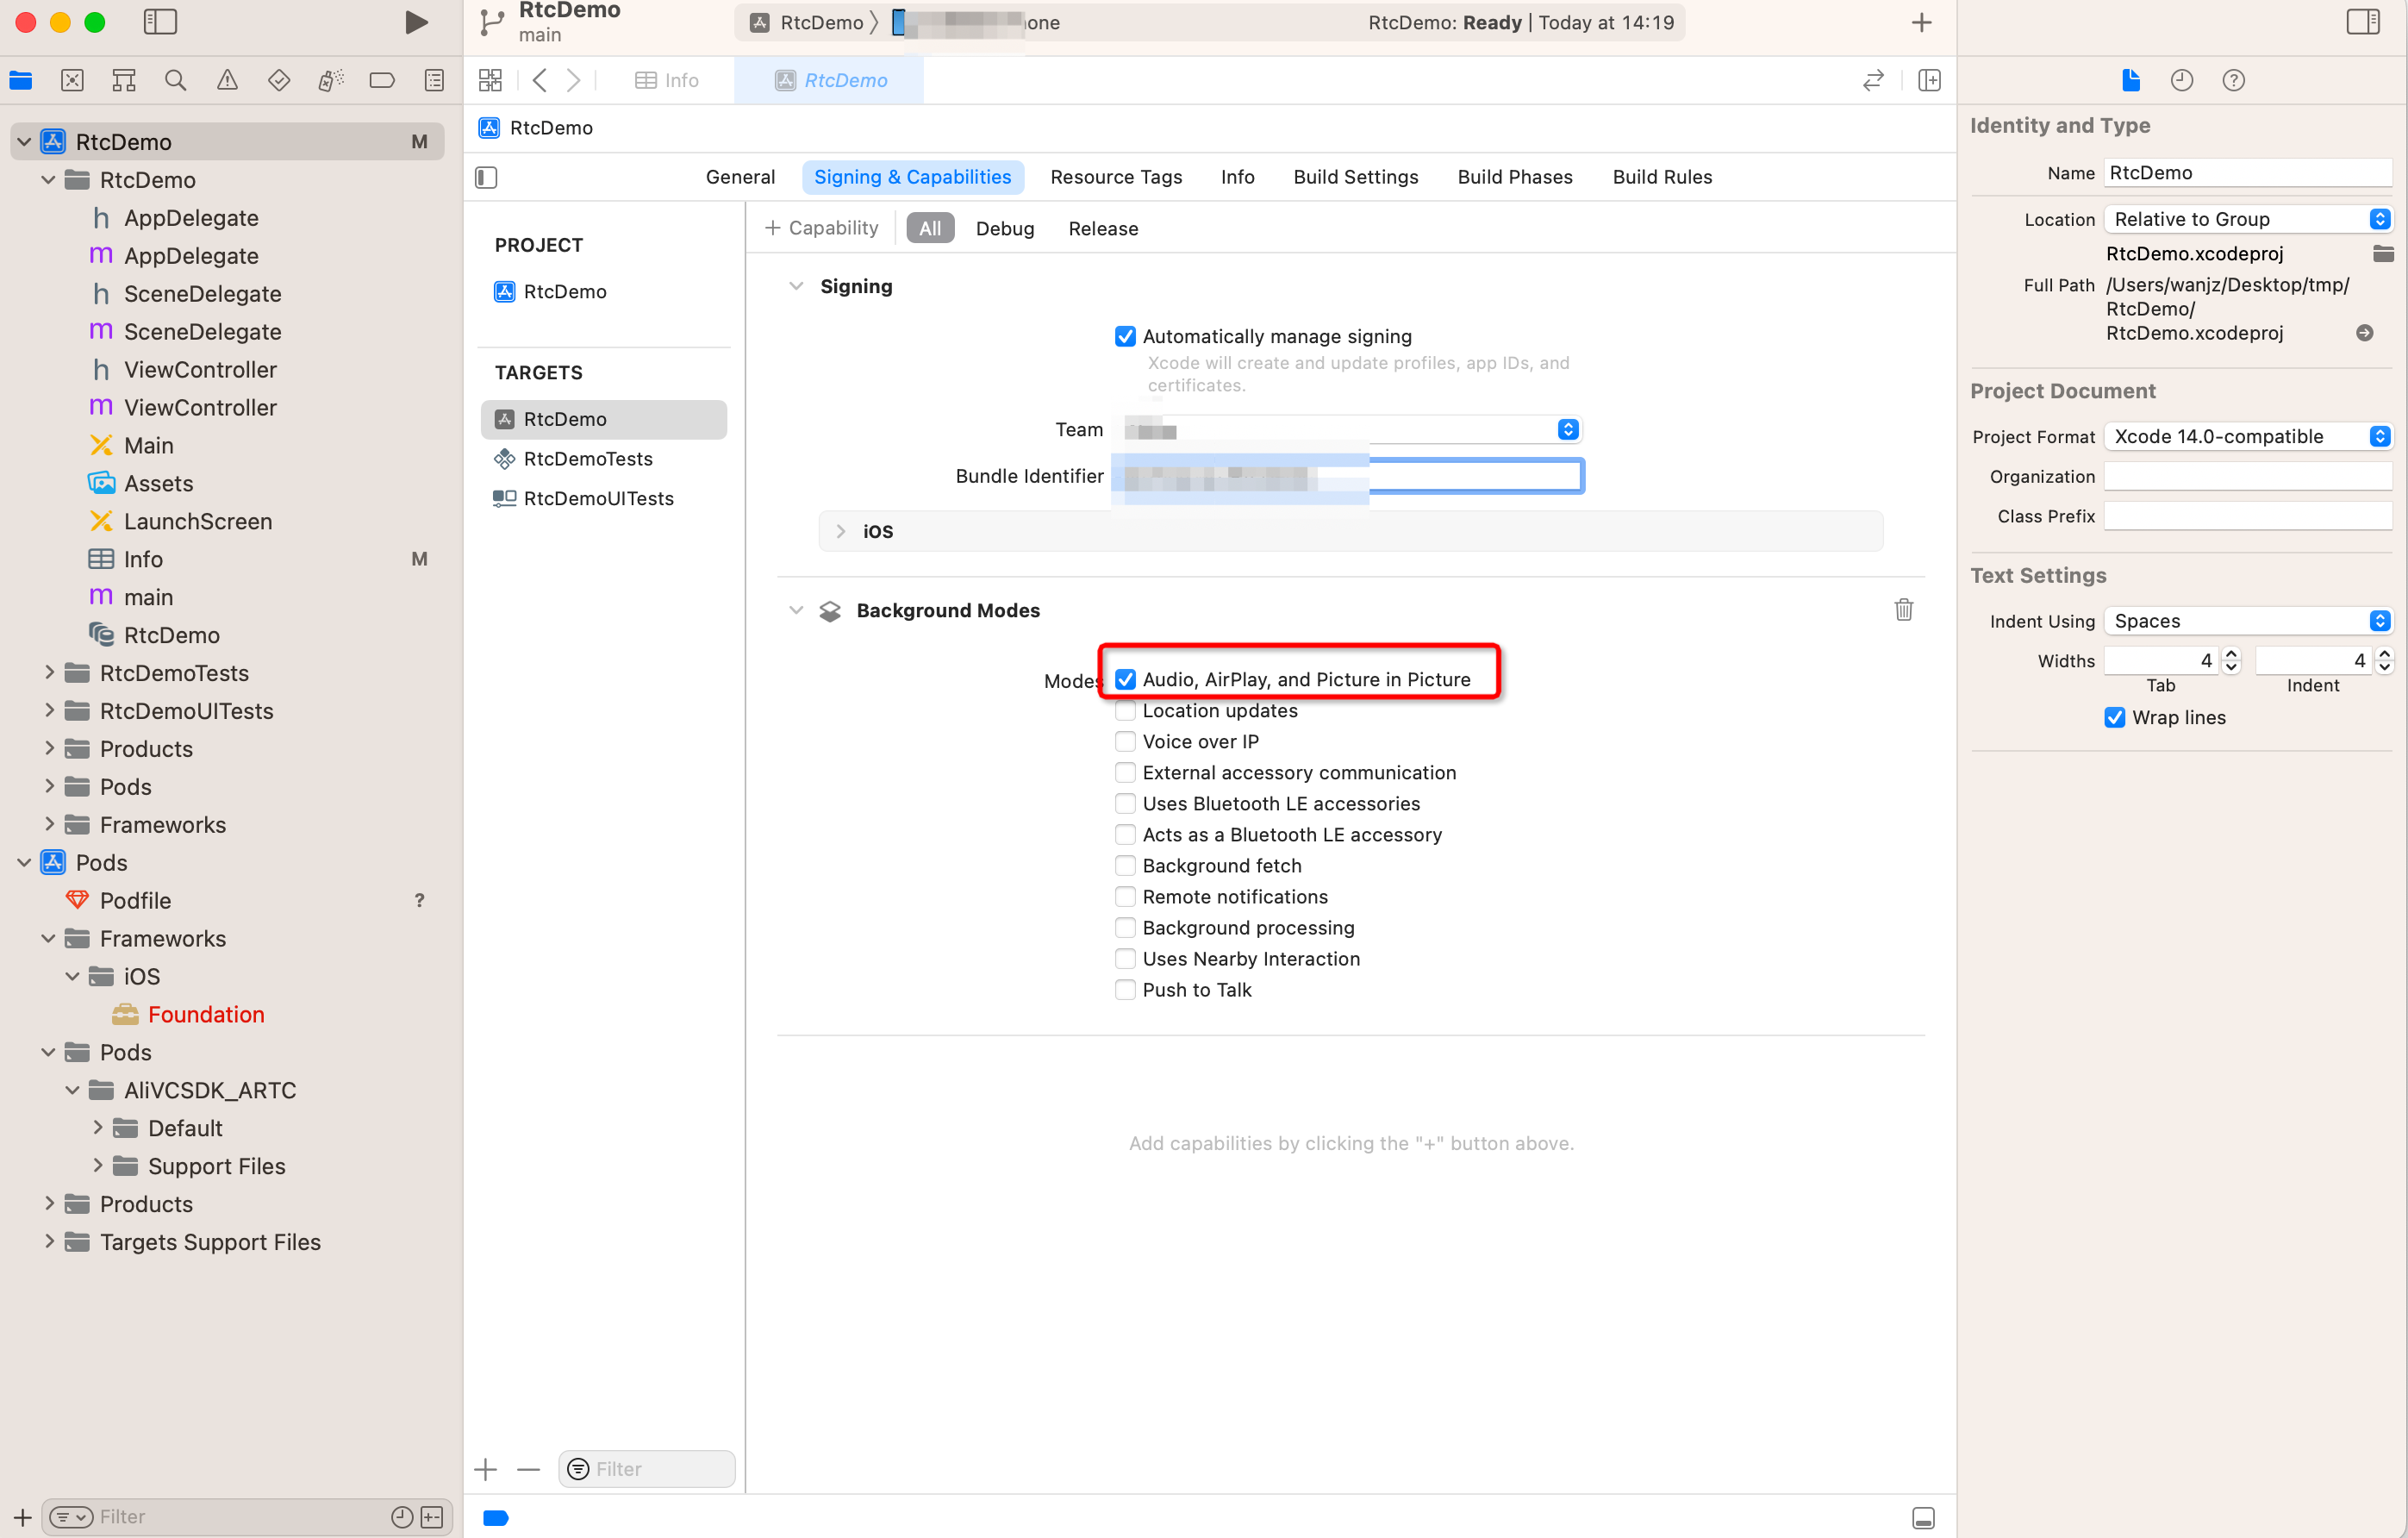
開啟音頻後台採集模式(可選)。
如圖所示,勾選Audio,AirPlay,and Picture in Picture即可。
步驟三:建立使用者介面
根據即時音視頻互動情境需要,建立相應的使用者介面。我們提供了一個以視頻多人通話情境為例,建立一個ScrollView視圖。後續在有人加入通話時,在該容器上添加通話視圖;有人離開通話時,從該容器上移除通話視圖,同時重新整理布局。
實現步驟
本節介紹如何使用阿里雲 ARTC SDK 快速實現一個基礎的即時音視頻互動應用。你可以先將完整範例程式碼複製到專案,快速體驗功能,再通過以下步驟瞭解核心 API 的調用。
下圖展示了實現音視頻互動的基本流程:
下面是一段實現音視訊通話基本流程的完整參考代碼:
完整範例程式碼的詳情與運行請參見:跑通iOS Demo樣本。
1、申請許可權請求
進入音視訊通話時,雖然SDK會檢查是否已在App中授予了所需要的許可權,當為保障體驗,建議在發起通話前檢查視頻拍攝及麥克風採集的許可權。
func checkMicrophonePermission(completion: @escaping (Bool) -> Void) {
    let status = AVCaptureDevice.authorizationStatus(for: .audio)

    switch status {
    case .notDetermined:
        AVCaptureDevice.requestAccess(for: .audio) { granted in
            completion(granted)
        }
    case .authorized:
        completion(true)
    default:
        completion(false)
    }
}

func checkCameraPermission(completion: @escaping (Bool) -> Void) {
    let status = AVCaptureDevice.authorizationStatus(for: .video)

    switch status {
    case .notDetermined:
        AVCaptureDevice.requestAccess(for: .video) { granted in
            completion(granted)
        }
    case .authorized:
        completion(true)
    default:
        completion(false)
    }
}

// 使用樣本
checkMicrophonePermission { granted in
    if granted {
        print("使用者已授權麥克風")
    } else {
        print("使用者未授權麥克風")
    }
}

checkCameraPermission { granted in
    if granted {
        print("使用者已授權網路攝影機")
    } else {
        print("使用者未授權網路攝影機")
    }
}
2、鑒權Token
加入ARTC頻道需要一個鑒權Token,用於鑒權使用者的合法身份,其鑒權Token建置規則參見:Token鑒權。Token 產生有兩種方式:單參數方式和多參數方式,不同的Token產生方式需要調用SDK不同的加入頻道(joinChannel)的介面。
上線發布階段:
由於Token的產生需要使用AppKey,寫死在用戶端存在泄漏的風險,因此強烈建議線上業務通過業務Server產生下發給用戶端。
開發調試階段:
開發調試階段,如果業務Server還沒有產生Token的邏輯,可以暫時參考APIExample上的Token產生邏輯,產生臨時Token,其參考代碼如下:
class ARTCTokenHelper: NSObject {

    /**
    * RTC AppId
    */
    public static let AppId = "<RTC AppId>"

    /**
    * RTC AppKey
    */
    public static let AppKey = "<RTC AppKey>"

    /**
    * 根據channelId,userId, timestamp 產生多參數入會的 token
    * Generate a multi-parameter meeting token based on channelId, userId, and timestamp
    */
    public func generateAuthInfoToken(appId: String = ARTCTokenHelper.AppId, appKey: String =  ARTCTokenHelper.AppKey, channelId: String, userId: String, timestamp: Int64) -> String {
        let stringBuilder = appId + appKey + channelId + userId + "\(timestamp)"
        let token = ARTCTokenHelper.GetSHA256(stringBuilder)
        return token
    }

    /**
    * 根據channelId,userId, nonce 產生單參數入會 的token
    * Generate a single-parameter meeting token based on channelId, userId, and nonce
    */
    public func generateJoinToken(appId: String = ARTCTokenHelper.AppId, appKey: String =  ARTCTokenHelper.AppKey, channelId: String, userId: String, timestamp: Int64, nonce: String = "") -> String {
        let token = self.generateAuthInfoToken(appId: appId, appKey: appKey, channelId: channelId, userId: userId, timestamp: timestamp)

        let tokenJson: [String: Any] = [
            "appid": appId,
            "channelid": channelId,
            "userid": userId,
            "nonce": nonce,
            "timestamp": timestamp,
            "token": token
        ]

        if let jsonData = try? JSONSerialization.data(withJSONObject: tokenJson, options: []),
        let base64Token = jsonData.base64EncodedString() as String? {
            return base64Token
        }

        return ""
    }

    /**
    * 字串簽名
    * String signing (SHA256)
    */
    private static func GetSHA256(_ input: String) -> String {
        // 將輸入字串轉換為資料
        let data = Data(input.utf8)

        // 建立用於儲存雜湊結果的緩衝區
        var hash = [UInt8](repeating: 0, count: Int(CC_SHA256_DIGEST_LENGTH))

        // 計算 SHA-256 雜湊值
        data.withUnsafeBytes {
            _ = CC_SHA256($0.baseAddress, CC_LONG(data.count), &hash)
        }

        // 將雜湊值轉換為十六進位字串
        return hash.map { String(format: "%02hhx", $0) }.joined()
    }

}
3、匯入ARTC SDK 組件
// 匯入ARTC模組
import AliVCSDK_ARTC
4、建立並初始化引擎
-
建立RTC引擎
調用
sharedInstance介面建立引擎AliRTCEngineprivate var rtcEngine: AliRtcEngine? = nil // 建立引擎並設定回調 let engine = AliRtcEngine.sharedInstance(self, extras:nil) ... self.rtcEngine = engine -
初始化引擎
-
調用
setChannelProfile設定頻道為AliRTCInteractiveLive(互動模式)。根據具體的業務需求,可以選擇適用於互動娛樂情境的互動模式,或者適合一對一或一對多廣播的通訊模式。正確的模式選擇能夠確保使用者體驗的流暢性並有效利用網路資源。您可以根據業務情境選擇合適的模式。
模式
推流
拉流
模式介紹
互動模式
-
有角色限制,只有被賦予主播身份的使用者可以進行推流操作。
-
在整個過程中,參與者可以靈活地切換角色。
無角色限制,所有參與者都擁有拉流的許可權。
-
在互動模式中,主播加入或退出會議、以及開始推送直播流的事件都會即時通知給觀眾端,確保觀眾能夠及時瞭解主播的動態。反之,觀眾的任何活動不會通告給主播,保持了主播的直播流程不受幹擾。
-
在互動模式下,主播角色負責進行直播互動,而觀眾角色則主要接收內容,通常不參與直播的互動過程。若業務需求未來可能發生變化,導致不確定是否需要支援觀眾的互動參與,建議預設採用互動模式。這種模式具有較高的靈活性,可通過調整使用者角色許可權來適應不同的互動需求。
通訊模式
無角色限制,所有參與者都擁有推流許可權。
無角色限制,所有參與者都擁有拉流的許可權。
-
在通訊模式下,會議參與者能夠相互察覺到彼此的存在。
-
該模式雖然沒有區分使用者角色,但實際上與互動模式中的主播角色相對應;目的是為了簡化操作,讓使用者能夠通過調用更少的API來實現所需的功能。
-
-
調用
setClientRole設定使用者角色為AliRTCSdkInteractive(主播)或者AliRTCSdkLive(觀眾)。注意:主播角色預設推拉流,觀眾角色預設關閉預覽和推流,只拉流。注意:當使用者從主播角色轉換到觀眾角色時(通常被稱作“下麥”),系統將停止推送本地的音視頻流,已經訂閱的音視頻流不受影響;當使用者從觀眾播角色轉換到主播角色時(通常被稱作“上麥”),系統將會推送本地的音視頻流,已經訂閱的音視頻流不受影響。
// 設定頻道模式為互動模式,RTC下都使用AliRtcInteractivelive
engine.setChannelProfile(AliRtcChannelProfile.interactivelive)
// 設定使用者角色,既需要推流也需要拉流使用AliRtcClientRoleInteractive, 只拉流不推流使用AliRtcClientRolelive
engine.setClientRole(AliRtcClientRole.roleInteractive)
-
-
實現常用的回調
SDK 在運行過程中如遇到異常情況,會優先嘗試內部重試機制以自動回復。對於無法自行解決的錯誤,SDK 會通過預定義的回調介面通知您的應用程式。
以下是一些 SDK 無法處理、需由應用程式層監聽和響應的關鍵回調:
異常發生原因
回調及參數
解決方案
說明
鑒權失敗
onJoinChannelResult回調中的result返回AliRtcErrJoinBadToken
發生錯誤時App需要檢查Token是否正確。
在使用者主動調用API時,若鑒權失敗,系統將在調用API的回調中返回鑒權失敗的錯誤資訊。
鑒權將要到期
onAuthInfoWillExpire
發生該異常時App需要重新擷取最新的鑒權資訊後,再調用refreshAuthInfo重新整理鑒權資訊。
鑒權到期錯誤在兩種情況下出現:使用者調用API或程式執行期間。因此,錯誤反饋將通過API回調或通過獨立的錯誤回調通知。
鑒權到期
onAuthInfoExpired
發生該異常時App需要重新入會。
鑒權到期錯誤在兩種情況下出現:使用者調用API或程式執行期間。因此,錯誤反饋將通過API回調或通過獨立的錯誤回調通知。
網路連接異常
onConnectionStatusChange回調返回AliRtcConnectionStatusFailed。
發生該異常時APP需要重新入會。
SDK具備一定時間斷網自動回復能力,但若斷線時間超出預設閾值,會觸發逾時並中斷連線。此時,App應檢查網路狀態並指導使用者重新加入會議。
被踢下線
onBye
-
AliRtcOnByeUserReplaced:當發生該異常時排查使用者userid是否相同。
-
AliRtcOnByeBeKickedOut:當發生該異常時,表示被業務踢下線,需要重新入會。
-
AliRtcOnByeChannelTerminated:當發生該異常時,表示房間被銷毀,需要重新入會。
RTC服務提供了管理員可以主動移除參與者的功能。
本地裝置異常
onLocalDeviceException
發生該異常時App需要檢測許可權、裝置硬體是否正常。
RTC服務支援裝置檢測和異常診斷的能力;當本地裝置發生異常時,RTC服務會通過回調的方式通知客戶本地裝置異常,此時,若SDK無法自行解決問題,則App需要介入以查看裝置是否正常。
extension VideoCallMainVC: AliRtcEngineDelegate { func onJoinChannelResult(_ result: Int32, channel: String, elapsed: Int32) { "onJoinChannelResult1 result: \(result)".printLog() } func onJoinChannelResult(_ result: Int32, channel: String, userId: String, elapsed: Int32) { "onJoinChannelResult2 result: \(result)".printLog() } func onRemoteUser(onLineNotify uid: String, elapsed: Int32) { // 遠端使用者的上線 "onRemoteUserOlineNotify uid: \(uid)".printLog() } func onRemoteUserOffLineNotify(_ uid: String, offlineReason reason: AliRtcUserOfflineReason) { // 遠端使用者的下線 "onRemoteUserOffLineNotify uid: \(uid) reason: \(reason)".printLog() } func onRemoteTrackAvailableNotify(_ uid: String, audioTrack: AliRtcAudioTrack, videoTrack: AliRtcVideoTrack) { "onRemoteTrackAvailableNotify uid: \(uid) audioTrack: \(audioTrack) videoTrack: \(videoTrack)".printLog() } func onAuthInfoWillExpire() { "onAuthInfoWillExpire".printLog() /* TODO: 務必處理;Token即將到期,需要業務觸發重新擷取當前channel,user的鑒權資訊,然後設定refreshAuthInfo即可 */ } func onAuthInfoExpired() { "onAuthInfoExpired".printLog() /* TODO: 務必處理;提示Token失效,並執行離會與釋放引擎 */ } func onBye(_ code: Int32) { "onBye code: \(code)".printLog() /* TODO: 務必處理;業務可能會觸發同一個UserID的不同裝置搶佔的情況 */ } func onLocalDeviceException(_ deviceType: AliRtcLocalDeviceType, exceptionType: AliRtcLocalDeviceExceptionType, message msg: String?) { "onLocalDeviceException deviceType: \(deviceType) exceptionType: \(exceptionType)".printLog() /* TODO: 務必處理;建議業務提示裝置錯誤,此時SDK內部已經嘗試了各種恢複策略已經無法繼續使用時才會上報 */ } func onConnectionStatusChange(_ status: AliRtcConnectionStatus, reason: AliRtcConnectionStatusChangeReason) { "onConnectionStatusChange status: \(status) reason: \(reason)".printLog() if status == .failed { /* TODO: 務必處理;建議業務提示使用者,此時SDK內部已經嘗試了各種恢複策略已經無法繼續使用時才會上報 */ } else { /* TODO: 可選處理;增加業務代碼,一般用於資料統計、UI變化 */ } } } -
5、設定音視頻屬性
-
設定音頻相關屬性
調用
setAudioProfile設定音訊編碼模式和音頻情境// 設定音頻Profile,預設使用高音質模式AliRtcEngineHighQualityMode及音樂模式AliRtcSceneMusicMode engine.setAudioProfile(AliRtcAudioProfile.engineHighQualityMode, audio_scene: AliRtcAudioScenario.sceneMusicMode) -
設定視頻相關屬性
可以設定推出去的視頻流的解析度、碼率、幀率等資訊。
// 設定視頻編碼參數
let config = AliRtcVideoEncoderConfiguration()
config.dimensions = CGSize(width: 720, height: 1280)
config.frameRate = 20
config.bitrate = 1200
config.keyFrameInterval = 2000
config.orientationMode = AliRtcVideoEncoderOrientationMode.adaptive
engine.setVideoEncoderConfiguration(config)
engine.setCapturePipelineScaleMode(.post)
6、設定推拉流屬性
設定推送音視頻流及預設拉所有使用者的流:
-
調用
publishLocalAudioStream推送音頻流 -
調用
publishLocalVideoStream推送視頻流,如果是語音通話,可以設定成false
// SDK預設會publish音頻,publishLocalVideoStream(true)可以不調用
engine.publishLocalVideoStream(true)
// SDK預設會publish視頻,如果是視訊通話,publishLocalAudioStream(true)可以不調用
// 如果是純語音通話 則需要設定publishLocalVideoStream(false)設定不publish視頻
engine.publishLocalAudioStream(true)

// 設定預設訂閱遠端的音頻和視頻流
engine.setDefaultSubscribeAllRemoteAudioStreams(true)
engine.subscribeAllRemoteAudioStreams(true)
engine.setDefaultSubscribeAllRemoteVideoStreams(true)
engine.subscribeAllRemoteVideoStreams(true)SDK預設是自動推拉流模式,預設會推送音視頻流及訂閱頻道內所有使用者的音視頻流,可以通過調用上面的介面關閉自動推拉流模式。
7、開啟本地預覽
-
調用
setLocalViewConfig設定本地渲染視圖,同時設定本地的視頻顯示內容。 -
調用
startPreview方法,開啟本地視頻預覽
let videoView = self.createVideoView(uid: self.userId)

let canvas = AliVideoCanvas()
canvas.view = videoView.canvasView
canvas.renderMode = .auto
canvas.mirrorMode = .onlyFrontCameraPreviewEnabled
canvas.rotationMode = ._0

self.rtcEngine?.setLocalViewConfig(canvas, for: AliRtcVideoTrack.camera)
self.rtcEngine?.startPreview()
8、加入頻道
調用joinChannel加入頻道,這裡推薦使用單參數方式,需要調用joinChannel[3/3]介面。調用完加入頻道後,需要同時判斷傳回值,及在onJoinChannelResult回調中拿到加入頻道結果,如果返回0並且result為0,則表示加入頻道成功,否則需要檢查傳進來的Token是否非法。
let ret = self.rtcEngine?.joinChannel(joinToken, channelId: nil, userId: nil, name: nil) { [weak self] errCode, channelId, userId, elapsed in
    if errCode == 0 {
        // success

    }
    else {
        // failed
    }

    let resultMsg = "\(msg) \n CallbackErrorCode: \(errCode)"
    resultMsg.printLog()
    UIAlertController.showAlertWithMainThread(msg: resultMsg, vc: self!)
}

let resultMsg = "\(msg) \n ReturnErrorCode: \(ret ?? 0)"
resultMsg.printLog()
if ret != 0 {
    UIAlertController.showAlertWithMainThread(msg: resultMsg, vc: self)
}-
入會後會按照入會前設定的參數執行相應的推流和拉流。
-
SDK預設會自動推拉流,以減少用戶端需要調用的API數量。
9、設定遠端視圖
遠端使用者並進行推流或停止推流時,會觸發onRemoteTrackAvailableNotify回調,在回調會設定或移除遠端視圖,範例程式碼如下:
func onRemoteTrackAvailableNotify(_ uid: String, audioTrack: AliRtcAudioTrack, videoTrack: AliRtcVideoTrack) {
    "onRemoteTrackAvailableNotify uid: \(uid) audioTrack: \(audioTrack)  videoTrack: \(videoTrack)".printLog()
    // 遠端使用者的流狀態
    if audioTrack != .no {
        let videoView = self.videoViewList.first { $0.uidLabel.text == uid }
        if videoView == nil {
            _ = self.createVideoView(uid: uid)
        }
    }
    if videoTrack != .no {
        var videoView = self.videoViewList.first { $0.uidLabel.text == uid }
        if videoView == nil {
            videoView = self.createVideoView(uid: uid)
        }

        let canvas = AliVideoCanvas()
        canvas.view = videoView!.canvasView
        canvas.renderMode = .auto
        canvas.mirrorMode = .onlyFrontCameraPreviewEnabled
        canvas.rotationMode = ._0
        self.rtcEngine?.setRemoteViewConfig(canvas, uid: uid, for: AliRtcVideoTrack.camera)
    }
    else {
        self.rtcEngine?.setRemoteViewConfig(nil, uid: uid, for: AliRtcVideoTrack.camera)
    }

    if audioTrack == .no && videoTrack == .no {
        self.removeVideoView(uid: uid)
        self.rtcEngine?.setRemoteViewConfig(nil, uid: uid, for: AliRtcVideoTrack.camera)
    }
}
10、離開房間並銷毀引擎
音視頻互動結束,需要離開房間並銷毀引擎,按照下列步驟結束音視頻互動
-
調用
stopPreview停止視頻預覽。 -
調用
leaveChannel離會。 -
調用
destroy銷毀引擎,並釋放相關資源。
self.rtcEngine?.stopPreview()
self.rtcEngine?.leaveChannel()
AliRtcEngine.destroy()
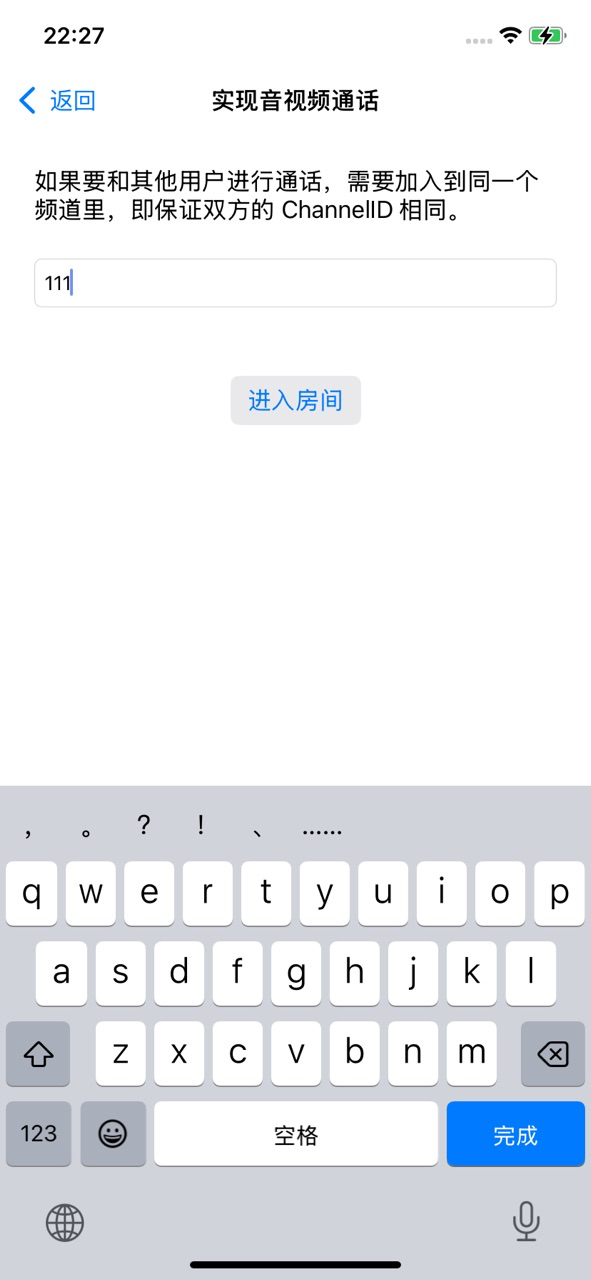
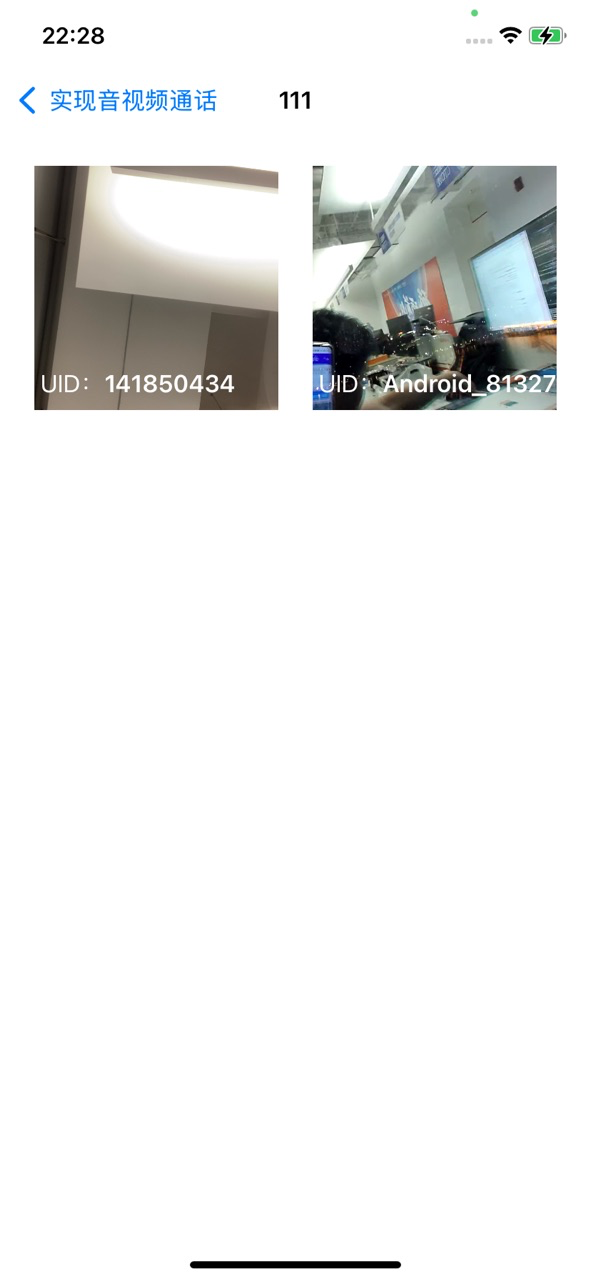
self.rtcEngine = nil11、效果示範