O DataWorks oferece verificações integradas, como revisão de código antes da implantação do nó e verificações no Data Governance Center. Além disso, o DataWorks suporta verificações personalizadas. Desenvolva um programa de verificação personalizado conforme suas necessidades de negócios e conecte-o ao DataWorks para gerenciar os processos dos nós. Este tópico descreve como assinar eventos de alteração de status de uma instância de nó acionada automaticamente usando o módulo OpenEvent da DataWorks Open Platform. Neste tópico, as alterações de status da instância são obtidas no Operation Center.
Informações básicas
Para obter mais informações sobre os recursos e conceitos básicos da DataWorks Open Platform envolvidos neste tópico, consulte Overview.
Descrição da configuração de assinatura
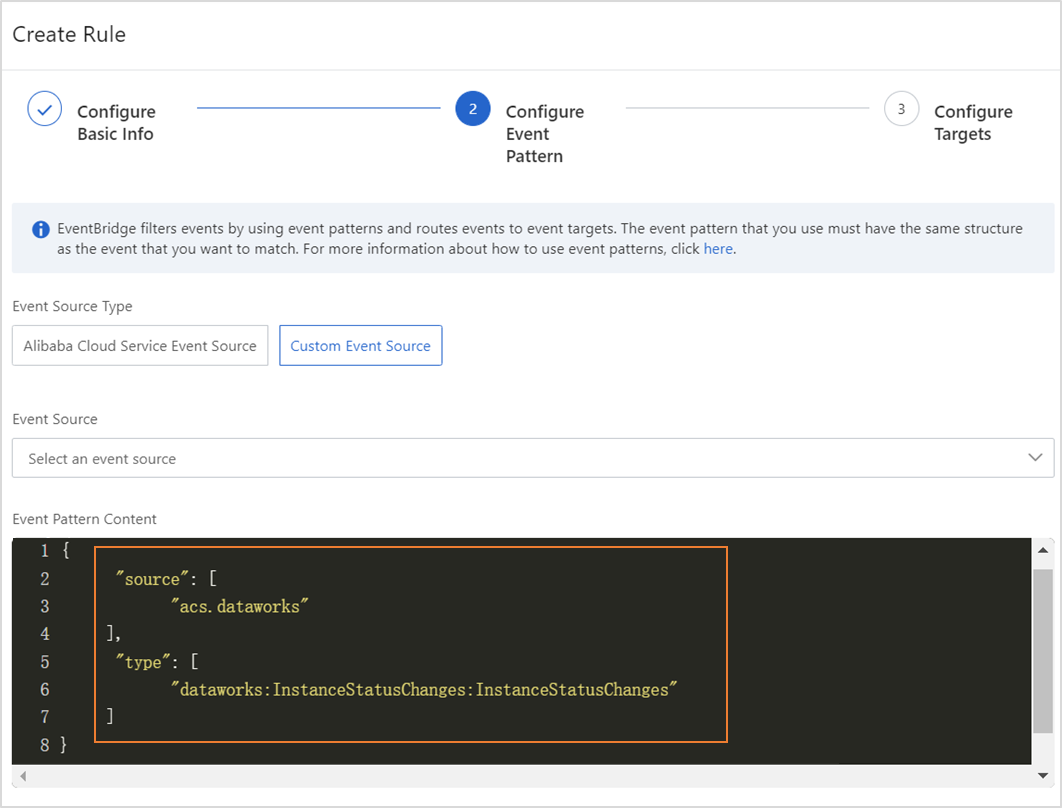
Ao configurar o parâmetro Pattern Content para uma regra de evento no EventBridge, defina type como dataworks:InstanceStatusChanges:InstanceStatusChanges. Assim, você assina os eventos de alteração de status de uma instância de nó acionada automaticamente.
Pré-requisitos
EventBridge ativado. Para mais informações, consulte Billing.
DataWorks ativado. Para mais informações, consulte Purchase guide.
Workspace criado no DataWorks. Para mais informações, consulte Create a workspace.
Procedimento
Etapa 1: Configurar um barramento personalizado
Esta seção descreve as etapas principais e as precauções para configurar um barramento personalizado. Para obter mais detalhes sobre como ativar e configurar a assinatura de mensagens de evento, consulte Enable message subscription.
Faça login no console do EventBridge. No painel de navegação à esquerda, clique em Event Buses.
No canto superior direito da página Event Buses, clique em Quickly Create para criar um barramento personalizado.
-
No painel de navegação à esquerda, clique em Event Buses. Na página Event Buses, localize o barramento personalizado criado e clique no nome dele. A página Overview do barramento personalizado será exibida.
No painel de navegação à esquerda, clique em Event Rules. Na página exibida, clique em Create Rule para criar uma regra de evento.
-
Neste exemplo, o barramento personalizado recebe mensagens de evento de commit e de implantação de nó. O conteúdo a seguir fornece um exemplo de configuração e os parâmetros principais da regra de evento:
Configure Basic Info: Nesta etapa, configure o parâmetro Name.
-
Configure Event Pattern:
Event Source Type: Defina como Custom Event Source.
Event Source: Deixe este parâmetro vazio.
-
Pattern Content: Configure este parâmetro no formato JSON. Insira o seguinte conteúdo:
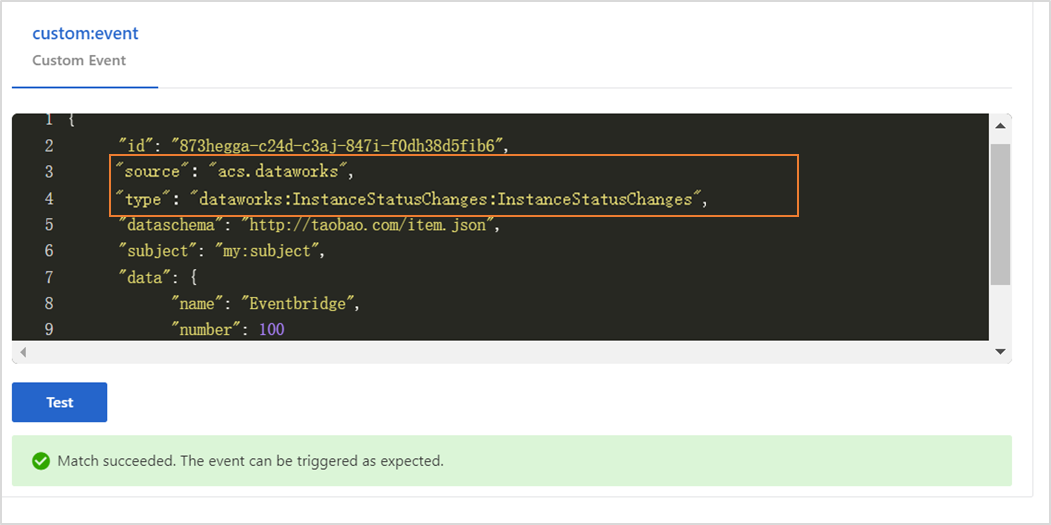
{ "source": [ "acs.dataworks" ], "type": [ "dataworks:InstanceStatusChanges:InstanceStatusChanges" ] }source: identificador do service onde o evento ocorre. Defina este parâmetro como acs.dataworks.
type: tipo de evento que ocorre no service. Defina este parâmetro como dataworks:InstanceStatusChanges:InstanceStatusChanges.
Event Pattern Debugging: Altere os valores dos parâmetros source e type nesta seção e clique em Test. Se o teste for bem-sucedido, clique em Next Step.
-
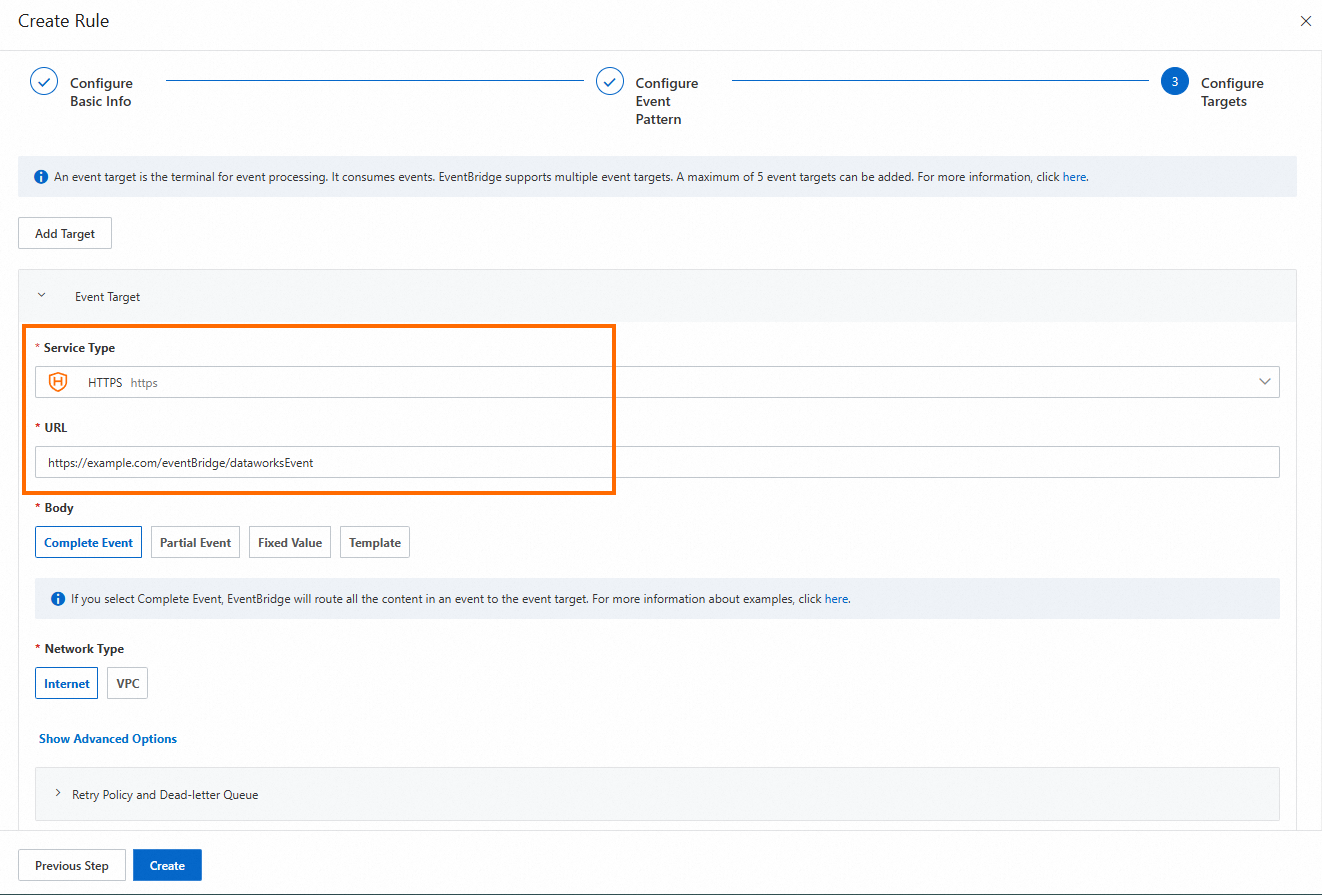
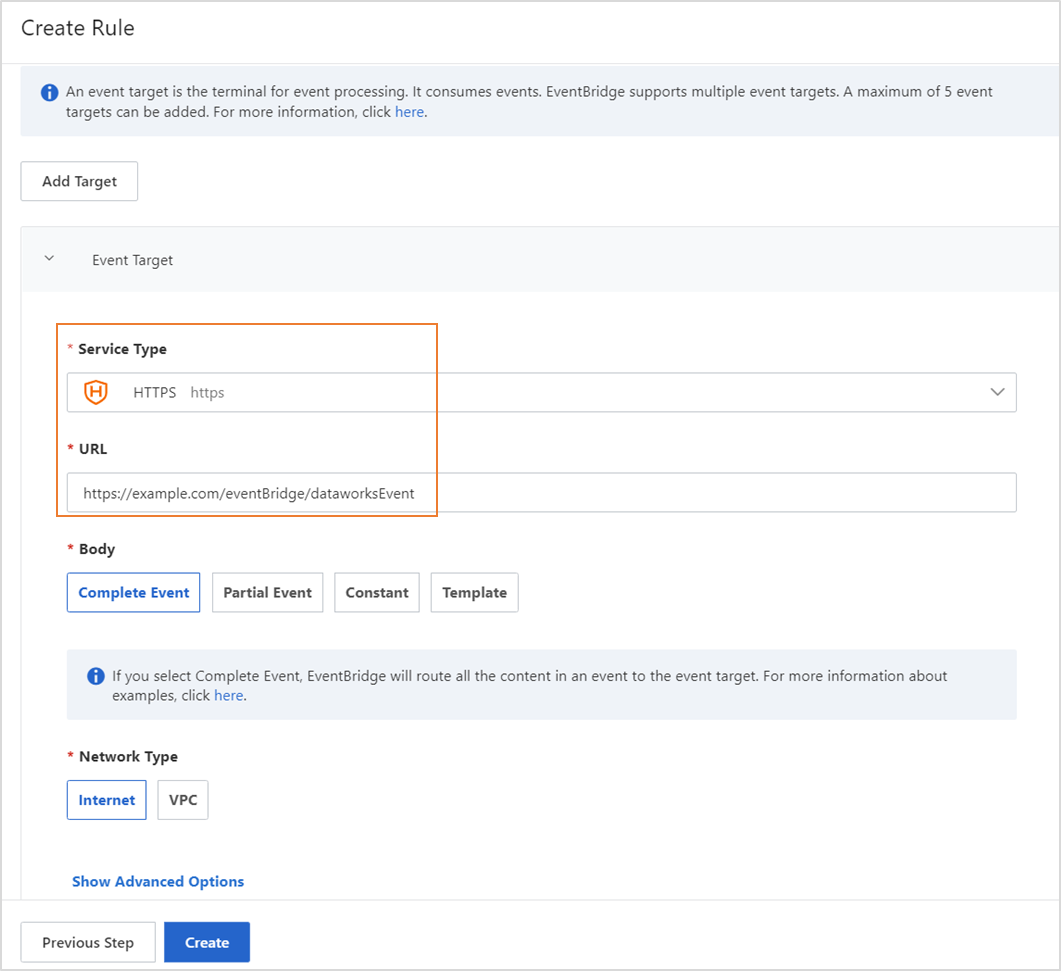
Configure Targets:
Service Type: Defina como HTTPS ou HTTP. Para mais informações sobre tipos de service, consulte Manage event rules.
URL: Insira a URL para receber mensagens enviadas pelo barramento personalizado, como
https://Server address:Port number/event/consumer.Body: Defina como Complete Event.
Network Type: Defina como Internet.
Etapa 2: Configurar um canal de distribuição de eventos
-
Faça login no console do DataWorks. Na região de destino, clique em no painel de navegação à esquerda. Clique em Go to Open Platform para abrir a página Developer Backend.
-
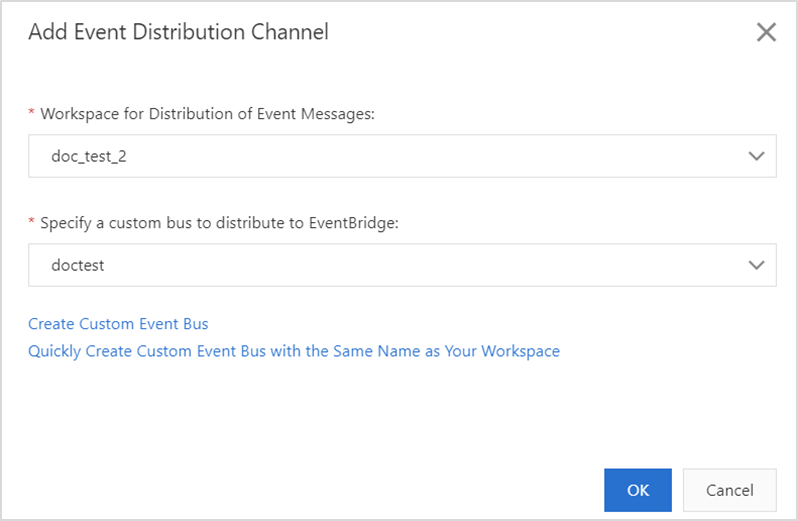
Na página Developer Backend, clique em OpenEvent no painel de navegação à esquerda. Na página exibida, clique em Add Event Distribution Channel e configure as opções na caixa de diálogo.
Workspace for Event Distribution: Selecione um workspace criado.
Custom Bus in Eventbridge for Distribution: Selecione o barramento de eventos criado na Etapa 1.
Após salvar o canal de distribuição de eventos, na coluna Operation do canal, clique em Enable para ativar o novo canal de distribuição de eventos.
Desenvolver um programa de service
Código de exemplo
Modifique o código para obter e gerar as mensagens que o EventBridge envia para o service.
package com.aliyun.dataworks.demo;

import com.alibaba.fastjson.JSON;
import com.alibaba.fastjson.JSONObject;
import com.aliyun.dataworks.config.Constants;
import org.springframework.web.bind.annotation.PostMapping;
import org.springframework.web.bind.annotation.RequestBody;
import org.springframework.web.bind.annotation.RequestMapping;
import org.springframework.web.bind.annotation.RestController;

/**
 * @author dataworks demo
 */
@RestController
@RequestMapping("/event")
public class ExtensionsController {

    /**
     * Receive event messages that are sent from EventBridge.
     * @param jsonParam
     */
    @PostMapping("/consumer")
    public void consumerEventBridge(@RequestBody String jsonParam){
        JSONObject jsonObj = JSON.parseObject(jsonParam);
        String eventCode = jsonObj.getString(Constants.EVENT_CODE_FILED);
        if(Constants.INSTANCE_STATUS_EVENT_CODE.equals(eventCode)){
            JSONObject dataParam = JSON.parseObject(jsonObj.getString("data"));
            // The time when the auto triggered node instance started to wait for the scheduling time.
            System.out.println("beginWaitTimeTime: "+ dataParam.getString("beginWaitTimeTime"));
            //DagId
            System.out.println("dagId: "+ dataParam.getString("dagId"));
            // The type of the directed acyclic graph (DAG). Valid values:
            // 0: for auto triggered nodes
            // 1: for manually triggered nodes
            // 2: for smoke testing
            // 3: for nodes for which you backfill data
            // 4: for manually triggered workflows
            // 5: for temporary workflows
            System.out.println("dagType: "+dataParam.getString("dagType"));
            // The type of the node. Valid values:
            // NORMAL(0): The node is an auto triggered node. The scheduling system regularly runs the node.
            // MANUAL(1): The node is a manually triggered node. The scheduling system does not regularly run the node.
            // PAUSE(2): The node is a frozen node. The scheduling system regularly runs the node but sets the node status to Failed when the scheduling system starts to run the node.
            // SKIP(3): The node is a dry-run node. The scheduling system regularly runs the node but sets the node status to Succeeded when the scheduling system starts to run the node.
            // SKIP_UNCHOOSE(4): The node is an unselected node in a temporary workflow. This type of node exists only in temporary workflows. The scheduling system sets the node status to Succeeded when the scheduling system starts to run the node.
            // SKIP_CYCLE(5): The node is scheduled by week or month, and is waiting for the scheduling time to arrive. The scheduling system regularly runs the node but sets the node status to Succeeded when the scheduling system starts to run the node.
            // CONDITION_UNCHOOSE(6): The node is not selected by its ancestor branch node and is run as a dry-run node.
            // REALTIME_DEPRECATED(7): The node has instances that are generated in real time but are deprecated. The scheduling system sets the node status to Succeeded.
            System.out.println("taskType: "+dataParam.getString("taskType"));
            // The time when the node instance was modified.
            System.out.println("modifyTime: "+dataParam.getString("modifyTime"));
            // The time when the node instance was created.
            System.out.println("createTime: "+dataParam.getString("createTime"));
            // The ID of the workspace. You can call the ListProjects operation to query the ID.
            System.out.println("appId: "+dataParam.getString("appId"));
            // The ID of the tenant that manages the workspace to which the auto triggered node instance belongs.
            System.out.println("tenantId: "+dataParam.getString("tenantId"));
            // The operation code of the auto triggered node instance. You can ignore the field value.
            System.out.println("opCode: "+dataParam.getString("opCode"));
            // The ID of the workflow. For an auto triggered node instance, the field value is 1. For a manually triggered workflow or an auto triggered node instance of the internal workflow type, the field value is the actual workflow ID.
            System.out.println("flowId: "+dataParam.getString("flowId"));
            // The ID of the node for which the auto triggered node instance was generated.
            System.out.println("nodeId:"+dataParam.getString("nodeId"));
            // The time when the auto triggered node instance started to wait for resources.
            System.out.println("beginWaitResTime: "+dataParam.getString("beginWaitResTime"));
            // The ID of the auto triggered node instance.
            System.out.println("taskId: "+dataParam.getString("taskId"));
            // The status of the node. Valid values:
            // 0: The node is not running.
            // 2: The node is waiting for the scheduling time to arrive. The scheduling time is specified by the dueTime or cycleTime parameter.
            // 3: The node is waiting for resources.
            // 4: The node is running.
            // 7: The tables that are specified in the node are issued to Data Quality and data in the tables is checked based on monitoring rules in Data Quality.
            // 8: Branch conditions are being checked.
            // 5: The node failed to be run.
            // 6: The node is successfully run.
            System.out.println("status: "+dataParam.getString("status"));
        }else{
            System.out.println("Failed to filter out other types of events. Check the parameter configurations.");
        }
    }
}
Implantação do projeto de exemplo
-
Prepare o ambiente e o projeto.
Requisito de ambiente: Java 8 ou posterior e Maven. O Maven é uma ferramenta de automação de build para Java.
Link para baixe do arquivo do projeto: event-demo-instance-status.zip.
-
Após baixar o arquivo do projeto, acesse o diretório raiz e execute o seguinte comando:
mvn clean package -Dmaven.test.skip=true spring-boot:repackage -
Depois de obter o pacote JAR pronto para instalação, execute o seguinte comando:
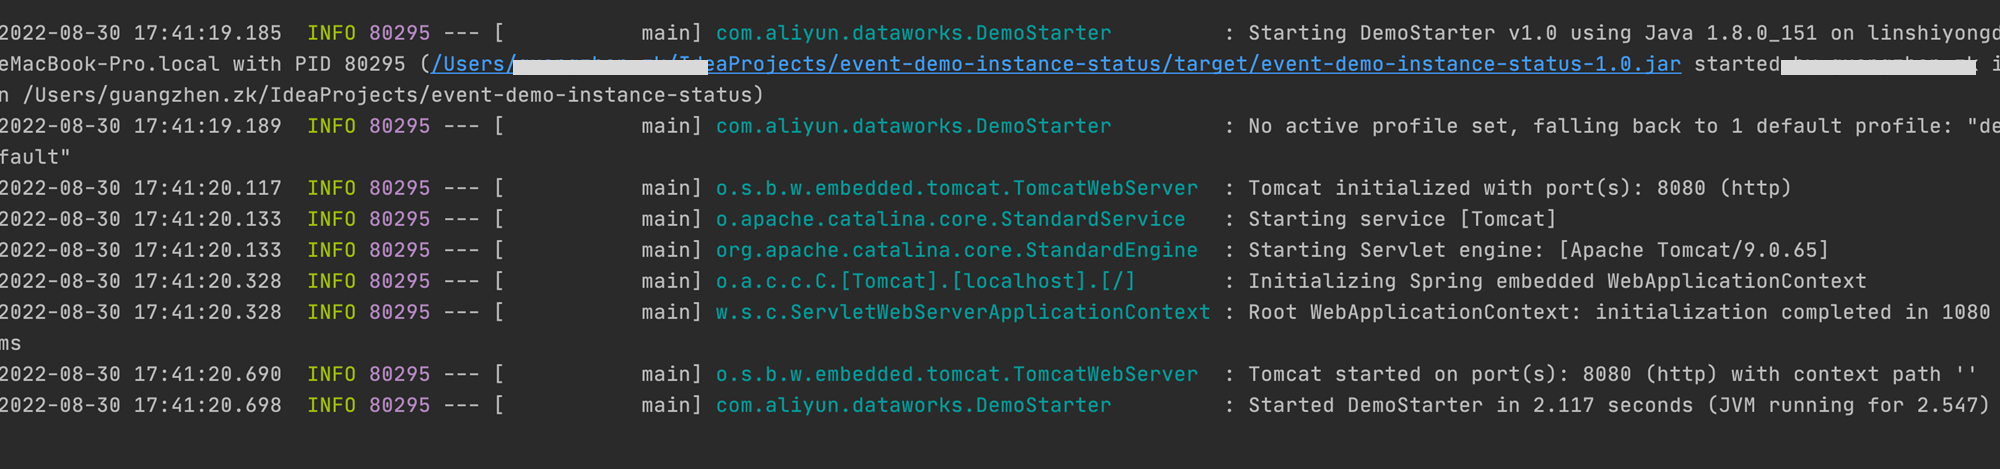
java -jar target/event-demo-instance-status-1.0.jarA figura a seguir mostra o projeto iniciado com sucesso.
Insira
http://localhost:8080/indexna barra de endereços do navegador e pressione Enter. Se"hello world!"for retornado, a extensão foi implantada com sucesso. Será possível assinar mensagens de evento após estabelecer conexões de rede entre o DataWorks e sua extensão, e entre o EventBridge e sua extensão.
Ativar e configurar a assinatura de mensagens de evento (OpenEvent)
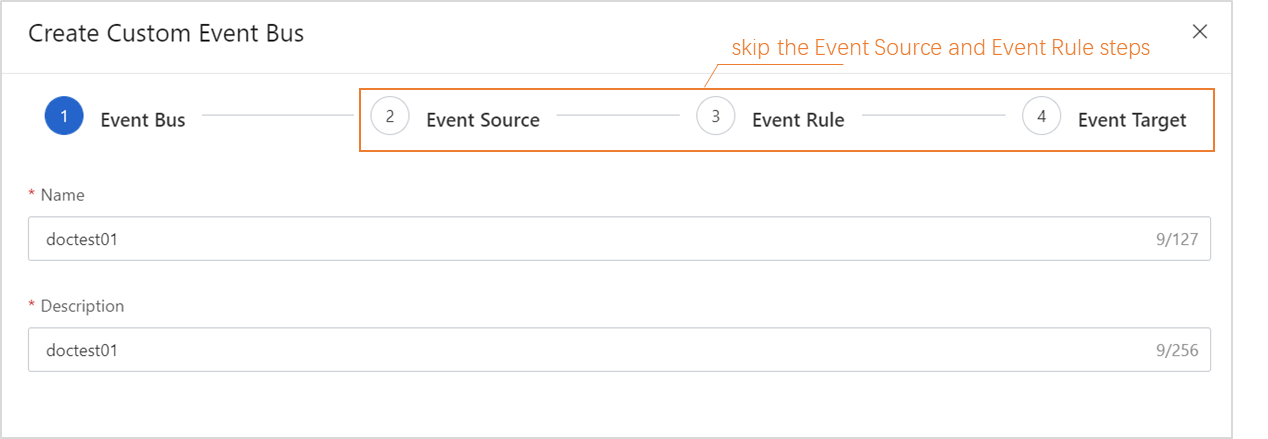
No console do EventBridge, crie um barramento personalizado. Não é necessário configurar os parâmetros nas etapas Event Source, Event Rule e Event Target.
-
No console do EventBridge, crie uma regra de evento para o barramento personalizado.
Neste exemplo, o barramento personalizado recebe mensagens de eventos de alteração de status de uma instância de nó acionada automaticamente. O conteúdo a seguir fornece um exemplo de configuração e os parâmetros principais da regra de evento:
-
Configure os parâmetros na etapa Configure Event Pattern.
{
    "source": [
        "acs.dataworks"
    ],
    "type": [
        "dataworks:InstanceStatusChanges:InstanceStatusChanges"
    ]
}
source: identificador do service onde o evento ocorre. Defina este parâmetro como acs.dataworks.
type: tipo de evento que ocorre no service. Defina este parâmetro como dataworks:InstanceStatusChanges:InstanceStatusChanges. Altere os valores dos parâmetros source e type na seção Event Pattern Debugging e clique em Test. Se o teste for bem-sucedido, clique em Next Step.
Na etapa Configure Targets, defina Service Type como HTTPS e insira uma URL válida. Mantenha as configurações padrão para os demais parâmetros.
-
Acesse a página Open Platform no console do DataWorks. Na árvore de navegação à esquerda, clique em OpenEvent. Na página exibida, adicione um canal de distribuição de eventos.
Escrever o código
package com.aliyun.dataworks.demo;

import com.alibaba.fastjson.JSON;
import com.alibaba.fastjson.JSONObject;
import com.aliyun.dataworks.config.Constants;
import org.springframework.web.bind.annotation.PostMapping;
import org.springframework.web.bind.annotation.RequestBody;
import org.springframework.web.bind.annotation.RequestMapping;
import org.springframework.web.bind.annotation.RestController;

/**
 * @author dataworks demo
 */
@RestController
@RequestMapping("/event")
public class ExtensionsController {

    /**
     * Receive event messages that are sent from EventBridge.
     * @param jsonParam
     */
    @PostMapping("/consumer")
    public void consumerEventBridge(@RequestBody String jsonParam){
        JSONObject jsonObj = JSON.parseObject(jsonParam);
        String eventCode = jsonObj.getString(Constants.EVENT_CODE_FILED);
        if(Constants.INSTANCE_STATUS_EVENT_CODE.equals(eventCode)){
            JSONObject dataParam = JSON.parseObject(jsonObj.getString("data"));
            // The time when the auto triggered node instance started to wait for the scheduling time.
            System.out.println("beginWaitTimeTime: "+ dataParam.getString("beginWaitTimeTime"));
            //DagId
            System.out.println("dagId: "+ dataParam.getString("dagId"));
            // The type of the directed acyclic graph (DAG). Valid values:
            // 0: for auto triggered nodes
            // 1: for manually triggered nodes
            // 2: for smoke testing
            // 3: for nodes for which you backfill data
            // 4: for manually triggered workflows
            // 5: for temporary workflows
            System.out.println("dagType: "+dataParam.getString("dagType"));
            // The type of the node. Valid values:
            // NORMAL(0): The node is an auto triggered node. The scheduling system regularly runs the node.
            // MANUAL(1): The node is a manually triggered node. The scheduling system does not regularly run the node.
            // PAUSE(2): The node is a frozen node. The scheduling system regularly runs the node but sets the node status to Failed when the scheduling system starts to run the node.
            // SKIP(3): The node is a dry-run node. The scheduling system regularly runs the node but sets the node status to Succeeded when the scheduling system starts to run the node.
            // SKIP_UNCHOOSE(4): The node is an unselected node in a temporary workflow. This type of node exists only in temporary workflows. The scheduling system sets the node status to Succeeded when the scheduling system starts to run the node.
            // SKIP_CYCLE(5): The node is scheduled by week or month, and is waiting for the scheduling time to arrive. The scheduling system regularly runs the node but sets the node status to Succeeded when the scheduling system starts to run the node.
            // CONDITION_UNCHOOSE(6): The node is not selected by its ancestor branch node and is run as a dry-run node.
            // REALTIME_DEPRECATED(7): The node has instances that are generated in real time but are deprecated. The scheduling system sets the node status to Succeeded.
            System.out.println("taskType: "+dataParam.getString("taskType"));
            // The time when the node instance was modified.
            System.out.println("modifyTime: "+dataParam.getString("modifyTime"));
            // The time when the node instance was created.
            System.out.println("createTime: "+dataParam.getString("createTime"));
            // The ID of the workspace. You can call the ListProjects operation to query the ID.
            System.out.println("appId: "+dataParam.getString("appId"));
            // The ID of the tenant that manages the workspace to which the auto triggered node instance belongs.
            System.out.println("tenantId: "+dataParam.getString("tenantId"));
            // The operation code of the auto triggered node instance. You can ignore the field value.
            System.out.println("opCode: "+dataParam.getString("opCode"));
            // The ID of the workflow. For an auto triggered node instance, the field value is 1. For a manually triggered workflow or an auto triggered node instance of the internal workflow type, the field value is the actual workflow ID.
            System.out.println("flowId: "+dataParam.getString("flowId"));
            // The ID of the node for which the auto triggered node instance was generated.
            System.out.println("nodeId:"+dataParam.getString("nodeId"));
            // The time when the auto triggered node instance started to wait for resources.
            System.out.println("beginWaitResTime: "+dataParam.getString("beginWaitResTime"));
            // The ID of the auto triggered node instance.
            System.out.println("taskId: "+dataParam.getString("taskId"));
            // The status of the node. Valid values:
            // 0: The node is not running.
            // 2: The node is waiting for the scheduling time to arrive. The scheduling time is specified by the dueTime or cycleTime parameter.
            // 3: The node is waiting for resources.
            // 4: The node is running.
            // 7: The tables that are specified in the node are issued to Data Quality and data in the tables is checked based on monitoring rules in Data Quality.
            // 8: Branch conditions are being checked.
            // 5: The node failed to be run.
            // 6: The node is successfully run.
            System.out.println("status: "+dataParam.getString("status"));
        }else{
            System.out.println("Failed to filter out other types of events. Check the parameter configurations.");
        }
    }
}
Implantar e executar o código na máquina local
-
Baixe o arquivo do projeto de demonstração:
Requisito de ambiente: Java 8 ou posterior e Maven. O Maven é uma ferramenta de automação de build para Java.
Link para baixe do arquivo do projeto: event-demo-instance-status.zip.
-
Métodos de implantação
Implantação local: Empacote o projeto como um arquivo JAR e execute o comando
java -jar yourapp.jarem um servidor local com Java 8 e Maven instalados para iniciar o service.Implantação na cloud: Empacote o projeto como um arquivo JAR e faça upload para o ambiente de execução apropriado, como um contêiner docker ou servidor cloud, para implantação.
NotaO service implantado deve ser acessível pelo EventBridge via Internet.
-
Após baixar o arquivo do projeto, acesse o diretório raiz e execute o seguinte comando:
mvn clean package -Dmaven.test.skip=true spring-boot:repackageDepois de obter o pacote JAR pronto para instalação, execute o seguinte comando:
java -jar target/event-demo-instance-status-1.0.jarA figura a seguir mostra o projeto iniciado com sucesso.
Insira http://localhost:8080/indexna barra de endereços do navegador e pressione Enter. Se"hello world!"for retornado, a extensão foi implantada com sucesso. Será possível assinar mensagens de evento após estabelecer conexões de rede entre o DataWorks e sua extensão, e entre o EventBridge e sua extensão.