複数のリージョンにまたがり、低遅延でのアクセスと高可用性を必要とするサービスには、グローバルテーブル機能をご利用ください。この機能は、リージョン間で自動的にデータを同期し、クロスリージョンディザスタリカバリを実現するとともに、最寄りのリージョンからの読み取りおよび書き込みをサポートし、ディザスタリカバリ時のスイッチオーバーを容易にします。
仕組み
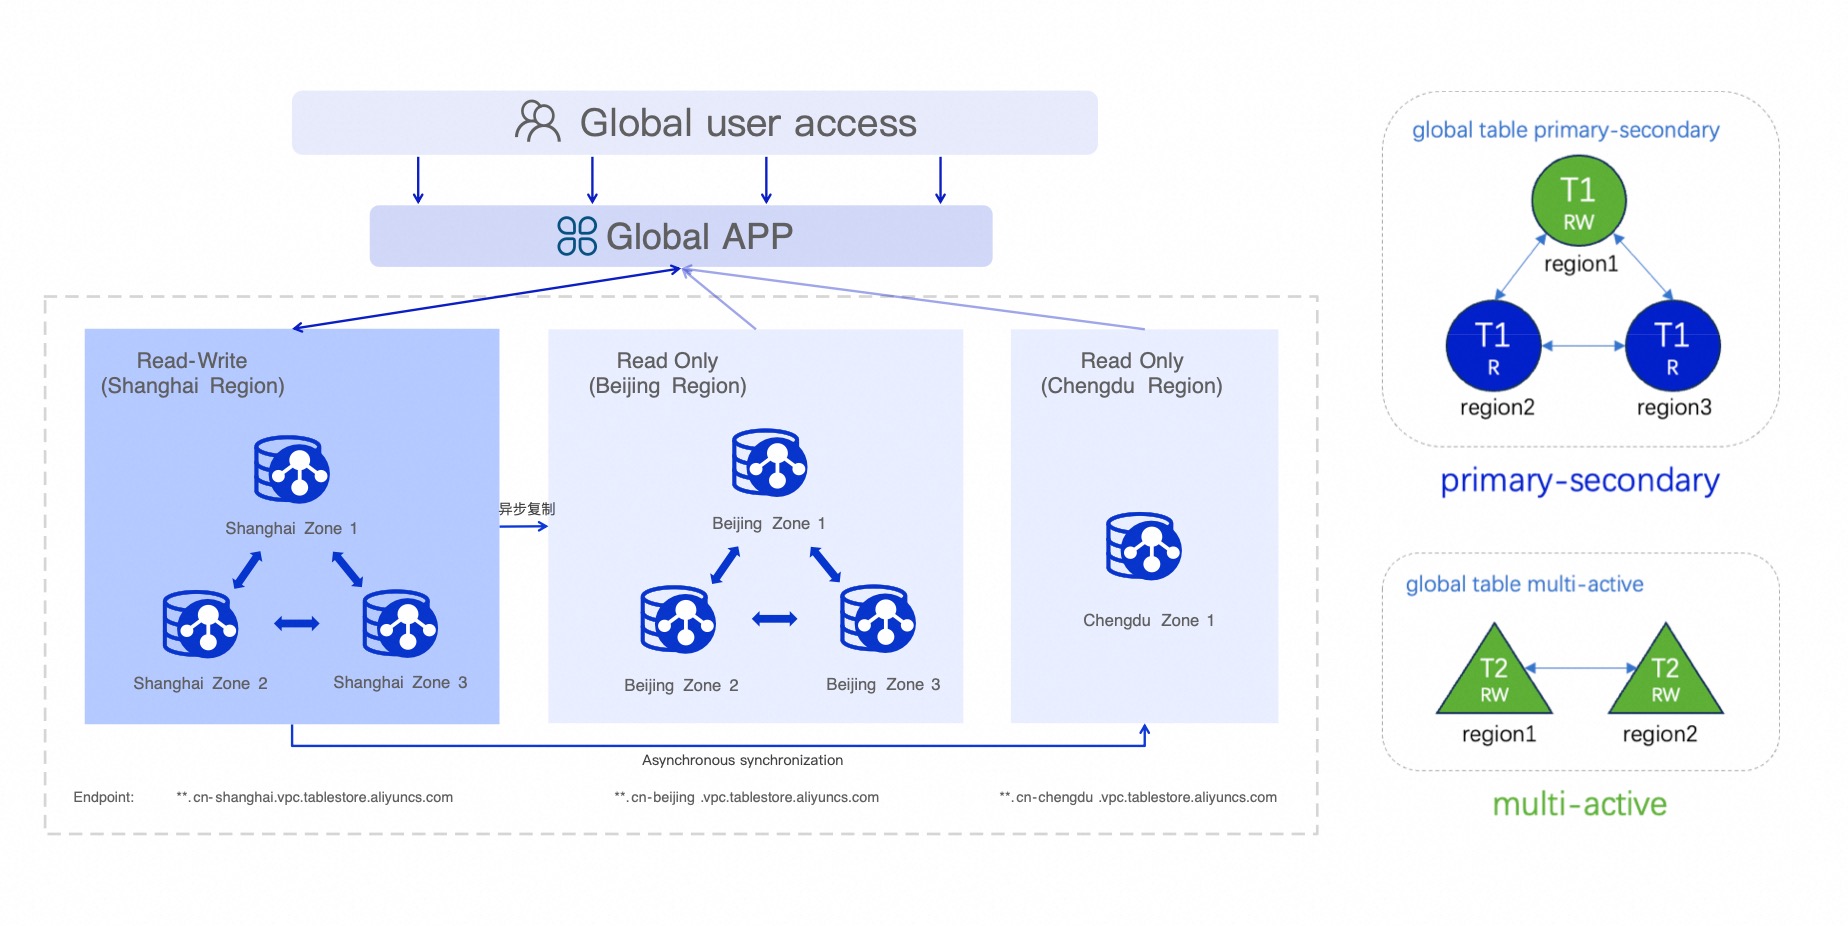
グローバルテーブルは、Tablestore のマルチリージョンレプリケーション技術を利用して、異なるリージョンにあるインスタンス間にデータ同期チャネルを構築します。あるリージョンのテーブルのデータが変更されると、Tablestore は自動的にその変更を他のリージョンのレプリカテーブルに同期します。これにより、リージョン間のデータ整合性が保たれます。また、異なるインスタンスおよびリージョン間で、動的にテーブルレプリカの追加または削除が可能です。
すべてのレプリケーションプロセスはバックグラウンドで自動的に実行されます。このメカニズムにより、データ整合性を確保しつつ、許容可能な目標復旧時点 (RPO) を達成し、多くの業務システムにおけるディザスタリカバリおよび業務継続性の要件を効果的に満たします。
日常的な利用では、ユーザーまたはアプリケーションは、読み取りおよび書き込み操作のために最寄りのレプリカにアクセスできます。これにより、アクセス遅延が大幅に削減されます。データセンターの停止や自然災害などのリージョン障害が発生した場合でも、複数のレプリカにより迅速にディザスタリカバリスイッチオーバーを実施でき、重要なアプリケーションおよびデータを再構築して業務継続性を確保できます。
特徴
|
|
クロスリージョンディザスタリカバリ テーブルレプリカは複数のリージョンにまたがります。リージョン障害が発生した場合、他のリージョンのレプリカが引き続きサービスを提供できます。 |
|
低遅延アクセス ユーザーまたはアプリケーションは、最寄りのレプリカに対してデータの読み取りおよび書き込みが可能です。これにより、操作の遅延が大幅に軽減されます。 |
||
|
|
結果整合性 グローバルテーブルは結果整合性モデルを採用しています。データは非同期で同期され、すべてのレプリカ間で最終的に整合性が保たれます。 |
|
自動コンフリクト解決 システムは、Last Write Wins (LWW) アルゴリズムを使用して、リージョン間での同時書き込みコンフリクトを自動的に処理します。 |


ユースケース
グローバルテーブルは、高可用性、低遅延でのクロスリージョン読み書き、およびクロスリージョンディザスタリカバリを必要とするワークロードに適しています。代表的なユースケースは以下のとおりです。
-
クロスリージョンバックアップ:プライマリリージョンが障害を起こした場合、セカンダリリージョンに切り替えて読み取りサービスを継続し、業務継続性を確保できます。たとえば、EC システムが中国 (杭州) リージョンの Tablestore インスタンスにプライマリユーザーテーブルを保存し、中国 (北京) リージョンにレプリカテーブルを配置している場合、中国 (杭州) リージョンが障害を起こしても、中国 (北京) リージョンのインスタンスが引き続きクエリサービスを提供します。
-
1 リージョン書き込み、複数リージョン読み取り:最寄りのリージョンにデータを書き込み、他の近隣リージョンから読み取ります。これは、リモートアクセスの高速化が必要なシナリオに適しています。たとえば、特定のワークロードの主要な書き込み操作を中国 (杭州) リージョンに向け、読み取り専用レプリカを中国 (北京) および中国 (上海) リージョンにデプロイすることで、低遅延でのクロスリージョン読み取りの需要に対応できます。
-
複数リージョン書き込み、グローバル読み取り:複数のリージョンにデータが書き込まれることでグローバルデータセットが生成され、結果整合性のある読み取りが提供されます。これは、ゲームのユーザープロファイルやソーシャルメッセージングシステムなど、グローバルデータセットへのアクセスが必要なクロスリージョンデプロイメントに適しています。
グローバルテーブルの対応リージョン:この機能は現在、中国 (杭州)、中国 (上海)、中国 (青島)、中国 (北京)、中国 (張家口)、中国 (フフホト)、中国 (ウランチャブ)、中国 (深セン)、中国 (広州)、および中国 (成都) リージョンでサポートされています。
グローバルテーブルの作成
開始する前に、Tablestore を有効化してインスタンスを作成してください。プライマリリージョンおよびターゲットレプリカリージョンの両方にインスタンスを作成する必要があります。
ステップ 1:ベーステーブルの準備
プライマリリージョンで、グローバルテーブルのベースとなるデータテーブルを作成します。
-
既存のデータテーブルをグローバルテーブルのベーステーブルとして使用する場合は、次の要件を満たしていることを確認してください:生存時間 (TTL) が -1 に設定されていること、バージョンの最大数が 1 であること、最大バージョンオフセットが MaxInt32 (2147483647) であること、およびテーブルが行モードであること。
-
行モード以外の既存テーブルは、グローバルテーブルに変換できません。このようなテーブルを使用する場合は、テクニカルサポートまでお問い合わせください。
-
インスタンスの管理ページに移動します。
-
Tablestore コンソールにログインします。
-
ページ上部で、リソースグループとリージョンを選択します。
-
概要ページで、インスタンスエイリアスをクリックするか、インスタンスの[操作]列でインスタンスの管理をクリックします。
-
-
インスタンスの詳細タブで、テーブルの作成をクリックします。
-
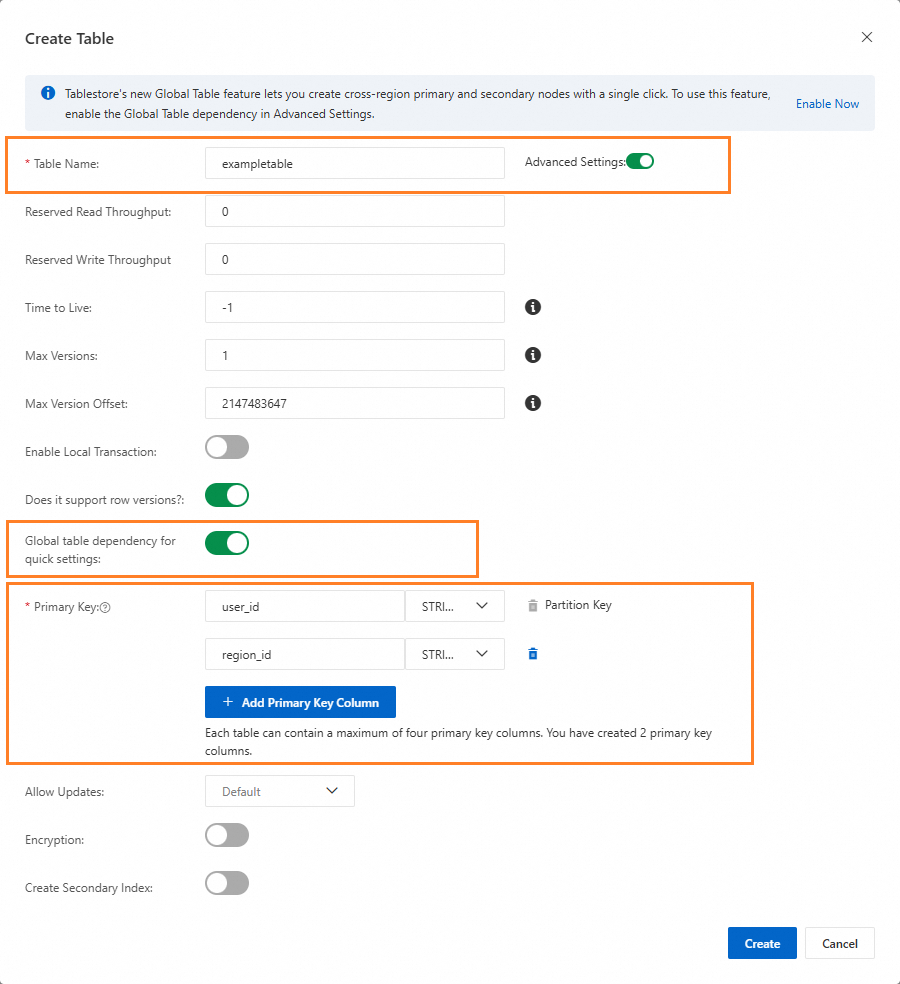
テーブルの作成ダイアログボックスで、テーブル名およびプライマリキーを設定します。
-
[詳細設定]スイッチをオンにし、次にグローバルテーブルの依存関係をクイック設定するスイッチをオンにします。これにより、グローバルテーブルに必要なテーブルプロパティが自動的に設定されます。
パラメーター
必須値
説明
生存時間 (TTL)
-1
データは期限切れになりません。
バージョンの最大数
1
バージョンの最大数は 1 です。
行バージョン管理のサポート
有効
テーブルを行モードに設定します。
説明行バージョンをサポートするかどうかを一度有効にすると、無効化することはできません。行バージョン管理を有効化した後は、以下の制限が適用されます。
-
1 行あたり最大 256 列まで保持できます。
-
データ書き込み時にバージョン番号を手動で指定することはできません。システムが自動的に生成する必要があります。
-
行を更新する際、システムはまず現在の行バージョンを読み取る必要があります。これにより、少量の読み取りオーバーヘッドが発生します。
最大バージョンオフセット
MaxInt32 (2147483647)
バージョンオフセットが Int32 の最大値に設定されます。つまり、制限はありません。
-
-
作成をクリックします。
ステップ 2:グローバルテーブルの作成
ベーステーブルをグローバルテーブルに変換し、レプリカリージョンを追加します。レプリカを追加すると、システムは選択したレプリカリージョンに自動的に対応するデータテーブルを作成し、データ同期チャネルを確立します。
-
プライマリリージョンのテーブルリストタブで、ベーステーブルの[操作]列にあるグローバルテーブルの新規作成をクリックします。
説明または、データテーブル名をクリックしてグローバルテーブルタブに移動し、グローバルテーブルの同期関係を作成するをクリックして続行することもできます。
-
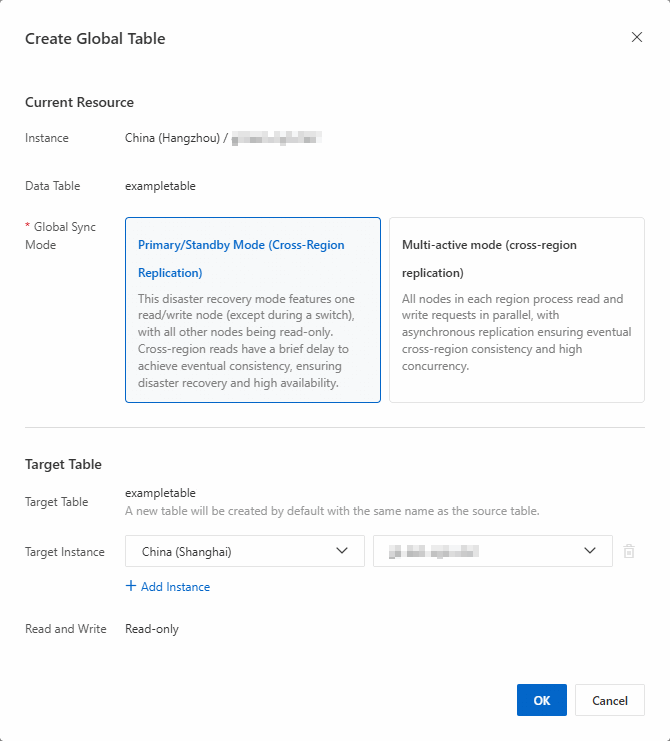
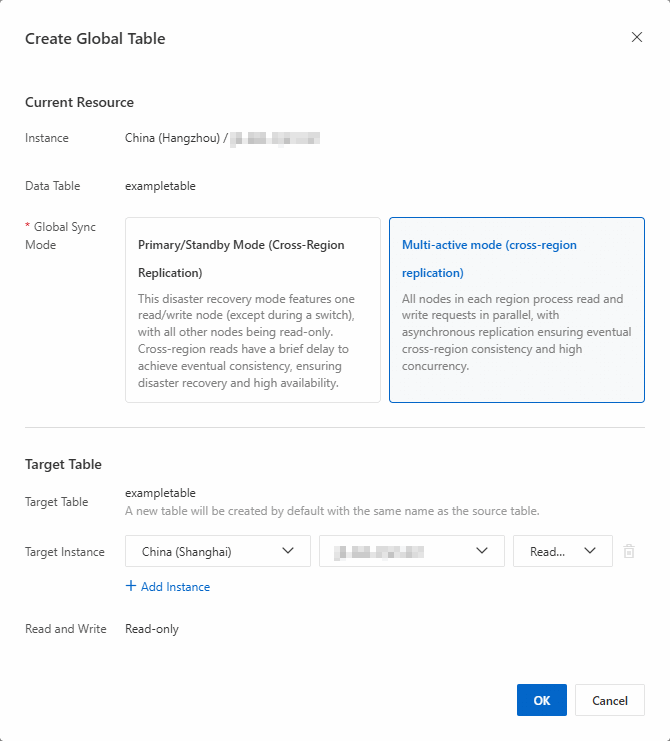
グローバルテーブルの作成ダイアログボックスで、グローバルテーブルのパラメーターを設定します。
説明宛先インスタンスに、グローバルテーブルと同じ名前のデータテーブルがすでに存在する場合、グローバルテーブルの作成は失敗します。
アクティブ・パッシブモード
-
現在のリソースエリアで、グローバル同期モードをプライマリ / セカンダリモード (クロスリージョンレプリケーション)に設定します。
-
ターゲットテーブルエリアで、宛先インスタンスのリージョンおよびインスタンス名を選択します。
複数の宛先インスタンスを一度に追加できます。グローバルテーブルを作成すると、システムは選択したリージョンのインスタンスに自動的にターゲットテーブルを作成します。ターゲットテーブル名はベーステーブル名と同じになります。
マルチアクティブモード
-
現在のリソースエリアで、グローバル同期モードを複数の読み取り / 書き込み (リージョン間レプリケーション)に設定します。
-
ターゲットテーブルエリアで、宛先インスタンスのリージョン、インスタンス名、および読み書きモードを選択します。
複数の宛先インスタンスを一度に追加できます。グローバルテーブルを作成すると、システムは選択したリージョンのインスタンスに自動的にターゲットテーブルを作成します。ターゲットテーブル名はベーステーブル名と同じになります。
-
-
OKをクリックします。
グローバルテーブルの作成ダイアログボックスで、リストの表示をクリックします。グローバルテーブルタブでグローバルテーブルを確認できます。
ステップ 3:グローバルテーブルの検証と使用
グローバルテーブルを作成したら、データ同期機能を検証し、基本的な読み取りおよび書き込みテストを実行します。
-
テストデータの書き込み:プライマリリージョンのデータテーブルにテストデータを書き込みます。
-
プライマリリージョンのテーブルリストタブで、ベーステーブルの[操作]列にあるクエリをクリックします。
-
データのクエリタブで、挿入をクリックします。
-
挿入ダイアログボックスで、プライマリキーを設定し、列を追加をクリックして属性を追加し、OKをクリックします。
-
-
データ同期の検証:1~3 秒待機した後、レプリカリージョンのデータをクエリして同期を検証します。
-
プライマリリージョンのテーブルリストタブで、ベーステーブルの[操作]列にあるクエリをクリックします。
-
ベーステーブルのグローバルテーブルタブで、レプリカリージョンのレプリカテーブル名をクリックします。
-
レプリカテーブルのデータのクエリタブで、プライマリリージョンのベーステーブルから同期されたデータを確認できます。
-
グローバルテーブルの読み取りおよび書き込み
グローバルテーブルのレプリカテーブルからのデータ読み取りおよび書き込みは、標準的なデータテーブルからのデータ読み取りおよびデータ書き込みと同じです。
-
データを読み取るには、対応するレプリカテーブルが配置されているインスタンスのエンドポイントを取得する必要があります。
-
プライマリセカンダリモードでは、プライマリレプリカのみがそのインスタンスのエンドポイント経由で書き込みを許可します。他のレプリカは読み取り専用ですが、プライマリセカンダリスイッチオーバー中は例外です。マルチアクティブモードでは、すべての書き込み可能なレプリカがそれぞれのインスタンスのエンドポイント経由で書き込みを許可します。
重要マルチアクティブモードの日常的な書き込みシナリオでは、同期書き込みとアプリケーション書き込みが同時に発生する可能性があります。両方の操作が同じデータ行を変更する場合、バージョン番号が大きい行が小さいバージョンの行を上書きします。これにより、小さいバージョンのデータが上書きまたは破棄される可能性があります。
プライマリセカンダリモードの管理
アクティブ-パッシブ関係を変更する
-
この機能は、プライマリセカンダリモードのグローバルテーブルでのみ利用可能です。
-
プライマリセカンダリスイッチオーバー中、同期書き込みとアプリケーション書き込みが同時に発生する可能性があります。両方の操作が同じデータ行を変更する場合、バージョン番号が大きい行が小さいバージョンの行を上書きします。これにより、小さいバージョンのデータが上書きまたは破棄される可能性があります。
プライマリセカンダリモードでは、プライマリレプリカが障害を起こした場合や、アプリケーションの書き込みリージョンを切り替える必要がある場合、別のレプリカを新しいプライマリに昇格させることでサービス継続性を確保できます。
-
[グローバルテーブル]タブで、従属テーブルの操作列にあるプライマリテーブルへの切り替えをクリックします。
-
プライマリ / セカンダリ関係の変更ダイアログボックスで、プライマリテーブルスイッチオーバータスクを送信し、データ同期を開始します。
重要データ同期は継続します。所要時間はデータ量およびシステムリソースに依存します。データ同期中は、現在のプライマリレプリカと昇格中のレプリカの両方が読み取りおよび書き込み可能であるため、データの不整合リスクがあります。
-
データ同期 ステップで、データ同期の開始 をクリックします。
-
プライマリ / セカンダリの切り替えダイアログボックスで、詳細の表示をクリックして、データ同期の RPO ステータスを確認します。
-
-
アプリケーション層の書き込みパスを切り替えます。
アプリケーション層の書き込みパスを切り替える前に、プライマリテーブルとセカンダリテーブルのデータが整合していることを確認してください。
-
任意のテーブルの同期モード列で、書き込みリンクの切り替えを確定するをクリックします。
-
アプリケーション層書き込みリンクの切り替えステップで、データ同期が完了し、アプリケーション内のすべての書き込みエンドポイントが新しいプライマリのエンドポイントに変更されていることを確認してから、書き込みリンクの切り替えが完了しましたをクリックします。
-
-
プライマリテーブルへの切り替えを確定します。
書き込みパスを切り替えた後は、できるだけ早くプライマリテーブルの切り替えを確定してください。
重要この操作により、元のプライマリテーブルの書き込み機能が無効になります。
-
任意のテーブルの同期モード列で、表示をクリックします。
-
プライマリテーブルの切り替えの確定ステップで、同期が完了しました。今すぐプライマリテーブルが切り替わりますをクリックします。
説明アクティブ-パッシブテーブルのスイッチオーバーをキャンセルするには、プライマリテーブル切り替えのキャンセル をクリックしてから、キャンセルを確認します。
-
確認ダイアログボックスで、[OK]をクリックします。
変更が成功すると、元のプライマリレプリカは読み取り専用になり、新しいプライマリレプリカが読み取りおよび書き込み機能を提供します。
-
グローバルリージョンの追加
グローバルテーブルに 1 つ以上のグローバルリージョンを追加します。
-
グローバルテーブルタブで、レプリカテーブルの操作列にあるグローバルリージョンの追加をクリックします。
-
グローバルリージョンの追加ダイアログボックスで、宛先インスタンスのリージョンおよびインスタンス名を選択します。
複数のグローバルリージョンを追加するには、インスタンスの追加をクリックして続行します。
説明宛先インスタンスに、グローバルテーブルと同じ名前のデータテーブルがすでに存在する場合、グローバルリージョンの追加は失敗します。
-
OKをクリックします。
同期関係の削除
グローバルテーブルの同期関係を削除します。
グローバルテーブルのすべての同期を停止するには、セカンダリテーブルから始めてプライマリテーブルで終えるように、各レプリカの同期関係を個別に削除する必要があります。特定のリージョンのみを削除する場合は、そのレプリカテーブルに対して操作を実行してください。
-
グローバルテーブルタブで、同期関係の削除を開始する方法を以下から選択します。
-
単一レプリカの削除:操作列にあるレプリカテーブルの同期関係の解除をクリックします。
-
複数レプリカの一括削除:削除するレプリカテーブルを選択し、リスト下部の同期関係の解除をクリックします。
-
-
確認ダイアログボックスで、OKをクリックします。
システムが同期関係の削除を開始します。プロセスが完了するまでお待ちください。
マルチアクティブモードの管理
ターゲットインスタンスの編集
-
グローバルテーブルタブで、レプリカテーブルの操作列にある編集をクリックします。
-
グローバルテーブルの編集ダイアログボックスで、必要な操作を実行します。
-
ターゲットインスタンスの追加:宛先インスタンスのリージョン、インスタンス名、および読み書きモードを選択します。
複数のグローバルリージョンを追加するには、インスタンスの追加をクリックして続行します。
説明宛先インスタンスに、グローバルテーブルと同じ名前のデータテーブルがすでに存在する場合、グローバルリージョンの追加は失敗します。
-
インスタンスの読み書きモードの変更:既存のインスタンスに対して読み書きモードを選択します。
-
-
OKをクリックします。
同期関係の削除
グローバルテーブルの同期関係を削除します。
グローバルテーブルのすべてのリージョンの同期を停止するには、各レプリカテーブルの同期関係を個別に削除する必要があります。特定のリージョンの同期関係のみを削除する場合は、削除対象のレプリカテーブルに対してのみ操作を実行してください。
-
グローバルテーブルタブで、レプリカテーブルの操作列にある同期の解除をクリックします。
-
確認ダイアログボックスで、OKをクリックします。
システムが同期関係の削除を開始します。プロセスが完了するまでお待ちください。
開発者向け統合
Java SDK を使用してグローバルテーブルを利用できます。
本番環境に適用
-
グローバルテーブルの運用に関する推奨事項
-
既存テーブルに対するグローバルテーブルの作成:元の読み取りおよび書き込み API は変更されません。データは新しいレプリカに自動的に同期されます。新しいレプリカは読み取り負荷を分担できます。
-
ゼロから新しいグローバルテーブルの作成:テーブルスキーマを決定し、ベーステーブルを作成します。グローバルテーブルのスキーマは変更できないため、グローバルテーブルを作成する前にベーステーブルのスキーマを十分に検討およびテストする必要があります。
-
新しいレプリカの動的アタッチ:グローバルテーブルの使用中に、既存のレプリカの読み取りおよび書き込み操作に影響を与えることなく、新しいレプリカを動的に追加できます。新しいレプリカには、グローバルテーブルの最新データが含まれます。
-
既存レプリカのデタッチ:レプリカテーブルが不要になった場合は、デタッチできます。デタッチ後、レプリカは他のレプリカからのデータ同期を停止しますが、テーブルおよびそのデータは保持されます。レプリカを削除するには、デタッチ後に手動で削除する必要があります。
-
-
適切なリージョンの組み合わせを選択:ユーザーの分布およびビジネスニーズに基づいて、適切なプライマリおよびセカンダリリージョンを選択します。
-
プライマリリージョンのフェールオーバー:プライマリセカンダリモードでは、プライマリリージョンが利用できなくなった場合、コンソールで新しいプライマリレプリカを選択してフェールオーバーを実行します。アプリケーションの書き込みパスを新しいプライマリに切り替え、データの同期を待ってから、レプリカを新しいプライマリに昇格させます。スイッチオーバーにより、一時的な書き込み中断が発生する可能性があります。アプリケーションでリトライを実装することを推奨します。
重要データ損失を防ぐため、ビジネスアプリケーションはアプリケーションおよびサービスのスイッチオーバーの順序とタイミングを適切に管理する必要があります。
クォータと制限
詳細については、「グローバルテーブルの制限事項」をご参照ください。
-
テーブルタイプの制限:データテーブルのみがサポートされます。時系列テーブル、検索インデックス、セカンダリインデックスのクロスリージョン同期はサポートされていません。
-
レプリカ数:1 つのグローバルテーブルは最大 10 リージョンをサポートします。
-
同期遅延:同期の RPO は通常数秒以内です。実際の遅延はリージョン、ネットワーク状況、データ量に依存します。
-
データ上書きリスク :プライマリセカンダリスイッチオーバー中またはマルチアクティブモードの日常的な書き込み操作において、同期書き込み操作とユーザー書き込み操作が同時に発生する可能性があります。両方の操作が同じデータ行を変更する場合、バージョン番号が大きい書き込みが小さいバージョンの書き込みを上書きします。
-
サポートされていない機能:
-
データ転送遅延に関する信頼性保証は提供されていません。リアルタイム通信 (RTC) はサポートされていません。
-
グローバルテーブルの TTL 構成や事前定義列の追加など、プロパティを変更することはできません。
-
既存のデータテーブルはデフォルトで列モードで作成され、直接グローバルテーブルに変換することはできません。
-
以前にグローバルテーブルの一部であったデータテーブルの同期関係を再度関連付けることはできません。このテーブルを新しいグローバルテーブルで使用するには、まず関連付けられた検索インデックスおよびセカンダリインデックスを削除し、テーブル自体を削除した後、新しいグローバルテーブルを作成する必要があります。
説明このシナリオは、かつてグローバルテーブルの一部であったデータテーブルの同期関係が削除され、再度グローバルテーブルとして使用したい場合に該当します。
-
課金
グローバルテーブルには、データストレージ、データ読み取り、データ書き込み、およびクロスリージョンレプリケーショントラフィックの料金が発生します。
各レプリカテーブルのデータストレージおよび読み書き操作の課金方法は、標準的なデータテーブルと同じです。詳細については、「課金概要」をご参照ください。
以下の料金が適用されます。
-
データストレージ料金:各レプリカテーブルはデータを独立して保存します。各テーブルのリージョンに保存されている実際のデータ量に対して個別に課金されます。
-
データ読み取り料金:すべてのレプリカテーブルのローカル読み取り操作をカバーします。
-
データ書き込み料金:書き込み操作は書き込み可能なレプリカに対してのみ実行できます。書き込み料金は、データが直接書き込まれたテーブルに対してのみ発生します。非同期レプリケーションによってデータを同期するレプリカテーブルには、書き込み料金は発生しません。
-
クロスリージョンレプリケーショントラフィック料金:データが非同期で各レプリカテーブルにレプリケーションされる際に発生するクロスリージョンデータ転送トラフィックに対して課金されます。
重要各レプリカのクロスリージョンレプリケーショントラフィック料金は個別に計算されます。料金は、データをプルするインスタンスに対して課金されます。
よくある質問
グローバルテーブルの構成(TTL の設定やカスタム列の追加など)を変更するにはどうすればよいですか?
グローバルテーブルの構成を直接変更することはできません。グローバルテーブルの構成を変更するには、すべてのレプリカの同期を削除し、元のベーステーブルを変更した後、再度グローバルテーブルを作成する必要があります。このプロセス中にサービス中断を回避するには、他のレプリカを削除する前に、すべての読み書きトラフィックをプライマリレプリカに集約してください。
レプリカテーブルを削除するにはどうすればよいですか?
まず、レプリカの同期関係を削除します。削除後、コンソールのインスタンスのテーブルリストからテーブルを削除できます。
プライマリセカンダリモードで、プライマリではないインスタンスのレプリカテーブルからデータを読み取るにはどうすればよいですか?
プライマリインスタンスで、ベーステーブルのグローバルテーブルタブに移動し、関連付けられたレプリカテーブルのインスタンス名を確認します。その後、そのインスタンスのエンドポイントを使用してデータを読み取ります。
行モードで、異なるリージョンで同じ行の異なる列を順番に UpdateRow API で更新する場合(例:最初に 'a' を更新し、次に 'b' を更新)、行データはどのようになりますか?
行のデータは最終的に整合性が保たれます。最終的な状態は、最後の書き込み('b')が行われたレプリカの全体の行になります。この結果は、'b' の書き込みが行われた時点でそのレプリカがすでに 'a' の更新を同期していたかどうかに依存します。
-
'b' の書き込みが行われた時点で、レプリカがまだ 'a' の更新を同期していなかった場合、最終的な行には 'b' の更新データのみが含まれ、'a' の更新データは含まれません。
-
'b' の書き込みが行われた時点で、レプリカがすでに 'a' の更新を同期していた場合、最終的な行には 'a' および 'b' の両方の更新データが含まれます。
異なる国のリージョン間でグローバルテーブルを作成できますか?
データコンプライアンス要件により、現在、異なる国にまたがるグローバルテーブルの作成はサポートされていません。グローバルテーブルの対応リージョンのリストについては、「機能と対応リージョン」をご参照ください。