本 Topic では、カスタムベースライン cp_change_28238 またはベースライン 10.2.3.5 以降でスキャンマルチコード認識 SDK を使用する方法について説明します。 CocoaPods を使用した既存のプロジェクトに基づいて、スキャンマルチコード認識 SDK を iOS クライアントに統合できます。
前提条件
プロジェクトを mPaaS に接続済みであること。 詳細については、「CocoaPods を使用した既存プロジェクトに基づく接続」をご参照ください。
SDK の追加
cocoapods-mPaaS プラグインを使用して、マルチコード認識 SDK を追加します。 手順は以下の通りです。
Podfileファイルで、mPaaS_baseline をcp_change_28238またはベースライン 10.2.3.5 以降に変更します。mPaaS_pod "mPaaS_ScanCode"を使用して、スキャンコンポーネントの依存関係を追加します。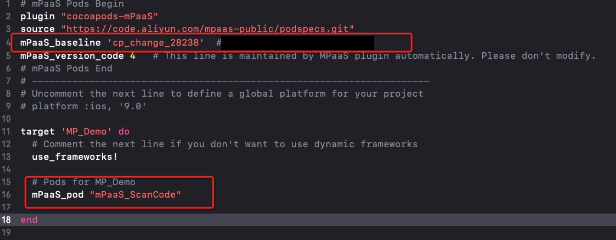
ここをクリックして CocoaPods の使用方法を学習します。 次に、必要に応じてコマンドラインで
pod installまたはpod updateを実行して、統合を完了します。
SDK の使用
デフォルトのスキャンページの起動
このセクションでは、公式の スキャンデモを使用して、カスタムベースライン cp_change_28238 またはベースライン 10.2.3.5 以降で、デフォルト UI を使用してスキャンマルチコード認識 SDK を使用する方法について説明します。
デフォルトのスキャンページを開き、スキャン結果を処理します。
 #import <TBScanSDK/TBScanSDK.h>

 @interface MPScanDemoVC()

 @property(nonatomic, strong) TBScanViewController *scanVC;

 @end

- (void)defaultScan {

   // アルバムエントリを表示するかどうかを指定します。
   [MPScanCodeAdapterInterface sharedInstance].shoulShowAlbum = NO;

   TBScanViewController *vc = [[MPScanCodeAdapterInterface sharedInstance] createDefaultScanPageWithallback:^(id  _Nonnull result, BOOL keepAlive) {
       // スキャン結果を処理します。
       UIAlertView *alert = [[UIAlertView alloc] initWithTitle:@"" message:result[@"resp_result"] delegate:self cancelButtonTitle:@"OK" otherButtonTitles:nil, nil];
        alert.tag = 1999;
        [alert show];
    }];

     // スキャンタイプを設定します。
     vc.scanType =  ScanType_Default_Code;

    [self.navigationController pushViewController:vc animated:YES];
    self.scanVC =  vc;
}
マルチコード認識の場合は、連続スキャンを有効にします。
- (void)alertView:(UIAlertView *)alertView clickedButtonAtIndex:(NSInteger)buttonIndex {
    // スキャンを続行します。
    [self.scanVC resumeCaptureSession];
}
カスタム UI の使用方法
このセクションでは、公式の スキャンデモを使用して、カスタム UI でスキャンマルチコード認識 SDK を使用する方法について説明します。
TBScanViewController から継承するカスタム ViewController の作成
#import <UIKit/UIKit.h>

NS_ASSUME_NONNULL_BEGIN

@interface MPScanCodeViewController : TBScanViewController<TBScanViewControllerDelegate>

@end

NS_ASSUME_NONNULL_END
カスタムスキャン ViewController の初期化
// カスタムスキャンのエントリポイント
- (void)customScanAction
{
    MPScanCodeViewController *vc = [[MPScanCodeViewController alloc] initWithConfig:@{}];
    [self.navigationController pushViewController:vc animated:YES];
}
@implementation MPScanCodeViewController
- (instancetype)initWithConfig:(NSDictionary *)config
{
if (self = [super initWithConfig:config])
{
self.delegate = self;
self.scanType = ScanType_All_Code;
}
return self;
}カスタムスキャン ViewController の初期化には、-(instancetype)initWithConfig:(NSDictionary *)config; メソッドのみを使用してください。
スキャンボックスのカスタマイズ
- (void)buildContainerView:(UIView*)containerView
{
    // カスタムスキャンボックスビュー
    UIView* bg = [[UIView alloc] initWithFrame:containerView.bounds];
    [containerView addSubview:bg];
    CGRect rect = [MPScanCodeViewController constructScanAnimationRect];
    UIView* view = [[UIView alloc] initWithFrame:rect];
    view.backgroundColor = [UIColor orangeColor];
    view.alpha = 0.5;
    [bg addSubview:view];
}
スキャン結果の処理
ご自身のビジネスシナリオに応じて処理してください。
#pragma mark TBScanViewControllerDelegate

-(void)didFind:(NSArray<TBScanResult*>*)resultArray
{
    TBScanResult *result = resultArray.firstObject;
    NSString* content = result.data;
    if (result.resultType == TBScanResultTypeQRCode) {
        content = [NSString stringWithFormat:@"qrcode:%@, hiddenData:%@, TBScanQRCodeResultType:%@", result.data, result.hiddenData, [result.extData objectForKey:TBScanResultTypeQRCode]];
        NSLog(@"subType is %@, ScanType_QRCode is %@", @(result.subType), @(ScanType_QRCode));
    } else if (result.resultType == TBScanResultTypeVLGen3Code) {
        content = [NSString stringWithFormat:@"gen3:%@", result.data];
        NSLog(@"subType is %@, ScanType_GEN3 is %@", @(result.subType), @(ScanType_GEN3));
    } else if (result.resultType == TBScanResultTypeGoodsBarcode) {
        content = [NSString stringWithFormat:@"barcode:%@", result.data];
        NSLog(@"subType is %@, EAN13 is %@", @(result.subType), @(EAN13));
    } else if (result.resultType == TBScanResultTypeDataMatrixCode) {
        content = [NSString stringWithFormat:@"dm:%@", result.data];
        NSLog(@"subType is %@, ScanType_DATAMATRIX is %@", @(result.subType), @(ScanType_DATAMATRIX));
    } else if (result.resultType == TBScanResultTypeExpressCode) {
        content = [NSString stringWithFormat:@"express:%@", result.data];
        NSLog(@"subType is %@, ScanType_FASTMAIL is %@", @(result.subType), @(ScanType_FASTMAIL));
    }
    dispatch_async(dispatch_get_main_queue(), ^{
        UIAlertView *alert = [[UIAlertView alloc] initWithTitle:@"" message:content delegate:self cancelButtonTitle:@"OK" otherButtonTitles:nil, nil];
        alert.tag = 9999;
        [alert show];
    });
}