The purpose of creating a Tomcat cluster is to provide higher load capacity and distribute access evenly across different servers. Use the structure frame in the following diagram as an example.
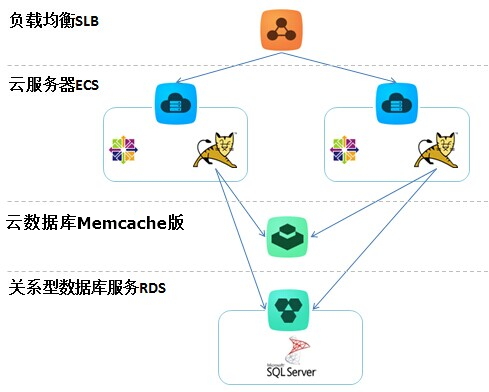
Alibaba Cloud clusters are generally divided into two modes. One is to completely centralize the SESSION, keeping each cluster point consistent. The other is to designate a node in a cluster to provide service based on a single session.
Install TOMCAT and JDK on ECS.
In this example, TOMCAT 7 and JDK 7 are used. It is recommended to download TOMCAT locally, configure it, and then upload it to ECS.
Add memcached support library package to TOMCAT.
For configuration of memcached-session-manager, please refer to the referenced document.
This step mainly involves downloading some libraries, and the download addresses are provided in the above document. Place the downloaded libraries in the Tomcat/lib folder, as shown in the following diagram. (Note: The prefix "msm-" for each file is not originally there; it is added for easier management.)
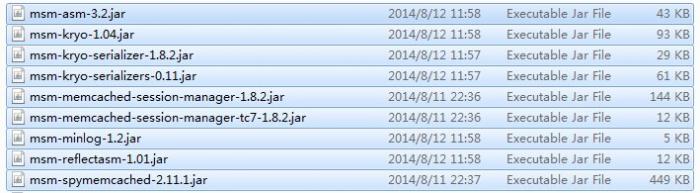
With these packages, you can configure TOMCAT to connect to Memcache.
Sync Tomcat Session to Memcache.
This step requires specific configuration of TOMCAT, with two configuration modes: STICKY and NON-STICKY.
STICKY: Load balancing will assign the user session to the same cluster node each time. The user retrieves session data from TOMCAT each time, and TOMCAT backs up a SESSION to Memcache, allowing for the most efficient SESSION retrieval.
NON-STICKY: Load balancing does not manage user sessions but distributes connections separately each time. Sessions are maintained on Memcache, and each read and write occurs on Memcache. Because data is accessed remotely, efficiency is lower, but this is most consistent with the expected effect of clustering or centralized caching.
Edit the configuration to connect to Memcache in /Tomcat/conf/context.xml under the
<Context>element by adding the following configuration description. Below are the two configuration modes for TOMCAT:STICKY mode
<Manager className="de.javakaffee.web.msm.MemcachedBackupSessionManager"
  memcachedNodes="Memcache address:11211"
  username="Memcache instance name"
  password="Memcache password"
  memcachedProtocol="binary"
  sticky="true"
  sessionBackupAsync="true"
  sessionBackupTimeout="1000"
  requestUriIgnorePattern=".*\.(gif|jpg|jpeg|png|bmp|swf|js|css|html|htm|xml|json)$"
  transcoderFactoryClass="de.javakaffee.web.msm.serializer.kryo.KryoTranscoderFactory" ></Manager>
NON-STICKY mode
<Manager className="de.javakaffee.web.msm.MemcachedBackupSessionManager" memcachedNodes="Memcache address:11211" username="Memcache instance name" password="Memcache password" memcachedProtocol="binary" sticky="false" lockingMode="auto" sessionBackupAsync="false" sessionBackupTimeout="1000" requestUriIgnorePattern=".*\.(gif|jpg|jpeg|png|bmp|swf|js|css|html|htm|xml|json)$" transcoderFactoryClass="de.javakaffee.web.msm.serializer.kryo.KryoTranscoderFactory" />Note: The
memcachedProtocol="binary"is required because the Tomcat memcached plug-in mode has this property value as text, while Alibaba Cloud supports binary mode data.
Modify TOMCAT's JVM settings and NIO.
Modify the JVM settings in the /Tomcat/bin/ directory by adding a setenv.sh file to specify the configuration to be optimized.
CATALINA_OPTS="-server -Xms3072m -Xmx3072m -Xmn1024m -XX:PermSize=96m -XX:MaxPermSize=128m -XX:+UseConcMarkSweepGC -XX:+UseCMSCompactAtFullCollection -XX:CMSMaxAbortablePrecleanTime=50 -XX:+CMSPermGenSweepingEnabled"Modify the NIO settings in the /Tomcat/conf/context.xml file.
Comment out the original Connector=8080 definition and add the following configuration definition to use the NIO method.
 <Connector port="8080"
         protocol="org.apache.coyote.http11.Http11NioProtocol"
         connectionTimeout="20000"
         URIEncoding="UTF-8"
         useBodyEncodingForURI="true"
         enableLookups="false"
         redirectPort="8443" />
Create a JSP to check the SESSION.
Create a JSP file in the Tomcat/webapps/ROOT directory.
 <%@ page language="java" import="java.util.*" pageEncoding="ISO-8859-1"%>
 <%
 String path = request.getContextPath();
 String basePath = request.getScheme()+"://"+request.getServerName()+":"+request.getServerPort()+path+"/";
 %>
 <!DOCTYPE HTML PUBLIC "-//W3C//DTD HTML 4.01 Transitional//EN">
 <html>
   <head>
     <base href="<%=basePath%>">
     <title>My JSP 'session.jsp' starting page</title>
     <meta http-equiv="pragma" content="no-cache">
     <meta http-equiv="cache-control" content="no-cache">
     <meta http-equiv="expires" content="0">
     <meta http-equiv="keywords" content="keyword1,keyword2,keyword3">
     <meta http-equiv="description" content="This is my page">
     <!--
     <link rel="stylesheet" type="text/css" href="styles.css">
     -->
   </head>
   <body>

     <h1>
     <%
      out.println("This is (TOMCAT1), SESSION ID:" + session.getId());
     %>
     </h1>
   </body>
 </html>
Upload the configured TOMCAT to ECS.
After uploading, start it, and you can see your TOMCAT at: <server address>:8080/session.jsp. If you see the following text, it indicates that TOMCAT has successfully connected to Memcache.
This is (TOMCAT1), SESSION ID:CAC189E5ABA13FFE29FCB1697F80182B-OCS
Note: When the website load is low, Memcache can be used normally to cache tomcat sessions. If the load is high and sessions frequently become invalid, you need to upgrade the Memcache specifications to use it normally.