この章では、MQTTトピックを介してメッセージを送受信する方法、およびUbuntuでデバイスモデリングによるデバイスプログラミング方法を実装する方法について説明します。
ローカル開発環境のインストール
Ubuntu16.04のインストール
このクイックエクスペリエンスのコンパイル環境は、64ビットホストでUbuntu16.04です。 この環境は他のバージョンのLinuxでは検証されていません。 互換性の問題を回避するため、Alibabaと一致するリリースバージョンをインストールすることを推奨します。
Windowsオペレーティングシステムを使用している場合は、VMWare Virtualboxをインストールすることを推奨します。
次に、64ビットデスクトップ版のUbuntu 16.04.x LTSをインストールします。 ダウンロードリンク: http://releases.ubuntu.com/16.04
前提ソフトウェアのインストール
このSDKの開発およびコンパイル環境では、make-4.1、git-2.7.4、gcc-5.4.0、gcov-5.4.0、lcov-1.12、bash-4.3.48、tar-1.28、mingw-5.3.1
次のコマンドを使用して、必要なソフトウェアをインストールできます。
$ sudo apt-get install -y build-essential make git gccHacklab Web IDEを介して開発する
PCまたはラップトップにUbuntuをインストールする予定がない場合は、Alibaba Cloud IoT Platformが提供するHacklab Web IDE環境を介してデバイス用に直接開発することもできます。 Hacklab Web IDEは、クラウド上のLinux開発環境であり、必要なソフトウェアがすべてインストールされています。 Alibaba Cloudアカウントをお持ちの場合は、Hacklab Web IDEにログインし、ブラウザーから開発を開始できます。
MQTTトピックを使用してデバイスにアクセスする
プロダクトとデバイスの作成
Alibaba Cloudアカウントを使用してAlibaba Cloud IoT Platformにログインし、プロダクトを作成します。 MQTTトピックを使用して製品関数を直接実装するため、製品を作成するときは必ず「基本バージョン」を選択してください。
製品を作成したら、特定のデバイスを作成する必要があります。 Alibaba Cloud IoT Platformは、デバイスのID情報を生成します。
クラウドでの製品作成に慣れていない場合は、Alibaba cloud IoT Platformで製品とデバイスを作成する方法を学んでください。
プロダクト関数の実装
SDKのルートディレクトリ構造を理解する
Link Kit SDKがダウンロードされた後、トップレベルのディレクトリ構造は次のようになります。
$ ls
ビルドルールの設定例LICENSE make.settings project.mk sdk-c.mk win_board_conf.mk CMakeLists.txt Config.linkkitには、makefileプリビルドREADME.txt win.makefile
が含まれます
デバイス識別の変更
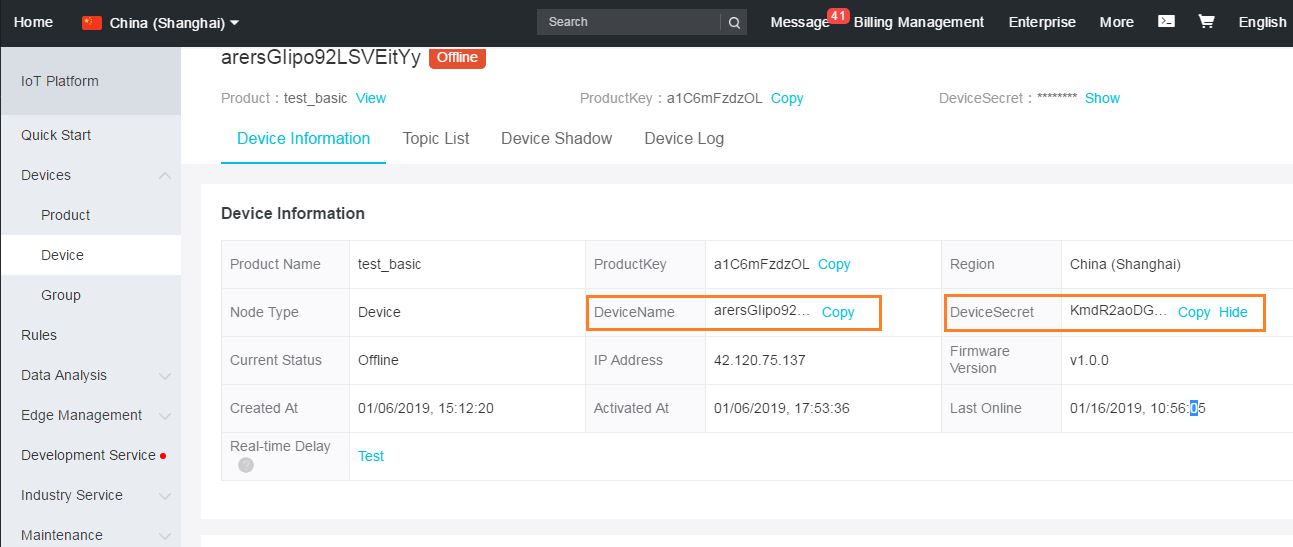
下の写真に示されている「コピー」ボタンをクリックして、製品のProductKeyとproduct Secretを取得するには:
下の図に示されている「コピー」ボタンをクリックしてデバイスのDeviceNameとDeviceSecretを取得するには:
ファイルを開きます。/examples/mqtt/mqtt-example.c、次のコードスニペットを編集して、PRODUCT_KEY/PRODUCT_SECRET/DEVICE_NAME/DEVICE_SECRETの値を置き換えます。
#include "iot_import.h"
# 「iot_export.h」を含める
# 「app_entry.h」を含める

# define PRODUCT_KEY "a1MZxOdcBnO"
# define PRODUCT_SECRET "h4I4dneEFp7EImTv"
# DEVICE_NAME "test_01" を定義する
# define DEVICE_SECRET "t9GmMf2jb3LgWfXBaZD2r3aJrfVWBv56"
デバイスを初期化して接続を確立する
次のコードスニペットでは、デバイスの初期化と接続確立プロセスについて簡単に説明します。
int mqtt_client(void)
{
    ...
    ...


/* サーバーへのMQTT接続を確立する前にデバイスID情報を入力します * /

    if (0! =IOT_SetupConnInfo(__product_key, __device_name, __device_secret, (void **)&pconn_info)) {
        EXAMPLE_TRACE("AUTHリクエストが失敗しました!") ;
        rc = -1;
        goto do_exit;
    }

    /* MQTTパラメータを初期化する * /
    ...
    ...
サーバーへのMQTT接続の確立を試みます。
pclient = IOT_MQTT_Construct(&mqtt_params);
    if (NULL == pclient) {
        EXAMPLE_TRACE("MQTTコンストラクト失敗");
        rc = -1;
        goto do_exit;
    }
クラウドへのデータのレポート
サンプルファイルでは、次のトピックが定義されています。
#define TOPIC_UPDATE "/" PRODUCT_KEY "/" DEVICE_NAME "/update"
# define TOPIC_ERROR "/" PRODUCT_KEY "/" DEVICE_NAME "/update/error"
# define TOPIC_GET "/" PRODUCT_KEY "/" DEVICE_NAME "/get"
# define TOPIC_DATA "/" PRODUCT_KEY "/" DEVICE_NAME "/data"

/* トピック形式の定義 * /
# define TOPIC_UPDATE_FMT "/% s/% s/update"
# define TOPIC_ERROR_FMT "/% s/% s/update/error"
# define TOPIC_GET_FMT "/% s/% s/get"
# define TOPIC_DATA_FMT "/% s/% s/data"
Alibaba Cloud IoT Platformは、デフォルトで「Basic Edition」製品に対して次の3つのトピックを生成します。
次のコードスニペットは、トピック 'UPDATE' にデータを送信する方法を示しています。
/* トピック情報の初期化 * /
    memset(&topic_msg, 0x0, sizeof(iotx_mqtt_topic_info_t));
    strcpy(msg_pub、"更新: こんにちは! start!") ;

    topic_msg.qos = IOTX_MQTT_QOS1;
    topic_msg.retain = 0;
    topic_msg.dup = 0;
    topic_msg.payload = (void *)msg_pub;
    topic_msg.payload_len = strlen(msg_pub);

    rc = IOT_MQTT_Publish(pclient、TOPIC_UPDATE、およびtopic_msg);
    if (rc < 0) {
    IOT_MQTT_Destroy(&pclient);
    EXPELE_TRACE ("公開時にエラーが発生する");
    rc = -1;
    goto do_exit;
    }

    例_トレース ("\n publish message: \n topic: % s\n payload: \% s\n rc = % d", TOPIC_UPDATE, topic_msg.payload, rc);
クラウドからのデータのサブスクライブと処理
サンプルプログラムは、トピックTOPIC_DATAをサブスクライブし、トピックからデータを受信するときにハンドラーを指定します。
rc = IOT_MQTT_Subscribe(pclient, TOPIC_DATA, IOTX_MQTT_QOS1, _demo_message_arrive, NULL);
    if (rc < 0) {
    IOT_MQTT_Destroy(&pclient);
    例_トレース ("IOT_MQTT_Subscribe() failed, rc = % d", rc);
    rc = -1;
    goto do_exit;
    }

    IOT_MQTT_Yield(pclient、200);

    HAL_SleepMs(2000);

    ...
    ...
関数_demo_message_arrive() では、単にデータを出力します。
static void _demo_message_arrive(void * pcontext、void * pclient、iotx_mqtt_event_msg_pt msg)
{
    iotx_mqtt_topic_info_pt ptopic_info = (iotx_mqtt_topic_info_pt) msg->msg;

    /* トピック名とトピックメッセージを印刷する * /
    EXAMPLE_TRACE("----");
    例_TRACE("packetId: % d", ptopic_info->packet_id);
    例_トレース ("トピック: '%.* s' (長さ: % d)" 、
                  ptopic_info->topic_len,
                  ptopic_info->ptopic,
                  ptopic_info->topic_len);
    例_トレース ("ペイロード: '%.* s' (長さ: % d)" 、
                  ptopic_info->payload_len,
                  ptopic_info->payload,
                  ptopic_info->payload_len);
    EXAMPLE_TRACE("----");
}
次のコードスニペットは、このトピックにデータを送信しようとします。
do {
    cnt ++;
    msg_len = snprintf(msg_pub, sizeof(msg_pub), "{\" attr_name\":\" temperature\", \" attr_value\":\" % d\"}", cnt);
    ...
    ...

    rc = IOT_MQTT_Publish(pclient, TOPIC_DATA, &topic_msg);
    if (rc < 0) {
    EXPELE_TRACE ("公開時にエラーが発生する");
    rc = -1;
    break;
    }
例_TRACE("packet-id=% u, publish topic msg=% s", (uint32_t)rc, msg_pub); この例はTOPIC_DATAトピックをサブスクライブしているため、IoTプラットフォームにデータを送信した後にデータを受信します。
サンプルプログラムのコンパイル
SDKの最上位ディレクトリで次のコマンドを実行します。
はdistcleanを作ります
作る コンパイルが正常に完了すると、現在のパスのoutput/release/binディレクトリにサンプルプログラムが生成されます。
$ tree output/release
出力 /リリース /
+ -- ビン
...
...
| + -- mqtt-例
...
...
データを観察する
以下のコマンドを実行します。
$。/output/release/bin/mqtt-例Alibaba Cloud IoT Platformのコンソールで指定されたプロダクトを見つけ、デバイスから報告されたメッセージをLog Serviceで表示できます。 クラウド上のデバイスから報告されたデータを表示する方法については、こちらをクリックしてください。
また、Linuxコンソールのサンプルプログラムによって印刷されたクラウドからのデータを確認することもできます。
_demo_message_arrive | 166 :: ----
_demo_message_arrive | 167 :: packetId: 35641
_demo_message_arrive | 171 :: トピック: '/a1ExpAkj9Hi/Example1/data' (長さ: 26)
_demo_message_arrive | 175 :: ペイロード: '{"attr_name":"temperature", "attr_value":"1"}' (長さ: 45)
_demo_message_arrive | 176 :: ----
デバイスモデリングによる製品の開発
プロダクトとデバイスの作成
Alibaba Cloud IoT Platform上で製品を作成し、複数のサービスを提供できます。 Alibaba Cloud IoT Platformで製品を作成するためのヘルプリンクは次のとおりです。
Smart Life IoT Platform (Alibaba Cloud IoT Platformのライフスタイル関連サービス) で製品を作成する必要がある場合は、Life IoT Platformにログインして製品を作成できます。
この例では、funtionsをサポートする製品を作成する必要があります。
プロパティLightSwitch
識別子: LightSwitch
データ型: enum
値: 0と1
読み取り /書き込みタイプ: 読み取りと書き込み
サービスカスタム
識別子: カスタム
呼び出しメソッド: Asynchronous
入力パラメータ: {Identifier: transparency, Data type: int32, Value range: 0 ~ 100}
出力パラメーター: {識別子: Contrastratio, データ型: int32, 値の範囲: 0 ~ 100}
Event
識別子: エラー
イベントタイプ: 情報
出力パラメーター: {Identifier: Errorcode, Data type: enum, Value range: 0, 1}
本番環境の定義後、IoTプラットフォームはこの製品のJSON形式のTSL記述ファイルを生成します。
プロダクト関数の実装
デバイスをルーチンに入力します。
の証明書 (ProductKey/ProductSecret/DeviceName/DeviceSecret) を置き換えます。/examples/linkkit/linkkit_example_solo.cは、IoTプラットフォームで生成されたデバイスのものとします。
#define PRODUCT_KEY "a1csED27mp7"
    # define PRODUCT_SECRET "VuULINCrtTAzCSzp"
    # DEVICE_NAME "AdvExample1" を定義する
    # define DEVICE_SECRET "3xGoxtWRscxPAoMxnJnjocZbNfmCTRi0"
プログラムのコンパイルと実行
SDKの最上位ディレクトリで次のコマンドを実行します。
$ make distclean
$make コンパイルが正常に完了すると、Pro-Edition製品のサンプルプログラムが現在のパスのoutput/release/binディレクトリに生成され、その名前はlinkkit-example-soloです。
SDKの最上位ディレクトリで次のコマンドを実行します。
$。/output/release/bin/linkkit-example-soloデータを観察する
サンプルプログラムは、LightSwitchプロパティの値を定期的にクラウドに報告します。IoTプラットフォームでプロパティを確認できます。
レポートのプロパティ
このプログラム例では、関数user_post_propertyを呼び出してプロパティを報告します。 サンプルは、様々な状況のペイロードを報告することを繰り返す。 この関数は、IoTプラットフォームにいくつかの無効なプロパティを送信しようとすることに注意してください。目的は、開発者がIoT platfromによって返されるエラーコードに精通できるようにすることです。
void user_post_property(void)
    {
    static int example_index = 0;
    int res = 0;
    user_example_ctx_t * user_example_ctx = user_example_get_ctx();
    char * property_payload = "NULL";

    if (example_index == 0) {
典型的な属性レポート
/* 典型的な例 * /
property_payload = "{\" LightSwitch\":1}";
example_index ++;
} else if(...) {
...
...
}

res = IOT_Linkkit_Report(user_example_ctx->master_devid, ITM_MSG_POST_PROPERTY,
(unsigned char *)property_payload, strlen(property_payload));

EXAMPLE_TRACE("投稿プロパティメッセージID: % d" 、res);
}
典型的な属性レポートで出力されるログは次のとおりです。
[inf] dm_msg_request(218): DM送信メッセージ、URI: /sys/a1csED27mp7 /thing/event/property/post、Payload: {"id":"1" 、"version":"1.0" 、"params":{"LightSwitch":1} 、"method":"thing event.property.post"} 。[dbg] MQTTPublish(319): ALLOC: (160) / [224] @ 0x1da41a0
[inf] MQTTPublish(378): アップストリームトピック: '/sys/a1csED27mp7/AdvExample1/thing/event/property/post'
[inf] MQTTPublish(379): アップストリームペイロード:
次のメッセージがクラウドに送信されます。
> {
> "id": "1" 、> "version": "1.0" 、> "params": {
> "LightSwitch": 1
> },
> "method": "thing.event.property.post"
>}

[inf] dm_client_publish(106): 公開結果: 0
[dbg] alcs_observe_notify(105): payload:{"id":"1" 、"version":"1.0" 、"params":{"LightSwitch":1} 、"method":"thing.event.property.post"}
[dbg] CoAPResourceByPath_get(176): リソースを見つけました: /sys/a1csED27mp7/AdvExample1/thing/event/property/post
[inf] dm_server_send(76): Send Observe Notify Result 0
[dbg] dm_msg_cache_insert(79): dmcリストサイズ: 0
user_post_property。 431: プロパティの投稿メッセージID: 1
[dbg] iotx_mc_cycle(1774): 公開
[inf] iotx_mc_handle_recv_PUBLISH(1549): 下流トピック: '/sys/a1csED27mp7/AdvExample1/thing/event/property/post_reply'
[inf] iotx_mc_handle_recv_PUBLISH(1550): Downstream Payload:
クラウドから次の応答が受信されます。
< {
<"code": 200、<"data": {
< },
<"id": "1" 、<"メッセージ": "成功" 、<"method": "thing.event.property.post" 、<"version": "1.0"
<}

[dbg] iotx_mc_handle_recv_PUBLISH(1555): Packet Ident : 00000000
[dbg] iotx_mc_handle_recv_PUBLISH(1556): トピックの長さ: 60
[dbg] iotx_mc_handle_recv_PUBLISH(1560): トピック名: /sys/a1csED27mp7/AdvExample1/thing/event/property/post_reply
[dbg] iotx_mc_handle_recv_PUBLISH(1563): ペイロードレン /ルーム: 104 / 4935
[dbg] iotx_mc_handle_recv_PUBLISH(1564): Buflenを受け取る: 5000
[dbg] iotx_mc_handle_recv_PUBLISH(1575): msg...
[dbg] iotx_mc_deliver_message(1291): 一致するトピック
[inf] dm_msg_proc_thing_event_post_reply(258): Event Id: property
[dbg] dm_msg_response_parse(167): 現在のリクエストメッセージID: 1
[dbg] dm_msg_response_parse(168): Current Request Message Code: 200
[dbg] dm_msg_response_parse(169): 現在のリクエストメッセージデータ: {}
[dbg] dm_msg_response_parse(174): 現在のリクエストメッセージDesc: success
[dbg] dm_ipc_msg_insert(87): dm msgリストサイズ: 0、最大サイズ: 50
[dbg] dm_msg_cache_remove(142): メッセージIDの削除: 1
[inf] _iotx_linkkit_event_callback(219): Receive Message Type: 30
[inf] _iotx_linkkit_event_callback(221): Receive Message: {"id":1,"code":200,"devid":0,"payload" :{}}
[dbg] _iotx_linkkit_event_callback(476): 現在のId: 1
[dbg] _iotx_linkkit_event_callback(477): 現在のコード: 200
[dbg] _iotx_linkkit_event_callback(478): Current Devid: 0
コールバック関数のログ:
user_report_reply_event_handlerです。 300: メッセージ投稿返信受信、デビッド: 0、メッセージID: 1、コード: 200、返信: {} プロパティ設定要求を処理する
exmapleコードでプロパティ設定リクエストを受信すると、次のコールバック関数が呼び出されます。
static int user_property_set_event_handler(const int devid, const char * request, const int request_len)
{
int res = 0;
user_example_ctx_t * user_example_ctx = user_example_get_ctx();
例_トレース (「プロパティセット受信、デビッド: % d、リクエスト: % s」、デビッド、リクエスト);
関数では、プロパティの値をIoTプラットフォームに送り返すだけで、デバイスのプロパティレコードが更新されます。
res = IOT_Linkkit_Report(user_example_ctx->master_devid, ITM_MSG_POST_PROPERTY,
(unsigned char *)request, request_len);
EXAMPLE_TRACE("投稿プロパティメッセージID: % d" 、res);

0を返します。}
IoT flatformから設定された値は、デバイスログに表示されます。
[dbg] iotx_mc_cycle(1774): 公開
[inf] iotx_mc_handle_recv_PUBLISH(1549): 下流トピック: '/sys/a1csED27mp7/AdvExample1/thing/service/property/set'
[inf] iotx_mc_handle_recv_PUBLISH(1550): Downstream Payload:
クラウドから受信したプロパティ設定要求は次のとおりです。
< {
<"method": "thing.service.property.set" 、<"id": "161430786" 、<"params": {
<"LightSwitch": 1
< },
<"version": "1.0.0"
<}

[dbg] iotx_mc_handle_recv_PUBLISH(1555): Packet Ident : 00000000
[dbg] iotx_mc_handle_recv_PUBLISH(1556): トピックの長さ: 55
[dbg] iotx_mc_handle_recv_PUBLISH(1560): トピック名: /sys/a1csED27mp7/AdvExample1/thing/service/property/set
[dbg] iotx_mc_handle_recv_PUBLISH(1563): ペイロードレン /ルーム: 113 / 4940
[dbg] iotx_mc_handle_recv_PUBLISH(1564): Buflenを受け取る: 5000
[dbg] iotx_mc_handle_recv_PUBLISH(1575): msg...
[dbg] iotx_mc_deliver_message(1291): 一致するトピック
[inf] dm_msg_proc_thing_service_property_set(93): thing/service/property/set
[dbg] dm_msg_request_parse(142): 現在のリクエストメッセージID: 161430786
[dbg] dm_msg_request_parse(143): 現在のリクエストメッセージバージョン: 1.0.0
[dbg] dm_msg_request_parse(144): Current Request Messageメソッド: thing.service.property.set
[dbg] dm_msg_request_parse(145): Current Request Message Params: {"LightSwitch":1}
[dbg] dm_ipc_msg_insert(87): dm msgリストサイズ: 0、最大サイズ: 50
[inf] dm_msg_response(274): 送信URI: /sys/a1csED27mp7/AdvExample1/thing/service/property/set_reply、ペイロード: {"id":"161430786" 、"code":200、"data" :{}}
[dbg] MQTTPublish(319): ALLOC :( 100) / [164] @ 0x154f1f0
[inf] MQTTPublish(378): アップストリームトピック: '/sys/a1csED27mp7/AdvExample1/thing/service/property/set_reply'
[inf] MQTTPublish(379): アップストリームペイロード: user_property_set_event_handlerサンプル関数が属性設定リクエストを受信すると、次のログが出力されます。
user_property_set_event_handlerです。 160: プロパティセット受信、デビッド: 0、リクエスト: {"LightSwitch":1} 注: 実際の製品がプロパティ設定を受け取った場合、開発者は単に値をIoTプラットフォームに送り返すのではなく、プロパティを解析して処理する必要があります。
イベントを報告する
サンプルプログラムの関数user_post_event() は、IoTプラットフォームにイベントを送信することです。ここでも、いくつかの無効なイベントを生成してIoTプラットフォームに送信します。
void user_post_event(void)
    {
    static int example_index = 0;
    int res = 0;
    user_example_ctx_t * user_example_ctx = user_example_get_ctx();
    char * event_id = "エラー";
    char * event_payload = "NULL";

    if (example_index == 0) {
    ...

    // イベントをクラウドに報告する

    res = IOT_Linkkit_TriggerEvent(user_example_ctx->master_devid, event_id, strlen(event_id),
    event_payload、strlen(event_payload);
    EXAMPLE_TRACE("ポストイベントメッセージID: % d" 、res);
    }
クラウドに報告されるイベントは次のとおりです。
> {
> "id": "1" 、> "version": "1.0" 、> "params": {
> "ErrorCode": 0
> },
> "method": "thing.event.Error.post"
>}

[inf] dm_client_publish(106): 公開結果: 0
[dbg] alcs_observe_notify(105): payload:{"id":"1","version":"1.0","params":{"ErrorCode":0},"method":"thing.event.Error.post"}
[inf] dm_server_send(76): Send Observe Notify Result 0
[dbg] dm_msg_cache_insert(79): dmcリストサイズ: 0
user_post_eventです。 ID: 1 470: イベントメッセージの投稿
[dbg] iotx_mc_cycle(1774): 公開
[inf] iotx_mc_handle_recv_PUBLISH(1549): 下流トピック: '/sys/a1csED27mp7/AdvExample1/thing/event/Error/post_reply'
[inf] iotx_mc_handle_recv_PUBLISH(1550): Downstream Payload:
クラウドから受信した応答は次のとおりです。
< {
<"code": 200、<"data": {
< },
<"id": "1" 、<"メッセージ": "成功" 、<"method": "thing.event.Error.post" 、<"version": "1.0"
<}

[dbg] iotx_mc_handle_recv_PUBLISH(1555): Packet Ident : 00000000
[dbg] iotx_mc_handle_recv_PUBLISH(1556): トピックの長さ: 57
[dbg] iotx_mc_handle_recv_PUBLISH(1560): トピック名: /sys/a1csED27mp7/AdvExample1/thing/event/Error/post_reply
[dbg] iotx_mc_handle_recv_PUBLISH(1563): ペイロードレン /ルーム: 101 / 4938
[dbg] iotx_mc_handle_recv_PUBLISH(1564): Buflenを受け取る: 5000
[dbg] iotx_mc_handle_recv_PUBLISH(1575): msg...
[dbg] iotx_mc_deliver_message(1291): 一致するトピック
[inf] dm_msg_proc_thing_event_post_reply(258): イベントId: エラー
[dbg] dm_msg_response_parse(167): 現在のリクエストメッセージID: 1
[dbg] dm_msg_response_parse(168): Current Request Message Code: 200
[dbg] dm_msg_response_parse(169): 現在のリクエストメッセージデータ: {}
[dbg] dm_msg_response_parse(174): 現在のリクエストメッセージDesc: success
[dbg] dm_ipc_msg_insert(87): dm msgリストサイズ: 0、最大サイズ: 50
[dbg] dm_msg_cache_remove(142): メッセージIDの削除: 1
[inf] _iotx_linkkit_event_callback(219): Receive Message Type: 31
[inf] _iotx_linkkit_event_callback(221): Receive Message: {"id":1,"code":200,"devid":0,"eventid":"Error","payload":"success"}
[dbg] _iotx_linkkit_event_callback(513): 現在のId: 1
[dbg] _iotx_linkkit_event_callback(514): 現在のコード: 200
[dbg] _iotx_linkkit_event_callback(515): Current Devid: 0
[dbg] _iotx_linkkit_event_callback(516): 現在のEventID: エラー
[dbg] _iotx_linkkit_event_callback(517): 現在のメッセージ: 成功 次のログは、ユーザーのコールバック関数user_trigger_event_reply_event_handlerに対して出力されます。
user_trigger_event_reply_event_handlerです。 310: トリガーイベント返信受信、Devid: 0、メッセージID: 1、コード: 200、EventID: エラー、メッセージ: 成功 サービス呼び出し
このプログラム例では、service-call-requestを受信すると、次のコールバック関数が呼び出されます。
static int user_service_request_event_handler(const int devid, const char * serviceid, const int serviceid_len,
const char * request, const int request_len,
char **response, int * response_len)
{
int contrastratio = 0、to_cloud = 0;
cJSON * root = NULL、* item_transparency = NULL、* item_from_cloud = NULL;
例_TRACE("Service Request Received, Devid: % d, Service ID: %.* s, Payload: % s", devid, serviceid_len,"
serviceid、リクエスト);

/* ルートの解析 * /
root = cJSON_Parse (リクエスト);
if (root == NULL | |! cJSON_IsObject (ルート) {
EXPELE_TRACE ("JSON解析エラー");
リターン-1;
}
受信したサービスを [カスタム] のサービスIDで処理し、サービス入力パラメーターの値 + 1を出力パラメーターに割り当てて、クラウドに返す必要があります。
if (strlen("Custom") == serviceid_len && memcmp("Custom", serviceid, serviceid_len) == 0) {
...
contrastratio = item_transparency->valueint + 1;

...
HAL_Snprintf(* response、* response_len、response_fmt、コントラスト);
* response_len = strlen(* response);
} else if (strlen("SyncService") == serviceid_len && memcmp("SyncService", serviceid, serviceid_len) == 0) {
...
...
}
cJSON_Delete (ルート);

0を返します。}
この時点で、デバイス側に次のログが表示されます。
[dbg] iotx_mc_cycle(1774): 公開
[inf] iotx_mc_handle_recv_PUBLISH(1549): 下流トピック: '/sys/a1csED27mp7/AdvExample1/thing/service/Custom'
[inf] iotx_mc_handle_recv_PUBLISH(1550): Downstream Payload: 次のサービス呼び出し要求がクラウドから受信され、入力パラメーターはtransparencyです。
< {
<"method": "thing.service.Custom" 、<"id": "161445548" 、<"params": {
<"透明性": 5
< },
<"version": "1.0.0"
<}

[dbg] iotx_mc_handle_recv_PUBLISH(1555): Packet Ident : 00000000
[dbg] iotx_mc_handle_recv_PUBLISH(1556): トピックの長さ: 49
[dbg] iotx_mc_handle_recv_PUBLISH(1560): トピック名: /sys/a1csED27mp7/AdvExample1/thing/service/Custom
[dbg] iotx_mc_handle_recv_PUBLISH(1563): Payload Len/Room : 96 / 4946
[dbg] iotx_mc_handle_recv_PUBLISH(1564): Buflenを受け取る: 5000
[dbg] iotx_mc_handle_recv_PUBLISH(1575): msg...
[dbg] iotx_mc_deliver_message(1291): 一致するトピック
[inf] dm_msg_proc_thing_service_request(224): サービス識別子: カスタム
[dbg] dm_msg_request_parse(142): 現在のリクエストメッセージID: 161445548
[dbg] dm_msg_request_parse(143): 現在のリクエストメッセージバージョン: 1.0.0
[dbg] dm_msg_request_parse(144): Current Request Messageメソッド: thing.service.Custom
[dbg] dm_msg_request_parse(145): Current Request Message Params: {"transparency":5}
[dbg] dm_ipc_msg_insert(87): dm msgリストサイズ: 0、最大サイズ: 50
[inf] _iotx_linkkit_event_callback(219): Receive Message Type: 18
[inf] _iotx_linkkit_event_callback(221): Receive Message: {"id":"161445548","devid":0,"serviceid":"Custom","payload":{"transparency":5}}
[dbg] _iotx_linkkit_event_callback(300): 現在のId: 161445548
[dbg] _iotx_linkkit_event_callback(301): Current Devid: 0
[dbg] _iotx_linkkit_event_callback(302): 現在のServiceID: カスタム
[dbg] _iotx_linkkit_event_callback(303): 現在のペイロード: {"transparency":5} ユーザーの呼び出し関数user_service_request_event_handlerが呼び出されます。
user_service_request_event_handlerです。 99: サービスリクエスト受信、デビッド: 0、サービスID: カスタム、ペイロード: {"transparency":5}

user_service_request_event_handlerです。 116: transparency: 5
[dbg] iotx_dm_send_service_response(280): 現在のサービス応答ペイロード、長さ: 19、ペイロード: {"Contrastratio":6}
[dbg] dm_mgr_upstream_thing_service_response(1275): 現在のサービス名: thing /Service /Custom_reply
[inf] dm_msg_response(274): 送信URI: /sys/a1csED27mp7/AdvExample1/thing/service/Custom_reply、ペイロード: {"id":"161445548" 、"code":200、"data":{"Contrastratio":6}}
[dbg] MQTTPublish(319): ALLOC :( 111) / [175] @ 0x85a1a0
[inf] MQTTPublish(378): アップストリームトピック: '/sys/a1csED27mp7/AdvExample1/thing/service/Custom_reply'
[inf] MQTTPublish(379): アップストリームペイロード: コールバック関数で、transparencyの値に1を追加し、その値をContrastratioに割り当ててから、クラウドに報告します。
> {
> "id": "161445548" 、> "code": 200、> "data": {
> "コントラスト": 6
>}
>}

[inf] dm_client_publish(106): 公開結果: 0
[dbg] alcs_observe_notify(105): payload:{"id":"161445548","code":200,"data":{"Contrastratio":6}}
[inf] dm_server_send(76): Send Observe Notify Result 0
これで、単一項目ルーチンの高度なバージョンのサービス、属性、およびイベントの説明が終了します。