DataWorks は、ノードデプロイ前のコードレビューや Data Governance Center でのチェックなど、組み込みのチェック機能を提供しています。DataWorks はカスタムチェックもサポートしています。ビジネス要件に基づいてカスタムチェックプログラムを開発し、カスタムチェックプログラムを DataWorks に接続して、ノードのプロセスを管理できます。このトピックでは、DataWorks Open Platform の OpenEvent モジュールを使用して、自動トリガーノードインスタンスのステータス変更イベントをサブスクライブする方法について説明します。このトピックでは、自動トリガーノードインスタンスのステータス変更は Operation Center から取得されます。
背景情報
このトピックに関連する DataWorks Open Platform の機能と基本概念の詳細については、「OpenEvent」をご参照ください。
サブスクリプション設定の説明
EventBridge でイベントルールの Pattern Content パラメーターを設定する場合、type を dataworks:InstanceStatusChanges:InstanceStatusChanges に設定します。このようにして、自動トリガーノードインスタンスのステータス変更イベントをサブスクライブできます。
前提条件
EventBridge がアクティブ化されていること。詳細については、「課金」をご参照ください。
DataWorks がアクティブ化されていること。詳細については、「購入ガイド」をご参照ください。
DataWorks でワークスペースが作成されていること。詳細については、「ワークスペースの作成」をご参照ください。
手順
ステップ 1:カスタムバスを設定する
このセクションでは、カスタムバスを設定するための主要な設定手順と注意事項について説明します。イベントメッセージのサブスクリプションを有効化および設定する方法の詳細については、「イベントメッセージのサブスクリプションを有効にする」をご参照ください。
EventBridge コンソールにログインします。左側のナビゲーションペインで、[イベントバス] をクリックします。
[イベントバス]ページの右上隅にある [クイック作成] をクリックして、カスタムバスを作成します。
左側のナビゲーションペインで、[イベントバス] をクリックします。[イベントバス]ページで、作成したカスタムバスを見つけて、その名前をクリックします。カスタムバスの[概要]ページが表示されます。
左側のナビゲーションペインで、[イベントルール]をクリックします。表示されるページで、[ルールの作成]をクリックしてイベントルールを作成します。
この例では、カスタムバスはノードコミットイベントメッセージとノードデプロイイベントメッセージを受信するように設定されています。以下の内容は、デモの設定方法とイベントルールの主要なパラメーターの例を示しています。
基本情報の構成:このステップでは、Name パラメーターを設定する必要があります。
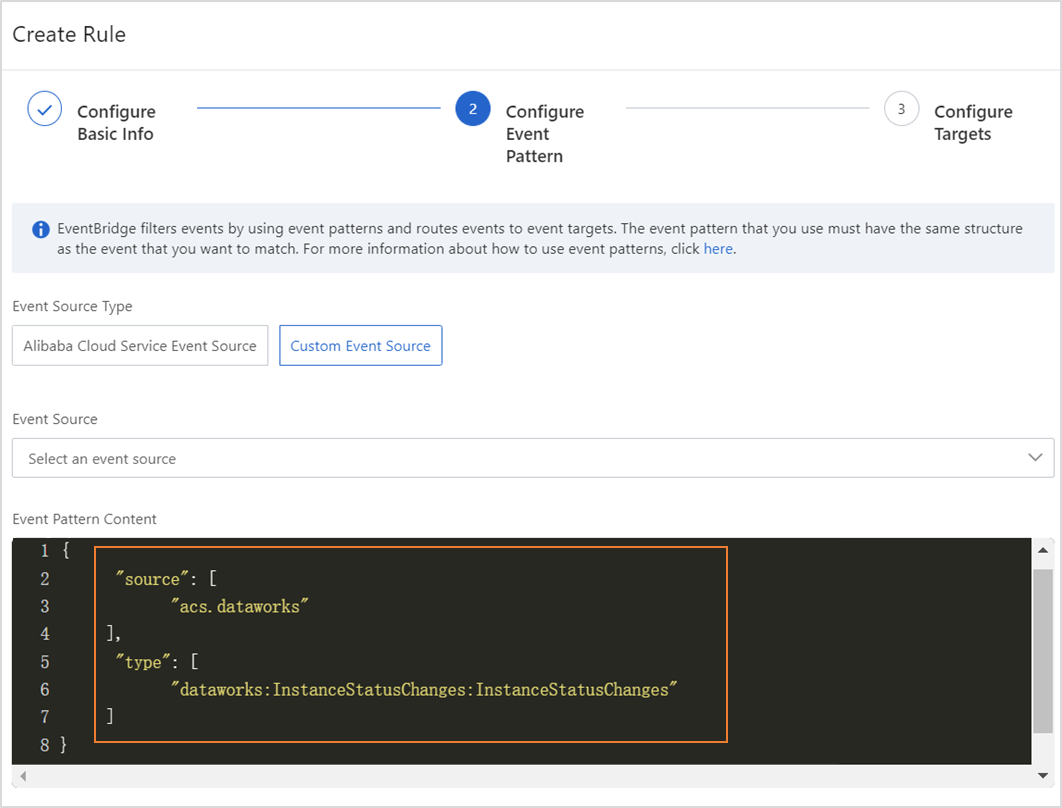
イベントパターンの構成:
イベントソースタイプ:カスタムイベントソースに設定します。
イベントソース:このパラメーターは空のままにします。
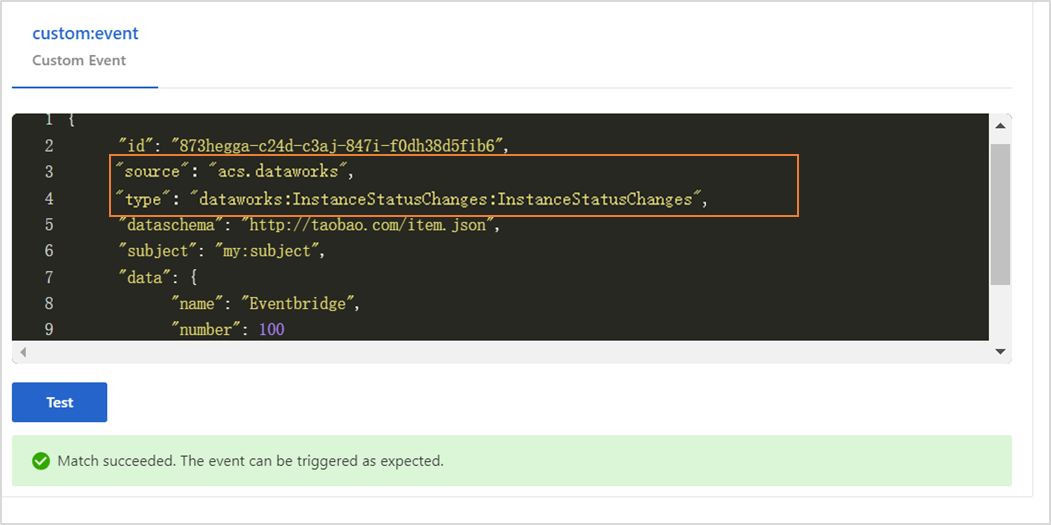
パターンコンテンツ:このパラメーターを JSON 形式で設定します。以下の内容を入力します。
{ "source": [ "acs.dataworks" ], "type": [ "dataworks:InstanceStatusChanges:InstanceStatusChanges" ] }source:イベントが発生するサービスの識別子。このパラメーターを acs.dataworks に設定します。
type:サービスで発生するイベントのタイプ。このパラメーターを dataworks:InstanceStatusChanges:InstanceStatusChanges に設定します。
イベントパターンのデバッグ: このセクションで source パラメーターと type パラメーターの値を変更し、[テスト] をクリックします。テストが成功したら、[次のステップ] をクリックします。
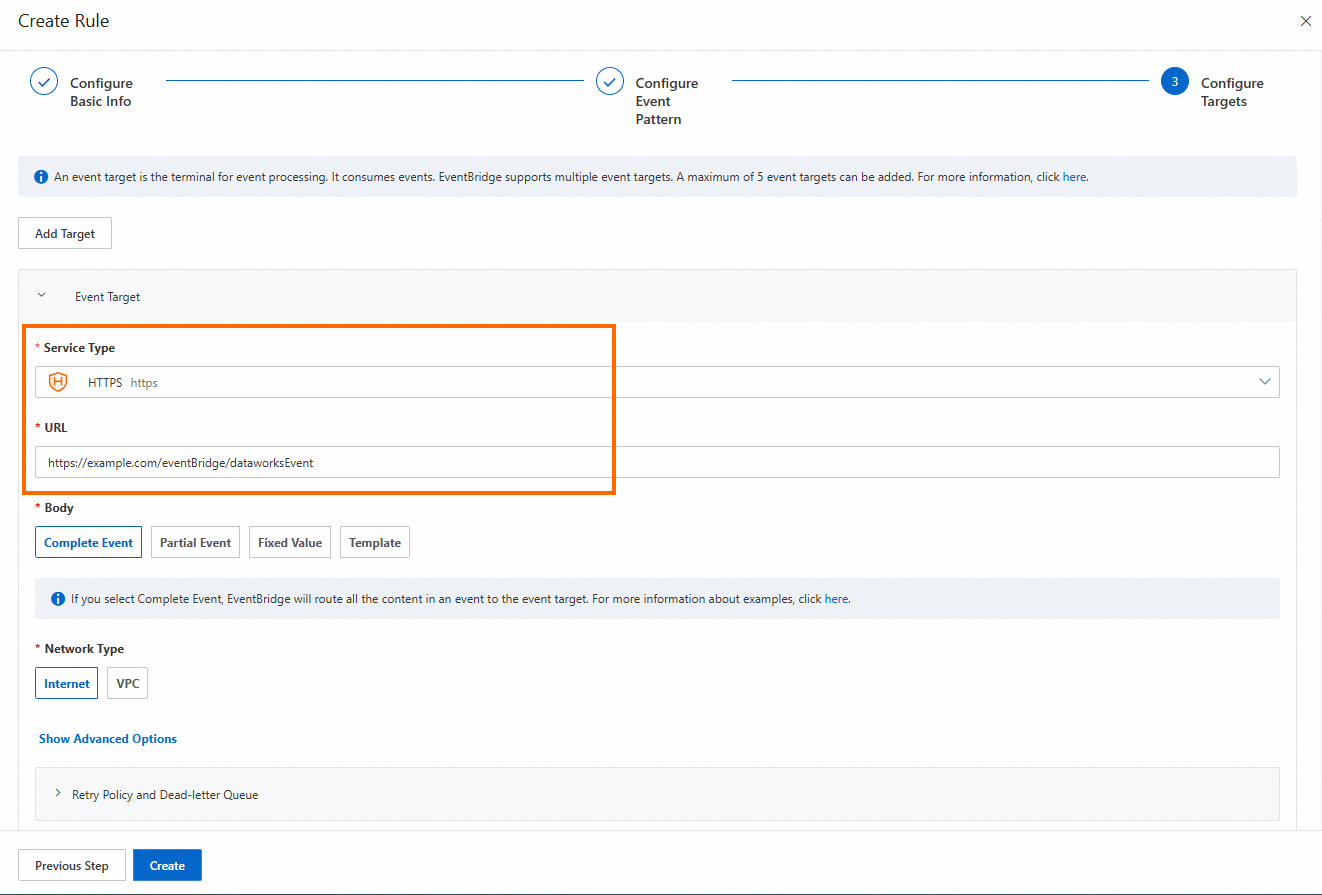
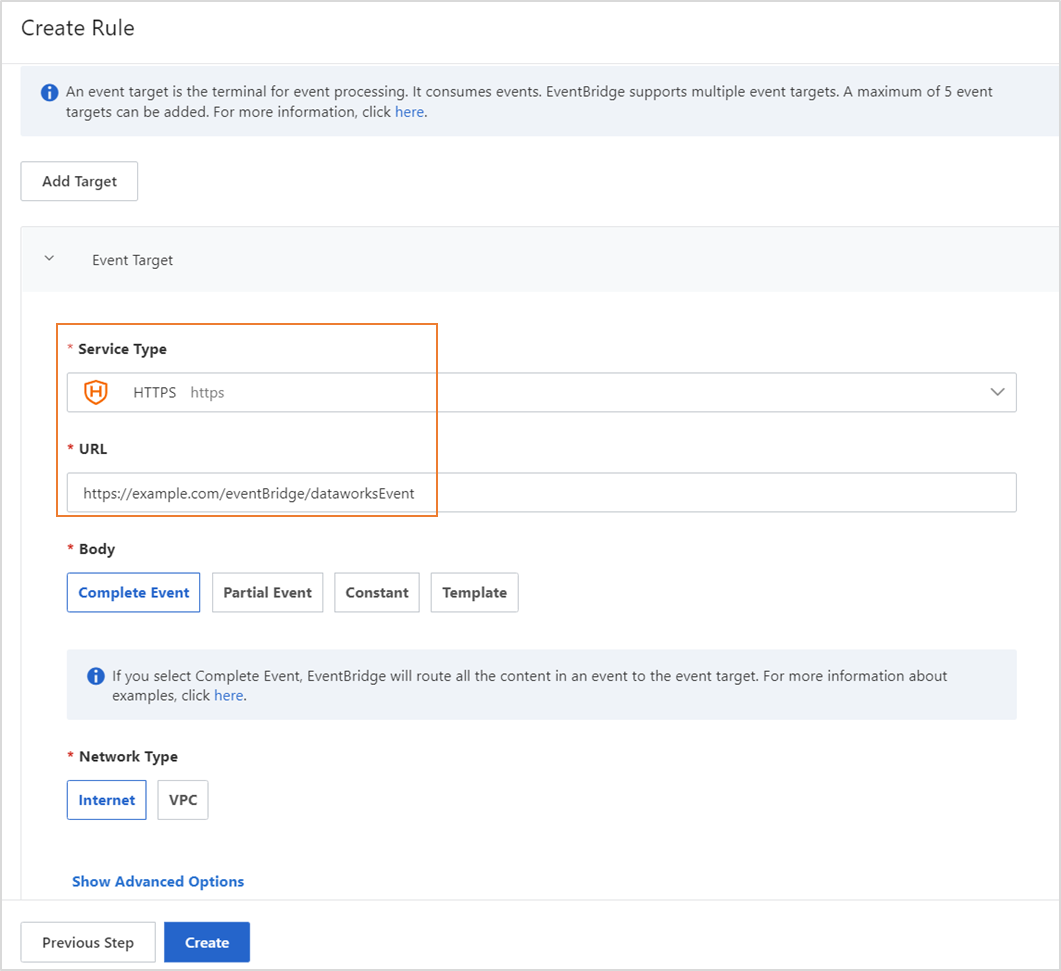
ターゲットの構成:
サービスタイプ:HTTPS または HTTP に設定します。サービスタイプの詳細については、「イベントルールの管理」をご参照ください。
URL:カスタムバスによってプッシュされるメッセージを受信するための URL を入力します(例:
https://サーバーアドレス:ポート番号/event/consumer)。本文:完全なイベントに設定します。
ネットワークタイプ:インターネットに設定します。
ステップ 2:イベント配信チャネルを構成する
Open Platform ページに移動します。
DataWorks コンソール にログインします。上部のナビゲーションバーで、目的のリージョンを選択します。左側のナビゲーションペインで、 を選択します。[開発者バックエンド] タブが表示されます。
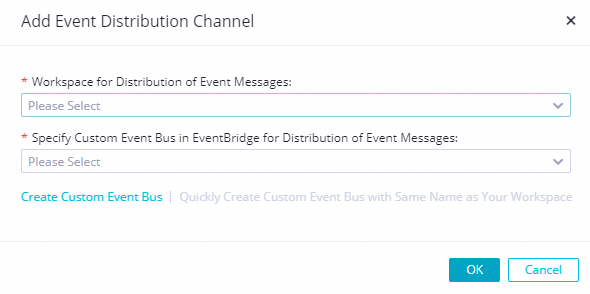
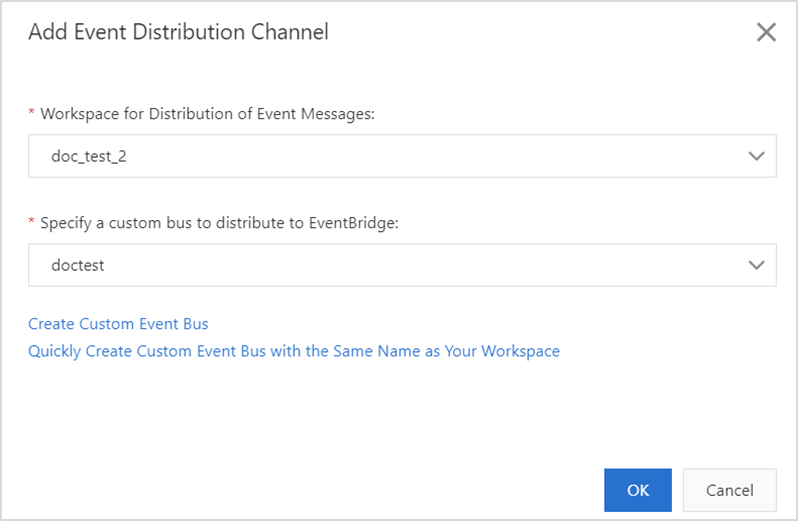
[開発者バックエンド]ページの左側のナビゲーションペインで、[openevent] をクリックします。表示されるページで、[イベント配信チャネルを追加] をクリックします。[イベント配信チャネルを追加]ダイアログボックスで、パラメーターを設定します。
イベントメッセージ配信用のワークスペース:ワークスペースを選択します。
イベントメッセージ配信用の Eventbridge でのカスタムイベントバスの指定:ステップ 1 で作成したイベントバスを選択します。
イベント配信チャネルを保存した後、OpenEvent ページでイベント配信チャネルを見つけて、[アクション] 列の [有効化] をクリックします。
サービスプログラムを開発する
サンプルコード
EventBridge がサービスにプッシュするメッセージを取得し、メッセージを生成するようにコードを変更します。
package com.aliyun.dataworks.demo;

import com.alibaba.fastjson.JSON;
import com.alibaba.fastjson.JSONObject;
import com.aliyun.dataworks.config.Constants;
import org.springframework.web.bind.annotation.PostMapping;
import org.springframework.web.bind.annotation.RequestBody;
import org.springframework.web.bind.annotation.RequestMapping;
import org.springframework.web.bind.annotation.RestController;


/**
 * @author dataworks demo  // dataworks デモ
 */
@RestController
@RequestMapping("/event")
public class ExtensionsController {

    /**
     * Receive event messages that are sent from EventBridge. // EventBridge から送信されたイベントメッセージを受信します。
     * @param jsonParam
     */
    @PostMapping("/consumer")
    public void consumerEventBridge(@RequestBody String jsonParam){
        JSONObject jsonObj = JSON.parseObject(jsonParam);
        String eventCode = jsonObj.getString(Constants.EVENT_CODE_FILED);
        if(Constants.INSTANCE_STATUS_EVENT_CODE.equals(eventCode)){
            JSONObject dataParam = JSON.parseObject(jsonObj.getString("data"));
            // The time when the auto triggered node instance started to wait for the scheduling time. // 自動トリガーノードインスタンスがスケジューリング時間を待機し始めた時間。
            System.out.println("beginWaitTimeTime: "+ dataParam.getString("beginWaitTimeTime"));
            //DagId // DAG ID
            System.out.println("dagId: "+ dataParam.getString("dagId"));
            // The type of the directed acyclic graph (DAG). Valid values: // 有向非巡回グラフ(DAG)のタイプ。有効な値:
            // 0: for auto triggered nodes // 0:自動トリガーノードの場合
            // 1: for manually triggered nodes // 1:手動トリガーノードの場合
            // 2: for smoke testing // 2:スモークテストの場合
            // 3: for nodes for which you backfill data // 3:データをバックフィルするノードの場合
            // 4: for manually triggered workflows // 4:手動トリガーワークフローの場合
            // 5: for temporary workflows // 5:一時ワークフローの場合
            System.out.println("dagType: "+dataParam.getString("dagType"));
            // The type of the node. Valid values: // ノードのタイプ。有効な値:
            // NORMAL(0): The node is an auto triggered node. The scheduling system regularly runs the node. // NORMAL(0):ノードは自動トリガーノードです。スケジューリングシステムはノードを定期的に実行します。
            // MANUAL(1): The node is a manually triggered node. The scheduling system does not regularly run the node. // MANUAL(1):ノードは手動トリガーノードです。スケジューリングシステムはノードを定期的に実行しません。
            // PAUSE(2): The node is a frozen node. The scheduling system regularly runs the node but sets the node status to Failed when the scheduling system starts to run the node. // PAUSE(2):ノードはフリーズされたノードです。スケジューリングシステムはノードを定期的に実行しますが、スケジューリングシステムがノードの実行を開始するときにノードのステータスを「失敗」に設定します。
            // SKIP(3): The node is a dry-run node. The scheduling system regularly runs the node but sets the node status to Succeeded when the scheduling system starts to run the node. // SKIP(3):ノードはドライランノードです。スケジューリングシステムはノードを定期的に実行しますが、スケジューリングシステムがノードの実行を開始するときにノードのステータスを「成功」に設定します。
            // SKIP_UNCHOOSE(4): The node is an unselected node in a temporary workflow. This type of node exists only in temporary workflows. The scheduling system sets the node status to Succeeded when the scheduling system starts to run the node. // SKIP_UNCHOOSE(4):ノードは一時ワークフローで選択されていないノードです。このタイプのノードは一時ワークフローにのみ存在します。スケジューリングシステムは、ノードの実行を開始するときにノードのステータスを「成功」に設定します。
            // SKIP_CYCLE(5): The node is scheduled by week or month, and is waiting for the scheduling time to arrive. The scheduling system regularly runs the node but sets the node status to Succeeded when the scheduling system starts to run the node. // SKIP_CYCLE(5):ノードは週または月ごとにスケジュールされており、スケジューリング時間が来るのを待っています。スケジューリングシステムはノードを定期的に実行しますが、スケジューリングシステムがノードの実行を開始するときにノードのステータスを「成功」に設定します。
            // CONDITION_UNCHOOSE(6): The node is not selected by its ancestor branch node and is run as a dry-run node. // CONDITION_UNCHOOSE(6):ノードは祖先分岐ノードによって選択されておらず、ドライランノードとして実行されます。
            // REALTIME_DEPRECATED(7): The node has instances that are generated in real time but are deprecated. The scheduling system sets the node status to Succeeded. // REALTIME_DEPRECATED(7):ノードにはリアルタイムで生成されたが非推奨のインスタンスがあります。スケジューリングシステムはノードのステータスを「成功」に設定します。
            System.out.println("taskType: "+dataParam.getString("taskType"));
            // The time when the node instance was modified. // ノードインスタンスが変更された時間。
            System.out.println("modifyTime: "+dataParam.getString("modifyTime"));
            // The time when the node instance was created. // ノードインスタンスが作成された時間。
            System.out.println("createTime: "+dataParam.getString("createTime"));
            // The ID of the workspace. You can call the ListProjects operation to query the ID. // ワークスペースの ID。ListProjects オペレーションを呼び出して ID をクエリできます。
            System.out.println("appId: "+dataParam.getString("appId"));
            // The ID of the tenant that manages the workspace to which the auto triggered node instance belongs. // 自動トリガーノードインスタンスが属するワークスペースを管理するテナントの ID。
            System.out.println("tenantId: "+dataParam.getString("tenantId"));
            // The operation code of the auto triggered node instance. You can ignore the field value. // 自動トリガーノードインスタンスの操作コード。フィールド値は無視できます。
            System.out.println("opCode: "+dataParam.getString("opCode"));
            // The ID of the workflow. For an auto triggered node instance, the field value is 1. For a manually triggered workflow or an auto triggered node instance of the internal workflow type, the field value is the actual workflow ID. // ワークフローの ID。自動トリガーノードインスタンスの場合、フィールド値は 1 です。手動トリガーワークフローまたは内部ワークフロータイプの自動トリガーノードインスタンスの場合、フィールド値は実際のワークフロー ID です。
            System.out.println("flowId: "+dataParam.getString("flowId"));
            // The ID of the node for which the auto triggered node instance was generated. // 自動トリガーノードインスタンスが生成されたノードの ID。
            System.out.println("nodeId:"+dataParam.getString("nodeId"));
            // The time when the auto triggered node instance started to wait for resources. // 自動トリガーノードインスタンスがリソースの待機を開始した時間。
            System.out.println("beginWaitResTime: "+dataParam.getString("beginWaitResTime"));
            // The ID of the auto triggered node instance. // 自動トリガーノードインスタンスの ID。
            System.out.println("taskId: "+dataParam.getString("taskId"));
            // The status of the node. Valid values: // ノードのステータス。有効な値:
            // 0: The node is not running. // 0:ノードは実行されていません。
            // 2: The node is waiting for the scheduling time to arrive. The scheduling time is specified by the dueTime or cycleTime parameter. // 2:ノードはスケジューリング時間が来るのを待っています。スケジューリング時間は dueTime パラメーターまたは cycleTime パラメーターで指定されます。
            // 3: The node is waiting for resources. // 3:ノードはリソースを待機しています。
            // 4: The node is running. // 4:ノードは実行中です。
            // 7: The tables that are specified in the node are issued to Data Quality and data in the tables is checked based on monitoring rules in Data Quality. // 7:ノードで指定されたテーブルが Data Quality に発行され、Data Quality の監視ルールに基づいてテーブル内のデータがチェックされます。
            // 8: Branch conditions are being checked. // 8:分岐条件がチェックされています。
            // 5: The node failed to be run. // 5:ノードの実行に失敗しました。
            // 6: The node is successfully run. // 6:ノードは正常に実行されました。
            System.out.println("status: "+dataParam.getString("status"));
        }else{
            System.out.println("Failed to filter out other types of events. Check the parameter configurations."); // 他のタイプのイベントをフィルタリングできませんでした。パラメーターの設定を確認してください。
        }
    }
}
サンプルプロジェクトのデプロイ
環境とプロジェクトを準備します。
環境要件:Java 8 以降と Maven。Maven は Java のビルド自動化ツールです。
プロジェクトファイルのダウンロードリンク:event-demo-instance-status.zip。
プロジェクトファイルをダウンロードした後、プロジェクトのルートディレクトリに移動し、次のコマンドを実行します。
mvn clean package -Dmaven.test.skip=true spring-boot:repackage直接インストールできる JAR パッケージを取得した後、次のコマンドを実行します。
java -jar target/event-demo-instance-status-1.0.jar次の図は、正常に起動されたプロジェクトを示しています。

ブラウザのアドレスバーに
http://localhost:8080/indexと入力し、Enter キーを押します。"hello world!"が返された場合、拡張機能は正常にデプロイされています。DataWorks と拡張機能の間、および EventBridge と拡張機能の間のネットワーク接続が確立された後、イベントメッセージをサブスクライブできます。
イベントメッセージのサブスクリプションを有効化および設定する(OpenEvent)
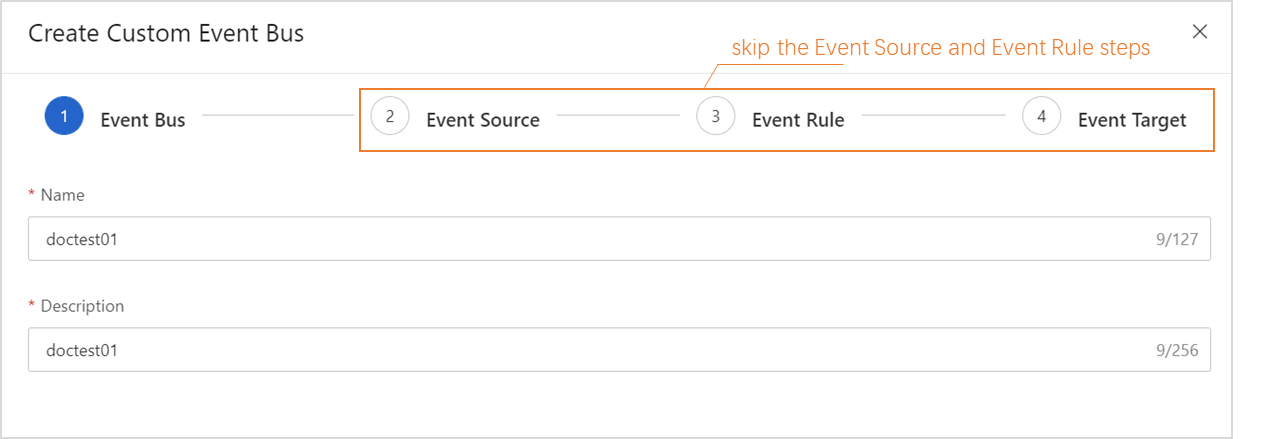
EventBridge コンソール で、カスタムバスを作成します。[イベントソース]、[イベントルール]、[イベントターゲット]の各ステップでパラメーターを設定する必要はありません。
EventBridge コンソール で、カスタムバスのイベントルールを作成します。
この例では、カスタムバスは自動トリガーノードインスタンスのステータス変更イベントのメッセージを受信するように設定されています。以下の内容は、デモの設定方法とイベントルールの主要なパラメーターの例を示しています。
[イベントパターンの構成] ステップでパラメーターを設定します。
{
    "source": [
        "acs.dataworks"
    ],
    "type": [
        "dataworks:InstanceStatusChanges:InstanceStatusChanges"
    ]
}
source:イベントが発生するサービスの識別子。このパラメーターを acs.dataworks に設定します。
type:サービスで発生するイベントのタイプ。このパラメーターを dataworks:InstanceStatusChanges:InstanceStatusChanges に設定します。[イベントパターンのデバッグ] セクションで source パラメーターと type パラメーターの値を変更し、[テスト]をクリックできます。テストが成功したら、[次のステップ]をクリックします。
[ターゲットの構成] ステップで、[サービスタイプ] を HTTPS に設定し、有効な URL を入力します。その他のパラメーターにはデフォルト設定を使用します。
DataWorks コンソール の Open Platform ページに移動します。左側のナビゲーションツリーで、[openevent] をクリックします。表示されるページで、イベント配信チャネルを追加します。
コードを書く
package com.aliyun.dataworks.demo;

import com.alibaba.fastjson.JSON;
import com.alibaba.fastjson.JSONObject;
import com.aliyun.dataworks.config.Constants;
import org.springframework.web.bind.annotation.PostMapping;
import org.springframework.web.bind.annotation.RequestBody;
import org.springframework.web.bind.annotation.RequestMapping;
import org.springframework.web.bind.annotation.RestController;


/**
 * @author dataworks demo // dataworks デモ
 */
@RestController
@RequestMapping("/event")
public class ExtensionsController {

    /**
     * Receive event messages that are sent from EventBridge. // EventBridge から送信されたイベントメッセージを受信します。
     * @param jsonParam
     */
    @PostMapping("/consumer")
    public void consumerEventBridge(@RequestBody String jsonParam){
        JSONObject jsonObj = JSON.parseObject(jsonParam);
        String eventCode = jsonObj.getString(Constants.EVENT_CODE_FILED);
        if(Constants.INSTANCE_STATUS_EVENT_CODE.equals(eventCode)){
            JSONObject dataParam = JSON.parseObject(jsonObj.getString("data"));
            // The time when the auto triggered node instance started to wait for the scheduling time. // 自動トリガーノードインスタンスがスケジューリング時間を待機し始めた時間。
            System.out.println("beginWaitTimeTime: "+ dataParam.getString("beginWaitTimeTime"));
            //DagId // DAG ID
            System.out.println("dagId: "+ dataParam.getString("dagId"));
            // The type of the directed acyclic graph (DAG). Valid values: // 有向非巡回グラフ(DAG)のタイプ。有効な値:
            // 0: for auto triggered nodes // 0:自動トリガーノードの場合
            // 1: for manually triggered nodes // 1:手動トリガーノードの場合
            // 2: for smoke testing // 2:スモークテストの場合
            // 3: for nodes for which you backfill data // 3:データをバックフィルするノードの場合
            // 4: for manually triggered workflows // 4:手動トリガーワークフローの場合
            // 5: for temporary workflows // 5:一時ワークフローの場合
            System.out.println("dagType: "+dataParam.getString("dagType"));
            // The type of the node. Valid values: // ノードのタイプ。有効な値:
            // NORMAL(0): The node is an auto triggered node. The scheduling system regularly runs the node. // NORMAL(0):ノードは自動トリガーノードです。スケジューリングシステムはノードを定期的に実行します。
            // MANUAL(1): The node is a manually triggered node. The scheduling system does not regularly run the node. // MANUAL(1):ノードは手動トリガーノードです。スケジューリングシステムはノードを定期的に実行しません。
            // PAUSE(2): The node is a frozen node. The scheduling system regularly runs the node but sets the node status to Failed when the scheduling system starts to run the node. // PAUSE(2):ノードはフリーズされたノードです。スケジューリングシステムはノードを定期的に実行しますが、スケジューリングシステムがノードの実行を開始するときにノードのステータスを「失敗」に設定します。
            // SKIP(3): The node is a dry-run node. The scheduling system regularly runs the node but sets the node status to Succeeded when the scheduling system starts to run the node. // SKIP(3):ノードはドライランノードです。スケジューリングシステムはノードを定期的に実行しますが、スケジューリングシステムがノードの実行を開始するときにノードのステータスを「成功」に設定します。
            // SKIP_UNCHOOSE(4): The node is an unselected node in a temporary workflow. This type of node exists only in temporary workflows. The scheduling system sets the node status to Succeeded when the scheduling system starts to run the node. // SKIP_UNCHOOSE(4):ノードは一時ワークフローで選択されていないノードです。このタイプのノードは一時ワークフローにのみ存在します。スケジューリングシステムは、ノードの実行を開始するときにノードのステータスを「成功」に設定します。
            // SKIP_CYCLE(5): The node is scheduled by week or month, and is waiting for the scheduling time to arrive. The scheduling system regularly runs the node but sets the node status to Succeeded when the scheduling system starts to run the node. // SKIP_CYCLE(5):ノードは週または月ごとにスケジュールされており、スケジューリング時間が来るのを待っています。スケジューリングシステムはノードを定期的に実行しますが、スケジューリングシステムがノードの実行を開始するときにノードのステータスを「成功」に設定します。
            // CONDITION_UNCHOOSE(6): The node is not selected by its ancestor branch node and is run as a dry-run node. // CONDITION_UNCHOOSE(6):ノードは祖先分岐ノードによって選択されておらず、ドライランノードとして実行されます。
            // REALTIME_DEPRECATED(7): The node has instances that are generated in real time but are deprecated. The scheduling system sets the node status to Succeeded. // REALTIME_DEPRECATED(7):ノードにはリアルタイムで生成されたが非推奨のインスタンスがあります。スケジューリングシステムはノードのステータスを「成功」に設定します。
            System.out.println("taskType: "+dataParam.getString("taskType"));
            // The time when the node instance was modified. // ノードインスタンスが変更された時間。
            System.out.println("modifyTime: "+dataParam.getString("modifyTime"));
            // The time when the node instance was created. // ノードインスタンスが作成された時間。
            System.out.println("createTime: "+dataParam.getString("createTime"));
            // The ID of the workspace. You can call the ListProjects operation to query the ID. // ワークスペースの ID。ListProjects オペレーションを呼び出して ID をクエリできます。
            System.out.println("appId: "+dataParam.getString("appId"));
            // The ID of the tenant that manages the workspace to which the auto triggered node instance belongs. // 自動トリガーノードインスタンスが属するワークスペースを管理するテナントの ID。
            System.out.println("tenantId: "+dataParam.getString("tenantId"));
            // The operation code of the auto triggered node instance. You can ignore the field value. // 自動トリガーノードインスタンスの操作コード。フィールド値は無視できます。
            System.out.println("opCode: "+dataParam.getString("opCode"));
            // The ID of the workflow. For an auto triggered node instance, the field value is 1. For a manually triggered workflow or an auto triggered node instance of the internal workflow type, the field value is the actual workflow ID. // ワークフローの ID。自動トリガーノードインスタンスの場合、フィールド値は 1 です。手動トリガーワークフローまたは内部ワークフロータイプの自動トリガーノードインスタンスの場合、フィールド値は実際のワークフロー ID です。
            System.out.println("flowId: "+dataParam.getString("flowId"));
            // The ID of the node for which the auto triggered node instance was generated. // 自動トリガーノードインスタンスが生成されたノードの ID。
            System.out.println("nodeId:"+dataParam.getString("nodeId"));
            // The time when the auto triggered node instance started to wait for resources. // 自動トリガーノードインスタンスがリソースの待機を開始した時間。
            System.out.println("beginWaitResTime: "+dataParam.getString("beginWaitResTime"));
            // The ID of the auto triggered node instance. // 自動トリガーノードインスタンスの ID。
            System.out.println("taskId: "+dataParam.getString("taskId"));
            // The status of the node. Valid values: // ノードのステータス。有効な値:
            // 0: The node is not running. // 0:ノードは実行されていません。
            // 2: The node is waiting for the scheduling time to arrive. The scheduling time is specified by the dueTime or cycleTime parameter. // 2:ノードはスケジューリング時間が来るのを待っています。スケジューリング時間は dueTime パラメーターまたは cycleTime パラメーターで指定されます。
            // 3: The node is waiting for resources. // 3:ノードはリソースを待機しています。
            // 4: The node is running. // 4:ノードは実行中です。
            // 7: The tables that are specified in the node are issued to Data Quality and data in the tables is checked based on monitoring rules in Data Quality. // 7:ノードで指定されたテーブルが Data Quality に発行され、Data Quality の監視ルールに基づいてテーブル内のデータがチェックされます。
            // 8: Branch conditions are being checked. // 8:分岐条件がチェックされています。
            // 5: The node failed to be run. // 5:ノードの実行に失敗しました。
            // 6: The node is successfully run. // 6:ノードは正常に実行されました。
            System.out.println("status: "+dataParam.getString("status"));
        }else{
            System.out.println("Failed to filter out other types of events. Check the parameter configurations."); // 他のタイプのイベントをフィルタリングできませんでした。パラメーターの設定を確認してください。
        }
    }
}
オンプレミス マシンにコードをデプロイして実行する
デモプロジェクトファイルをダウンロードします。
環境要件:Java 8 以降と Maven。Maven は Java のビルド自動化ツールです。
プロジェクトファイルのダウンロードリンク:event-demo-instance-status.zip。
デプロイモードを選択します。
オンプレミスデプロイ:プロジェクトファイルを JAR パッケージにパッケージ化した後、Java 8 と Maven がデプロイされているオンプレミスサーバーで
java -jar yourapp.jarコマンドを実行して、サービスプログラムを起動します。クラウドベースのデプロイ:プロジェクトファイルを JAR パッケージにパッケージ化した後、デプロイのために Docker コンテナやクラウドサーバーなどの関連するランタイム環境にパッケージをアップロードします。
説明サービスプログラムをデプロイした後、EventBridge がインターネット経由でサービスにアクセスできることを確認してください。
プロジェクトファイルをダウンロードした後、プロジェクトのルートディレクトリに移動し、次のコマンドを実行します。
mvn clean package -Dmaven.test.skip=true spring-boot:repackage直接インストールできる JAR パッケージを取得した後、次のコマンドを実行します。
java -jar target/event-demo-instance-status-1.0.jar次の図は、正常に起動されたプロジェクトを示しています。
ブラウザのアドレスバーに http://localhost:8080/indexと入力し、Enter キーを押します。"hello world!"が返された場合、拡張機能は正常にデプロイされています。DataWorks と拡張機能の間、および EventBridge と拡張機能の間のネットワーク接続が確立された後、イベントメッセージをサブスクライブできます。