LAMP is the most common environment for building web applications. LAMP stands for Linux, Apache, MySQL, and PHP—meaning Apache, MySQL, and PHP installed on a Linux system. This topic shows how to use a LAMP image from Simple Application Server to quickly set up a development environment.
Background information
Alibaba Cloud Alibaba Cloud Marketplace offers a wide range of runtime images that include both an operating system and applications. When you create an instance, choose a runtime image that includes the LAMP environment. After creation, you won’t need to deploy the environment manually. You can use a LAMP environment image from Alibaba Cloud Marketplace in one of two ways:
-
When creating a Simple Application Server instance, directly select an application image that includes the LAMP environment.
-
After creating a Simple Application Server instance, change the operating system of your purchased instance to an application image that includes the LAMP environment.
This topic uses the application image method to help you deploy a LAMP environment quickly and easily. If you need a customized deployment, refer to the ECS documentation to manually deploy a LAMP environment. For more information, see Manually deploy a LAMP environment.
Step 1: Create a server
Choose the method that fits your business scenario.
Create a new server
If you haven’t created a Simple Application Server yet, select an application image that includes the LAMP environment to create a server quickly.
-
Go to the Servers page in the Simple Application Server console.
-
In the middle of the page, click Create Server.
-
On the Simple Application Server purchase page, configure your resources.
For detailed instructions, see Create a Simple Application Server.
In the Image section, select LAMP 7.4 as the application image.
Change the image
If you already have a Simple Application Server, change the operating system of your purchased instance to an application image that includes the LAMP environment. For more information, see Reset simple application server.
For limits on resetting the system, see Limits.
Resetting the system purges all disk data on the server. If your server contains important data, do not use this method. Instead, manually deploy the LAMP environment. For more information, see Manually deploy a LAMP environment.
Step 2: View application information
-
Click the instance ID on the LAMP server card
-
Click the Application Details tab.
-
view the usernames and passwords for preinstalled software.
-
In the LAMP information section, click Remote connection.
-
In the command line of the remotely connected server, run the following command to view application information.
sudo cat /credentials/password.txt########################################################################## # OneinStack for CentOS/RedHat 6+ Debian 7+ and Ubuntu 12+ # # For more information please visit https://oneinstack.com # ########################################################################## MySQL root password: NeKxxx FTP account: ftpuser FTP password: bKJxxxThe output varies slightly depending on the LAMP image version. This topic uses LAMP 7.4 as an example. You can obtain the preconfigured database administrator password.
[admin@iZj6cfztoffl5xdjtax**** ~]$ sudo cat /credentials/password.txt mysql administrator username:root mysql administrator password:w1gnxHCyKKB**** --- -
Select the application information with your mouse, right-click, and click Copy. Paste the information to your local host for later use when deploying your website.
Keep your password information secure.
-
-
Optional: View PHP configuration details.
If you want to use the
phpinfofunction to view PHP configuration details or verify that your server is running properly, follow these steps.NoteThe phpinfo.php file is not included by default. You must create a phpinfo.php file that contains the
phpinfofunction before viewing PHP configuration details.-
Run the following command to create a phpinfo.php file in the website root directory to store the
phpinfofunction code.-
LAMP 7.4:
sudo vim /data/wwwroot/example/phpinfo.php -
LAMP 6.1.0:
su root
sudo vim /home/www/htdocs/phpinfo.php
-
-
Press i to enter edit mode and add the following code.
<?php phpinfo(); ?> -
Press Esc, type
:wq, and press Enter to save and exit the file. -
On your local host, open a browser and go to
http://public IP address of your Simple Application Server/phpinfo.php.If your server has a domain name attached, access it using
your domain name/phpinfo.php.This example accesses
http://public IP address of your Simple Application Server/phpinfo.phpto view PHP configuration details, as shown in the following figure. Successful display confirms that your LAMP server is running normally.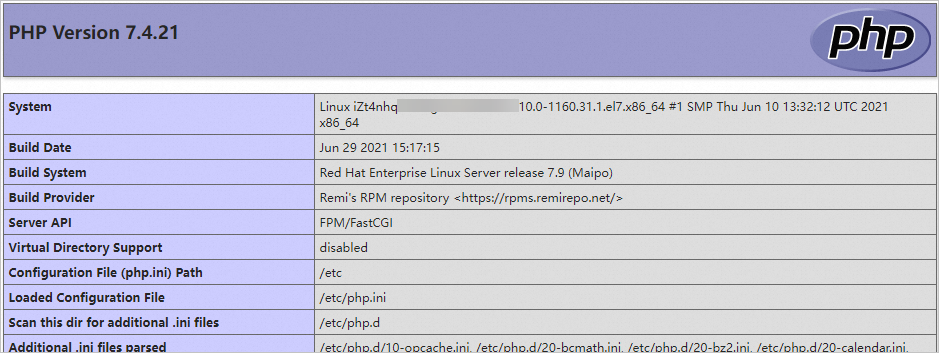
-
Step 3: Test website access
Upload the web project files you want to deploy to the website root directory on the server and change the owner of the project files. In this example, using LNMP 7.4, you can upload a test file named test.html with the FileZilla tool. The file content is as follows:
<html>
<head>
<meta charset="utf-8">
<title>Test Environment</title>
</head>
<body>
Test123456789
</body>
</html>
Follow these steps.
-
Upload your website code from your local host to the website root directory of your LAMP server.
-
Add firewall rules to allow traffic on ports
21and20000/30000.Port
21is the default port for FTP service. Ports20000/30000are used by the FTP service in passive mode on your LAMP server. For more information about adding firewall rules, see Firewall settings. -
Use FileZilla with your saved FTP credentials to connect to the server and upload the test file test.html to the /data/wwwroot/example directory on your LAMP server.
For more information, see Set up an FTP server (Linux).
-
-
In the command line of the remotely connected server, run the following command to change the ownership of the test file.
This example uses LAMP 7.4. The website root directory is /data/wwwroot/example, and the test file is test.html. Run the following command:
sudo chmod 777 -R /data/wwwroot/example sudo chown -R apache:apache /data/wwwroot/example/test.html -
On your local host, open a browser and go to
http://public IP address of your Simple Application Server/test.html.If your server has a domain name attached, access it using
your domain name/test.html.The website loads successfully. The page displays the text
Test123456789, confirming that website access works correctly.