This topic describes how to migrate data from a self-managed PostgreSQL database to a PolarDB for PostgreSQL cluster by using the pg_dumpall, pg_dump, and pg_restore commands.
To migrate data from an ApsaraDB RDS for PostgreSQL instance to a PolarDB for PostgreSQL cluster, see Migrate data from an ApsaraDB RDS for PostgreSQL instance to a PolarDB for PostgreSQL cluster.
Prerequisites
The available storage space of the PolarDB for PostgreSQL cluster is larger than that of the self-managed PostgreSQL database.
Usage notes
Full data is migrated in this procedure. To prevent data inconsistency before and after migration, stop business activities and do not write data to the self-managed PostgreSQL database during the migration.
Preparations
Create a Linux Elastic Compute Service (ECS) instance. In this example, an ECS instance that runs 64-bit Ubuntu 16.04 is used. For more information, see Create an ECS instance.
NoteThe ECS instance and the destination PolarDB for PostgreSQL cluster must reside in the same virtual private cloud (VPC).
You can create a pay-as-you-go ECS instance and release it after the migration.
Install a PostgreSQL client on the Linux ECS instance to run the data restoration commands. For more information, see PostgreSQL official documentation.
NoteMake sure that the installed PostgreSQL client matches the version of the source PostgreSQL database.
Step 1: Back up the self-managed PostgreSQL database
Full data is migrated in this procedure. To prevent data inconsistency before and after migration, stop business activities and do not write data to the self-managed PostgreSQL database during the migration.
Run the following command on the server on which the self-managed server resides to back up all role information in the database.
pg_dumpall -U <username> -h <hostname> -p <port> -r -f <filename>Parameters:
<username>: the account used to log on to the self-managed PostgreSQL database.
<hostname>: the endpoint of the self-managed PostgreSQL database. If the database resides on the server on which you execute the command, use localhost.
<port>: the port number of the database service.
<filename>: the name of the generated backup file.
Example:
pg_dumpall -U postgres -h localhost -p 5432 -r -f roleinfo.sqlWhen the
Password:prompt is displayed, enter the password of the database to start the backup process.Run the
vimcommand to replaceSUPERUSERin the role information backup file withpolar_superuser.NoteIf the role information backup file does not contain
SUPERUSERinformation, you can skip this step.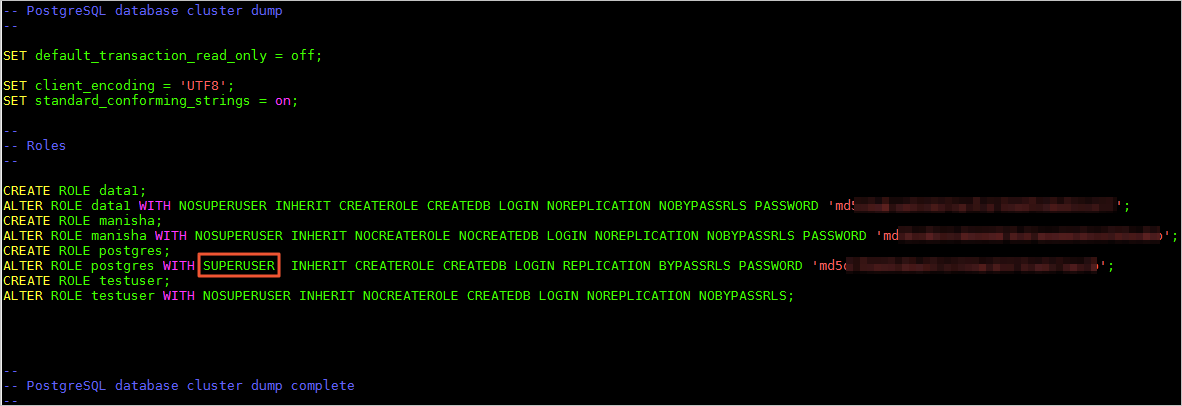
Run the following command on the server on which the self-managed server resides to back up data of the self-managed PostgreSQL database.
pg_dump -U <username> -h <hostname> -p <port> <dbname> -Fd -j <njobs> -f <dumpdir>Parameters:
<username>: the account used to log on to the self-managed PostgreSQL database.
<hostname>: the endpoint of the self-managed PostgreSQL database. If the database resides on the server on which you execute the command, use localhost.
<port>: the port number of the database service.
<dbname>: the name of the database whose data you want to back up.
<njobs>: the number of concurrent backup jobs.
NoteConcurrent backup jobs can reduce the required time to back up data but increase the load on the database server.
If the self-managed PostgreSQL database is earlier than 9.2, you must specify the
--no-synchronized-snapshotsparameter.
<dumpdir>: the directory of the generated backup file.
Example:
pg_dump -U postgres -h localhost -p 5432 mytestdata -Fd -j 5 -f postgresdumpWhen the
Password:prompt is displayed, enter the password of the database to start the backup process.The data in the self-managed PostgreSQL instance is backed up to the specified directory. In this example, the data is stored in the postgresdump directory.
Step 2: Migrate data to the PolarDB for PostgreSQL cluster
Upload the directory that contains the backup files to the ECS instance.
NoteBackup files include the role information backup file and database backup file.
Run the following command on the ECS instance to migrate the role information in the role information backup file to the PolarDB for PostgreSQL cluster:
psql -U <username> -h <hostname> -p <port> -d <dbname> -f <filename>Parameters:
<username>: the account used to log on to the PolarDB for PostgreSQL cluster.
<hostname>: the primary private endpoint of the PolarDB for PostgreSQL cluster.
<port>: the port number of the database service. For more information, see View the endpoint and port number.
<dbname>: the name of the database to which you want to restore data.
<filename>: the name of the role information backup file.
psql -U gctest -h pc-xxxxxxxx.pg.polardb.cn-qd-pldb1.rds.aliyuncs.com -d testdb -p 1921 -f roleinfo.sqlWhen the
Password:prompt is displayed, enter the password of the database to start the data migration.Run the following command on the ECS instance to migrate data from the source database to the PolarDB for PostgreSQL cluster.
pg_restore -U <username> -h <hostname> -p <port> -d <dbname> -j <njobs> <dumpdir>Parameters:
<username>: the account used to log on to the PolarDB for PostgreSQL cluster.
<hostname>: the primary private endpoint of the PolarDB for PostgreSQL cluster. For more information, see View or apply for an endpoint.
<port>: the port number of the database service. For more information, see View the endpoint and port number.
<dbname>: the name of the destination database to which you want to restore data.
NoteThe destination database must be available. If it is not available, create the database in the destination cluster.
<njobs>: the number of concurrent data restoration jobs.
NoteConcurrent data restoration jobs can reduce the amount of time that is required to restore data but increase the load on the database server.
<dumpdir>: the directory in which the backup file is located.
Example:
pg_restore -U gctest -h pc-mxxxxxxxx.pg.polardb.cn-qd-pldb1.rds.aliyuncs.com -p 1921 -d mytestdata -j 6 postgresdumpWhen the
Password:prompt is displayed, enter the password to start data migration.NoteIf you forget the password of the database, see Manage a database account.
Wait until the data migration is complete.