You can use the mobile client (Android client/iOS client) to connect to and use cloud computers. This topic describes how to log on to the mobile client.
The examples in this topic are based on the iOS client V7.7 and the Enterprise Edition. If your experience differs from the description in this topic, you may be using a different client or an outdated version. Upgrade to the latest version.
Simplified logon
Alibaba Cloud Workspace terminals support multiple logon methods, such as single sign-on (SSO) and multi-factor authentication (MFA), and provide various advanced features. This section describes only the username-password-based logon method that is suitable for most scenarios. To learn about other logon methods and the advanced features of Alibaba Cloud Workspace terminals, see Alternative logon methods and advanced features.
Prerequisites
Cloud resources are assigned to you. After the administrator assigns you a cloud computer, you can obtain logon credentials, such as the organization ID, office network ID, username, and password, from the inbox of the email address specified by the administrator.
You have installed the client. For more information, see Install and update the mobile client.
Procedure
Open the client and make sure you are on the Enterprise & Business screen. If not, click the switch button in the upper-right corner.
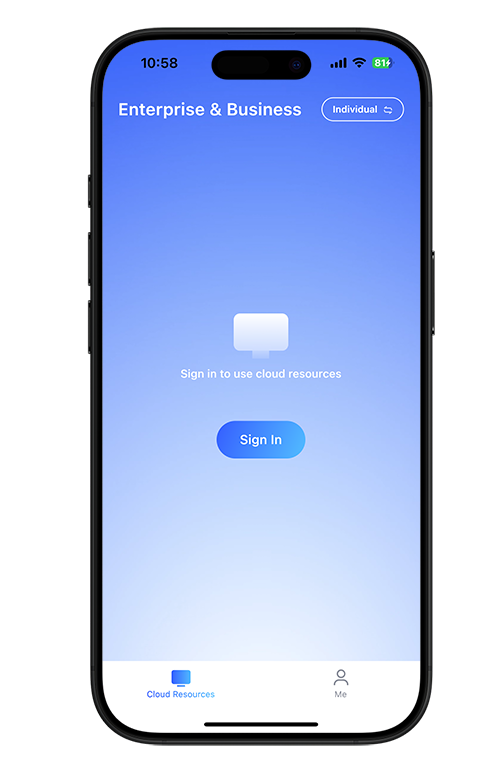
At the bottom of the screen, agree to the privacy policy. Enter the organization ID or office network ID provided in your logon credentials, then click the icon.
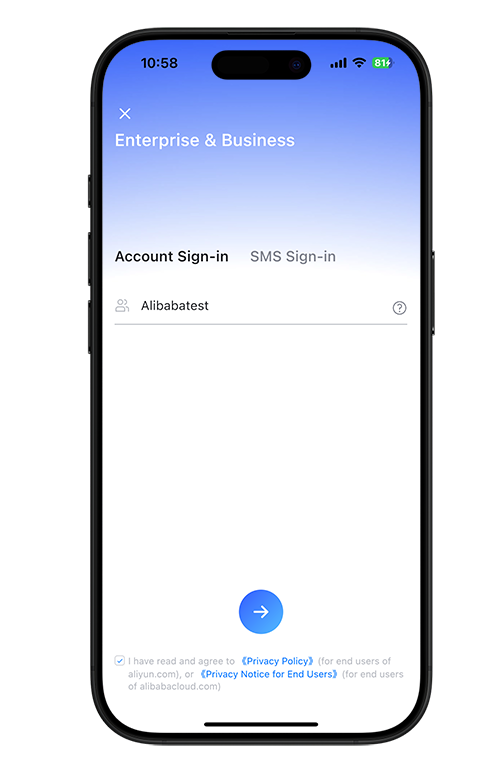
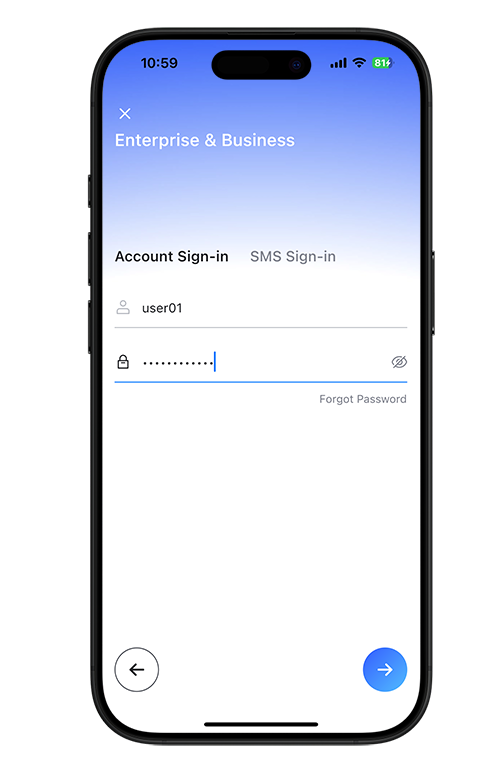
In the Username and Password text boxes, enter the username and password in the logon credentials sent to you, and click the icon.
NoteIf you log on to the client for the first time, use the initial password provided. You will then be prompted to specify a new password by following on-screen instructions. The initial password is valid for three days. If the initial password expires, click Forgot Password to obtain a new initial password.
After you log on, the cloud computers assigned to you by the administrator are displayed in the client.
On the cloud resources page, click the connect icon on a cloud computer card to start using it. For more information, see Connect to a cloud computer.
Alternative logon methods
This section describes the related concepts, alternative logon methods, and advanced features of Alibaba Cloud Workspace terminals. If you use username-password-based logon and do not require advanced features, see Simplified logon.
Background
Roles of Alibaba Cloud Workspace users fall into the following categories:
End users: individuals who access cloud computers from Alibaba Cloud Workspace terminals. Example: Jack, a designer from a design company.
Administrators: O&M personnel who are responsible for resource purchase and renewal, resource creation and assignment, policy creation and binding, O&M and monitoring, and end user management. Example: Steven, the IT administrator of the company in which the designer Jack works.

Prerequisites
The administrator has created an end user account for you and assigned Alibaba Cloud Workspace resources to you. If you are an administrator, you must first purchase and assign cloud resources by following the instructions in the following topics.
Logon credentials are obtained. After the administrator purchases and assigns EDS resources to you, you can receive logon credentials as an end user, such as the organization ID, office network ID, username, and password. The query methods of logon credentials vary based on the account type and the account activation type.
NoteFor information about account types and their differences, see the "Account systems" section of the Overview topic.
Convenience accounts
Administrator-activated: Administrators configure logon credentials and password reset notifications in the EDS console and deliver the logon credentials to end users offline. Cloud Phone supports only administrator-activated convenience accounts.
User-activated: End users can obtain the logon credentials and password reset notifications from their inboxes of the email addresses specified by the administrator.
Enterprise Active Directory (AD) accounts: Administrators deliver the logon credentials to end users offline.
You have set the correct network accessing type (Internet or Alibaba Cloud VPC). Your administrator determines the network accessing type. The default option is Internet. To change it, open the mobile client. Before you log on, choose , then select the correct network accessing type.
Procedure
Open the client and make sure you are on the Enterprise & Business screen. If not, click the switch icon in the upper-right corner.
Select a logon method.
Log on with a username and password
When you go to the logon screen, the username-and-password-based logon method is selected by default. If not, click the Account Sign-in tab.
Enter the organization ID or office network ID provided in your logon credentials, then click the icon.
NoteWhen you log on with an organization ID, you can access all Alibaba Cloud Workspace resources, regardless of the office network to which they belong. When you log on with an office network ID, you can access only the Alibaba Cloud Workspace resources that belong to that office network. For more information, see Differences between office network IDs and organization IDs.
Perform one of the following operations based on whether the administrator has enabled SSO for the organization ID or office network:
If SSO is not enabled, enter the username and your custom password, and click the icon.
NoteWhen you log on for the first time, enter the initial password from your logon credentials and follow the prompts to set a custom password. Use this custom password for all subsequent logons.
The initial password is valid for 3 days. If you are prompted that the password has expired when you log on, or if you forget your custom password, click Forgot Password and follow the prompts to reset your password.
ImportantWhen you log on to the client, enter the correct password. If you enter an incorrect password 10 consecutive times, the system automatically locks your account for 20 minutes. You are not allowed to log on during this time.
If SSO is enabled, enter the SSO username and password as prompted on the page, and click the icon.
Conditional. If your administrator has enabled MFA for your cloud computer, enter the dynamic password that is generated by the virtual MFA device.
NoteBefore you use MFA, associate a virtual MFA device with your account as prompted. Alibaba Cloud Workspace supports various virtual MFA applications, such as Alibaba Cloud App and Google Authenticator App, that run based on the time-based one-time password (TOTP) algorithm.
Conditional. If your administrator has enabled client logon verification, obtain the verification code that is sent to your associated email address and enter the verification code when you use a new logon device.
NoteThe client logon verification feature applies only when you access your cloud computer over the Internet. The feature does not apply if you access your cloud computer over an Alibaba Cloud virtual private cloud (VPC).
After you log on to the client, Alibaba Cloud Workspace services are displayed as cards or icons. Click a card or an icon to access Alibaba Cloud Workspace services.
NoteIf the cloud computer is in the Stopped or Hibernated state, start or wake up the cloud computer.
FAQ
For information about how to resolve this issue, see FAQ about clients.
Next steps
Enable auto logon
If you want to stay logged on after a successful logon, you can enable auto logon.
Open the mobile client.
Choose .
On the Sign-in tab, configure the following settings in the Sign-in section:
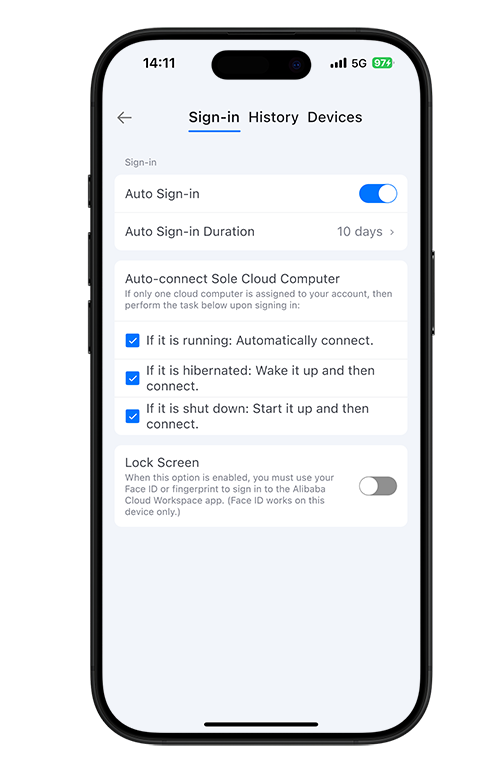
Choose whether to enable Auto Sign-in.
NoteIf you cannot modify the configuration, your administrator has disabled the auto logon feature in the Elastic Desktop Service Enterprise console. If needed, contact your administrator to enable it.
If you enable Auto Sign-in, select an Auto Sign-in Duration.
NoteAfter you enable auto logon, if you manually log off, the logon status becomes invalid automatically. You will need to enter your logon credentials the next time you try to log on.
Use a cloud computer
For information about how to connect to and use a cloud computer from the mobile client, see Connect to a cloud computer and Use cloud computers.
Log off
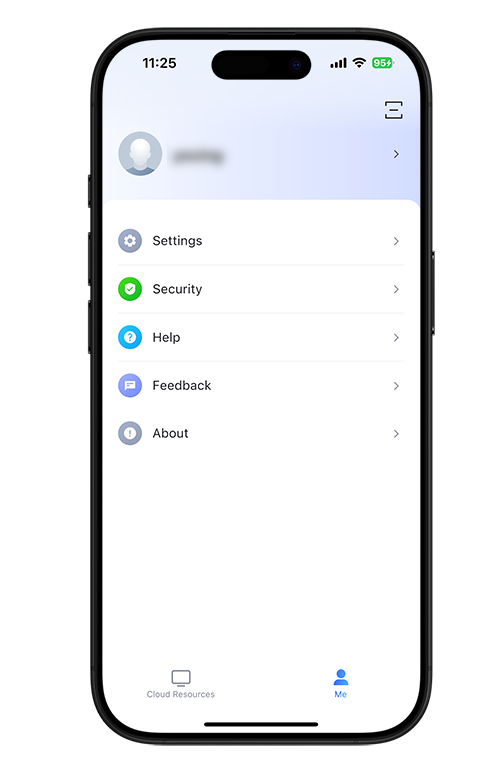
On the Me screen, tap your profile picture at the top. Then, on the Account Information screen, tap Log Out at the bottom and tap Yes.