You can add your website to Web Application Firewall (WAF) in transparent proxy mode by entering your website information without modifying the Domain Name System (DNS) record. You can use transparent proxy mode if your origin server is deployed on an Alibaba Cloud Elastic Compute Service (ECS) or Internet-facing Server Load Balancer (SLB) instance. This topic describes how to add a website to WAF in transparent proxy mode.
If you migrated your WAF 2.0 instance to WAF 3.0, you can add your cloud service instances, such as ECS, Classic Load Balancer (CLB), and Application Load Balancer (ALB) instances, to WAF in cloud native mode. For more information, see Cloud native mode.
Limits
Item | Description |
Cloud service instance type | Transparent proxy mode does not support private SLB and IPv6 Internet-facing SLB instances. |
SLB and ECS region | The supported regions include the following:
Specific Internet-facing SLB instances do not support transparent proxy mode because of their network architecture. |
Number of traffic redirection port configurations | The number of traffic redirection port configurations that can be added varies based on the WAF edition.
You can enable transparent proxy mode for specific ports of an origin server. After you enable transparent proxy mode for a port, traffic to that port is redirected to WAF for protection. The origin server must have a public IP address. These ports can be standard ports, such as Port 80 and Port 443, or other custom ports. For example, if you enable transparent proxy mode for ports 80 and 443 on SLB instance A and for ports 80 and 443 on SLB instance B, you add a total of four traffic redirection port configurations. The configurations are for port 80 on SLB instance A, port 443 on SLB instance A, port 80 on SLB instance B, and port 443 on SLB instance B. |
Supported port range | Ports 0 to 65535 are supported, including standard and non-standard ports. For more information, see Ports supported by WAF. Note Only subscription WAF instances of the Business, Enterprise, or Exclusive editions support non-standard ports. |
Services protected by both Anti-DDoS Pro and WAF | If your service must be protected by both Anti-DDoS Pro and WAF, you can add the service to WAF in transparent proxy mode only if the service is added to Anti-DDoS Pro in Website Config mode (Layer 7 access mode). If the service is added to Anti-DDoS Pro in Port Config mode (Layer 4 access mode), the service cannot be added to WAF in transparent proxy mode. In this case, we recommend that you add the service to WAF in CNAME record mode. For more information, see Add a domain name to WAF (CNAME record mode). |
Prerequisites
You have purchased a WAF instance.
You have created an Internet-facing SLB instance that uses IPv4 and is bound to a public IP address. Mutual authentication must be disabled for the ports of the instance.
NoteIf you use a private SLB instance that is associated with an Elastic IP Address (EIP), you can add your website to WAF in transparent proxy mode.
If the domain name of your website is hosted on a server in the Chinese mainland, you must obtain an ICP filing for the domain name from Alibaba Cloud. When you submit an ICP filing application in the Alibaba Cloud ICP Filing system, the system automatically identifies the ICP filing type and displays the required steps based on the basic information that you enter. For more information, see ICP filing scenarios.
The certificate that is used for the port in the transparent proxy mode configuration meets the following requirements:
The certificate is uploaded to the Certificate Management Service console for centralized management, or is purchased and requested directly from the Certificate Management Service console.
The certificate is selected and configured for the port's listener in the SLB console.
NoteThis prerequisite applies only when you add web traffic on a Layer 7 SLB instance. It does not apply when you add web traffic on a Layer 4 SLB instance or an ECS origin server.
You have authorized WAF to access cloud resources. For more information, see Authorize WAF to access cloud resources.
Step 1: Add a domain name
Transient connection interruptions lasting a few seconds may occur when you add an instance to WAF. These interruptions are caused by DNS resolution updates, network configuration changes, and WAF initialization.
After an instance is added to WAF, the listener port is automatically removed from WAF if you perform any of the following operations. In this case, you must add the port again. Otherwise, service traffic will not be protected by WAF.
For a CLB instance with a Layer 7 listener, the port is removed if you replace the public IP address bound to the instance, replace the listener port's certificate with a third-party certificate, or enable mutual authentication.
For an ECS instance or a CLB instance with a Layer 4 listener, the port is removed if you replace the public IP address bound to the instance or enable mutual authentication.
For an ECS instance, traffic from the EIP or public IP address is redirected.
If you unbind an EIP from an ECS instance, the traffic redirection configuration is automatically deleted.
Log on to the Web Application Firewall console. In the top navigation bar, select the resource group and region (Chinese Mainland or Outside Chinese Mainland) of your WAF instance.
In the navigation pane on the left, choose .
On the Domain Names tab, click Website Access.
On the Add Domain Name page, set Access Mode to Transparent Proxy Mode.
Configure parameters such as the domain name and origin server port.
Configuration item
Description
Domain Name
Enter the domain name of the website that you want to add to WAF for protection. The domain name can be an exact-match domain name, such as
www.aliyundoc.com, or a wildcard domain name, such as*.aliyundoc.com. When you enter a domain name, take note of the following items:A wildcard domain name can cover all subdomains that are at the same level as the wildcard domain name. For example,
*.aliyundoc.comcan cover subdomains such aswww.aliyundoc.comandtest.aliyundoc.com.ImportantIf you enter a wildcard domain name, WAF does not match the parent domain name of the wildcard domain name. For example, if you enter
*.aliyundoc.com, WAF does not matchaliyundoc.com. If you want to use WAF to protectaliyundoc.com, you must separately add the domain name to WAF.If you enter a wildcard domain name and an exact-match domain name, WAF uses the forwarding and protection rules of the exact-match domain name.
Origin server port
Select the origin server ports that you want to add to WAF.
The following instances can be added to WAF in transparent proxy mode: SLB-based Domains, Layer 7 SLB-based Domains, Layer 4 SLB-based Domains, and ECS-based Domains instances. Click the corresponding tab based on the type of the instance that you want to add to WAF. For example, if your origin server is deployed on an Application Load Balancer (ALB) instance and you want to enable WAF protection for traffic on the listener ports of the instance, click the SLB-based Domains tab.
You can perform the following operations on the corresponding tab:
Add ports
The ports of SLB-based Domains instances and Layer 7 SLB-based Domains instances are automatically synchronized to WAF. You need to only select the ports that you want to add to WAF.
If you want to add Layer 4 SLB-based Domains or ECS-based Domains instances to WAF, you must manually add the ports to WAF. You can click Add to enable traffic redirection for the ports.
After you add an origin server port, you can select the port in the instance list. You can also remove the port or disable traffic redirection on the Servers tab. For more information, see View origin servers and manage traffic redirection ports
Select the listener ports of the instance to enable WAF protection for the ports. For more information, see Configure a traffic redirection port for an ALB instance.
Is a Layer 7 proxy such as Anti-DDoS Proxy or CDN deployed in front of WAF:
Enable Traffic Mark
Specify whether to enable the traffic marking feature.
The feature adds or modifies custom header fields that you specify in WAF back-to-origin requests. You can use the custom header fields to label the requests that are forwarded by WAF or record the originating IP addresses or ports of clients.
If you select Enable Traffic Mark, you must specify custom header fields.
ImportantWe recommend that you do not configure a standard HTTP header field such as User-Agent. If you configure a standard HTTP header field, the value of the standard header field is overwritten by the value of the custom header field.
If an attacker obtains the IP address of the origin server before you add the domain name to WAF and purchases another WAF instance to forward requests to the origin server, you can select Enable Traffic Mark and specify a custom header field. After the origin server receives a request, we recommend that you check the header field. If the specified header field exists in the request, the request is allowed.
Click Add Mark to add a header field. You can add up to five header fields.
Resource Group
Select a resource group to which you want to add the domain name.
NoteYou can use Resource Management to create resource groups and manage resources within your Alibaba Cloud account by department or project. For more information, see Create a resource group.
In the Check And Confirm section, review the configuration information for transparent proxy mode and click Next.
In the Add Completed section, click Complete. Return to Domain Name List.
After you add the domain name, you can view the domain name's configurations and origin server on the Domain Names tab. You can modify or delete the domain name configurations as needed.
By default, WAF detects traffic on the port that is enabled in the Add Domain Name section and forwards normal traffic to the origin server. On the Servers tab, you can change the protection status of a port as needed.
Step 2: View and manage traffic redirection ports
View origin servers and manage traffic redirection ports
After you add a domain name to WAF, you can view information about the origin server. You can forcefully disable traffic redirection or remove traffic redirection ports in emergency disaster recovery scenarios.
On the Website Access page, click the Servers tab.
Click the
 icon next to an instance to expand the instance and view the ports that are protected by WAF.
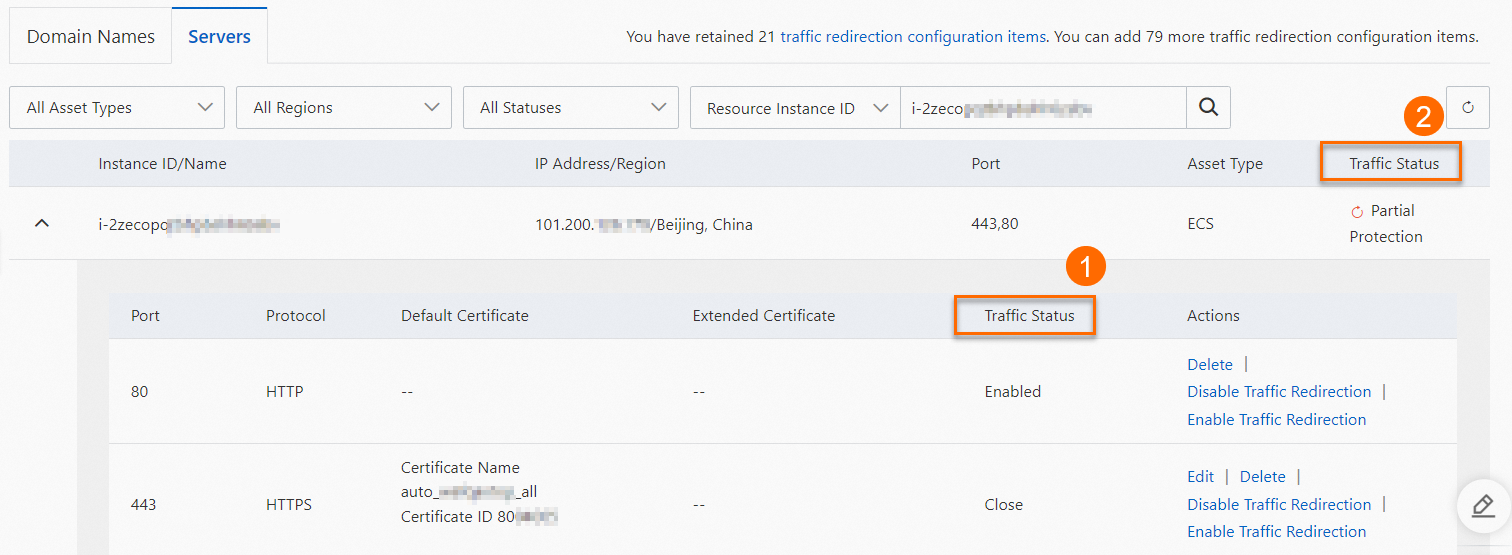 Note
NoteThe ports of Layer 4 SLB and ECS instances are not automatically synchronized to WAF. You must manually add the ports to WAF. For more information, see Add ports.
Description of Traffic Status:
Traffic Status (labeled as ① in the preceding figure) indicates whether traffic on the port is protected by WAF. Valid values are Enabled and Close. In the Actions column, you can click Disable Traffic Redirection or Enable Traffic Redirection to change the port's traffic redirection status.
NoteIf you disable traffic redirection, traffic on the port is no longer redirected to WAF.
Traffic Status (labeled as ② in the preceding figure) indicates the overall WAF protection status for the ports of the instance. Valid values are Unprotected, Partial Protection, and Running.
Optional: If the instance is a Layer 4 SLB instance or an ECS instance, you can click Delete in the Actions column of a port and click OK in the Note dialog box to remove a port that no longer requires traffic protection.
Update the certificates of traffic redirection ports
If the instance is an ALB Instance or a Layer 7 SLB Instance, you do not need to upload a separate certificate.
If the certificate configured for the listener port of the instance is updated, you only need to update the certificate in the SLB console. The updated certificate is automatically synchronized to WAF. The certificate synchronization to WAF takes approximately 30 minutes.
ImportantIf the certificate that is bound to a traffic redirection port is replaced with a certificate that was not purchased from Alibaba Cloud Certificate Management Service, you must update the certificate and re-add the instance to WAF.
If an SLB instance is associated with an expired certificate, the certificate is not automatically synchronized to WAF. You must delete the expired certificate and then synchronize the new certificate.
If the certificate that is automatically synchronized to WAF does not take effect, you can click the
 icon on the Servers tab to manually update the certificate for the instance's listener port.
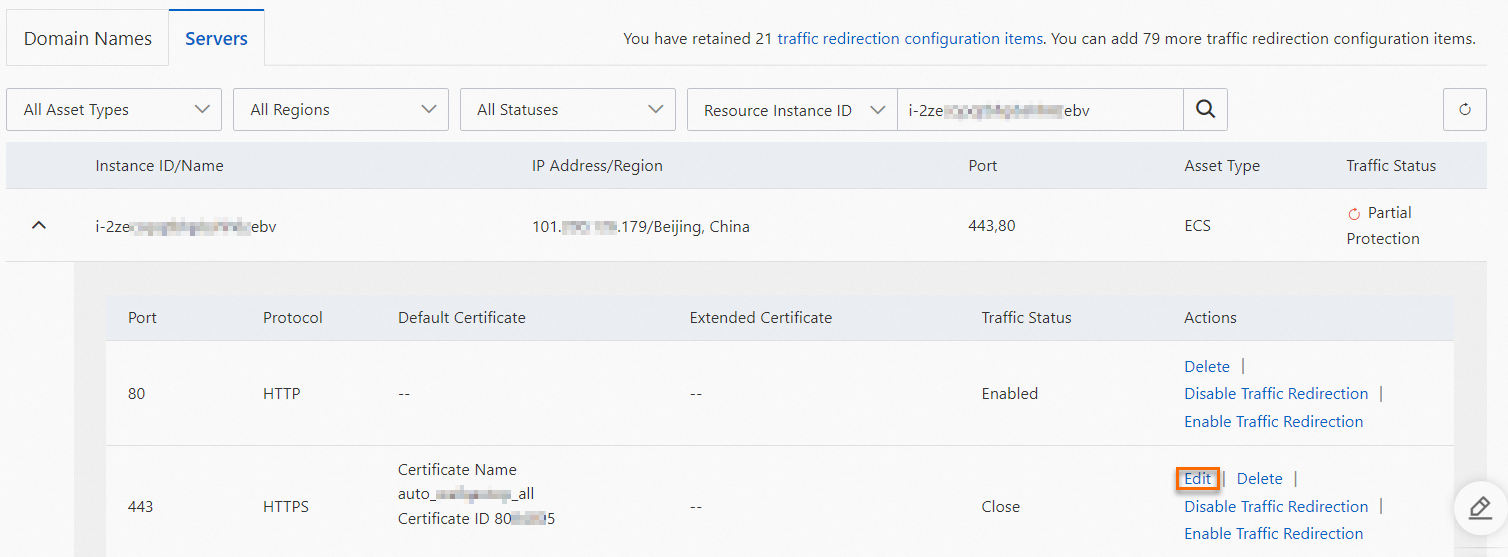
If the instance is an ECS Instance or a Layer 4 SLB Instance, you must upload the certificate again in the WAF console.
On the Servers tab, find the instance for which you want to update the certificate and click Edit in the Actions column. You can upload a certificate by selecting Manual Upload or Select Existing Certificate.
What to do next
After you add a website to WAF, all traffic to the website is detected and filtered by WAF. WAF provides multiple features to protect your website against different types of attacks. By default, the Protection Rules Engine and HTTP Flood Protection features are enabled. The Protection Rules Engine feature protects websites against common web attacks, such as SQL injection attacks, cross-site scripting (XSS) attacks, and webshell uploads. The CC Security Protection feature protects websites against Challenge Collapsar (CC) attacks. You can enable other features and configure protection rules for them as needed. For more information, see Overview of website protection configuration.