After a client creates an SSL-VPN connection to a VPC, the client can access only resources in the VPC by default. It cannot access resources in other VPCs. To resolve this issue, you can use CEN or VPC peering connections to connect VPCs. Then, add routes that point to the destination service to enable your client to access resources over the SSL-VPN connection across VPCs. For example, you can follow this topic to use a client to access resources in other VPCs of the same region, resources in VPCs of other regions, or resources in VPCs that belong to other accounts.
Introduction
Inter-VPC connections determine whether a client can access resources in VPCs of other region, resources in VPCs that belong to other accounts, or resources in other VPCs of the same region. Currently, you can use CEN or VPC peering connections to connect VPCs in the same region, VPCs in different regions, or VPCs that belong to different accounts in order to access resources in the preceding scenarios. After you connect the VPCs, you need to add the CIDR blocks of the VPCs to the SSL server and configure routes that point to your client for the relevant cloud service.
For more information about the differences between CEN and VPC peering connections, see Connect VPCs.
CEN | VPC peering connections |
 |  |
Background information
In the following scenario, the client has created an SSL-VPN connection to VPC1 to access resources in the VPC. Due to business changes, the enterprise wants their remote clients to access resources in VPC2. To do this, the enterprise needs to use CEN or VPC peering connections to connect VPC1 and VPC2, and then adds routes to the SSL server and the route table of VPC1 or VPC2. This way, the remote clients can access resources in VPC2 over SSL-VPN connections.

Prerequisites
The client has created an SSL-VPN connection to VPC1, and the client can access resources in VPC1. For more information, see Connect a client to a VPC.
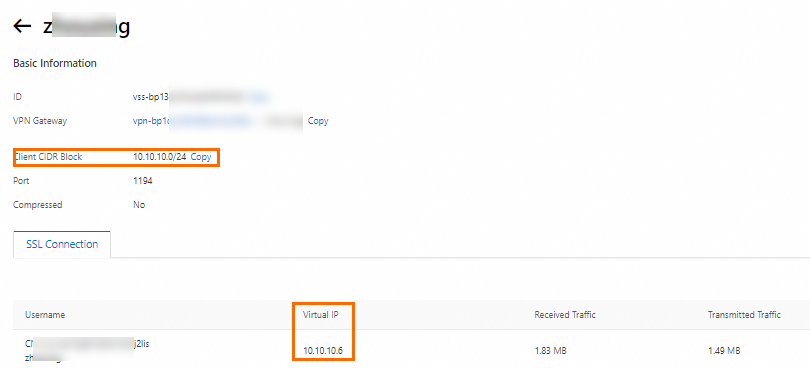
Go to the SSL Servers page and check the CIDR block and virtual IP address of the client configured on the SSL server, which will be used in subsequent steps and network connectivity testing.
 Important
Make sure that the CIDR block of the client does not overlap with the interconnected CIDR blocks of VPC1 and VPC2, and the CIDR blocks of VPC1 and VPC2 to be connected to the client do not overlap. If the client CIDR block overlaps with any of these CIDR blocks, modify the client CIDR block. This operation will interrupt the SSL-VPN connection. Therefore, you need to configure the client to recreate the SSL-VPN connection.
Procedure
This topic describes how to connect VPCs by using CEN and VPC peering connections. Choose a method based on your business requirement.
Step 1: Connect VPCs
CEN
In this topic, CEN is used to connect VPCs that reside in different regions but belong to the same account. If you want to use CEN to connect VPCs in other scenarios, see CEN Quick Start.
When you create the CEN instance, select Create CEN Only, enter a name, and keep the default settings for other parameters.
Create a transit router in the China (Hangzhou) and China (Shanghai) regions, respectively. Keep the default settings for other parameters.
Create VPC connections.
Connect VPC1 to the transit router in the China (Hangzhou) region and connect VPC2 to the transit router in the China (Shanghai) region.
Log on to the CEN console.
On the Instances page, click the ID of the CEN instance that you want to manage.
On the tab, click Create Connection in the Actions column of a transit router.
On the Connection with Peer Network Instance page, connect VPC1 and VPC2 to the corresponding transit routers.
Parameter
Connect to VPC1
Connect to VPC2
Network Type
Select Virtual Private Cloud (VPC).
Select Virtual Private Cloud (VPC).
Region
Select China (Hangzhou).
Select China (Shanghai).
Resource Owner ID
Use the default value: Current Account.
Attachment Name
Enter VPC1-Attachment.
Enter VPC2-Attachment.
Network Instance
Select VPC1.
Select VPC2.
VSwitch
Select a vSwitches in the zones supported by the transit router.
If the region contains multiple zones, you need to select at least two zones and select one vSwitch in each zone. The two vSwitches can be used for zone-disaster recovery when the VPC communicates with the transit router. If there are insufficient vSwitches, create vSwitches.
Advanced Settings
Use the default setting, which enables all advanced settings.
NoteIf the route table of the VPC already contains routes destined for 10.0.0.0/8, 172.16.0.0/12, or 192.168.0.0/16, the system cannot automatically propagate these routes. You need to manually add routes pointing to the VPC peering connection to the VPC route table to enable the VPC and transit router to communicate.
You can click Check Route to the right of Network Instance to check if the preceding routes exist in the network instance.
Create an inter-region connection.
VPC1 and VPC2 reside in different regions. Therefore, you need to create an inter-region connection between the transit router in China (Hangzhou) and the transit router in China (Shanghai) to connect VPC1 and VPC2.
In the tab, click Create Connection in the Actions column of a transit router.
On the Connection with Peer Network Instance page, create an inter-region connection.
Parameter
Description
Network Type
Select Inter-region Connection.
Region
Select China (Hangzhou).
Peer Region
Select China (Shanghai).
Bandwidth Allocation Method
Select Pay-By-Data-Transfer.
NoteIn pay-by-data-transfer mode, the traffic transmission fee for the inter-region connection is billed by CDT.
Bandwidth
Specify a bandwidth value for the inter-region connection. Unit: Mbit/s.
Advanced Settings
Use the default value, which enables all advanced features.
VPC peering connections
In this topic, VPC peering connections are used to connect VPCs that reside in different regions but belong to the same account. To use VPC peering connections to connect VPCs in other scenarios, see Use VPC peering connection for private communication.
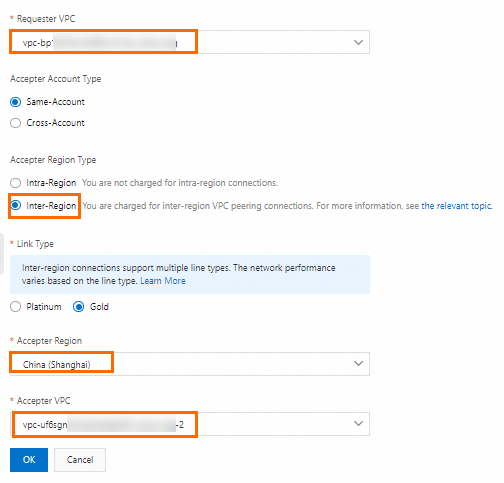
Create a VPC peering connection.
Log on to the VPC Peering Connection console. In the top menu bar, select the region where the requester VPC resides.
In this topic, VPC1 is specified as the requester. Select the China (Hangzhou) region.
If this is the first time you use VPC peering connections, click Activate CDT on the VpcPeer page and then click OK in the message that appears.
On the VpcPeer page, click Create VPC Peering Connection and configure the following parameters.
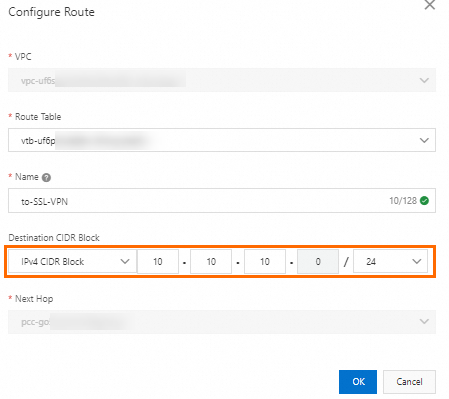
Configure routes for the VPC peering connection.
On the VpcPeer page, find the VPC peering connection. In the Requester VPC column, click Configure Route to add a route from VPC1 to VPC2. This allows the client to access VPC2 through VPC1.

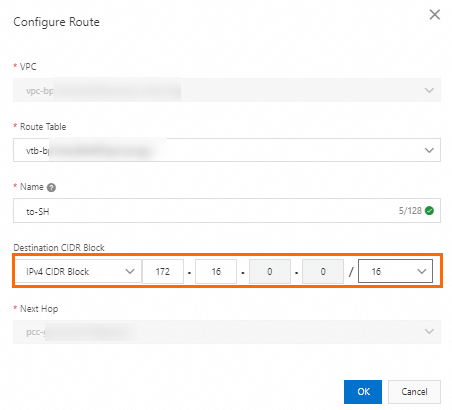
(Optional) In the Accepter VPC column, click Configure Route to add a route from VPC2 to VPC1.
After you complete this step, VPC1 and VPC2 can communicate over the private network. If you do not need VPC1 and VPC2 to communicate, skip this step.
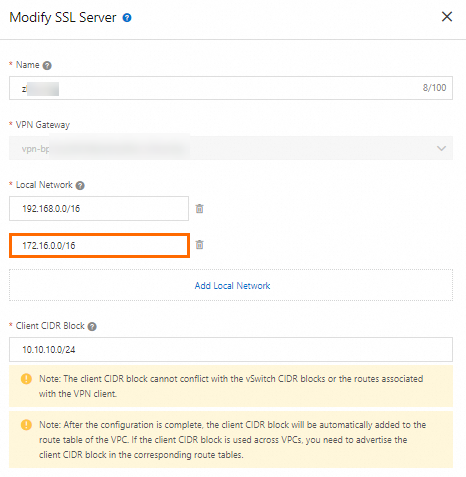
Step 2: Add cross-VPC CIDR blocks to the SSL server
Add the CIDR block of VPC2 to the SSL server so that the VPN gateway allows the client to access resources in the CIDR block.
If the client needs to access resources in across VPCs, you need to add all cross-VPC CIDR blocks to the SSL server.
Log on to the VPN Gateway console.
In the left-side navigation pane, choose .
In the top menu bar, select the region of the SSL server.
On the SSL Servers page, find the SSL server and click Edit in the Actions column.
In the Modify SSL Server panel, click Add Local Network, add the CIDR block of VPC2, and then click OK.
Step 3: Configure routes that point to the client
CEN
Advertise routes pointing to the client from VPC1 to CEN so that VPC2 can communicate with the client through CEN.
Log on to the VPC console.
In the top menu bar, select the region of VPC1.
In the left-side navigation pane, click Route Tables.
On the Route Tables page, find the route table of VPC1 and click its ID.
On the tab, find the route pointing to the client and click Advertise in the Route Advertisement Status column.
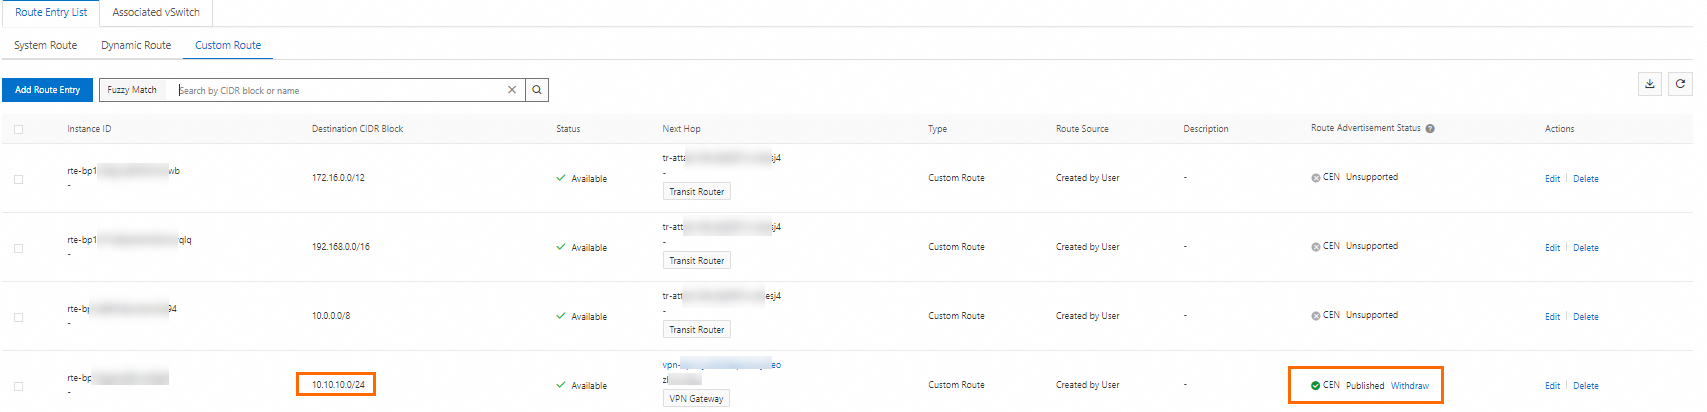
VPC peering connections
Log on to the VPC Peering Connection console. On the VpcPeer page, find the VPC peering connection. In the Accepter VPC column, click Configure Route to configure a route that points to the client for VPC2.
If the client needs to access multiple resources residing in different VPCs, you need to add routes pointing to the client to the route table of each VPC.

Step 4: Test connectivity
After you complete the configuration, the client can access resources in VPC2. Resources in VPC2 can also access the client.
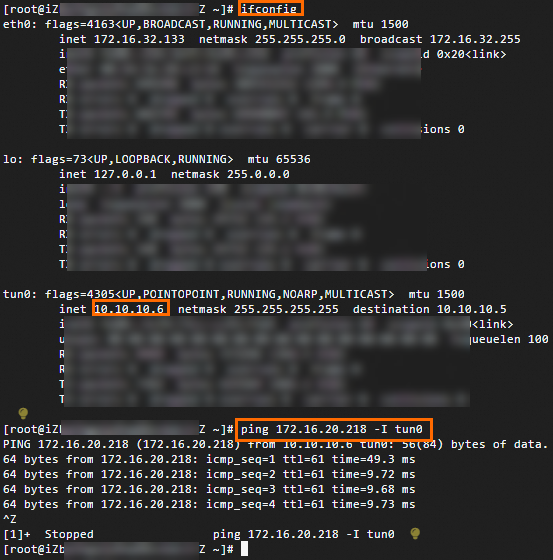
Open the CLI on the client.
Run the
ifconfigcommand to view the interface that creates the SSL-VPN connection.Run the
ping <ECS IP address> -I <SSL-VPN tunnel interface>command to access the ECS2 instance from the SSL-VPN tunnel interface. If the client can receive reply messages in the following figure, the client can access resources in VPC2.NoteBefore you run the ping command, make sure that the security group rules of ECS2 and the ACL rules of the client allow ICMP messages.
Log on to the ECS2 instance in VPC2 and run the
ping <client virtual address>command to access the client. If ECS2 can receive reply messages as shown in the following figure, ECS2 can access the client.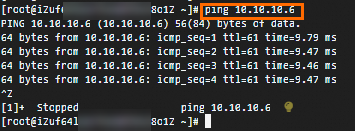
FAQ
What do I do if the connectivity test fails after I advertise routes pointing to the client to CEN?
If you enabled all Advanced Settings when creating the VPC peering connection and inter-region connection, the transit routers will automatically propagate and learn routes by default. However, if you did not enable all Advanced Settings or you added custom routes, or route conflicts exist in your environment, the transit routers may fail to learn or create routes. Consequently, a connectivity issue occurs. In this case, log on to the relevant service console and check the routes of each instance involved in the VPC interconnection scenario to ensure that all instances have routes pointing to the VPC and client. If any relevant routes are missing, manually add them. For more inforamtion about the procedure, see Add a custom route entry and Add custom routes.