You can use tags to label and classify virtual private clouds (VPCs), route tables, and vSwitches, which facilitates resource search and aggregation.
Tag overview
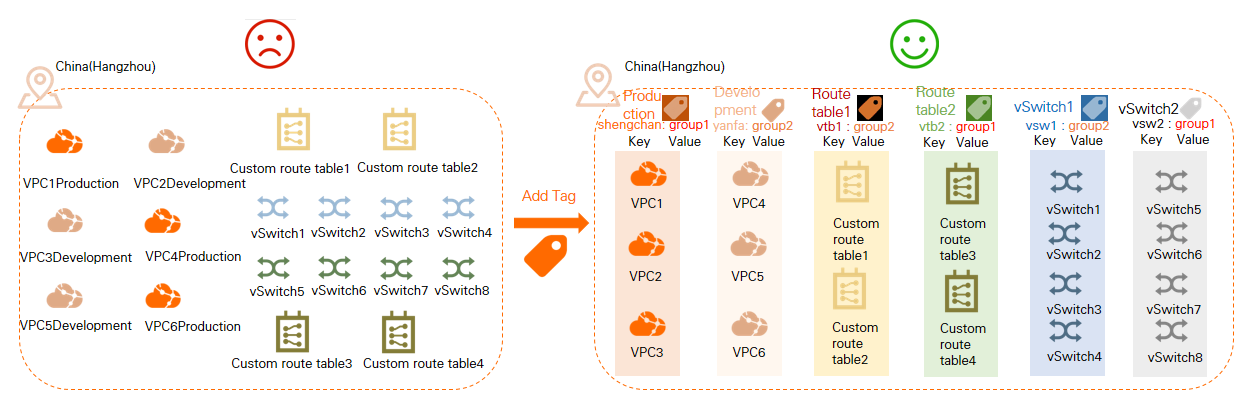
As shown in the figure, as the number of VPCs, route tables, or vSwitches increases, managing these instances becomes challenging. You can use tags to group instances to search and filter instances in a more efficient way.
Tags are used to classify instances. Each tag consists of a key-value pair. Before you use tags, take note of the following limits:
Each tag key added to an instance must be unique.
You cannot create tags without adding them to instances. All tags must be added to instances.
Tag information is not shared across regions.
For example, if you are in the China (Shanghai) region, you cannot view tags created in the China (Hangzhou) region.
You can modify the key and value of a tag or remove a tag from an instance.
If you delete an instance, all tags added to the instance are deleted. This does not affect the tags added to other instances.
You can add at most 20 tags to each instance. Quota increases are not supported.
Add tags to an instance
Log on to the VPC console.
In the top navigation bar, select the region where the VPC is deployed.
On the VPC page, perform the following steps to add tags.
Add tags to an instance
Perform one of the following steps based on whether VPCs have existing tags.
If a VPC has no tag added, hover over
 in the Tags column and click Add in the pop-up message.
 If a VPC has tags added, hover over
in the Tags column and click Edit in the pop-up message.
In the Configure Tags dialog box, specify the key and value and click OK.
Parameter
Description
Tag Key
Specify a tag key. You can select or enter a tag key. You can specify up to 20 tag keys.
A tag key can be up to 128 characters in length and cannot contain
http://orhttps://. It cannot start withacs:oraliyun.Tag Value
Specify a tag value. You can select or enter a tag value. You can specify up to 20 tag values.
A tag value can be up to 128 characters in length and cannot contain
http://orhttps://. It cannot start withacs:oraliyun.
Add tags to multiple instances
Select the VPCs to which you want to add tags and choose in the lower-left corner.
In the Configure Tags dialog box, specify Tag Key and Tag Value, and click OK.
Search instances by tag
You can search instances by tag after adding tags to instances.
Log on to the VPC console.
In the top navigation bar, select the region where the VPC is deployed.
On the VPC page, click Filter by Tag.
In the dialog box that appears, select or enter a tag key and a tag value.
Remove tags from an instance
If a tag is added to multiple instances and you remove the tag from an instance, the tag is not removed from other instances.
Log on to the VPC console.
In the top navigation bar, select the region where the VPC is deployed.
On the VPC page, perform the following operations to remove tags from a VPC.
Remove tags from an instance
Find the VPC from which you want to remove tags, move the pointer over
in the Tags column, and then click Edit in the pop-up message. In the Configure Tags dialog box, find the key-value pairs that you want to remove, click
 on the right side, and then click OK.
Remove tags from multiple instances
Find the instances from which you want to remove tags and choose in the lower-left corner.
In the Delete Tags for Multiple Resources dialog box, find the tag key-value pair, and remove the tag.
Learn more
References
APIs
TagResources: creates tags and adds the tags to resources.
UnTagResources: removes tags from resources.