Tablestore allows you to connect a Tablestore instance to DataWorks. This way, you can manage and use the data of the instance in DataWorks. To connect an instance to DataWorks, you must add a Tablestore data source in DataWorks. After you add the Tablestore data source, you can configure a data synchronization task in DataWorks to synchronize and migrate Tablestore data and execute SQL statements to query Tablestore data. This topic describes how to add a Tablestore data source and execute SQL statements to query Tablestore data.
Background information
DataWorks is an end-to-end big data development and governance platform that provides data warehousing, data lake, and data lakehouse solutions based on big data compute engines, such as MaxCompute, Hologres, E-MapReduce (EMR), AnalyticDB, and Cloudera Data Platform (CDP). For more information, see What is DataWorks?
Scenarios
After you connect a Tablestore instance to DataWorks, you can process and analyze data in DataWorks in an efficient manner and use the data in various big data scenarios. The following items describe common scenarios:
Large-scale data storage and analysis
Tablestore provides high throughput and can store large amounts of data. DataWorks supports big data analytics. After the connection, you can use SQL statements, MapReduce tasks, or custom code in DataWorks to query and process Tablestore data. For example, you can analyze logs and user behavior.
Real-time data processing
DataWorks supports real-time computing tasks, such as Flink tasks. After the connection, you can consume, process, and analyze Tablestore data in real time in scenarios such as real-time monitoring, real-time reporting, and real-time recommendation.
Offline data processing and batch processing
DataWorks provides task scheduling capabilities. After the connection, batch processing tasks involving Tablestore data are triggered to run as scheduled. The tasks can be extract, transform, load (ETL) tasks that convert raw data into the required formats for analysis or scheduled tasks that aggregate and analyze data.
Data lake and data warehouse building
Tablestore can be used as the storage layer of a data lake that stores raw or semi-structured data. After the connection, you can use DataWorks to build a data pipeline to process and cleanse Tablestore data and then import the data into MaxCompute or other data warehouses for further analysis and mining.
BI reporting and data visualization
DataWorks can be integrated with business intelligence (BI) reporting tools, such as Quick BI. After the connection, DataWorks can directly read data from Tablestore and generate various BI reports and dashboards to provide data support for decision-making of enterprises.
Machine learning and AI projects
You can store the data for training, models, and features in Tablestore. After the connection, you can use DataWorks to call tasks that are created in Platform for AI (PAI) for model training and prediction based on the Tablestore data. This allows you to perform end-to-end development from data preparation to model deployment.
Procedure
After you connect a Tablestore instance to DataWorks, you can use the SQL query feature to query and analyze Tablestore data.
You can connect a Tablestore instance to DataWorks only if you use the Wide Column or TimeSeries model.
Prerequisites
A Resource Access Management (RAM) user for which an AccessKey pair is created is created. The AliyunOTSFullAccess policy is attached to the RAM user to grant the RAM user the permissions to manage Tablestore and the AliyunDataWorksFullAccess policy is attached to the RAM user to grant the RAM user the permissions to manage DataWorks. For more information, see Use the AccessKey pair of a RAM user to access Tablestore.
Specific resources are created based on the Tablestore data model that you use.
If you use the Wide Column model, a data table is created and data is written to the data table. For more information, see Operations on a data table and Write data.
If you use the TimeSeries model, a time series table is created and data is written to the time series table. For more information, see Operations on time series tables and Write time series data.
The following operations are performed in the DataWorks console:
DataWorks is activated and a workspace is created. For more information, see Activate DataWorks and Create a workspace.
The permissions to query Tablestore data sources in the DataAnalysis service of DataWorks are obtained. For more information, see Use the data query and analysis control feature.
The account that you want to use is added as a member of the workspace, and the Data Analyst, Model Developer, Development, O&M, Workspace Manager, or Project Owner role is assigned to the member. For more information, see Add workspace members and assign roles to them.
Step 1: Add a Tablestore data source in DataWorks
To add a Tablestore database as the data source, perform the following steps:
Go to the Data Integration page.
Log on to the DataWorks console, select a region in the upper-left corner, choose , select a workspace from the drop-down list, and then click Go to Data Integration.
In the left-side navigation pane, click Data Source.
On the Data Source page, click Add Data Source.
In the Add Data Source dialog box, click the Tablestore block.
In the Add OTS data source dialog box, configure the parameters that are described in the following table.
Parameter
Description
Data Source Name
The name of the data source. The name can contain letters, digits, and underscores (_), and must start with a letter.
Data Source Description
The description of the data source. The description cannot exceed 80 characters in length.
Endpoint
The endpoint of the Tablestore instance. For more information, see Endpoints.
If the Tablestore instance and the resources of the destination data source are in the same region, enter a virtual private cloud (VPC) endpoint. Otherwise, enter a public endpoint.
Table Store instance name
The name of the Tablestore instance. For more information, see Instance.
AccessKey ID
The AccessKey ID and AccessKey secret of your Alibaba Cloud account or RAM user. For more information about how to create an AccessKey pair, see Create an AccessKey pair.
AccessKey Secret
Test the network connectivity between the data source and the resource group that you select.
To ensure that your synchronization nodes run as expected, you need to test the connectivity between the data source and all types of resource groups on which your synchronization nodes will run.
ImportantA synchronization task can use only one type of resource group. By default, only shared resource groups for Data Integration are displayed in the resource group list. To ensure the stability and performance of data synchronization, we recommend that you use an exclusive resource group for Data Integration.
Click Purchase to create a new resource group or click Associate Purchased Resource Group to associate an existing resource group. For more information, see Create and use an exclusive resource group for Data Integration.
After the resource group is started, click Test Network Connectivity in the Connection Status (Production Environment) column of the resource group.
If Connected is displayed, the connectivity test is passed.
If the data source passes the network connectivity test, click Complete.
The newly created data source is displayed in the data source list.
Step 2: Query Tablestore data by using the SQL query feature in DataWorks
Tablestore supports data storage models, such as the Wide Column and TimeSeries models. The SQL query operations vary based on the model of your instance. You must perform SQL query operations based on the model of your instance.
The SQL query feature in the DataAnalysis service of DataWorks provides the same capabilities as the SQL query feature of Tablestore. For more information, see SQL features.
Execute SQL statements to query data in an instance of the Wide Column model
Go to the data analysis page.
Log on to the DataWorks console as a project administrator.
In the left-side navigation pane, choose DataAnalysis > SQL Query.
On the SQL Query page, select a region, select a workspace that you want to manage, and then click Go to SQL Query.
Create an SQL query file.
In the left-side navigation pane of the SQL Query page, move the pointer over the plus icon to the right of My Files and select Create File.
In the Create File dialog box, enter a file name and click OK.
In the left-side navigation pane, you can view the created file.
Open the SQL editor for the created file and configure the information about the data source whose data you want to query.
In the left-side navigation pane of the SQL Query page, click My Files and click the created file. In the upper-right corner of the SQL editor that appears, click the
 icon.
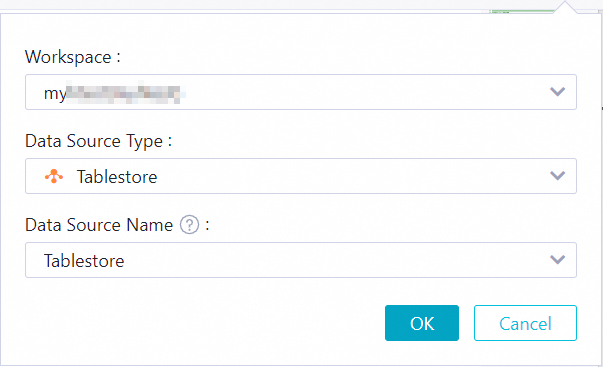
icon. In the dialog box that appears, configure the parameters. The following table describes the parameters.
Parameter
Description
Workspace
The workspace whose data you want to query. Select a workspace based on your business requirements.
Data Source Type
The type of the data source whose data you want to query. Select Tablestore.
Data Source Name
The name of the data source whose data you want to query. Select the data source that you added. The table that you want to query belongs to the instance that is specified for the data source.
ImportantThe Data Source Name drop-down list displays only the data sources that you are authorized to use. If you want to use other data sources, contact an administrator to grant the required permissions on the Security Center page. For more information, see Use the data query and analysis control feature.
Click OK.
Create a mapping table for a table and execute SQL statements.
If a mapping table is created for your table, you can skip this step.
ImportantWhen you create a mapping table for a table, make sure that the data types of the fields in the mapping table match the data types of the fields in the table. For more information, see Data type mappings in SQL.
In the SQL editor for the file, write an SQL statement to create a mapping table. For more information, see Create a mapping table for a table.
When you create a mapping table for a table, make sure that the mapping table has the same name and primary key columns as the table.
NoteIf a search index is created for a data table, you can create a mapping table for the search index. This way, you can execute SQL statements to query data based on the search index. For more information, see Create mapping tables for search indexes.
The following sample SQL statement provides an example on how to create a mapping table for a table named test_table:
CREATE TABLE `test_table` (
    `pk` VARCHAR(1024),
    `long_value` BIGINT(20),
    `double_value` DOUBLE,
    `string_value` MEDIUMTEXT,
    `bool_value` BOOL,
    PRIMARY KEY(`pk`)
);
Click the SQL statement and click Run in the toolbar.
The execution result is displayed on the Result tab of the SQL editor.
Execute SQL statements to query data in the table.
In the SQL editor for the file, write a SELECT statement to query data. For more information, see Query data.
The following sample SQL statement provides an example on how to query data in the test_table table and obtain up to 20 rows of data:
SELECT `pk`, `long_value`, `double_value`, `string_value`, `bool_value` FROM test_table LIMIT 20;Click the SQL statement and click Run in the toolbar.
The execution result is displayed on the Result tab of the SQL editor.
Execute SQL statements to query data in an instance of the TimeSeries model
Go to the data analysis page.
Log on to the DataWorks console as a project administrator.
In the left-side navigation pane, choose DataAnalysis > SQL Query.
On the SQL Query page, select a region, select a workspace that you want to manage, and then click Go to SQL Query.
Create an SQL query file.
In the left-side navigation pane of the SQL Query page, move the pointer over the plus icon to the right of My Files and select Create File.
In the Create File dialog box, enter a file name and click OK.
In the left-side navigation pane, you can view the created file.
Open the SQL editor for the created file and configure the information about the data source whose data you want to query.
In the left-side navigation pane of the SQL Query page, click My Files and click the created file. In the upper-right corner of the SQL editor that appears, click the
icon. In the dialog box that appears, configure the parameters. The following table describes the parameters.
Parameter
Description
Workspace
The workspace whose data you want to query. Select a workspace based on your business requirements.
Data Source Type
The type of the data source whose data you want to query. Select Tablestore.
Data Source Name
The name of the data source whose data you want to query. Select the data source that you added. The table that you want to query belongs to the instance that is specified for the data source.
ImportantThe Data Source Name drop-down list displays only the data sources that you are authorized to use. If you want to use other data sources, contact an administrator to grant the required permissions on the Security Center page. For more information, see Use the data query and analysis control feature.
Click OK.
Create a mapping table for a table and execute SQL statements.
After you create a time series table, the system automatically creates a mapping table in the single-value model and a mapping table for time series metadata for the time series table. The name of the mapping table in the single-value model is the same as the name of the time series table. The name of the mapping table for time series metadata is the name of the time series table suffixed by
::meta.If you want to use a mapping table in the multi-value model to query time series data in the time series table, you must create a mapping table in the multi-value model. If you do not want to use a mapping table in the multi-value model to query time series data, you do not need to create a mapping table in the multi-value model.
ImportantWhen you create a mapping table for a table, make sure that the data types of the fields in the mapping table match the data types of the fields in the table. For more information, see Data type mappings in SQL. For more information about the data types of fields in the mapping tables for a time series table, see Mapping tables for a time series table in SQL.
In the SQL editor for the file, write an SQL statement to create a mapping table. For more information, see Mapping tables for a time series table in SQL.
The following sample SQL statement provides an example on how to create a mapping table in the multi-value model named
timeseries_table::muti_modelfor the time series table. The metrics in the mapping table are cpu, memory, and disktop: Sample SQL statement:CREATE TABLE `timeseries_table::muti_model` ( `_m_name` VARCHAR(1024), `_data_source` VARCHAR(1024), `_tags` VARCHAR(1024), `_time` BIGINT(20), `cpu` DOUBLE(10), `memory` DOUBLE(10), `disktop` DOUBLE(10), PRIMARY KEY(`_m_name`,`_data_source`,`_tags`,`_time`) );Click the SQL statement and click Run in the toolbar.
The execution result is displayed on the Result tab of the SQL editor.
Execute SQL statements to query data in the table.
In the SQL editor for the file, write a SELECT statement to query data. For more information, see SQL examples.
Query data by using a mapping table in the single-value model
The following sample SQL statement provides an example on how to query the data whose metric type is basic_metric in the time series data table:
SELECT * FROM timeseries_table WHERE _m_name = "basic_metric" LIMIT 10;Query data by using a mapping table for time series metadata
The following sample SQL statement provides an example on how to query the time series whose metric name is basic_metric in the mapping table for time series metadata:
SELECT * FROM `timeseries_table::meta` WHERE _m_name = "basic_metric" LIMIT 100;Query data by using a mapping table in the multi-value model
The following sample SQL statement provides an example on how to query information about the metrics in the time series whose cpu value is greater than 20.0 by using the mapping table in the multi-value model:
SELECT cpu,memory,disktop FROM `timeseries_table::muti_model` WHERE cpu > 20.0 LIMIT 10;
Click the SQL statement and click Run in the toolbar.
The execution result is displayed on the Result tab of the SQL editor.
Billing rules
Tablestore fees
When you execute SQL statements in DataWorks to access Tablestore resources, no fees are generated for the SQL statements. However, if operations such as table scans or index queries are performed during the execution of the SQL statements, fees are generated for the operations. For more information, see Billable items of SQL query.
Other resource fees
When you use DataWorks tools, you are charged for specific features and resources. For more information, see Purchase guide.
References
You can also execute SQL statements to query data in the Tablestore console or Tablestore CLI or by using Tablestore SDKs, Java Database Connectivity (JDBC), or Tablestore driver for Go. For more information, see Usage method of SQL query.
You can also connect a Tablestore instance to Data Management (DMS) and then execute SQL statements to query and analyze Tablestore data. For more information, see Connect Tablestore to DMS.
You can use computing engines, such as MaxCompute, Spark, Hive, HadoopMR, Function Compute, Realtime Compute for Apache Flink, and PrestoDB, to compute and analyze data in tables. For more information, see Overview.
If you want to accelerate data queries and computing by executing SQL statements, you can create a secondary index or a search index. For more information, see Index selection policy and Computing pushdown.
You can also use Data Integration of DataWorks to migrate data from data sources, such as MySQL, Oracle, Kafka, HBase, MaxCompute, PolarDB-X 2.0, and Tablestore, to Tablestore. For more information, see Data Integration.