If your operating system enters the end of life (EOL) phase or to migrate to a different version to meet business requirements, you can use Server Migration Center (SMC) to migrate the operating system while retaining the data on the system disk of the ECS instance. This topic describes how to use SMC to migrate CentOS 7/8, Red Hat 7/8, and Alibaba Cloud Linux 2.
Only specific users can use SMC to migrate a CentOS 7 or CentOS 8 operating system to Red Hat 7 or Red Hat 8. To use this feature, you can submit a ticket to request access.
Background information
When the operating system of your ECS instance enters the end of life (EOL) phase, as described in Overview of operating system lifecycles, you may face increased security and operational risks. We recommend that you replace the operating system as soon as possible. The operating system migration feature of Server Migration Center (SMC) provides several migration solutions. After the migration, the operating system kernel and major system packages are upgraded, while the data on the system disk is retained.
If you do not need to retain data on the system disk or if you require more operating system conversion options, you can replace the operating system. For more information, see Replace the system disk.
Migration solutions
CentOS 7/8
Operating system architecture | Source operating system | Destination operating system |
x86 | CentOS 7.x |
|
CentOS 8.x |
| |
ARM64 | CentOS 7.x |
|
CentOS 8.x |
|
Red Hat 7/8
Operating system architecture | Source operating system | Destination operating system |
x86 | Red Hat 7.9 |
|
Red Hat 8.x |
|
Alibaba Cloud Linux 2
Operating system architecture | Source operating system | Destination operating system |
x86 | Alibaba Cloud Linux 2 | Alibaba Cloud Linux 3 |
Migration limitations
Limitation category | Description |
General limitations |
|
Migrate CentOS 7 to Alibaba Cloud Linux 2 | Alibaba Cloud Linux 2 uses kernel 4.19, while CentOS 7 uses kernel 3.10. The two kernel versions are not compatible. For services that depend on kernel interface programming, such as those that involve kernel out-of-tree (OOT) module development or hardware enablement, you must perform an evaluation in advance to determine whether a direct migration is suitable. This prevents services from failing to run after the migration. |
Migrate CentOS 7 to Alibaba Cloud Linux 3 | CentOS 7 uses kernel 3.10. Alibaba Cloud Linux 3 uses Linux kernel 5.10 LTS as its kernel and GCC 10.2, binutils 2.35, and glibc 2.32 as the basic toolchain. The two kernel versions are not compatible. For services that depend on kernel interface programming, such as those that involve kernel OOT module development or hardware enablement, you must perform an evaluation in advance to determine whether a direct migration is suitable. This prevents services from failing to run after the migration. |
Migrate CentOS 8 to Alibaba Cloud Linux 3 | Alibaba Cloud Linux 3 uses Linux kernel 5.10 LTS as its kernel and GCC 10.2, binutils 2.35, and glibc 2.32 as the basic toolchain. Its package ecosystem is compatible with CentOS 8. When you use the operating system migration tool described in this topic to migrate CentOS 8 to Alibaba Cloud Linux 3, the tool performs a basic check on the operating system to be migrated. |
In addition, you need to be aware of the following migration limitations for operating system-related features or software:
Feature or software | Support status | Does it affect the operating system migration process? | Description |
i386-architecture packages | Not supported | Yes | Alibaba Cloud Linux does not provide i386-architecture packages. If your current CentOS 7/8 system has i386-architecture packages, you cannot use the migration tool to migrate the operating system. You need to delete these packages before performing the migration to avoid system exceptions during migration. |
epel-modular | Not supported | No | The platform on which the EPEL repository in CentOS 7/8 depends is different from that in Alibaba Cloud Linux 3. Therefore, you can migrate the operating system, but note that you cannot install epel-modular-based packages after migration. |
C/C++ program compatibility | Not guaranteed | No | Alibaba Cloud Linux 3 uses GCC 10.2, binutils 2.35, and glibc 2.32 as the basic toolchain, and the system's own packages have been made compatible. After the operating system migration, we recommend that you recompile and verify your C/C++ programs based on the new basic toolchain to avoid compatibility issues. |
Kernel module compatibility | Not supported | No | Alibaba Cloud Linux 3 uses Linux kernel 5.10 LTS as its kernel, and its package ecosystem is compatible with CentOS 8. However, you need to note that Alibaba Cloud Linux 3 is not fully compatible with the 3.10 kernel of CentOS 7 and the 4.18 kernel of CentOS 8. Therefore, for services that depend on kernel interface programming (such as kernel OOT module development and hardware enablement), you need to perform a migration evaluation on your own before migration to prevent services from failing to run after migration. |
MySQL database | Only migration to the same or a later version of MySQL is supported |
| Alibaba Cloud Linux 3 supports MySQL databases, but you need to note that because MySQL does not support downgrading, if the MySQL version provided by Alibaba Cloud Linux 3 is earlier than the MySQL version in the CentOS 7/8 to be migrated, you cannot use the migration tool to complete the operating system migration. |
Hot migration of operating system | Not supported | No | When using the operating system migration tool to migrate an operating system, it involves reinstalling software packages, which will cause services in the system to restart, leading to business interruptions. Therefore, before migration, you need to create a snapshot to back up data and isolate the operating system environment to be migrated to avoid affecting normal business. |
Usage notes for migration
Before you migrate the operating system, make sure that you understand the following notes.
Migration phase | Notes |
Before migration |
|
During migration |
|
After migration |
|
Billing
During the migration, the system creates snapshots of all disks on the ECS instance to back up data. You are charged for these snapshots on a pay-as-you-go basis. For more information, see Product Billing.
Procedure
During the migration, the system creates snapshots of all disks on the ECS instance to back up data. You are charged for the created snapshots on a pay-as-you-go basis. For more information, see Product Billing.
Migrate the operating system.
Fast migration (Recommended)
NoteTo use this method, you must install Cloud Assistant Agent on the ECS instance if it was purchased before December 1, 2017, was created from a custom image you uploaded, or is a third-party cloud server. ECS instances created from public images after December 1, 2017 have the required Cloud Assistant Agent pre-installed, so no action is required.
Go to the SMC console-Cloud Migration-OS Migration.
On the OS Migration page, click Start Migration.
In the Migrate Operating System dialog box, select the ECS instance to migrate by its instance ID and region, then click Pre-check.
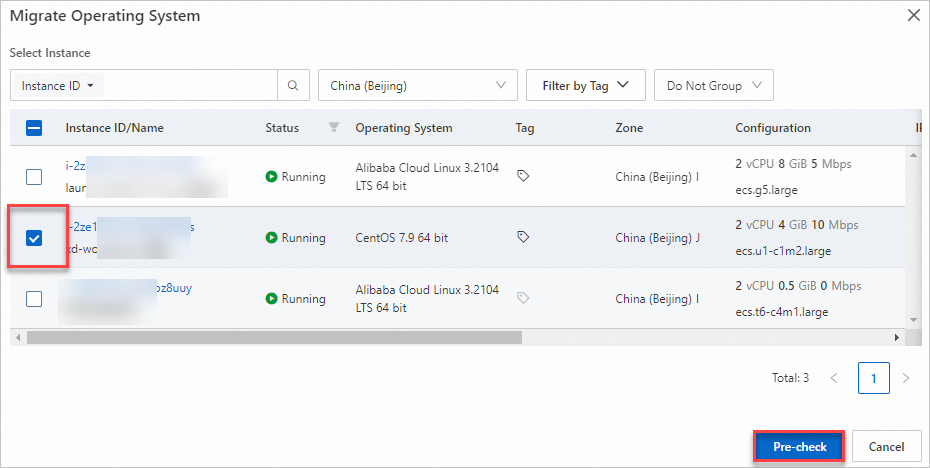
In the Migrate Operating System dialog box, the system automatically performs a pre-migration check, which takes about 10 seconds.
If the pre-check status changes from
 to
to  , the pre-check is successful.
If the pre-check status changes from
to  , the pre-check failed. Follow the prompts on the interface to resolve the issue and then try migrating again.
After you carefully read the notes for operating system migration, select I acknowledge and accept these risks and authorize Alibaba Cloud to create snapshots for all disks on the ECS instance, and then click Next.

In the Migrate Operating System dialog box, you can select the destination operating system.
Select the Same Destination Operating System: If you perform a batch migration, you can migrate multiple instances to the same operating system.
Select Destination Operating System by Instance: If you perform a batch migration, you can migrate multiple instances to different operating systems.
Click Check for Migratability to view the migration check result.
The check takes about 30 seconds.
 : The operating system can be migrated.
 : Migration is not supported. You can view the reason for the failure in the interface prompts.
Click Migrate.
You can view the progress of the operating system migration on the Migrate Operating System page.
WarningDuring the operating system migration, do not manually stop, restart, or release the ECS instance. Do not use O&M scripts to perform these operations. Otherwise, the migration fails.
Staged migration
Step 1: Import the migration source
A migration source is the data center server, VM, or cloud host from another platform that you plan to migrate.
Command-line one-click import of migration source (Recommended)
ImportantThe source server must have public network access. If the source server has firewall restrictions, see What are the endpoints of SMC? to obtain the SMC domain names and ports, and add them to the firewall whitelist.
If your source server cannot access the public network or you want to improve migration efficiency by transferring data over a private network, see the private network migration solution.
Go to SMC console - OS Migration.
On the OS Migration page, click Import Migration source.
Configure the parameters as prompted on the page and copy the activation code command. The parameters are described in the following table.
Parameter
Description
Migration Source Type
Select Alibaba Cloud ECS Instance.
Import Method
Select Use CLI To Import Server.
Activation Quota
The number of migration sources that can be activated by the activation code. The value ranges from 1 to 1000. The default value is 200.
Validity Period
The validity period of the activation code. The value ranges from 1 to 90 days. The default value is 90 days.
Activation Code
After generating the activation code, copy the command. Perform the following steps:
Click Generate.
Click the Linux Shell tab.
Click Copy to copy the activation code command.
Log on to the source server, and then paste and run the copied command with administrator privileges to import the migration source.
Log on to the Linux source server.
Paste and run the copied command with administrator privileges to import the migration source.

After you run the command, a message similar to
Import Source Server [s-bp18x8751kgz2oyh****] Successfully!appears, which indicates that the migration source was imported successfully.
On the Operating System Migration page of the SMC console, view the status of the migration source in the Real-time Migration Status column.
If the status of the migration source is Migration Source Online, the migration source is successfully imported.
If the migration source is in another state, the import failed. Troubleshoot the failure based on the following solutions and then import the migration source again:
Troubleshoot the failure based on the error message in the console or the log file in the SMC client installation directory. By default, the SMC client is installed in /smc.
For information about common issues and their solutions, see SMC FAQ and Troubleshoot errors.
Import a migration source using the SMC client
For more information about the SMC client, see SMC client usage guide.
Go to SMC console - OS Migration.
On the OS Migration page, click Import Migration source.
On the Import Migration Source page, configure the parameters. The following table describes the parameters.
Parameter
Description
Migration Source Type
Alibaba Cloud ECS Instance
Import Method
Select Client Import.
Import Description
After the Import Description, download the corresponding SMC client based on the source server's operating system (Linux or Windows) and bit version (32-bit or 64-bit).
Import the migration source.
ImportantDo not close the SMC client during the migration. Otherwise, the migration source will lose its connection to the SMC console and the migration will fail.
Use a remote connection tool that supports file transfer, such as WinSCP, to upload the SMC client to the Linux source server.
Remotely connect to the Linux source server and unzip the SMC client package.
This example uses the
Linux 64-bit General-purpose Edition. If you use a different version of the SMC client, replace the package name in the command with the actual downloaded file name.tar -zxvf go2aliyun_client.tar.gzNoteThe Linux 64-bit ARM Edition supports the g6r general-purpose and c6r compute-optimized instance families. For more information about instance families, see Enterprise-level Arm-based compute instance families.
(Optional) As needed, filter and exclude files or directories that do not need to be migrated.
ImportantIf you enable block replication for migration, you cannot exclude files or directories from migration.
Obtain an activation code or an AccessKey pair.
(Recommended) In the Description section of the SMC console, click Generateand copy the activation code.
Obtain an AccessKey pair: An AccessKey pair for an Alibaba Cloud account includes an AccessKey ID and an AccessKey secret. If you have not created an AccessKey pair, you must create one. For more information, see Create an AccessKey pair.
In the SMC client folder, run the following commands to start the SMC client.
cd go2aliyun_client_linux_x86_64
sudo chmod +x go2aliyun_client
sudo ./go2aliyun_client
Enter the activation code or AccessKey pair as prompted. This example uses an activation code:

After you enter the activation code or AccessKey pair, the following prompts may appear:
If the source system does not have a snapshot driver installed, the SMC client prompts you, as shown in the following figure. You can choose whether to install the snapshot driver based on your needs.
If you enable block replication when you create the migration task, enter
yesto automatically install the snapshot driver.If you do not enable block replication when you create the migration task, enter
no.
ImportantIf the snapshot driver fails to install, do not enable block replication when you create the migration task. Otherwise, the migration will fail.

Most mainstream source systems have rsync installed by default. If it is not installed, the SMC client prompts you. Enter
yesto automatically install rsync, as shown in the following figure.
If SELinux is enabled on the source system, the SMC client prompts you to disable it. Enter
yesto automatically disable SELinux, as shown in the following figure.
When a message similar to
Import Source Server [s-bp11npxndknsycqj****] Successfully!appears, it indicates that the migration source was imported successfully.NoteIf importing the migration source fails, you can troubleshoot the issue based on the displayed message, and then run the following commands in sequence to exit the background program and re-import the migration source. For more information about common issues and solutions, see SMC FAQ and Troubleshooting.
sudo ./go2aliyun_client --abort
sudo ./go2aliyun_client
On the Operating System Migration page of the SMC console, view the status of the migration source in the Real-time Migration Status column.
A status of Migration SourceOnline indicates a successful import.
If the status is not Source Online, the import failed. Troubleshoot the issue using the following methods and then re-import the source.
Troubleshoot the failure based on the error message in the console or the log file in the SMC client installation directory. By default, the SMC client is installed in /smc.
For common issues and solutions, see SMC FAQ and Troubleshooting.
Step 2: Migration configuration
Find the migration source that you want to manage and click Start Migration in the Actions column.
In the Migration Configuration dialog box, configure the parameters.
The following table describes the operating system migration parameters:
Current Operating System: The current operating system is displayed by default and cannot be modified. Example: CentOS 7.
Destination Operating System: From the drop-down list, select the operating system to which you want to migrate. Example: Alibaba Cloud Linux 3.
Migration Drill (Optional):
Decide whether to enable Migration Drill. This feature is enabled by default and is supported only for Linux operating system migrations. For more information, see Configure a migration drill.
NoteA migration drill simulates and verifies a migration solution before the actual migration. It helps you understand the feasibility and risks of the migration solution, which reduces potential problems and data loss during the actual migration.
A migration drill can help you quickly identify potential problems, provide solutions, and improve the success rate of the migration.
Execution Method (Conditional):
If Migration Drill is enabled, you can select a migration drill execution method from the Execution Method drop-down list. The default option is Drill And Migrate.
The following list describes the differences between the two methods:
Drill Only: Creates only a migration drill task. After the migration drill is complete, if an operating system migration is required, you must manually start the migration task.
Drill And Migrate: After the migration drill is complete, if no drill items are in the Critical state, the system automatically starts the operating system migration task.
Click Start Migration. In the Please Confirm Operating System Migration dialog box, carefully read the notes and then click I Confirm I Have Been Informed.
On the Operating System Migration page, view the real-time migration status.
WarningDuring the operating system migration, do not manually stop, restart, or release the Linux instance. Do not use O&M scripts to perform these operations. Otherwise, the migration fails.
Verify the migration result
 Note
NoteAfter the migration task is complete, the ECS instance automatically restarts. During the system initialization phase, operations such as updating software packages are performed. Do not perform any operations on the ECS instance until the system successfully starts. The system initialization phase takes about 15 to 30 minutes. The specific duration depends on the number of system software packages.
In the Actions column for the destination migration source, click View Destination Instance. Then, on the instance details page, check whether the operating system is migrated to the destination operating system.
ImportantAfter the migration, the source instance is migrated to the new system kernel and software packages. The original system disk data remains unchanged. However, applications may not run as expected due to changes in the environment or dependencies, which can cause business failures. You must perform thorough testing and verification.
To roll back the data on the source system disk, you can use the automatically created backup snapshot to restore the data. The steps are as follows:
Go to the ECS console - Snapshots.
In the Actions column of the automatically created backup snapshot, click Roll Back Disk.
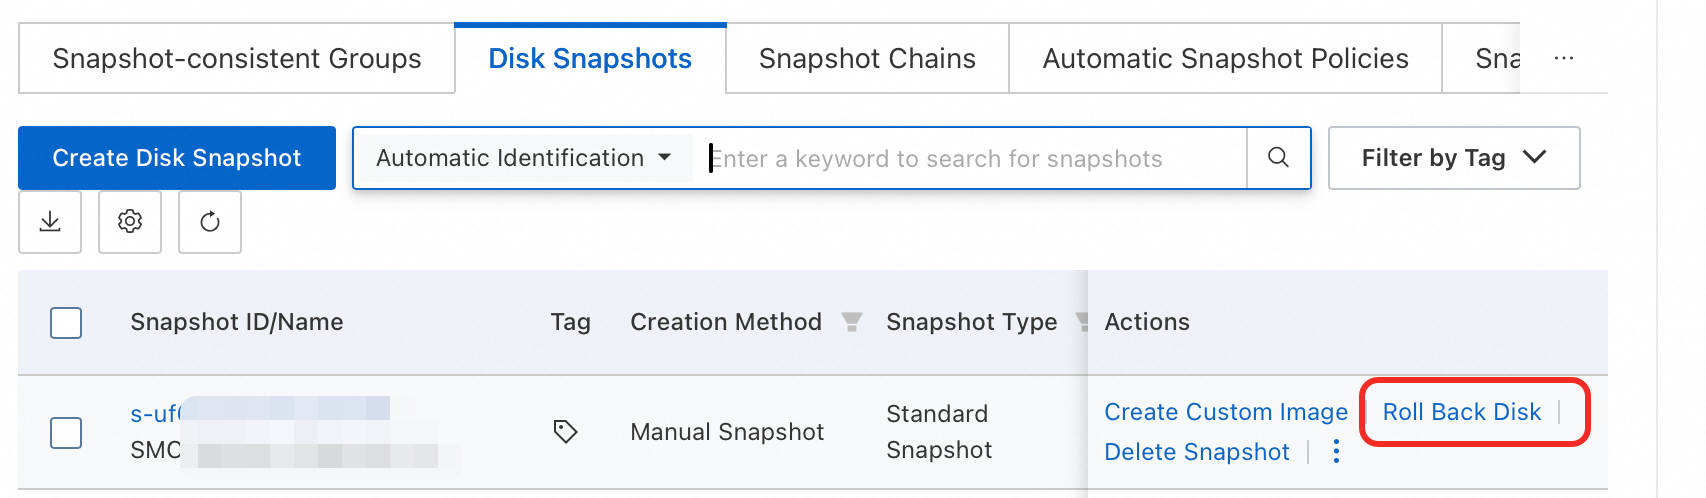
In the Roll Back Disk dialog box, click Confirm.
Clean up resources
During the migration, SMC creates pay-as-you-go snapshots named SMC_Backup_Snapshot_XXX to back up the data on the ECS instance's cloud disks. If you no longer need these snapshots, delete them promptly to avoid unnecessary charges. For more information, see Delete a snapshot.