This topic describes how to create Application Load Balancer (ALB) Ingresses on self-managed Kubernetes clusters. This way, the Kubernetes clusters can use ALB.
Scenarios
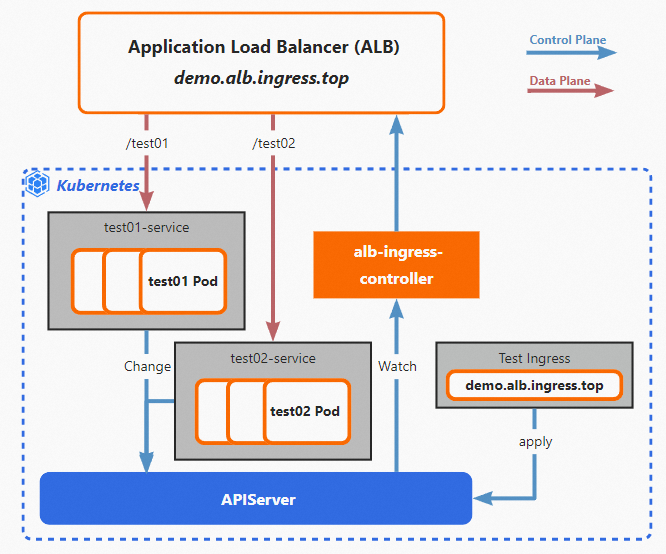
The following scenario is used as an example. You created a self-managed Kubernetes cluster based on Alibaba Cloud resources, and you want the cluster to forward requests by using an ALB Ingress.
You can deploy alb-ingress-controller in the self-managed Kubernetes cluster and create Ingresses and Services. alb-ingress-controller synchronizes the Ingresses to ALB as forwarding rules based on the configurations of the Kubernetes cluster. alb-ingress-controller also monitors subsequent changes of the Ingresses by listening to the API Server of the cluster, and synchronizes the changes to ALB. After the changes are synchronized, ALB forwards requests to specific pods in the cluster. For more information, see ALB Ingress management.
Usage notes
If you use an overlay network plug-in, such as Flannel, the backend Services of the ALB Ingress must be of the NodePort or LoadBalancer type.
The names of AlbConfigs, namespaces, Ingresses, and Services cannot start with aliyun.
Prerequisites
A self-managed Kubernetes cluster whose version is 1.20 or later is created on Alibaba Cloud. kubectl can be used to connect to the cluster. For more information about how to download and install kubectl, see Install and configure kubectl.
The cluster can access the Internet by using SNAT. For more information, see Use the SNAT feature of an Internet NAT gateway to access the Internet.
To use a controller image for the self-managed cluster, take note of the following information:
If you want to use a private image, you can compile and upload the image based on the information in Deploy the controller from source code.
Clusters that use the general x86 architecture support open source images of Alibaba Cloud.
Procedure

The following steps require you to modify files. The following table describes the files and the purpose of the files.
Step | File | Purpose |
load-balancer-controller.yaml Modified based on the template. | Used to deploy alb-ingress-controller. | |
alb.yaml Created and modified. | Used to create an AlbConfig and an IngressClass. After you create the resources, an ALB instance is created. | |
test-service.yaml Created and modified. | Used to deploy test Services. | |
test-ingress.yaml Created and modified. | Used to create an Ingress. |
Step 1: Deploy alb-ingress-controller
You may fail to pull the Deployment image if the network quality of your Internet service provider (ISP) is poor. To prevent this issue, you can use a private image. For more information about how to compile and upload a private image file, see How to deploy a controller from source code.
In this topic, alb-ingress-controller is deployed in InCluster mode. You can configure permissions on Services, endpoints, and nodes, and then use load-balancer-controller.yaml to deploy alb-ingress-controller. The service account, Deployment, and ConfigMap are preset. You need to only modify them based on your business requirements.
Modify the load-balancer-controller.yaml file and change the image of the Deployment to an available image address.
load-balancer-controller.yaml is used to deploy alb-ingress-controller.
Before the modification:
image: ${path/to/your/image/registry}After the modification:
image: alibabacloudslb/alibaba-load-balancer-controller:v1.2.0 #A compiled image that is compatible with the x86 architecture.Modify the load-balancer-controller.yaml file and configure the AccessKey ID and the AccessKey secret in the ConfigMap file.
NoteYou can log on to the RAM console by using the Alibaba Cloud account with which you want to create an ALB instance. Then, you can view the AccessKey ID and the AccessKey secret on the AccessKey page.
apiVersion: v1
kind: ConfigMap
metadata:
  name: load-balancer-config
  namespace: kube-system
data:
  cloud-config.conf: |-
       {
           "Global": {
               "AccessKeyID": "<YOUR_ACCESS_KEY_ID>", # Base64 encoding is required.
               "AccessKeySecret": "<YOUR_ACCESS_KEY_SECRET>" # Base64 encoding is required.
           }
       }
Connect to the cluster by using kubectl and run the following command to submit the modified load-balancer-controller.yaml file for deployment:
kubectl apply -f load-balancer-controller.yamlExpected output:
clusterrole.rbac.authorization.k8s.io/system:load-balancer-controller created
serviceaccount/load-balancer-controller created
clusterrolebinding.rbac.authorization.k8s.io/system:load-controller-manager created
configmap/load-balancer-config created
deployment.apps/load-balancer-controller created
Run the following command to verify the result:
kubectl -n kube-system get all | grep load-balancerAs shown in the following figure, the pod is in the Running state, which indicates that alb-ingress-controller is deployed.

Step 2: Create an AlbConfig and an IngressClass
After an AlbConfig and an IngressClass are created, an ALB instance is created at the same time.
Create a file named alb.yaml and copy the following content to the file:
alb.yaml is used to create an AlbConfig and an IngressClass.
apiVersion: alibabacloud.com/v1 kind: AlbConfig metadata: name: alb-demo spec: config: name: alb-test # alb-test is the name of the ALB instance. addressType: Internet # Intranet specifies an internal-facing ALB instance. Internet specifies an Internet-facing ALB instance. zoneMappings: - vSwitchId: vsw-wz9e2usil7e5an1xi**** # vSwitches in at least two zones must be specified. - vSwitchId: vsw-wz92lvykqj1siwvif**** listeners: - port: 80 protocol: HTTP --- apiVersion: networking.k8s.io/v1 kind: IngressClass metadata: name: alb spec: controller: ingress.k8s.alibabacloud/alb parameters: apiGroup: alibabacloud.com kind: AlbConfig name: alb-demo # The AlbConfig.NoteTake note of the following parameters:
albconfig.spec.config.addressType: the network type of the ALB instance. Valid values:
Internet (default): an Internet-facing ALB instance. If you create an Internet-facing ALB instance, a public IP address and a private IP address are assigned to each zone. Internet-facing ALB instances use elastic IP addresses (EIPs) to provide services over the Internet. You are charged instance fees and bandwidth or data transfer fees for the EIPs.
EIPs are used to provide services over the Internet and expose ALB instances to the Internet.
Private IP addresses allow Elastic Compute Service (ECS) instances in virtual private clouds (VPCs) to access ALB instances.
Intranet: an internal-facing ALB instance. If you create an internal-facing ALB instance, a private IP address is assigned to each zone. The ALB instance is accessible only over the internal network.
spec.config.zoneMappings: the IDs of the vSwitches of the ALB Ingress. You must specify at least two vSwitches in different zones. The zones must be supported by ALB. For more information about the regions and zones supported by ALB, see Supported regions and zones.
Use kubectl to connect to the cluster and run the following command to submit the alb.yaml file for deployment.
kubectl apply -f alb.yamlExpected output:
AlbConfig.alibabacloud.com/alb-demo create
ingressclass.networking.k8s.io/alb created
Check whether the ALB instance is created.
Method 1: Run the following command to query the ID of the ALB instance:
kubectl get albconfig alb-demo
Method 2: Log on to the ALB console and view the ALB instance in the ALB console.
NoteYou must use the Alibaba Cloud account configured in the ConfigMap file in Step 1: Deploy alb-ingress-controller to log on to the ALB console.
Step 3: Deploy test applications
In this topic, a test image is used to create Deployments and the Deployments are used to deploy test applications.
Create a file named test-service.yaml and copy the following content to the file:
test-service.yaml is used to deploy two Deployments named test01 and test02 and two Services named test01 and test02.
apiVersion: apps/v1
kind: Deployment
metadata:
  name: test01
spec:
  replicas: 2
  selector:
    matchLabels:
      app: test01
  template:
    metadata:
      labels:
        app: test01
    spec:
      containers:
      - name: test01
        image: registry.cn-hangzhou.aliyuncs.com/acs-sample/nginxdemos:latest
        ports:
        - containerPort: 80
---
apiVersion: v1
kind: Service
metadata:
  name: test01-service
spec:
  ports:
  - port: 80
    targetPort: 80
    protocol: TCP
  selector:
    app: test01
  type: NodePort
---
apiVersion: apps/v1
kind: Deployment
metadata:
  name: test02
spec:
  replicas: 1
  selector:
    matchLabels:
      app: test02
  template:
    metadata:
      labels:
        app: test02
    spec:
      containers:
      - name: test02
        image: registry.cn-hangzhou.aliyuncs.com/acs-sample/nginxdemos:latest
        ports:
        - containerPort: 80
---
apiVersion: v1
kind: Service
metadata:
  name: test02-service
spec:
  ports:
  - port: 80
    targetPort: 80
    protocol: TCP
  selector:
    app: test02
  type: NodePort
Connect to the cluster by using kubectl and run the following command to submit the test-service.yaml file for deployment:
kubectl apply -f test-service.yamlExpected output:
deployment "test01" created
service "test01-service" created
deployment "test02" created
service "test02-service" created
Run the following command to verify that the test Services are deployed:
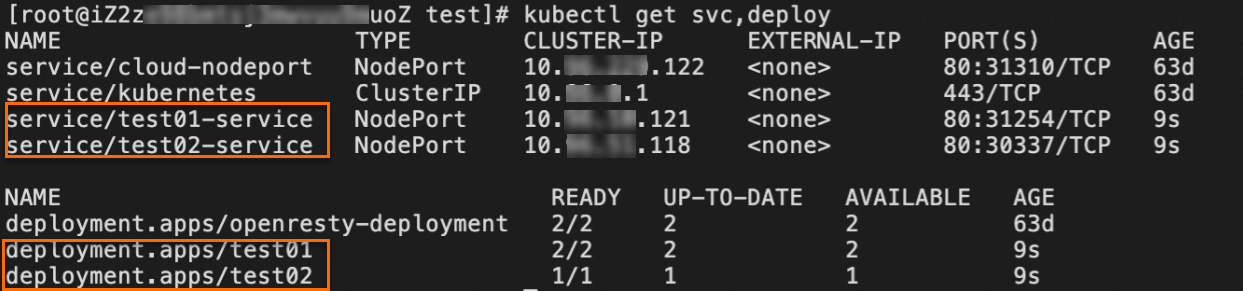
kubectl get svc,deployIf you receive the following response, the test Services are deployed.
Step 4: Create an Ingress
An Ingress corresponds to a forwarding rule in an ALB instance. In this topic, the Ingress forwards requests based on paths. For more information, see ALB Ingress user guide.
Create a file named test-ingress.yaml and copy the following content to the file:
The test-ingress.yaml file is used to create an Ingress.
apiVersion: networking.k8s.io/v1
kind: Ingress
metadata:
  name: test-ingress
spec:
  ingressClassName: alb
  rules:
   - host: demo.domain.ingress.top
     http:
      paths:
      - path: /test01
        pathType: Prefix
        backend:
          service:
            name: test01-service
            port:
              number: 80
      - path: /test02
        pathType: Prefix
        backend:
          service:
            name: test02-service
            port:
              number: 80
Connect to the cluster by using kubectl and run the following command to submit the test-ingress.yaml file for deployment:
kubectl apply -f test-ingress.yamlExpected output:
ingress "test-ingress" createdRun the following command to verify that the Ingress is created:
kubectl get ingressIf the following response is returned, the Ingress is created.

Step 5: Verify the result
Access Services by using a custom domain name
Create a CNAME record to map a custom domain name to the created domain name of the ALB instance. For more information, see Add a CNAME record to an ALB instance.
In this example, the custom domain name
demo.domain.ingress.topis mapped to the public domain name of the ALB instance.Run the following command to use the ALB instance to access the Service named test01.
curl http://demo.domain.ingress.top/test01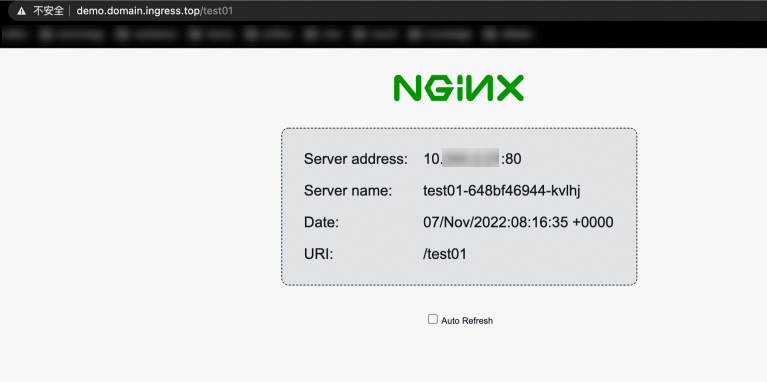
Run the following command to use the ALB instance to access the Service named test02.
curl http://demo.domain.ingress.top/test02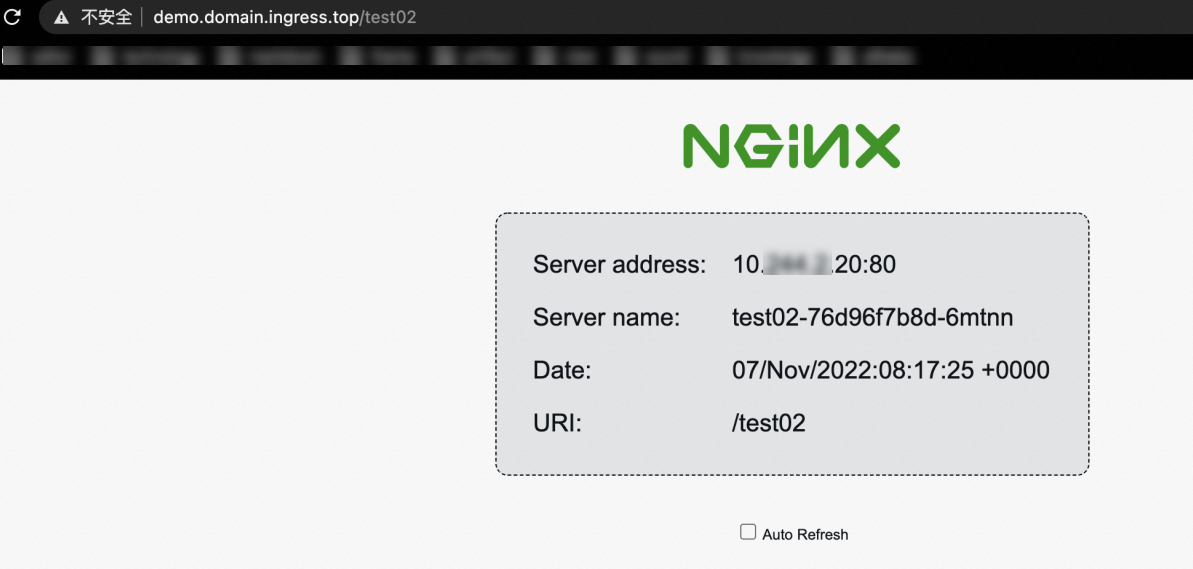
If you have questions, join the DingTalk Group 31945843 for technical support.
References
ALB Ingress overview and features:
Source code documentation: