A playbook is a predefined logical flow or script used to identify, classify, evaluate, and respond to security events. It includes a series of steps to perform specific operations, determine whether security threats exist, and decide how to respond to and mitigate them. You can customize and configure playbooks for different security event types and levels to meet various security needs.
Security operations teams often face repetitive, time-consuming manual work when responding to alerts — triaging the same threat types, running the same containment steps, and coordinating across multiple tools. Using playbooks for response orchestration helps improve the efficiency and consistency of your security responses.
The following sections explain how to create, configure, debug, and publish a custom playbook in Security Center.
Key concepts
Playbook types
Security Center provides two types of playbooks:
Predefined playbook: Built-in playbooks covering common security threat scenarios. Use them directly without configuration. To adapt a predefined playbook to your environment, copy it to create a custom playbook, then modify it as needed.
Custom playbook: For complex or highly specialized scenarios, build your own playbook using the visual flow editor. Drag, connect, and configure components to implement automated security response logic.
Playbook parameters
Input parameters define what triggers the playbook. When you select different trigger conditions, the parameter examples in the debugging panel update accordingly.
Output parameters define the fields the playbook produces after execution. Downstream nodes in the same playbook can reference these fields. Other playbooks can also access them using the setOutput action with the syntax ${event.parameter_path}.
In addition to custom output parameters, the system provides built-in system parameters. For details, see System parameters in playbooks.
Flow editor
The flow editor is a visual canvas for creating, modifying, debugging, and publishing playbook flows.
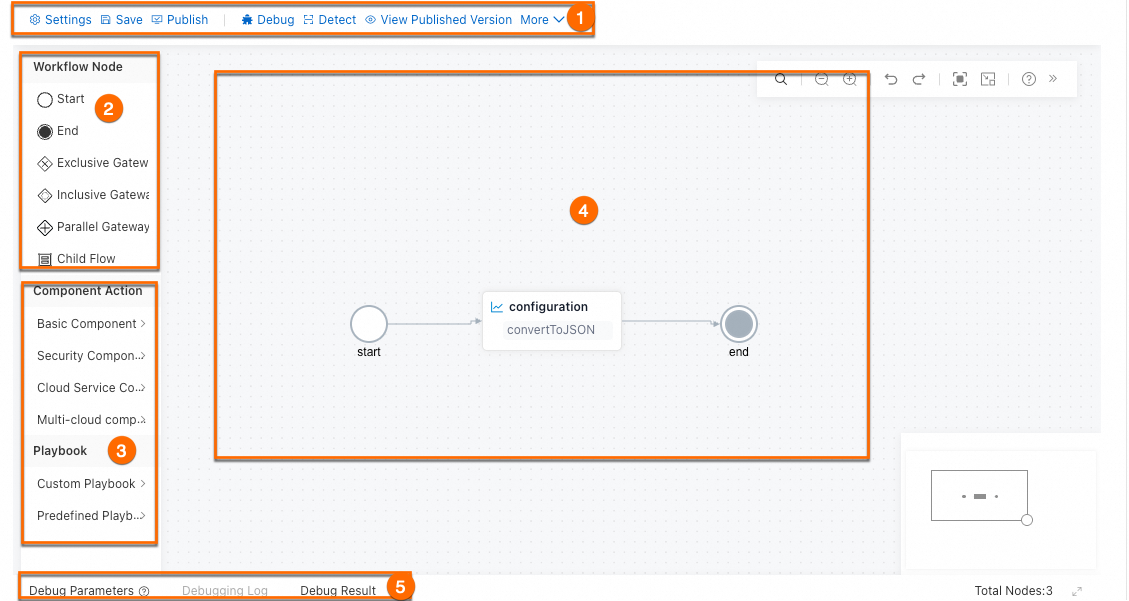
| Area | Description |
|---|---|
| 1 — Menu bar | Save: Saves the current state as a draft. Exiting without saving loses all unsaved changes. Drafts may be overwritten if you roll back from a published version — click Publish to preserve the playbook permanently. Publish: Converts the playbook to an official published version. Only published playbooks can be used in automatic response rules and event handling. Debug: Opens the debugging panel at the bottom of the page. Breakpoint debugging: Select a component on the canvas and click the |
| 2 — Flow nodes | The structural backbone of every flow, independent of external services. Each flow requires exactly one start node and can have multiple end nodes. For details, see System components. |
| 3 — Components and playbooks | Basic components: General-purpose IT components such as writing to a database, sending data to Simple Log Service (SLS), and running Python 3 scripts. Python 3 scripts run in a built-in Python 3.9 container with 0.25 vCPU and 256 MB of memory. The maximum script execution duration is 600 seconds. Security components: Components that handle security threats directly, such as Server Guard (terminate processes) and Cloud Firewall (block access). Cloud product components: Components that call Alibaba Cloud product OpenAPI operations and query threat intelligence. See Cloud product components (OpenAPI) and AliyunThreatIntelligence component. Third-party components: Components that call OpenAPI operations of non-Alibaba Cloud products, such as Web Application Firewall (WAF) from Tencent Cloud and Huawei Cloud. See Third-party components (OpenAPI). Playbooks panel: Lists all custom playbooks and predefined playbooks available in the current account. |
| 4 — Canvas | The drag-and-drop workspace. Drag components here and connect them to define the response logic. Double-click the start node ( ) to configure its basic information. ) to configure its basic information. |
| 5 — Debugging area | Click Debug or the |
Configure a custom playbook
Before you start building, consider the following questions. Answering them helps you design a clearer, more maintainable flow:
What security events or alerts should trigger this playbook?
What actions does the playbook need to take? Are any steps conditional?
When is the incident considered resolved?
Will this playbook be triggered automatically, manually, or both?
The following diagram shows the end-to-end configuration flow:

Prerequisites
Before you begin, make sure that you have:
Access to the Security Center console
The permissions required to create and publish playbooks in the SOAR module
Step 1: Create the playbook
Log on to the Security Center console.Log on to the Security Center console.
In the left navigation pane, choose Agentic SOC > SOAR. In the upper-left corner, select the region where the assets you want to protect are located: Chinese Mainland or Outside Chinese Mainland.
On the Custom Playbook tab, click Create Playbook.
In the Create Playbook panel, enter a Playbook Name and Playbook Description, then click OK.
Alternatively, go to the Predefined Playbook tab, find a suitable playbook, and click Copy in the Actions column to use it as a starting point.
Step 2: Configure the flow
After creating the playbook, you are automatically redirected to the flow configuration page. To return to this page later, click Edit in the Actions column on the Custom Playbook list.
Set input and output parameters
On the Playbook Editing page, click Settings in the upper-right corner.
In the configuration panel, click Input & Output Settings and define the input and output parameters. For the parameter types and syntax, see Playbook parameters.
Each flow must have exactly one start node and can have multiple end nodes.
Orchestrate the response flow
The canvas is where you build the core response logic. Drag components from the left panel, drop them onto the canvas, and connect them in the order they should execute.
The start node uses event as its node name. Do not name any other component event.
The following steps use the DataFormat component as an example.
Select a component action: In the Basic components section, find the DataFormat component. Choose an action — such as
joindataorconvertToJSON— and drag it onto the canvas.Configure component parameters: Click the component on the canvas to open its configuration panel. Alternatively, in the Basic Information section, click
 to open parameter settings. For details, see DataFormat component. Parameters support constants, variable values, system parameters, and expressions. Select a node parameter from the drop-down list in the input box to generate the corresponding syntax automatically. For the full parameter reference, see Component parameters and node execution flow.
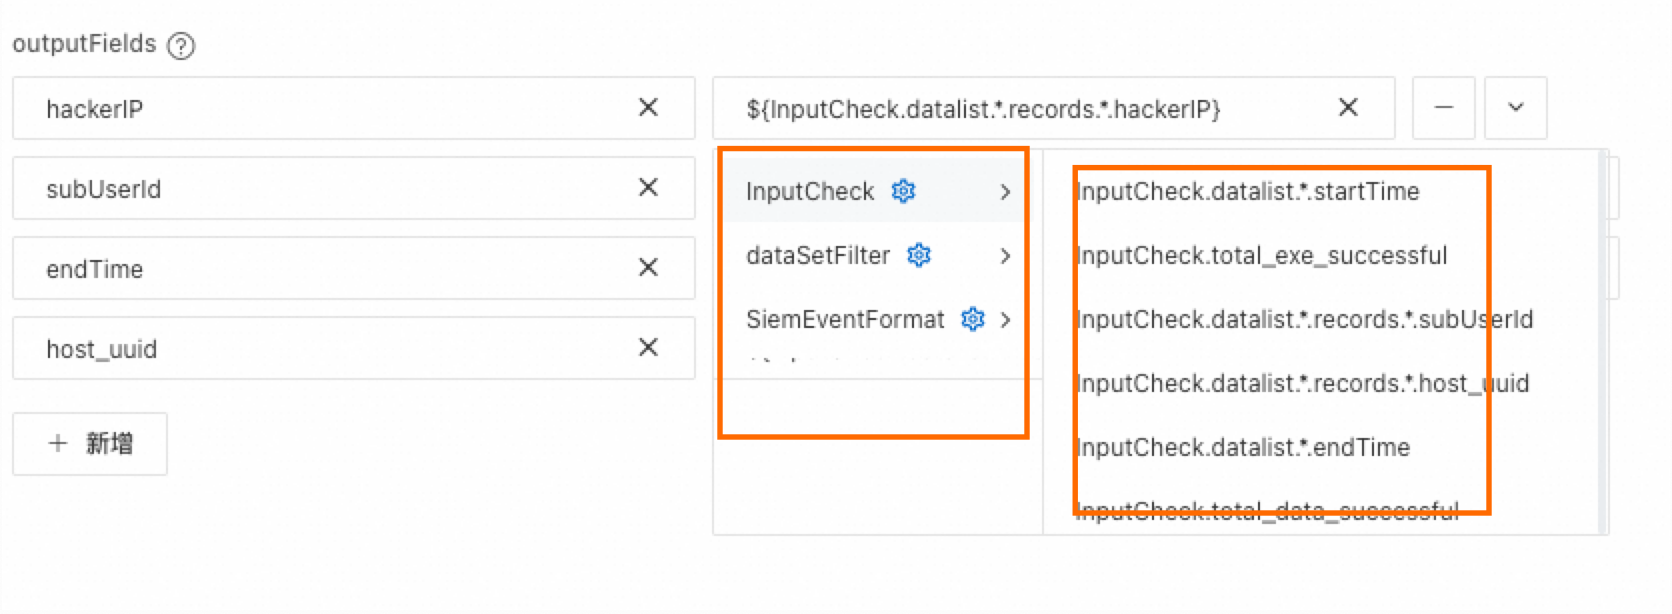
After configuring all components, click Save in the menu bar.
Exiting without saving permanently loses all unsaved changes.
Step 3: Debug the flow
Before publishing, run a debug session to verify the flow runs correctly.
Set a breakpoint (optional)
Breakpoints let you inspect intermediate results in a complex flow. The flow runs up to — but not including — the breakpointed node, then pauses.
Click the ![]() icon on a node to set it as a breakpoint.
icon on a node to set it as a breakpoint.
In a flow with multiple branches, the system debugs only the branch containing the breakpoint.
If multiple breakpoints are set on the same branch, only the last one takes effect.
Run the debug session
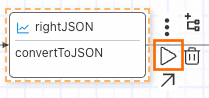
Click the
 debug button in the upper-left corner to open the Debug Parameters panel, and then click Debug.
Load parameter examples by clicking Example, then on the View Sample Input page, click Load Sample.
Modify the parameters as needed, then click OK.
The debugging parameters vary depending on the input parameter type configured for the playbook. Use Visual Mode for a more intuitive way to edit parameters.
Review the results
Click the ![]() icon on any node, or click Run Logs in the debugging area, to view the detailed input, output, and execution status for each node.
icon on any node, or click Run Logs in the debugging area, to view the detailed input, output, and execution status for each node.

The following output parameters appear in the debug results:
| Parameter | Description |
|---|---|
datalist | Preview of the output data. A maximum of three entries are shown. To view the full dataset, go to the Complete Output Result tab. |
total_data_successful | Volume of data processed successfully. |
total_data | Total volume of data processed. |
total_exe_successful | Number of times the action ran successfully. |
total_exe | Total number of times the action ran. |
total_data_with_dup | Volume of data after deduplication, counted from successfully processed data. |
Step 4: Publish
Click Publish in the menu bar to convert the playbook to a published version, making it available for use in response rules and event handling.
Use a playbook
Only published playbooks can be used for automatic response rules and security event handling.
After a playbook is triggered, view the generated response policies and tasks in the Response Center, or view execution records on the playbook's details page.
Security Center supports three ways to run a playbook:
Bind to an automatic response rule: Automates the response to specific security alerts. For details, see Automatic response rules.
Manually trigger during event handling: For complex security events that require manual analysis, trigger a playbook from the event handling center to assist with response tasks. For details, see the Run Playbook section in Evaluate and handle Agentic SOC security events.
Run directly: On the SOAR page, find the target playbook on the Predefined Playbook or Custom Playbook tab and click Run in the Actions column to execute the flow once.
Manage playbooks
Roll back a playbook
To restore a published playbook to a previous version:
On the Custom Playbook tab, find the playbook and click Details in the Actions column.
On the Basic Information tab, locate the publish history section to view available versions.
(Optional) Click View next to a version to open it and run a test in the Input Parameters (Run) area.
Click Roll Back to Edit or Roll Back and Publish for the version you want to restore:
Roll Back to Edit: Replaces the current draft with the selected version. The playbook is not published.
Roll Back and Publish: Replaces the current draft with the selected version and publishes it immediately.
If you roll back from a published version, the saved draft version may be overwritten. Before you roll back, carefully evaluate the flow differences between versions.
Import a playbook
Only JSON files are supported.
In the flow editor menu bar, click More, then select Import JSON.
On the import page, upload the JSON file and click OK.

View execution records
In the playbook list, click the playbook ID or Details in the Actions column. On the Historical Execution Records tab, view basic execution records for that playbook.
The system automatically creates an execution record each time a playbook is used to handle a security event or alert.
Rename a playbook
In the playbook list, click the playbook ID or Details in the Actions column. On the Basic Information tab, click Edit next to the playbook name.
Predefined playbook names cannot be changed.
Playbook names must be unique.
Troubleshooting
Error codes fall into two categories: errors from playbook orchestration, and errors from component execution.
Orchestration errors
| Error message | Cause | Fix |
|---|---|---|
| The filter condition for node [%s] is invalid. It must include data from the data list of node [%s]. | The filter node condition does not reference the target node's data. | Include the data variables of the node you want to filter, along with the corresponding conditions. |
| The start node has no downstream configuration. | No node is connected after the start node. | Connect at least one downstream node to the start node. |
| The node [nodeName] has no downstream nodes defined. | A non-terminal node has no outgoing connections. | Connect a downstream node to the indicated node. |
| The resource in node [node] does not exist. | The configured resource instance no longer exists. | Select an existing resource instance. |
| The resource in node [node] is required but not configured. | No resource instance is configured for the node. | Select and configure a resource instance. |
| Multiple nodes have the same name [nodeName]. | Two or more nodes share the same name. | Rename nodes so each name is unique. |
The path [path] defined in node [node1] is invalid because the child flow supports only the ${<subTask>.curLoop} and ${<subTask>.curIndex} formats. | A variable in the child flow uses an unsupported format. | Update the variable to use ${<subTask>.curLoop} or ${<subTask>.curIndex}. |
| The path [node2.path] defined in node [node1] is invalid because node [node2] does not exist. | A variable references a node that has been deleted or was never created. | Reconfigure the variable or add the missing node. |
| The path [node2.path] defined in node [node1] is invalid because node [node2] is not an ancestor node of the current node. | A variable references a node that is not upstream of the current node. | Reference only variables from ancestor nodes. |
Component execution errors
| Error code | Error message | Fix |
|---|---|---|
sophon.Internal.Error | An internal system error occurred. | Check your parameters and resource configuration. If the issue persists, contact support. |
component.Internal.ParamError | Component parameter error. | Verify that all parameters configured for the component are correct. |
component.Abnormal.InvokeError | Component execution error. | Check the error message for details. Contact support if needed. |
filter.Abnormal.Fail | The data does not meet the filter condition. | Verify that the filter condition is correctly defined. |
securityGroup.Internal.HostIsOutside | Hosts outside the cloud cannot use security groups to block IP addresses. | Confirm the target host is a cloud-based host. |
securityGroup.Internal.NumberExceedLimit | The number of security groups or security group rules exceeds the limit. | Check whether the host's associated security groups or rules exceed the allowed limit. |
sts_openapi.Internal.ParamError | ParamError: The parameters of your request are invalid. | Check the actual input parameters passed to the component. |
sts_openapi.Internal.WafRuleError | VerifyRuleCountExceed: The number of rules exceeds the limit. | The WAF custom rule limit has been reached. Remove unused rules. |
sts_openapi.Internal.DefenseTemplateNotExist | Defense.Control.DefenseTemplateNotExist: The protection template does not exist. | Check whether the WAF template was accidentally deleted. |
sts_openapi.Internal.DefenseTemplateBindUnbindResourceInvalid | Defense.Control.DefenseTemplateBindUnbindResourceInvalid: The resource to which the template is to be bound is unavailable. | Check whether the resource associated with the WAF template is available. |
sts_openapi.Internal.DefenseResourceRelationExist | Defense.Control.DefenseResourceRelationExist: The resource to which the template is to be bound is already bound to another template. | Check whether the resource is already bound to another WAF template. |
sts_openapi.Info.DefenseSceneNotSupported | Defense.Control.DefenseSceneNotSupported: This protection scenario is not supported. | The current WAF version does not support custom rules. Upgrade to a higher WAF edition. |
sts_openapi.Internal.ErrorAddressGroupExist | ErrorAddressGroupExist: The address group already exists. | The Cloud Firewall address group name conflicts with an existing one. Use a different name. |
sts_openapi.Internal.PermissionError | NoPermission: The caller does not have permission. | Grant the required permissions to modify the associated resource. |
sts_openapi.Internal.CFWRuleError | acl or expand acl count exceed. | The Cloud Firewall rule limit has been reached. Remove unused rules. |
sts_openapi.Internal.InvalidSecurityGroupId | InvalidSecurityGroupId.NotFound: The specified SecurityGroupId does not exist. | Check whether the security group was accidentally deleted. |
sts_openapi.Internal.ErrorParametersGroupAddress | ErrorParametersGroupAddress: The IP address in the address group is invalid. | The current IP address book is unavailable. Verify its configuration. |
sts_openapi.Internal.notBuyUser | not buy user: The user has not purchased the product. | Purchase Cloud Firewall to use this component. |
sts_openapi.Internal.Throttling | throttling or Throttling | The OpenAPI call was rate-limited. Reduce request frequency and retry. |
python.Info.aegis2 | The process does not exist. | The target process no longer exists. |
python.Internal.aegis3 | The process PID and path do not match. | Verify that the PID and file path correspond to the same process. |
python.Internal.aegis4 | Process permission denied. | Insufficient permissions to handle the process. |
python.Info.aegis5 | The file does not exist. | The target file no longer exists. |
python.Internal.aegis6 | The file MD5 values are inconsistent. | The input MD5 does not match the actual file. Verify the file integrity. |
python.Internal.aegis7 | File permission denied. | Insufficient permissions to handle the file. |
python.Internal.aegis8 | The object file exists and the MD5 values are inconsistent. | The object file exists but has a different MD5. Verify the file. |
python.Internal.aegis9 | The backup file does not exist. | The backup file for the target file does not exist. |
python.Internal.aegis10 | No fencing record is found. | No associated file fencing record exists for the target. |
python.Internal.aegis11 | The AliYunDun process cannot be terminated or fenced. | The AliYunDun process is protected and cannot be terminated or fenced. |
python.Internal.aegis91 | The host information does not exist. | Host information is missing. Verify the host is registered in Security Center. |
python.External.Fail | Python script error. | An error occurred during script execution. Review the error message or contact support. |
python.External.Data | Python component input format error. | The input format passed to the Python component is invalid. Review the error message or contact support. |