Security Center protects your serverless assets with threat detection, vulnerability scanning, and baseline risk checks. This topic describes how to connect serverless assets to Security Center and start protection.
Supported assets and features
Supported asset types
Security Center supports the following serverless asset types:
ECI
Elastic Container Instance (ECI) created from managed ACK clusters, dedicated ACK clusters, and ACK Serverless clusters
ECI instances created from Container Compute Service (ACS)
Serverless App Engine (SAE) instances
ImportantSAE instances with an instance type of 0.5 cores or less cannot be connected or scanned due to stability constraints.
ECI instances created directly from the Elastic Container Instance (ECI) consoleare not supported for synchronization or onboarding.
Lingjun resources of Platform for AI (PAI)
Supported security features
Security Center provides three security capabilities for serverless assets:
Threat detection: Detects web shell (back door) files, suspicious network connections, and abnormal process behaviors. For the full list of supported checks, see Overview of CWPP (cloud workload) security alerts.
Vulnerability scanning: View detectable vulnerabilities on the Vulnerabilities > Vulnerabilities page by clicking the number under Disclosed Vulnerabilities to open the Disclosed Vulnerabilities panel. Vulnerability scans run on a scheduled cycle — check the latest scan time on the Detectable Vulnerabilities page. Application vulnerabilities support scanning only; fixing is not supported. To eliminate the risk, manually upgrade or modify the software application based on the fixing suggestions in the vulnerability details.
Baseline risk checks: Detects and handles baseline risks, such as Restrict containers from running as root and Prohibit containers with kernel capabilities in the Kubernetes (ECI) Pod General International Security Best Practices Baseline. Baseline checks run on a scheduled cycle — check the latest check time on the CSPM page. For supported checks, see Baseline check items.
Security Center classifies connected serverless assets by container runtime status. Supported features vary by instance type:
Instance type | Supported security features |
Elastic Container Instance | Threat detection, vulnerability scanning, baseline risk checks |
RunD container instance | Threat detection |
Billing
The serverless security protection feature uses pay-as-you-go tiered pricing. The public preview ended on July 31, 2024 (UTC+8).
Billing method: Billed based on the number of bound server cores multiplied by the actual protection duration in seconds.
ImportantThe actual protection duration is calculated based on the online duration of the client.
Billing cycle: Billed daily.
Price: Tiered pricing is used based on the cumulative monthly usage.
Cumulative monthly usage:
Cumulative monthly usage for the current day = Cumulative monthly usage up to the previous day (0 on the first day) + Usage for the current day.
ImportantIn the first month of use, the statistical period is from the day you enable the service to the end of that month. From the second month onward, the statistical period is a calendar month, from the first to the last day of the month.
Example: On the first day, the cumulative monthly usage is the usage of the first day. On the second day, the cumulative monthly usage is the usage of the first day + the usage of the second day. On the third day, the cumulative monthly usage is the usage of the first day + the usage of the second day + the usage of the third day, and so on.
Tiered prices:
Cumulative monthly usage
Price
Fee calculation formula (U is the daily usage in core-seconds)
Tier 1: 0 to 200,000,000 core-seconds
USD 0.000003 per core-second
0.000003 × U (USD)
Tier 2: 200,000,001 to 1,000,000,000 core-seconds
USD 0.000002 per core-second
On the first day you enter this tier:
0.000003 × 200,000,000 + 0.000002 × (U - 200,000,000) (USD)
Each subsequent day: 0.000002 × U (USD)
Tier 3: 1,000,000,001 to 9,999,999,999,999 core-seconds
USD 0.0000015 per core-second
On the first day you enter this tier:
0.000003 × 200,000,000 + 0.000002 × 800,000,000
+ 0.0000015 × (U - 1,000,000,000) (USD)
Subsequent daily fee: 0.0000015 × U (USD).
Billing example:
Scenario: You have 20,000 cores of serverless assets that are online 24 hours a day (86,400 seconds).
Daily usage (U) = 20,000 cores × 86,400 seconds/day = 1,728,000,000 core-seconds.
First-day fee:
Usage details: The cumulative monthly usage on the first day is equal to the first day's usage, which is 1,728,000,000 core-seconds. The cumulative monthly usage has reached Tier 3. The fee is calculated based on the cross-tier billing rule for the first time that the usage enters Tier 3.
Cost calculation for the first day:0.000003 (Tier 1 unit price) × 200,000,000 + 0.000002 (Tier 2 unit price) × 800,000,000 + 0.0000015 (Tier 3 unit price) × (1,728,000,000 - 1,000,000,000) = 3,292 (USD).
Fees for the second and subsequent days:
Usage details: Because the cumulative monthly usage reached Tier 3 on the first day, the cumulative monthly usage remains in Tier 3 from the second day to the end of the month. The daily fee is calculated based on the Tier 3 unit price.
Cost calculation: Daily cost = 0.0000015 (unit price for Tier 3) × (20,000 × 86,400) = 2,592 (USD).
Stop billing
Security Center immediately stops detection and billing in the following situations:
Stop billing for all serverless assets:
On the Overview page, in the Pay-as-you-go area, turn off the Serverless Asset Protection switch.
On the Assets > Container page, click Suspended.
Your Alibaba Cloud account has an overdue payment.
Stop billing for a specific asset:
On the Assets > Container page, detach authorization from the target asset. See step 3.2 below.
Step 1: Install the Security Center client on ECI pods
ECI assets from ACK and ACS clusters require the Security Center client to be installed and running on each pod before protection can be applied.
Install the client by adding an annotation to your pod spec in YAML. The annotation differs by cluster type.
ACK Serverless cluster
Log on to the Container Service for Kubernetes (ACK) console and go to the management page of the target cluster.
In the left navigation pane, choose Workloads > Pods, then click Create from YAML.
In the YAML template, add the following annotation under
spec > template > metadata:annotations: k8s.aliyun.com/eci-aliyundun-enabled: 'true'Sample YAML:
apiVersion: apps/v1 # for versions before 1.8.0 use apps/v1beta1
kind: Deployment
metadata:
  name: nginx-deployment-basic
  labels:
    app: nginx
spec:
  replicas: 2
  selector:
    matchLabels:
      app: nginx
  template:
    metadata:
      annotations:
        k8s.aliyun.com/eci-aliyundun-enabled: 'true'
      labels:
        app: nginx
    spec:
    #  nodeSelector:
    #    env: test-team
      containers:
      - name: nginx
        image: nginx:1.7.9 # replace it with your exactly <image_name:tags>
        ports:
        - containerPort: 80
        resources:
          limits:
            cpu: "500m"
If you create a resource from an image instead of YAML, add the pod annotation k8s.aliyun.com/eci-aliyundun-enabled=true in the Advanced section. For details, see Create a stateless application from an image.

Managed or dedicated ACK cluster
Log on to the ACK console and go to the cluster management page. Deploy the ack-virtual-node component to schedule pods to ECI. For details, see Schedule a pod to an ECI.
In the left navigation pane, choose Workloads > Pods, then click Create from YAML: Sample YAML:
Under
metadata: add the annotationk8s.aliyun.com/eci-aliyundun-enabled: "true"Under
spec > containers: set the environment variableECI_CONTAINER_TYPE = sidecar
apiVersion: v1
kind: Pod
metadata:
  name: test-aegis-alinux2-lifsea-x86
  labels:
    eci: "true"
  annotations:
    k8s.aliyun.com/eci-aliyundun-enabled: "true"
spec:
  containers:
  - name: sidecar
    image: registry-vpc.cn-shanghai.aliyuncs.com/eci_open/centos:7
    command:
    - /bin/sh
    - -c
    args:
    - sleep inf
    env:
    - name: ECI_CONTAINER_TYPE
      value: sidecar
  - name: nginx
    image: registry-vpc.cn-shanghai.aliyuncs.com/eci_open/centos:7
    command:
    - /bin/sh
    - -c
    args:
    - sleep inf
ACS cluster
Log on to the Container Compute Service console and go to the management page of the target cluster.
In the left navigation pane, choose Workloads > Deployments, then click Create from YAML.
In the YAML template, add the following annotation under
spec > template > metadata:annotations: security.alibabacloud.com/aliyundun-enabled: 'true'Sample YAML:
apiVersion: apps/v1 # for versions before 1.8.0 use apps/v1beta1
kind: Deployment
metadata:
  name: nginx-deployment-basic
  labels:
    app: nginx
spec:
  replicas: 2
  selector:
    matchLabels:
      app: nginx
  template:
    metadata:
      labels:
        app: nginx
        alibabacloud.com/compute-class: general-purpose
        alibabacloud.com/compute-qos: default
      annotations:
         security.alibabacloud.com/aliyundun-enabled: 'true'
    spec:
    #  nodeSelector:
    #    env: test-team
      containers:
      - name: nginx
        image: anolis-registry.cn-zhangjiakou.cr.aliyuncs.com/openanolis/nginx:1.14.1-8.6 # replace it with your exactly <image_name:tags>
        ports:
        - containerPort: 80
        resources:
          limits:
            cpu: "500m"
If you create a resource from an image, add the pod annotation security.alibabacloud.com/aliyundun-enabled=true in the Advanced section. For details, see Create a resource from an image and Overview of ACS pods.

Step 2: Enable pay-as-you-go
Choose the path that matches your current Security Center edition.
Free Edition or free trial users
Go to the Security Center purchase page and log on with your Alibaba Cloud account.
Set Billing Method to Pay-as-you-go and set Serverless Asset Protection to Pay-as-you-go.
Click Custom Quota Binding. In the dialog box, select All Servers or Specific Servers to configure which assets to authorize.
ImportantWithout custom binding, all assets are authorized by default, and new assets are automatically authorized going forward.

Read the Security Center Terms of Service, then click Order Now.
After the order completes, Security Center automatically connects to ECI instances and SAE applications in a Running state and attaches authorization based on your Authorization Management configuration.
Paid edition users (Anti-virus, Premium, Enterprise, or Ultimate)
Log on to the Security Center console.
In the left navigation pane, choose Assets > Container. In the upper-left corner, select the region where your assets are located: Chinese Mainland or Outside Chinese Mainland.
On the Serverless Asset page, click Activate Now. Alternatively, turn on the Serverless Asset Protection switch in the Pay-as-you-go area on the right side of the Overview page.
In the confirmation dialog box, click Custom Quota Binding to select which assets to authorize, then click OK.
ImportantWithout custom binding, authorization follows this logic: - First time enabling: All assets are authorized by default, and new assets are automatically authorized. - Re-enabling: Previously authorized assets are reattached. If no ECI instances or SAE applications were authorized before, all assets are authorized by default, and authorization is automatically attached to new assets. - After clearing an overdue payment: Previously authorized assets are automatically reattached.
Select Security Center Service Level Agreement, then click Activate Now.
Step 3: Manage authorized assets
3.1 Sync assets
After enabling protection, sync the latest asset information to confirm that the Security Center client is installed and running on your target assets.
Log on to the Security Center console.
In the left navigation pane, choose Assets > Serverless Asset, then click Synchronize Assets. Security Center pulls the latest serverless asset information and refreshes the list. Syncing takes about one minute.
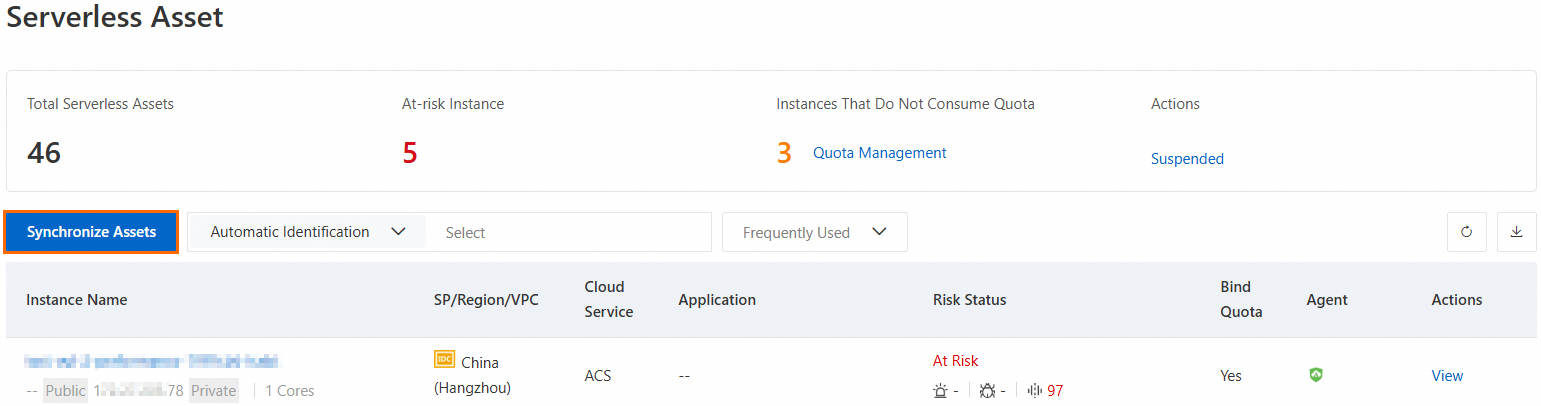
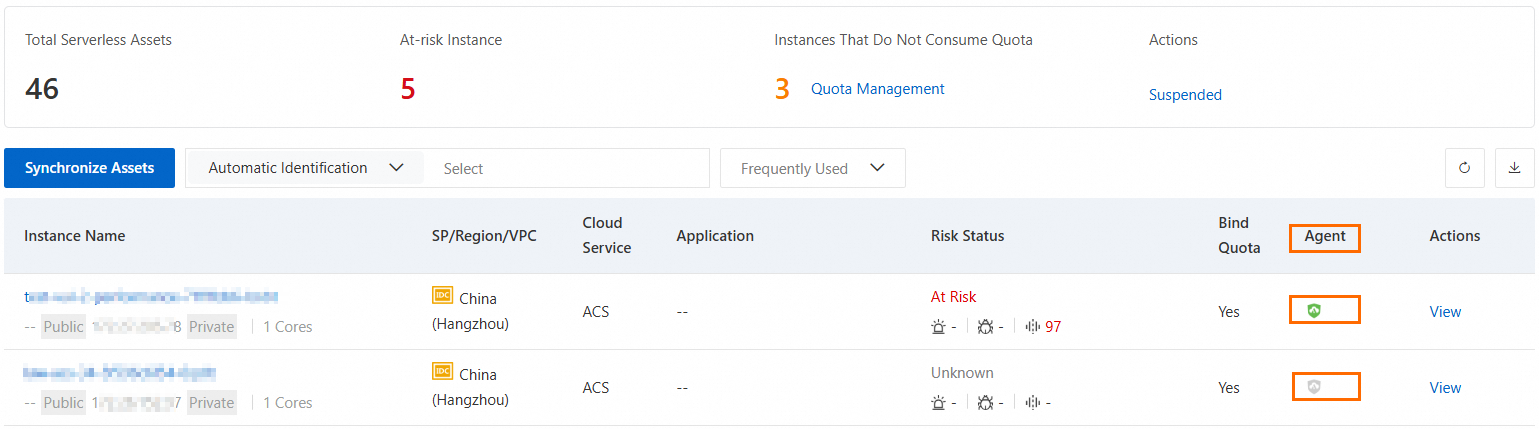
After syncing, check the Agent column for each asset. If the icon is gray, follow step 1 to install or repair the client, then restart the asset instance. Click Synchronize Assets again to refresh the status.
Green: The client is online and running. Attach authorization to start protection.
Gray: The client is offline (not installed, network issues, or other reasons). Security features are unavailable even after attaching authorization.
After creating or restarting any serverless asset instance, click Synchronize Assets to update the asset list.
3.2 Attach or detach authorization
After the Security Center client is online, attach authorization to enable security protection for the asset. Detach authorization from assets that no longer require protection.
Choose the approach based on your protection scope:
Approach | When to use | Effect |
Protect all assets | Default binding is already in place | Authorizes all assets and automatically authorizes new ones |
Protect specific assets | Use Custom Quota Binding during activation | Selects only the target assets for protection |
Exclude specific assets | All assets are bound by default and some do not need protection | Detach authorization from assets that do not require protection |
To attach or detach authorization:
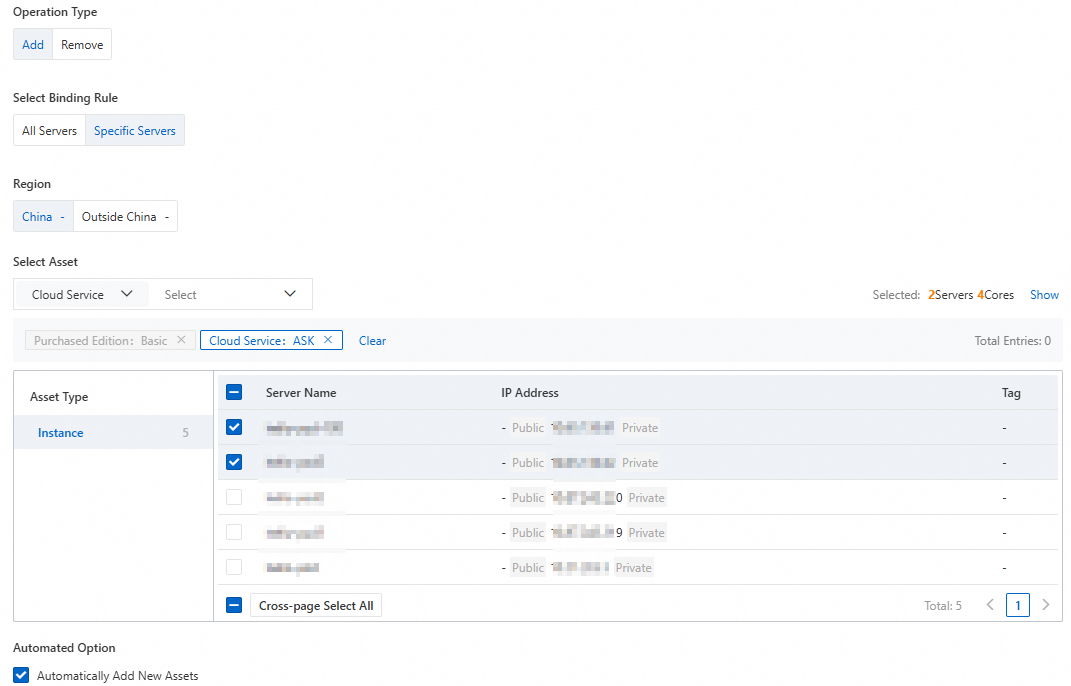
On the Assets > Container page, click Instances That Do Not Consume Quota under Quota Management above the asset list.
In the Quota Management dialog box, select Add or Remove, select the target assets, then click OK. To automatically authorize new serverless assets going forward, select Automatically Add New Assets.
Step 4: View and handle security risks
After an asset is connected and authorized, Security Center starts real-time threat detection for that instance. Vulnerability scans and baseline risk checks run on their respective scheduled cycles. Check the latest scan time on the Vulnerability Management or CSPM page.
On the Assets > Container page, check the Risk Status column. An At-risk Instance label indicates that alerts, vulnerabilities, or baseline risks have been detected.
Click the asset name or click View in the Actions column to open the asset's risk detail page.
Click the Alerts, Vulnerabilities, or Configuration Risks card to view the corresponding risk items.
Handle alerts: Click Details in the Actions column to review the alert and determine whether it represents a real risk. Then click Handle:
Real risk: isolate the threat.
Not a real risk or can be deferred: add to whitelist, ignore, or mark as manually handled.
Handle vulnerabilities: Click the Vulnerabilities card to view detected vulnerabilities. Address all detected vulnerabilities promptly, as they represent weaknesses that attackers can exploit. One-click fixing is not supported for application vulnerabilities — fix them manually following the instructions in the vulnerability details. For more information, see View and handle vulnerabilities.
Handle baseline risks: Click the Configuration Risks card to view detected baseline risks. Click Details in the Actions column to review the risk details and hardening suggestions, then decide whether to fix or whitelist the risk. If the Fix button appears in the Risk Handling list on the risk details page, fix the baseline risk directly in Security Center.