The image security scan feature of Security Center helps you detect vulnerabilities, baseline risks, malicious samples, and sensitive files in your images to ensure a secure runtime environment. This topic describes how to perform an image security scan.
Prerequisites
You have enabled the Container Image Scan feature and purchased sufficient Container Image Scan authorizations. For more information, see Enable the Container Image Security Scan feature.
You have purchased a Container Registry Enterprise Edition instance or added a private image repository. For more information, see Create a Container Registry Enterprise Edition instance and Add an image repository.
If your Enterprise instance is configured for a virtual private cloud (VPC), the VPC must meet specific region and zone requirements. You must select a vSwitch in a supported zone within a supported region to enable scanning. For a list of supported regions and zones, see Supported regions and zones.
Background information
Vulnerabilities may exist in the system software, middleware, web applications, and databases within your images. These vulnerabilities can include mining trojans and backdoor programs, which pose threats to your assets.
Security Center can scan images to detect system vulnerabilities, application vulnerabilities, baseline risks, malicious samples, sensitive files, and risks in image build instructions. For more information, see Image security features.
Usage notes
Image repositories to scan: Container Registry (ACR) Enterprise Edition image repositories that you created and Harbor, Quay, and GitLab image repositories that you added to Security Center.
Scan scope: By default, the scan uses all check items for all image repositories. You can set the scan scope as needed. The scan scope includes image repositories, baseline check items, vulnerability whitelists, whitelists of sensitive file types, and whitelists of at-risk files. For more information, see Step 1: Configure the image security scan scope.
Scan method: Perform an immediate image security scan (manual scan) and configure a periodic image security scan.
Both manual and periodic scans are performed based on the scan scope settings.
Resource consumption for scan tasks: Security Center identifies an image by its digest value. If the digest value of an image does not change, only the first scan consumes a quota unit. If the digest value changes, a new scan consumes another quota unit.
Before you scan images, make sure that you have a sufficient Container Image Scan quota. For more information, see Enable the Container Image Security Scan service.
Scan duration: To ensure the stability of image scan tasks, Security Center sets the timeout period for each image scan task to 4 hours. This value cannot be changed. After 4 hours, the task stops even if some image repositories in the task are not scanned.
NoteBefore you perform an image scan task, we recommend that you specify the required image repositories. If you specify a Harbor image repository, you can configure the Speed Limit to improve the image scan efficiency. For more information, see the Manage image repositories section in this topic.
Step 1: Configure the image security scan scope
The scan scope configuration takes effect for both manual and periodic scans.
Log on to the Security Center console. In the top-left corner of the console, select the region of the assets that you want to protect: Chinese MainlandChina or Outside Chinese Mainland. In the navigation pane on the left, choose .
In the upper-right corner of the Container Image Scan page, click Scan Settings.
Click the tab for a feature to configure its scan scope.
Configure scan parameters
In the Scan Settings panel, click the Scan Configuration tab and configure the parameters.
Configuration item
Description
Consumed Quota/Purchased Quota
The number of image scans that are performed and the total number of image scans that are allowed. If the number of image scans that are allowed is near exhaustion, you can click Scale Out to purchase more image scans.
Scan Cycle
Select a cycle to perform image security scans. This parameter takes effect only for periodic scans.
Scan Scope
Set the scope of image repositories to scan. Perform the following steps:
Click Manage to the right of Scan Scope.
In the Image Management dialog box, select the image repository that you want to scan.
By default, Automatically Adds New Image Repositories For Scan is enabled in the upper-right corner of the image repository list. This means that the system automatically adds new image repositories to the scan scope for periodic image security scans. You can click the switch
 icon to disable this feature.
Click OK.
Scan Time Range
Select a time range for the image vulnerability scan.
ImportantThe scan time range is based on the local update time of the image. If no update time is available, the local creation time of the image is used. The time range determines whether an image is scanned.
For example, if you set the scan time range to Last 7 Days, Security Center will scan images that were updated within the last 7 days.
If an update time is available but the image was last updated more than 7 days ago, the scan task status is successful, but the number of successful scans is 0.
If no update time is available and the image was created more than 7 days ago, the image is not scanned, similar to the preceding scenario.
Vulnerability Retention Period
Set the retention period for the results of periodic image vulnerability scans. Security Center automatically deletes the scan results of vulnerabilities that are outside the retention period.
Manage image repositories
You can click the Image Repository tab to view the list of Container Registry Enterprise Edition instances of the acr type that support scanning, and private image repositories that you have connected of types such as harbor, quay, and gitlab.
NoteSecurity Center automatically syncs Container Registry Enterprise Edition instances from your Alibaba Cloud account to the image repository list. You cannot remove Container Registry Enterprise Edition instances from the image repository list.
You can click Task Management in the upper-right corner of the Container Image Scan page. Then, on the Container Asset Synchronization and Image Asset Synchronization tabs, view the asset synchronization progress and status.
To scan a private image repository that is not in the image repository list, you can click Add Image Repository to add the repository. For more information, see Add image repositories.
If you do not want to scan a private image repository in the image repository list, click Remove in the Actions column for the repository. In the dialog box that appears, click OK to remove the repository.
NoteThe two default image repositories (repository types: acr and defaultAcr) in the image repository list cannot be deleted.
For a Harbor image repository, you can click Edit in the Actions column to configure the Throttling for image scanning to improve the efficiency of image security scans. Throttling specifies the number of images that can be scanned per hour. The default value is 10.
For example, if a harbor image repository contains 200 images and you use the default speed limit, the image scan task requires 20 hours to complete. However, the global timeout for each scan task is 4 hours. This means that not all images in the repository can be scanned. If you set the Speed Limit parameter to 200, the scan task requires only 1 hour to complete. You can configure the Speed Limit parameter based on your needs and network conditions.
Configure image baseline scans
While configuring image vulnerability scans, you can also configure image baseline checks.
In the Scan Settings panel, click the Baseline Configuration Management tab.
Click Manage to the right of Configuration Scope.
In the Baseline Check Scope panel, select the baselines that you want to check, and click Confirm.
ImportantThe Access Key Plaintext Storage and Password Leakage baseline checks in the Baseline Check Scope panel correspond to the AccessKey Leak Detection and Password Leak Detection checks, respectively. If you select the Access Key Plaintext Storage and Password Leakage baselines in the Baseline Check Scope panel, the switches for AccessKey Leak Detection and Password Leak Detection under Baseline Configuration Management are automatically enabled, so you do not need to set them again. You can also use the switches next to AccessKey Leak Detection and Password Leak Detection to enable or disable these two baselines.
Once configured, the system will check the baseline configuration of your images whenever you click Scan Now or a configured periodic scan starts.
Immediately perform a container runtime image scan
The container runtime image scan feature helps you detect security risks in the container runtime.
ImportantContainer runtime image scans support only manual scans. You cannot set periodic scans.
Log on to the Security Center console. In the top-left corner of the console, select the region where your assets are located: China or Outside China. In the navigation pane on the left, choose .
In the upper-right corner of the Container Image Scan page, click Scan Settings.
In the Scan Settings panel, click the Container Runtime Image Scan tab.
Click Configure Scan Scope. In the dialog box that appears, select the required cluster and the name of the application that you want to scan, and click OK.
Click Scan Now.
After you run an immediate scan, you can click Task Management in the upper-right corner of the Container Image Scan page. In the Task Management panel, click the Container Runtime Image Scan tab to view the scan progress. After the scan is complete, you can view the detected vulnerabilities on the Image Vulnerability Risk tab of the Container Image Scan page.
Configure image sensitive file scans
The image sensitive file scan feature detects sensitive data in common sensitive files and your custom image files. It can detect various sensitive file types, such as application configurations that contain sensitive information, common certificates and keys, application authentication or logon credentials, and credentials from Elastic Compute Service vendors. This feature helps you find sensitive information in the image environment. You can then handle the detected sensitive data to improve the security of the image runtime environment.
ImportantOnly static image scans are supported. Runtime sensitive file detection is not supported.
In the Scan Settings panel, click the Sensitive File Scan Settings tab.
Click Manage to the right of Configuration Scope.
In the Sensitive File Scan Settings panel, select the check items to scan.

Turn the sensitive file detection switch on or off.
After you enable the sensitive file detection switch, a sensitive file scan is also performed when you click Scan Now or when a periodic scan runs.
Configure a whitelist for at-risk files
If you do not want to receive alerts for risks from a specific image sensitive file, image build instruction, or malicious image sample, you can add the corresponding alert type to a whitelist. Security Center does not generate alerts for risks that are on the whitelist.
NoteThe whitelist for at-risk files displays alert types and image repositories that you have added to the whitelist from the Malicious Image Sample, Sensitive Image File, and Image Build Command Risks tabs. For more information, see Handle detected image risks.
You cannot configure a whitelist for at-risk files the first time you use the image security scan feature.
In the Scan Settings panel, click the At-risk File Whitelist Configuration tab.
Configure the whitelist for at-risk files.
Edit a whitelist rule: On the Sensitive File, Container Build, or Malicious Sample tab, find the target Alarm Metric, click Edit in the Actions column, and then select All Image Repositories or Current Image Repository Only as the whitelist scope.
Delete a whitelist rule: On the Sensitive File, Container Build, or Malicious Sample tab, find an alert type and click Delete in the Actions column to remove the alert type from the whitelist. Security Center will then resume detecting and generating alerts for these risks.
Configure image fixing
Security Center supports automatic fixing of system vulnerabilities for ACR Enterprise Edition image repositories. You can enable automatic fixing and configure the fixing cycle, fixing scope, and other parameters.
In the Scan Settings panel, click the Image Risk Fixing Configuration tab.
Click the Fixing Configuration switch to enable or disable the automatic fixing feature.
If you enable Fixing Configuration, you can configure the Fixing Period, Fixing Scope (the image repositories in an ACR Enterprise Edition instance), and Time Range (vulnerabilities in images that are updated within this time range are fixed).
ImportantSecurity Center evaluates the time range condition based on the last update time of an image. If an image has not been updated, its creation time is used. For example, if you set the Time Range to 7 Days, Security Center fixes vulnerabilities only in images that were updated within the last seven days.
After you click Scan Now or when a periodic scan task that you configure starts, Security Center detects and fixes system vulnerabilities on your images based on the fixing cycle that you specify.
You can click Task Management in the upper-right corner of the Container Image Scan page. In the Task Management panel, go to the Image Remediation tab to view the remediation status of image system vulnerabilities.
Configure a vulnerability whitelist
If you do not need to scan for a specific image vulnerability, you can add the vulnerability to a whitelist. Security Center does not generate alerts for vulnerabilities on the whitelist.
In the Scan Settings panel, click the Vulnerability Whitelist Settings tab.
Configure the vulnerability whitelist.
Create a vulnerability whitelist rule: Click Create Rule. In the Create Rule panel, configure whitelist rules for different types of vulnerabilities.
Edit a vulnerability whitelist rule: Click Edit in the Actions column of the target whitelist rule to modify its Rule Scope, Image Selection, and Note.
Delete a vulnerability whitelist rule: Find the required whitelist rule and click Delete in the Actions column. After the vulnerability is removed from the whitelist, Security Center resumes detecting the vulnerability and generating alerts for it.
Click the
 icon in the upper-right corner of the Scan Settings panel to close the panel.
Step 2: Perform an image security scan
After you configure the image security scan scope, manual scans and periodic scans are performed based on the configuration settings in the Scan Settings panel.
When you perform an image security scan for the first time, Security Center automatically creates a reverse endpoint in the VPC that is configured for the image. This reverse endpoint allows the Security Center service to access the Container Registry Enterprise Edition instance in your VPC. Do not delete the endpoint. For more information, see Description of automatically created reverse endpoints.
Perform an immediate image security scan (manual scan)
To perform an immediate image security scan, you can start a manual scan.
The Scan Now action scans all image repositories that are connected to Security Center by default. You can first configure the scan scope in the Scan Settings panel and then manually start a scan. The scan scope includes settings such as the image repositories to scan, container runtime scan configurations, and vulnerability whitelist configurations. For more information, see the Step 1: Configure the image security scan scope section in this topic.
Log on to the Security Center console. In the top-left corner of the console, select the region of the assets that you want to protect: Chinese Mainland or Outside Chinese Mainland.
In the navigation pane on the left, select .
On the Container Image Scan page, click Scan Now.
In the Quick Scan dialog box, all image types are selected by default. Deselect the image types that you do not want to scan and click OK.
The following types are supported:
acr: Security Center checks whether security risks exist in the Enterprise instances that you created in the Container Registry console.
harbor, quay, and gitlab: Security Center scans the private image repositories that you have added for security risks.
Container: If you select this type, Security Center immediately runs a container runtime image scan based on your settings.
The preceding types are displayed only if they are configured in Security Center.
You can also click Configure Scan Scope. In the Scan Settings panel, configure the settings for the scan scope and then return to the Quick Scan dialog box. For more information, see the Step 1: Configure the image security scan scope section in this topic.
The image risk scan results are displayed in about one minute. You can manually refresh the page after one minute to view the scan results in the risk list on the page.
Configure a periodic image security scan
By default, Security Center automatically scans your container assets for image vulnerabilities or malicious samples based on the scan cycle specified in the Scan Settings panel. You can follow these steps to modify the image vulnerability scan cycle.
Log on to the Security Center console. In the upper-left corner of the console, select the region where your assets are located: Chinese Mainland or Outside Chinese Mainland. In the navigation pane on the left, select .
In the upper-right corner of the Container Image Scan page, click Scan Settings.
In the Scan Settings panel, on the Scan Configuration tab, set the Scan Cycle, and then close the Scan Settings panel.
After you configure the scan cycle, Security Center scans your images based on your vulnerability scan configuration. For more information, see Step 1: Configure the image security scan scope in this topic.
Step 3: View the progress and status of an image scan task
In the upper-right corner of the Container Image Scan page, click Task Management.
In the Task Management panel, click the Image Scan tab.
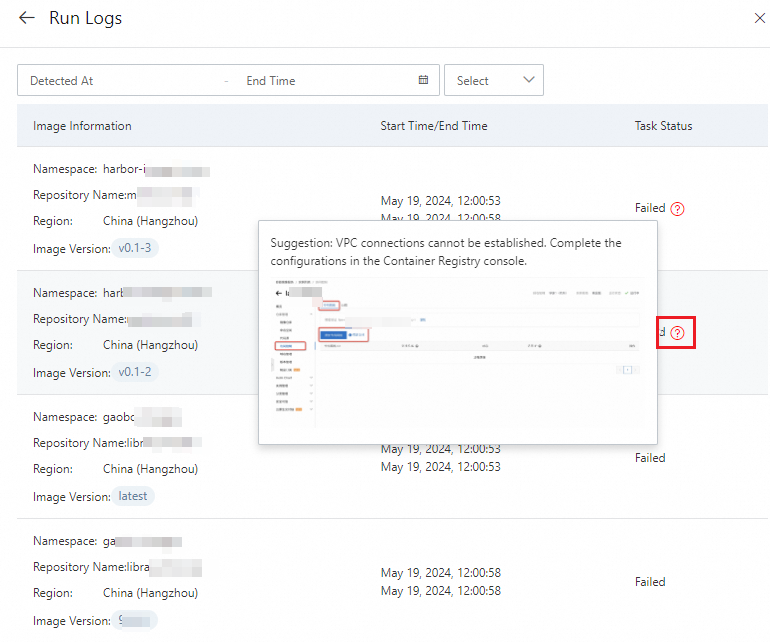
After you view the progress and status of the task, click Details in the Actions column to view its execution log.
For example, you can view information about the image for which the task failed and the cause of the failure.
What to do next
After you perform an image security scan, you can view the scan results. For more information, see View and handle detected image risks.
Appendix
Description of automatically created reverse endpoints
When you perform an image security scan for the first time, Security Center automatically creates a reverse endpoint in the VPC that is configured for the image. This endpoint allows the Security Center service to access the Container Registry Enterprise Edition instance in your VPC. Do not delete this endpoint. For more information about reverse endpoints, see How it works.
The reverse endpoint does not incur fees or affect any Alibaba Cloud products. If Security Center does not perform an image security scan in the VPC for one month, the reverse endpoint in that VPC is automatically deleted. The next time you perform a scan, a new reverse endpoint is automatically created. No action is required.
Supported regions and zones
The following tables list the regions and zones for the VPCs and vSwitches that are required for Container Registry Enterprise Edition instances to use the image security scan feature. If a configured VPC and vSwitch are not in these lists, the scan feature is not supported for the Enterprise Edition instance.
Public cloud
Region Name
Region ID
Number of supported zones
Zone Name
Zone ID
China (Qingdao)
cn-qingdao
2
Qingdao Zone B
cn-qingdao-b
Qingdao Zone C
cn-qingdao-c
China (Beijing)
cn-beijing
10
Beijing Zone C
cn-beijing-c
Beijing Zone D
cn-beijing-d
Beijing Zone E
cn-beijing-e
Beijing Zone F
cn-beijing-f
Beijing Zone G
cn-beijing-g
Beijing Zone H
cn-beijing-h
Beijing Zone I
cn-beijing-i
Beijing Zone J
cn-beijing-j
Beijing Zone K
cn-beijing-k
Beijing Zone L
cn-beijing-l
China (Zhangjiakou)
cn-zhangjiakou
3
Zhangjiakou Zone A
cn-zhangjiakou-a
Zhangjiakou Zone B
cn-zhangjiakou-b
Zhangjiakou Zone C
cn-zhangjiakou-c
China (Hohhot)
cn-huhehaote
2
Hohhot Zone A
cn-huhehaote-a
Hohhot Zone B
cn-huhehaote-b
China (Ulanqab)
cn-wulanchabu
3
Ulanqab Zone A
cn-wulanchabu-a
Ulanqab Zone B
cn-wulanchabu-b
Ulanqab Zone C
cn-wulanchabu-c
China (Hangzhou)
cn-hangzhou
7
Hangzhou Zone B
cn-hangzhou-b
Hangzhou Zone F
cn-hangzhou-f
Hangzhou Zone G
cn-hangzhou-g
Hangzhou Zone H
cn-hangzhou-h
Hangzhou Zone I
cn-hangzhou-i
Hangzhou Zone J
cn-hangzhou-j
Hangzhou Zone K
cn-hangzhou-k
China (Shanghai)
cn-shanghai
8
Shanghai Zone A
cn-shanghai-a
Shanghai Zone B
cn-shanghai-b
Shanghai Zone E
cn-shanghai-e
Shanghai Zone F
cn-shanghai-f
Shanghai Zone G
cn-shanghai-g
Shanghai Zone L
cn-shanghai-l
Shanghai Zone M
cn-shanghai-m
Shanghai Zone N
cn-shanghai-n
China (Shenzhen)
cn-shenzhen
4
Shenzhen Zone C
cn-shenzhen-c
Shenzhen Zone D
cn-shenzhen-d
Shenzhen Zone E
cn-shenzhen-e
Shenzhen Zone F
cn-shenzhen-f
China (Heyuan)
cn-heyuan
2
Heyuan Zone A
cn-heyuan-a
Heyuan Zone B
cn-heyuan-b
China (Guangzhou)
cn-guangzhou
2
Guangzhou Zone A
cn-guangzhou-a
Guangzhou Zone B
cn-guangzhou-b
China (Chengdu)
cn-chengdu
2
Chengdu Zone A
cn-chengdu-a
Chengdu Zone B
cn-chengdu-b
China (Hong Kong)
cn-hongkong
3
Hong Kong Zone B
cn-hongkong-b
Hong Kong Zone C
cn-hongkong-c
Hong Kong Zone D
cn-hongkong-d
Singapore
ap-southeast-1
3
Singapore Zone A
ap-southeast-1a
Singapore Zone B
ap-southeast-1b
Singapore Zone C
ap-southeast-1c
Malaysia (Kuala Lumpur)
ap-southeast-3
3
Kuala Lumpur Zone A
ap-southeast-3a
Kuala Lumpur Zone B
ap-southeast-3b
Kuala Lumpur Zone C
ap-southeast-3c
Indonesia (Jakarta)
ap-southeast-5
3
Jakarta Zone A
ap-southeast-5a
Jakarta Zone B
ap-southeast-5b
Jakarta Zone C
ap-southeast-5c
Philippines (Manila)
ap-southeast-6
1
Manila Zone A
ap-southeast-6a
Thailand (Bangkok)
ap-southeast-7
2
Bangkok Zone A
ap-southeast-7a
Bangkok Zone B
ap-southeast-7b
Japan (Tokyo)
ap-northeast-1
3
Tokyo Zone A
ap-northeast-1a
Tokyo Zone B
ap-northeast-1b
Tokyo Zone C
ap-northeast-1c
South Korea (Seoul)
ap-northeast-2
2
Seoul Zone A
ap-northeast-2a
Seoul Zone B
ap-northeast-2b
US (Silicon Valley)
us-west-1
2
Silicon Valley Zone A
us-west-1a
Silicon Valley Zone B
us-west-1b
US (Virginia)
us-east-1
2
Virginia Zone A
us-east-1a
Virginia Zone B
us-east-1b
Germany (Frankfurt)
eu-central-1
3
Frankfurt Zone A
eu-central-1a
Frankfurt Zone B
eu-central-1b
Frankfurt Zone C
eu-central-1c
UK (London)
eu-west-1
2
London Zone A
eu-west-1a
London Zone B
eu-west-1b
Finance Cloud
Region Name
Region ID
City
Number of zones
Zone Name
Zone ID
China (Shanghai) Finance Cloud
shanghai-finance-1
Shanghai
4
China (Shanghai) Finance Cloud Zone F
cn-shanghai-finance-1f
China (Shanghai) Finance Cloud Zone G
cn-shanghai-finance-1g
China (Shanghai) Finance Cloud Zone K
cn-shanghai-finance-1k
China (Shanghai) Finance Cloud Zone Z
cn-shanghai-finance-1z
China (Shenzhen) Finance Cloud
cn-shenzhen-finance-1
Shenzhen
2
China (Shenzhen) Finance Cloud Zone D
cn-shenzhen-finance-1d
China (Shenzhen) Finance Cloud Zone E
cn-shenzhen-finance-1e
China (Beijing) Finance Cloud (Invitational Preview)
cn-beijing-finance-1
Beijing
2
China (Beijing) Finance Cloud (Invitational Preview) Zone K
cn-beijing-finance-1k
China (Beijing) Finance Cloud (Invitational Preview) Zone L
cn-beijing-finance-1l
Gov Cloud
Region Name
Region ID
City
Number of zones
Zone Name
Zone ID
China (Beijing) Gov Cloud 1
cn-north-2-gov-1
Beijing
3
China (Beijing) Gov Cloud 1 Zone B
cn-north-2-gov-1b
China (Beijing) Gov Cloud 1 Zone C
cn-north-2-gov-1c
China (Beijing) Gov Cloud 1 Zone D
cn-north-2-gov-1d