SASE (Secure Access Service Edge) provides a security client that routes internet traffic from corporate endpoints to the nearest Alibaba Cloud SASE service node. Endpoints without the security client cannot be managed by your zero trust policy. This topic describes how to configure account information, allowlists, and push notifications, and how to install and customize the SASE security client.
Background information
After employees install the SASE security client on their endpoints, administrators can view the total number of endpoints with the client installed and their details in the terminal list. The terminal list also helps administrators identify users and endpoints that have not yet installed the client. For more information, see View the terminal list.
After an employee logs on to the SASE security client, the endpoint's internet traffic is routed through SASE. SASE then inspects and manages the endpoint's internet access behavior.
Configure account information
The Account Settings tab includes sections for an enterprise authentication identifier, an account expiration time, and an account expiration policy.
Log on to the SASE console.
In the left-side navigation pane, click Settings Center > General Configurations.
On the Account Settings tab, configure the following information.
Enterprise Authentication Identifier
The enterprise authentication identifier is the credential your employees provide to log on to the SASE security client. We recommend using an identifier that is easy for users to remember, such as your company name. Users must enter this identifier when they first log on to the SASE security client.
Set account expiration information
Account Authentication Frequency
This setting defines the period after the last logon during which the SASE security client can automatically sign in. If this period is exceeded, the user is returned to the logon page and must re-enter their credentials to log on to the SASE security client.
Account Authentication Policy
Immediate Authentication
When the session expires, the SASE security client logs off immediately, and the employee must authenticate again. This option prioritizes security and may interrupt work.
Authentication During Network Change
When the session expires, the SASE security client does not log off immediately. Instead, the employee is prompted to re-authenticate the next time the computer wakes up or the network connection changes. This option prioritizes user experience and avoids interrupting work.
Configure allowlists
If you determine that specific internal applications, public websites, outbound files, external devices, or watermarks are secure and do not require SASE management or auditing, you can add them to an allowlist. The following procedure describes how to configure an allowlist for websites.
Log on to the SASE console.
In the left-side navigation pane, click Settings Center > General Configurations.
On the Whitelist tab, configure an allowlist for private access or data protection.
Configure a private access allowlist
On the Private Access tab, add a website to the allowlist.
SASE provides two ways to add a website to an allowlist:
IP Address Whitelist: Add one or more IP addresses or IP address ranges for the website.
Domain Name Whitelist: Add one or more domain names or wildcard domain names for the website.
Click Submit.
After the allowlist is configured, corporate users can directly access the allowlisted internal applications.
Configure a data protection allowlist
On the Data Loss Prevention tab, add an allowlist for specified files, data storage, external devices, or watermarks.
SASE supports the following types of allowlists. When you configure an allowlist, separate multiple user entries with a comma (,).
Outbound File Transfer Detection Whitelist
Data Storage (Available only in the Data Protection edition of SASE Internet Access)
Peripheral Control Whitelist
Screen Watermark Whitelist
Application Watermark Whitelist
Print Watermark Whitelist
Click Submit.
After the allowlist is configured, SASE no longer manages or intercepts the actions of allowlisted users. If a user is on the storage space allowlist and triggers an outbound detection policy, their files are not stored.
Configure an internet behavior management allowlist
On the Internet Behavior Management tab, add users, user groups, and domains to an allowlist.
User Whitelist
User Group Whitelist
Exceptional Domain Name
Click Submit.
After the allowlist is configured, SASE no longer manages or intercepts the internet behavior of allowlisted users and user groups, or their access to allowlisted domains.
Configure push notifications
To receive timely alerts about endpoint user activities, such as logon events, device registrations, client uninstallation requests, and requests to use non-compliant software, you can configure push notifications. Once configured, SASE uses DingTalk, WeCom, or Lark chatbots to send these notifications to your corporate chat groups. This allows you to track events as they happen.
Before you configure SASE push notifications, you must create a custom chatbot in DingTalk, WeCom, or Lark.
For information about how to create a custom DingTalk chatbot and obtain its webhook and webhook key, see Custom DingTalk chatbots.
For information about how to create a custom WeCom chatbot and obtain its webhook, see Custom chatbots for WeCom groups.
For information about how to create a custom Lark chatbot and obtain its webhook and webhook key, see Custom Lark chatbots.
Log on to the SASE console.
In the left-side navigation pane, click Settings Center > General Configurations.
On the Message Push tab, click Create Template.
In the Create Template panel, configure push notifications by selecting a notification source.
Parameter
Description
Notification Source
DingTalk Chatbot
WeCom Chatbot
Lark Chatbot
SMS
Email Address
Chatbot Configuration
DingTalk Webhook URL
Example: https://oapi.dingtalk.com/robot/send?access_token=****
Webhook Key
Example: 123456
WeCom Webhook URL
Example: https://qyapi.weixin.qq.com/cgi-bin/webhook/send?key=90e25f1d-99b5-4496-890d-4d1c6efe3****
Lark Webhook URL
Example: https://open.feishu.cn/open-apis/bot/v2/hook/4c83950f-2335-42ae-a5bd-11a96d6d****
Webhook Key
Example: 123456
Message Type
Select one or more of the following message types:
Log Storage Capacity Threshold Notification
File Storage Capacity Threshold Notification
Notification of Client Log Report
Notification of Exceeded Registration Quota on Client
Notification of Application for Client Uninstallation
Application for Using Unauthorized Software
Notification of Abnormal Connector
Terminal Alert
Click Connectivity Test. When a success message appears, click OK.
To modify or delete the template later, click Edit or Delete on the Message Push tab.
ImportantIf you delete a push notification template, SASE can no longer automatically send notifications to your corporate chat group. Proceed with caution.
Configure client enterprise elements
SASE allows you to customize the branding for the client, download page, browser authentication page, and help guide in both Chinese and English. The following procedure uses the Chinese version as an example to show how to customize these elements.
Log on to the SASE console.
In the left-side navigation pane, click Settings Center > General Configurations.
On the Enterprise Elements tab, perform the relevant configurations.

Client elements
Click Custom Client Elements.
On the 中文版设置 and English Client Settings tabs, configure the Logo, Background Image, Title, and Promotion Text for the Chinese and English versions of the client, respectively. You can preview the changes on the right side of the page.
After you complete the configuration, click OK.
Download page
Click Custom Elements on Client Download Page.
On the 中文版设置 and English Client Settings tabs, configure the Logo, Logo Name, Title, Description, Download URL for Android Client, and Download URL for iOS Client for the Chinese and English versions of the client download page, respectively. You can preview the changes on the right side of the page.
After you complete the configuration, click OK.
Authentication page
Click Customize Browser Authentication Page Elements.
On the 中文版设置 and English Client Settings tabs, configure the Logo, Background Image, and Title for the Chinese and English versions of the browser authentication page, respectively. You can preview the changes on the right side of the page.
After you complete the configuration, click OK.
Help guide
The help guide feature helps users understand and use the product. Common formats include new user guides, operational tips, and Frequently Asked Questions (FAQs). Users can access the guide from the client at any time.
Click Guide.
On the 中文版设置 and English Client Settings tabs, configure the Title, Description, and URL for the Chinese and English versions of the help guide, respectively, and then click OK.
Log on to the SASE client.
Go to to view the configured help guide.
ImportantEnsure that your SASE App version is v4.8.5 or later.

Configure custom storage
By default, trace data from outbound file detection is stored in the cloud. To enhance data security and control, the Data Protection edition of SASE Internet Access supports custom storage configurations. This feature allows you to store trace data in your own Object Storage Service (OSS) bucket or an on-premises MinIO storage system.
Log on to the SASE console.
In the left-side navigation pane, click Settings Center > General Configurations.
On the Custom Storage Settings tab, view the built-in storage usage, click the toggle switch, and then click OK.
In the Data Storage Settings dialog box, you can configure your Alibaba Cloud OSS bucket or an on-premises MinIO storage system. Refer to the following table for parameter descriptions.
Parameter
Description
Custom Storage Type
Alibaba Cloud OSS: Configure your purchased Alibaba Cloud OSS bucket.
On-premises MinIO storage system: Transfer data to your on-premises storage space. Currently, only MinIO storage systems are supported.
Note1. When storing data in an on-premises MinIO system, you must encrypt the data in MinIO to mitigate the security risks of plaintext storage.
2. If the network connection between your on-premises MinIO system and the SASE platform is lost, you cannot download original files from trace logs on the console. You must use the file storage address from the logs to download the files directly from your MinIO system.
3. SASE uses a cloud-based OCR detection engine. When detecting image files, the files are uploaded to the SASE cloud platform for analysis. However, SASE does not store your enterprise's outbound image data.
Bucket
The bucket name of your storage space.
Endpoint
The endpoint of your storage space. Both HTTP and HTTPS protocols are supported.
ImportantWe recommend that you configure the HTTPS protocol. Otherwise, you may need to adjust your browser settings to view screenshot evidence or download source files.
AccessKey ID
The AccessKey ID for the storage space. Enter an AccessKey ID that has data download permissions. Otherwise, you cannot download original files from Log Audit - Sensitive File Detection.
AccessKey Secret
The AccessKey secret for the storage space.
Maximum Size
Specifies the maximum size of a single file to be stored, up to 60 MB.
Click Test Network Connectivity to test the connection to the storage space.
Click Ok.
After configuration, custom data storage is automatically enabled. Data files that trigger an outbound detection policy are stored in your specified storage space.
To disable custom data storage, toggle the switch off. When disabled, data files that trigger an outbound detection policy are stored in the SASE built-in storage space. Ensure that the built-in storage has sufficient capacity to avoid storage issues.
Other operations
If your built-in storage space is insufficient, you can Scale Up or Clear the storage.
Expand: Click Scale Up to go to the SASE purchase page and buy additional file storage capacity.
Clear: Click Clear. In the Clear Logs dialog box, you can choose to Clear by Time Range or Clear All. Then click OK.
Download the SASE client (SASE App)
Log on to the SASE console.
In the left-side navigation pane, click Settings Center > General Configurations.
On the Download Client tab, download the client installation package.
Downloads are available for PC and Download Mobile Client.
Unzip the downloaded client package and double-click the setup.exe installer to install the security client.

After installation, the SASE security client icon appears on the employee's desktop.
Upgrade the SASE client (SASE App)
Log on to the SASE console.
In the left-side navigation pane, click Settings Center > General Configurations.
On the Client Update tab, select the operating system of your server.

Under the tab for each operating system, select the SASE App version that you want to download and click Download in the Actions column.
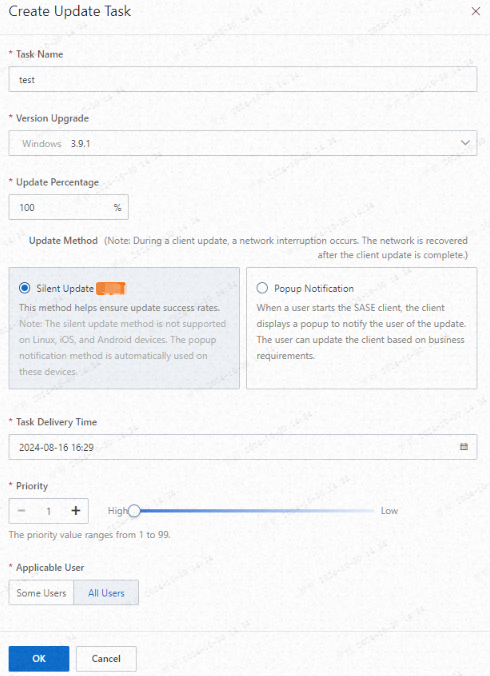
To push an upgrade task to employees, click Push Update, add an upgrade task, and then click OK.
You can specify a custom upgrade percentage. SASE randomly rolls out the upgrade to a corresponding percentage of the total endpoints that belong to employees in the effective user group.
In the Create Update Task dialog box, configure Task Name, Version Upgrade, Update Percentage, Update Method (Silent Update is recommended; Linux/Android/iOS do not support silent upgrade; alternatively select Popup Notification), Task Delivery Time, and Priority (valid values: 1 to 99; a smaller value indicates a higher priority).
Traffic redirection settings
The default SASE back-to-origin IP address assigned to each Virtual Private Cloud (VPC) may overlap with your corporate intranet's IP range, which can cause routing conflicts or access failures. To avoid this, you can configure custom proxy IP addresses.
Log on to the SASE console.
In the left-side navigation pane, click Settings Center > General Configurations.
On the Traffic Redirection Settings tab, configure proxy addresses for different operating systems, and click Submit.
ImportantOnly internal IP addresses can be configured as proxy IPs.
If your corporate internal applications have a firewall or other security control policies, ensure that the SASE back-to-origin IP address is included in those policies' allowlists to prevent traffic from being blocked.