The endpoint antivirus feature scans terminals for malware using Alibaba Cloud's malicious file detection service, automatically checking files against the latest antivirus engine versions. Use this feature to create scheduled or on-demand scan tasks, configure real-time protection, manage file blacklists and whitelists, and review scan results.
Supported check items and scan methods
The following table summarizes what the endpoint antivirus feature can detect and how it scans.
| Category | Details |
|---|---|
| Check items | Reverse shell, DDoS trojan, trojan downloader, engine test program, attacker tool, high-risk program, tainted basic software, malicious script, malicious program, mining program, proxy, ransomware, riskware, rootkit, password stealer, scanner, suspicious program, infectious virus, webshell, and worm. |
| Scan methods | Quick scan: Scans critical system paths, including services, drivers, startup items, running processes, and download, desktop, and document directories. Custom scan: Scans specific paths you define. Full disk scan: Scans all files. Real-time protection: Triggers automatically when a new file is written to disk or a new process starts. |
Real-time protection covers additional check items not available in scan tasks: cracking program, exploit, gametool, adware, and malicious document.
Supported operating systems
Blacklists and whitelists are supported on Windows and macOS.
Create a scan task
To use the endpoint antivirus feature, create a scan task that defines the scan method, resource usage, and how to handle detected threats. SASE runs the task on the targeted terminals.
Two scan task types are available:
Scheduled scan task: Runs at a defined frequency. Use for ongoing, periodic protection.
Immediate scan task: Runs once and expires after 24 hours. If a user does not log in to the SASE client within this period, their terminal is not scanned.
Create a scheduled scan task
Log on to the SASE console. In the left-side navigation pane, choose Terminal Protection > Antivirus.
On the Terminal Antivirus page, click Configure Policy.
On the Scheduled Scan tab, click Create Scheduled Task.
Configure the parameters and click OK.
| Parameter | Description | Example |
|---|---|---|
| Task name | The name of the task. | Antiviruspolicy_test |
| Description | A description of the task. | This task is used to perform antivirus scans on all enterprise terminals. |
| Priority | The task priority. Valid values: 1 to 10. A smaller value indicates a higher priority. | 1 |
| Policy status | The task runs only when enabled. | Enabled |
| Check item | The threat categories to scan for. | Select All |
| Scan mode | Quick scan: Scans critical system paths. Custom scan: Scans paths you specify. Full disk scan: Scans all files. | Quick Scan |
| Frequency | How often the task runs. | Every 3 days, 00:00–24:00 |
| Performance preference | Experience First: Minimizes resource usage; scans may be suspended or canceled. Balanced Mode: Balances system performance and scan completion. Security First: Prioritizes scan completion; uses more resources. | Experience First |
| Handling method | The action taken based on each file's risk level. High-risk: Notify User or Notify User and Quarantine Malicious Files. Medium-risk: Notify User or Notify User and Quarantine Malicious Files. Low-risk: Do Not Handle, Notify User, or Notify User and Quarantine Malicious Files. | High-risk: Notify User and Quarantine Malicious Files; Medium-risk: Notify User and Quarantine Malicious Files; Low-risk: Notify User |
| Applicable user | The users the task applies to. Select All Users or Some Users. If you select Some Users, choose the target user groups. | All Users |
| Exception user | Users excluded from the task. | — |
Create an immediate scan task
Log on to the SASE console. In the left-side navigation pane, choose Terminal Protection > Antivirus.
In the Scan Task section, click Scan Now.
Configure the parameters and click OK.
| Parameter | Description | Example |
|---|---|---|
| Task name | The name of the task. | Antiviruspolicy_test |
| Check item | The threat categories to scan for. | Select All |
| Scan mode | Quick scan: Scans critical system paths. Custom scan: Scans paths you specify. Full disk scan: Scans all files. | Quick Scan |
| Performance preference | Experience First: Minimizes resource usage; scans may be suspended or canceled. Balanced Mode: Balances system performance and scan completion. Security First: Prioritizes scan completion; uses more resources. | Experience First |
| Handling method | The action taken based on each file's risk level. High-risk: Notify User or Notify User and Quarantine Malicious Files. Medium-risk: Notify User or Notify User and Quarantine Malicious Files. Low-risk: Do Not Handle, Notify User, or Notify User and Quarantine Malicious Files. | High-risk: Notify User and Quarantine Malicious Files; Medium-risk: Notify User and Quarantine Malicious Files; Low-risk: Notify User |
| Applicable user | The users the task applies to. Select All Users or Some Users. If you select Some Users, choose the target user groups. | All Users |
| Exception user | Users excluded from the task. | — |
Configure real-time protection
Real-time protection triggers automatically when a new file is written to disk or a new process starts, detecting threats without waiting for a scheduled scan.
Log on to the SASE console. In the left-side navigation pane, choose Terminal Protection > Antivirus.
On the Terminal Antivirus page, click Configure Policy.
On the Real-time Protection tab, click Modify Configuration Item, configure the parameters, and click OK.
| Parameter | Description |
|---|---|
| Policy status | Toggle the switch to enable real-time protection. |
| Check item | The threat categories to monitor. Available items include all scan task check items, plus cracking program, exploit, gametool, adware, and malicious document. |
| Handling method | The action taken based on each file's risk level. High-risk: Notify User or Notify User and Quarantine Malicious Files. Medium-risk: Notify User or Notify User and Quarantine Malicious Files. Low-risk: Do Not Handle, Notify User, or Notify User and Quarantine Malicious Files. |
| Applicable user | The users real-time protection applies to. All Users: Applies to all user devices. Some Users: Select the target user groups. |
| Exception user | Users excluded from real-time protection. |
Configure blacklists and whitelists
Use a whitelist to exclude specific files from scanning. Use a blacklist to flag and quarantine file types detected on terminals.
Example: To skip scanning .exe files on Windows, add the exe extension to the whitelist. To block a file type across all terminals, add it to the blacklist. The SASE client notifies users or quarantines matching files according to your scan task configuration.
On the Terminal Antivirus page, click Configure Policy.
On the Blacklist/Whitelist tab, configure the entries.
Each entry is identified by one of the following criteria:
| Criterion | Description | Example |
|---|---|---|
| File name extension | The string after the last period (.) in a file name. | exe (from scan_file.exe) |
| File name | The full file name, including the extension. | scan_file.exe |
| Folder path | The absolute path to a folder. | C:\scan_dir |
| File path | The absolute path to a file. | C:\scan_dir\scan_file.exe |
| File MD5 hash value | The MD5 hash of the file contents. | 56486982bc352eb0e29efd54f7f0**** |
View virus statistics
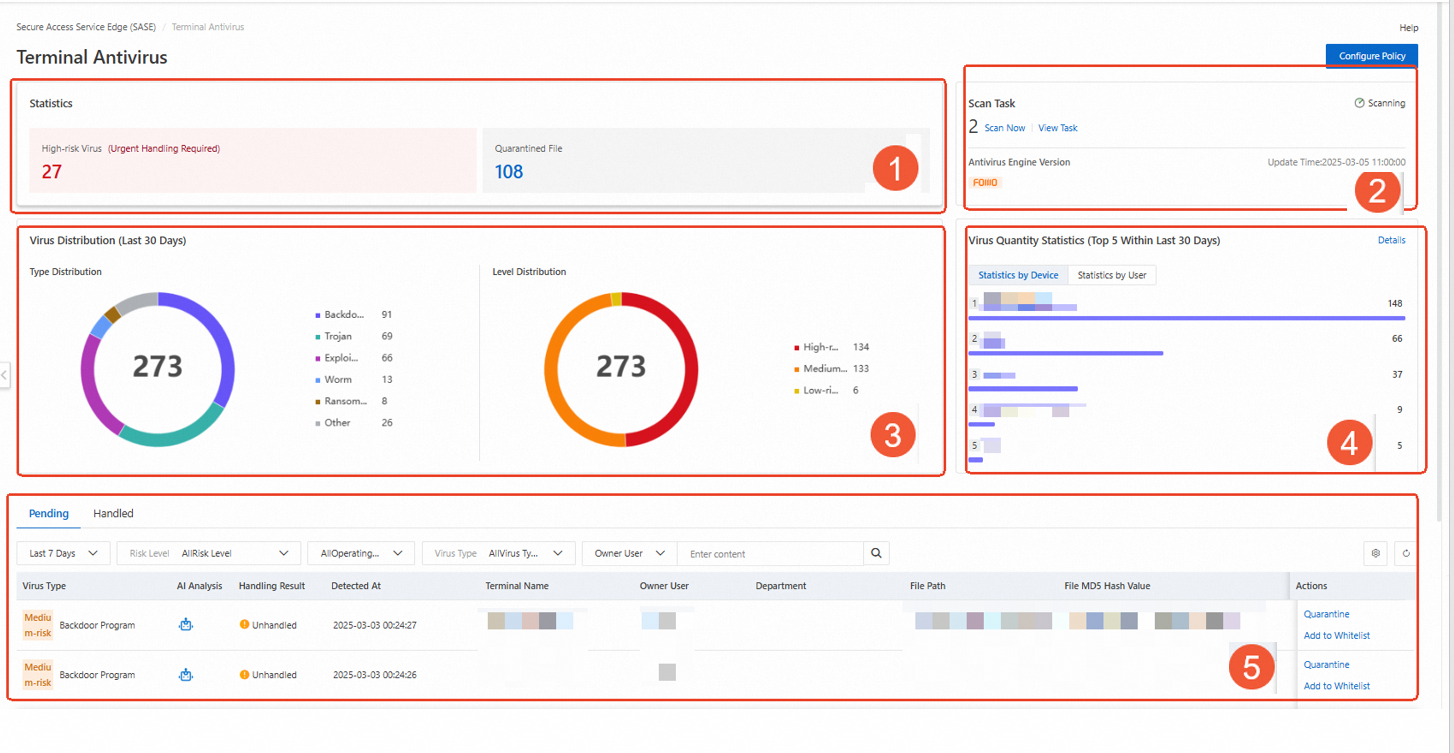
After configuring endpoint antivirus settings, check the protection status on the Terminal Antivirus page. By default, the page shows virus statistics for the previous 30 days.
| Section | Description |
|---|---|
| 1 | High-risk Virus: The number of detected high-risk malicious files that have not been quarantined. Click the number to view details in Section 5. Quarantined File: The number of quarantined files. Click the number to view details. Click Add to Whitelist to restore a quarantined file. |
| 2 | Scan Task: Create an immediate scan task, view all tasks, or check ongoing task details. Antivirus Engine Version: The latest antivirus engine version and last update time. |
| 3 | Type Distribution: The count of detected viruses by type. Level Distribution: The count of detected viruses by risk level. |
| 4 | The top 5 terminals and top 5 users with the highest virus counts. Click Details to view the breakdown. |
| 5 | Pending: High-risk malicious files that have not been quarantined. Add them to a whitelist or quarantine them based on your assessment. Handled: Files that have been quarantined, added to a whitelist, or failed to process. Click Add to Whitelist to restore a quarantined file. Click Remove from Whitelist to re-scan a whitelisted file. Click Ignore to dismiss a file that failed to process after confirming it is risk-free. |