This guide demonstrates how to automatically implement traffic isolation between local development and testing environments in Serverless App Engine (SAE) by simulating real call chains, facilitating rapid development and debugging.
Prerequisites
Install and configure Cloud Toolkit in IntelliJ IDEA.
- An Elastic Compute Service (ECS) instance that can be accessed over Secure Shell (SSH) is created in the virtual private cloud (VPC) where your application resides to establish channels between on-premises and cloud applications. For more information, see Create and manage an ECS instance in the console (express version). Important
- The ECS instance and the application must reside in the same VPC.
- The SSH channel requires password logon. Key pair logon is not supported.
- If a proxy is configured for your operating system, the system may fail to establish a channel between on-premises and cloud applications. You must disable the proxy and then try again.
Background
Using a Spring Cloud microservice application as an example, you can achieve traffic isolation by:
Setting traffic tags
Using end-cloud debugging
Routing traffic through different paths to SAE testing or local development environments
No business code modifications required
Step 1: Deploy applications to SAE testing environment
Deploy the demo application and name them with spring-cloud-zuul, spring-cloud-a, spring-cloud-b, and spring-cloud-c. For specific operations, see Modify service registration and discovery of applications to Nacos.
You can deploy applications using either image or JAR package methods and should configure the startup parameters -Dnacos.use.endpoint.parsing.rule=false and -Dnacos.use.cloud.namespace.parsing=false to utilize the purchased registration center.
Step 2: Configure end-cloud interconnection
Start IntelliJ IDEA.
In the top menu bar, select .
In the Settings dialog box, select .
On the Microservice page, configure the relevant parameters for interconnecting on-premises systems with the cloud.
Proxy: To set up a proxy, purchase an ECS instance with a public IP within the same VPC as the SAE application. Then, add this instance to the Proxy page.
Microservice: On the Microservice page, configure the proxy and register with the purchased MSE center.
MSE: On the MSE page, configure the relevant parameters.
Enter the License Key and App Name.
Log on to the SAE Webshell and execute the following command to retrieve the License Key and App Name.
env | grep javaFor instructions on how to log on to the Webshell, see Display the webshell window in full screen.
Sample output:
JAVA_TOOL_OPTIONS=-javaagent:/home/admin/.opt/ArmsAgent/arms-bootstrap-1.7.0-SNAPSHOT.jar -Darms.licenseKey=iioe7jcnuk@a0bcdaec24f**** -Darms.appId=8641dbc9-8663-4c47-95f7-683fa6dd**** -Darms.agent.env=Serverless -Darms.agent.args= -Dprofiler.micro.service.canary.enable=true -Dprofiler.micro.service.metadata.report.enable=true -Dprofiler.micro.service.http.server.enable=true -Dmsc.appName=cn-shenzhen-test-sc-gateway-****** -Dmsc.licenseKey=iioe7jcnuk@460d62050fa****Set the tag. In the Tag field, enter local.
Download the required agent to your local computer.
Click Apply, then click OK.
Launch the local application and confirm the integrated debugging is successful.
When you see a message in the Info dialog box confirming that the interconnection between on-premises and cloud is successfully enabled, this means the feature is now active.
Step 3: Test traffic routing
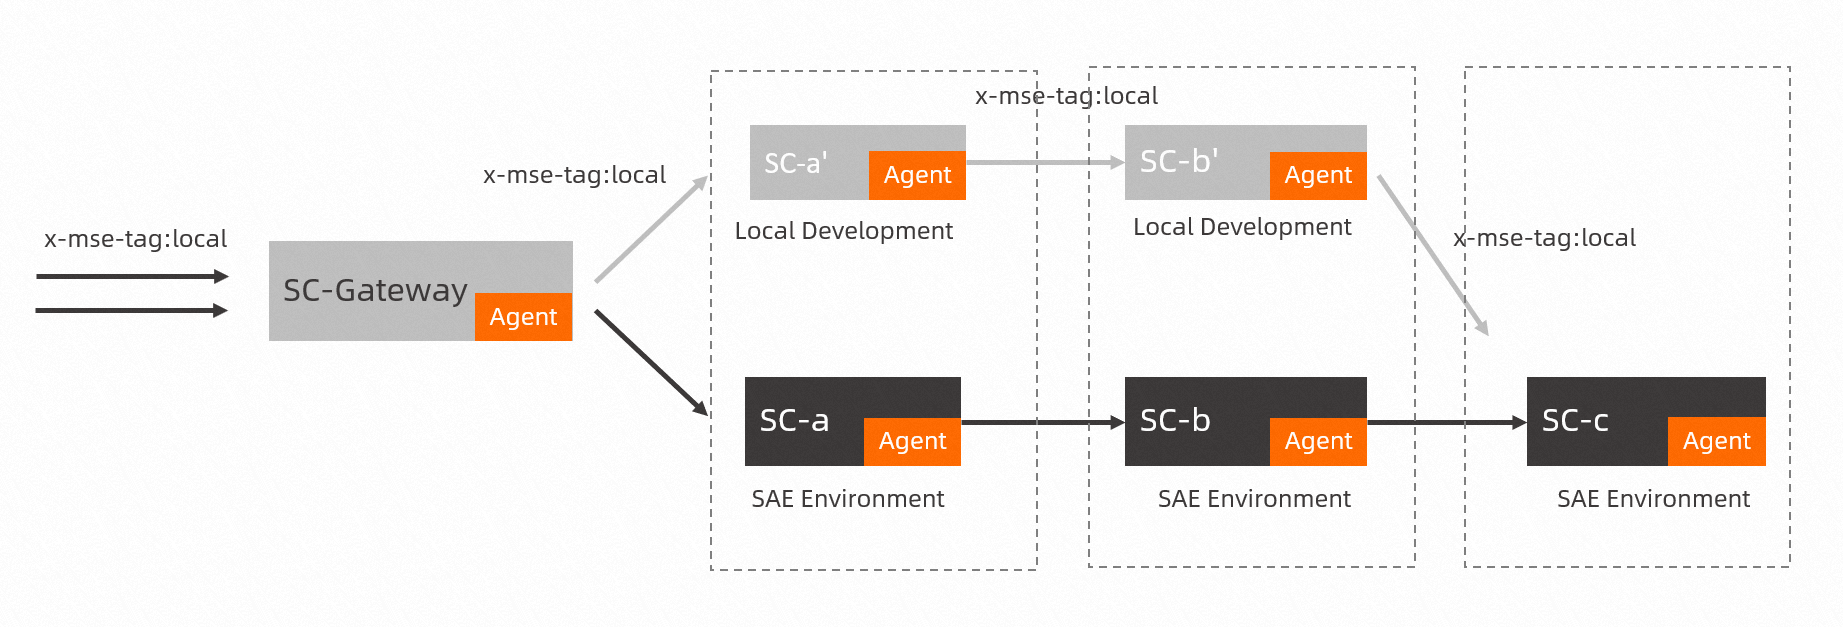
When sending an HTTP request to the cloud-native gateway, include x-mse-tag=[local] in the request header. Once configured, traffic will automatically complete closed loop in specified environment.
The key x-mse-tag is a static field; its value must match the environment tag.
After setting the environment tag, use the curl command to initiate a traffic call request. The results are as follows:
Main path:
curl http://47.106.XX.XX:8080/A/aOutput:
A[10.0.1.160] -> B[10.0.1.161] -> C[10.0.1.162]Branch path:
curl http://47.106.XX.XX:8080/A/a \--header 'x-mse-tag: local'Output:
A[127.0.0.1] -> B[127.0.0.1] -> C[10.0.1.162]