Realtime Compute for Apache Flink simplifies real-time data ingestion by automatically handling the switch from full to incremental synchronization, metadata discovery, schema evolution, and whole-database synchronization. This topic shows you how to quickly build a data ingestion job that streams data from ApsaraDB RDS for MySQL to Hologres.
Background
The following figure shows how these databases and tables appear in the DMS console.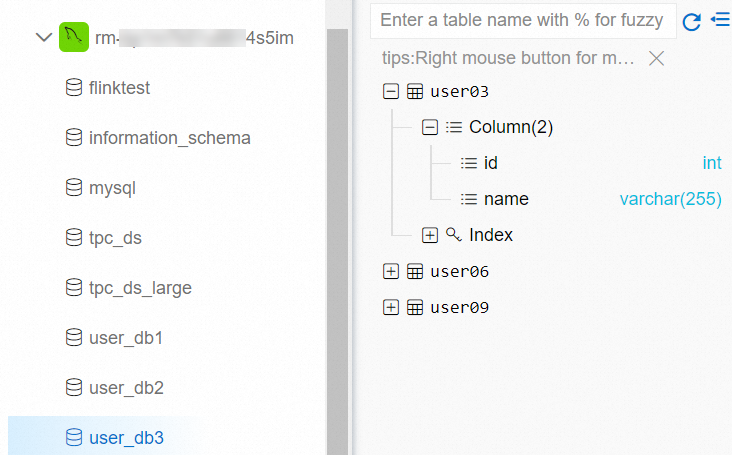
Follow these steps to develop a data ingestion job that synchronizes all these tables to Hologres and merges the sharded user tables into a single table:
This topic uses Flink CDC data ingestion to perform whole-database synchronization and merge sharded tables. This allows you to complete full and incremental data synchronization, as well as real-time schema change synchronization, with a single job.
Prerequisites
If you use a RAM user or RAM role, ensure that you have the required permissions to access the Flink console. For more information, see Manage permissions.
You have created a Flink workspace. For more information, see Activate Realtime Compute for Apache Flink.
Upstream and downstream storage
You have created an ApsaraDB RDS for MySQL instance. For more information, see (Deprecated, redirects to "Step 1") Quickly create an ApsaraDB RDS for MySQL instance.
You have created a Hologres instance. For more information, see Purchase a Hologres instance.
NoteThe ApsaraDB RDS for MySQL and Hologres instances must be in the same region and virtual private cloud (VPC) as the Flink workspace. Otherwise, you must establish a network connection. For more information, see How do I access other services across VPCs? and How do I access the internet?.
You have prepared test data and configured IP whitelists. For more information, see Prepare MySQL test data and a Hologres database and Configure an IP whitelist.
Prepare MySQL test data and a Hologres database
Click tpc_ds.sql, user_db1.sql, user_db2.sql, and user_db3.sql to download the test data files to your local machine.
In the DMS console, prepare the test data in your ApsaraDB RDS for MySQL instance.
Log on to your ApsaraDB RDS for MySQL instance by using DMS.
For more information, see (Deprecated, redirects to "Step 2") Log on to an ApsaraDB RDS for MySQL instance by using DMS.
In the SQL Console window, enter the following commands and click Execute.
The following commands create four databases:
tpc_ds,user_db1,user_db2, anduser_db3.CREATE DATABASE tpc_ds; CREATE DATABASE user_db1; CREATE DATABASE user_db2; CREATE DATABASE user_db3;In the top navigation bar, click Data Import.
On the Batch Data Import tab, select a database to import data into, upload the corresponding SQL file, click Submit, and then click Execute Change. In the dialog box that appears, click Confirm Execution.
Repeat this operation to import the corresponding data files into the
tpc_ds,user_db1,user_db2, anduser_db3databases.
In the Hologres console, create a database named
my_userto store the merged user table data.For more information, see Create a database.
Configure an IP whitelist
To allow Flink to access the ApsaraDB RDS for MySQL and Hologres instances, add the CIDR block of your Flink workspace to the IP whitelist of both instances.
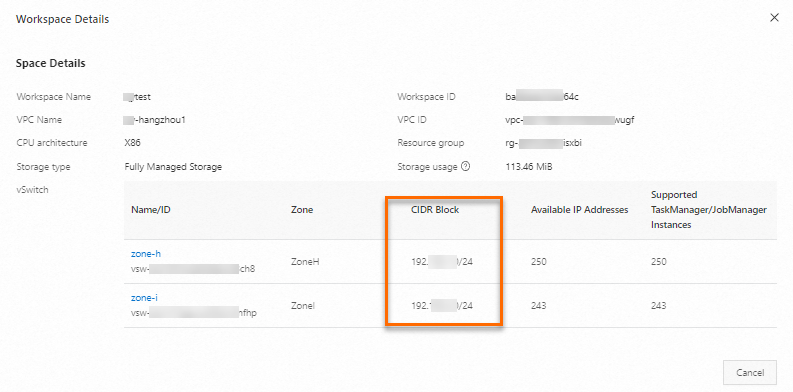
Obtain the CIDR block of the Flink workspace.
Log on to the Realtime Compute for Apache Flink console.
In the list of workspaces, find the target workspace and choose in the Actions column.
In the Workspace Details dialog box, view the CIDR Block information for the Flink vSwitch.
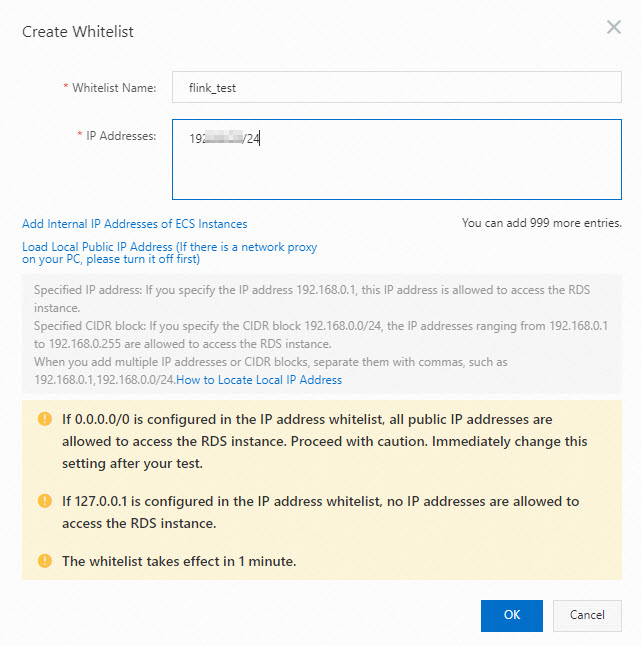
Add the Flink CIDR block to the IP whitelist of the ApsaraDB RDS for MySQL instance.
For more information, see Configure an IP whitelist.
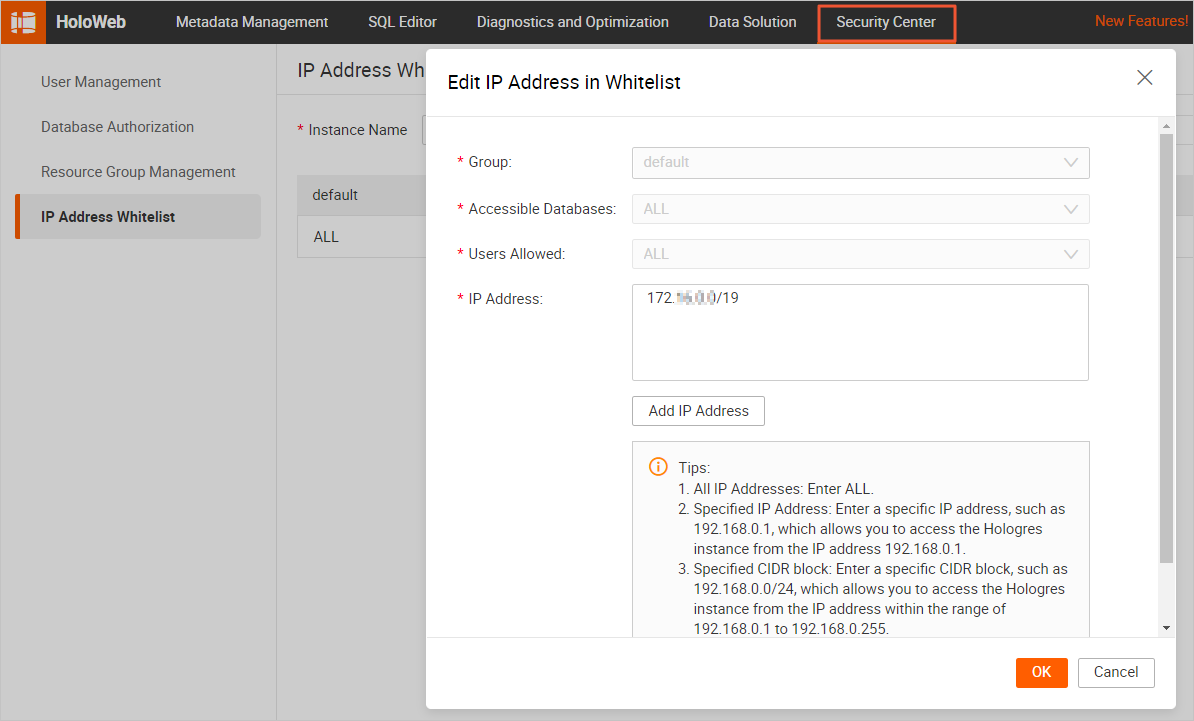
Add the Flink CIDR block to the IP whitelist of the Hologres instance.
When configuring a data connection in HoloWeb, set Login Method to Password-free login for current user before you configure an IP whitelist for the connection. For more information, see IP whitelist.
Step 1: Develop the ingestion job
Log on to the Flink development console and create a new job.
On the page, click New.
Click Blank Data Ingestion Draft.
Realtime Compute for Apache Flink provides a rich set of code templates, each with specific use cases, code samples, and guidance. You can click a template to learn about product features and syntax for implementing your business logic.
Click Next.
In the New Data Ingestion Job Draft dialog box, configure the job parameters.
Parameter
Description
Example
File Name
The name of the job.
NoteThe job name must be unique within the current project.
flink-test
Storage Location
The folder where the job's code file is stored.
You can also click the
 icon next to an existing folder to create a subfolder.
Job Drafts
Engine Version
The Flink engine version used by the job. For information about engine version numbers, version compatibility, and important lifecycle dates, see Engine Versions.
vvr-11.1-jdk11-flink-1.20
Click OK.
Copy the following job code into the job editor.
The following code synchronizes all tables from the
tpc_dsdatabase to Hologres and merges the sharded user tables into a single table in Hologres:source: type: mysql name: MySQL Source hostname: localhost port: 3306 username: username password: password tables: tpc_ds.\.*,user_db[0-9]+.user[0-9]+ server-id: 8601-8604 # (Optional) Synchronize table and column comments. include-comments.enabled: true # (Optional) Prioritize the distribution of unbounded chunks to prevent potential TaskManager OutOfMemory errors. scan.incremental.snapshot.unbounded-chunk-first.enabled: true # (Optional) Enable parsing filters to accelerate reading. scan.only.deserialize.captured.tables.changelog.enabled: true sink: type: hologres name: Hologres Sink endpoint: ****.hologres.aliyuncs.com:80 dbname: cdcyaml_test username: ${secret_values.holo-username} password: ${secret_values.holo-password} sink.type-normalize-strategy: BROADEN route: # Merge and synchronize the sharded user tables to the my_user.users table. - source-table: user_db[0-9]+.user[0-9]+ sink-table: my_user.usersNoteTables from the MySQL
tpc_dsdatabase are mapped directly to identically named tables in the destination, so theroutesection requires no extra mapping configuration. To synchronize the tables to a database with a different name, such asods_tps_ds, configure theroutemodule as follows:route: # Merge and synchronize the sharded user tables to the my_user.users table. - source-table: user_db[0-9]+.user[0-9]+ sink-table: my_user.users # Rename the database for all tables under tpc_ds and synchronize them to ods_tps_ds. - source-table: tpc_ds.\.* sink-table: ods_tps_ds.<> replace-symbol: <>
Step 2: Start the job
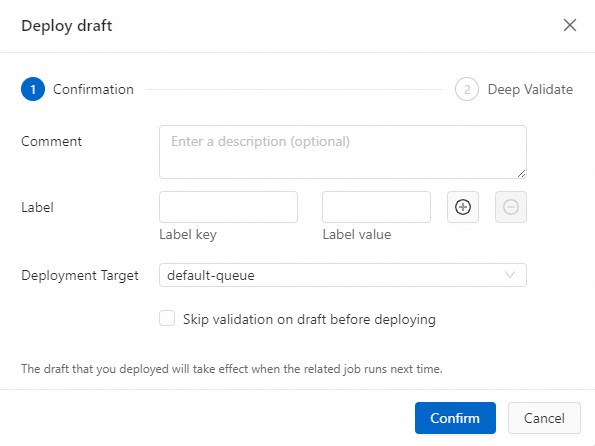
On the page, click Deploy. In the dialog box that appears, click Confirm.
On the page, click Start in the Actions column for the target job. Configure the parameters as required. For more information, see Start a job.
Click Start.
After the job starts, you can view its runtime information and status on the Job Operations page.

Step 3: Verify full synchronization
Log on to the Hologres management console.
On the Metadata Management tab, verify that the 24 tables and their data are present in the
tpc_dsdatabase of the Hologres instance.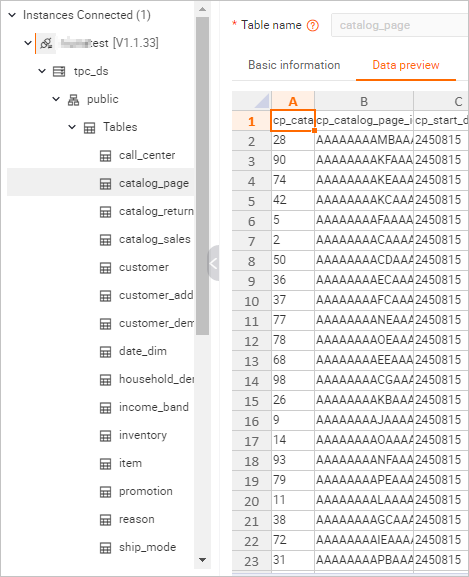
On the Metadata Management tab, check the schema of the
userstable in themy_userdatabase.The following figures show the synchronized table schema and data.
Table schema
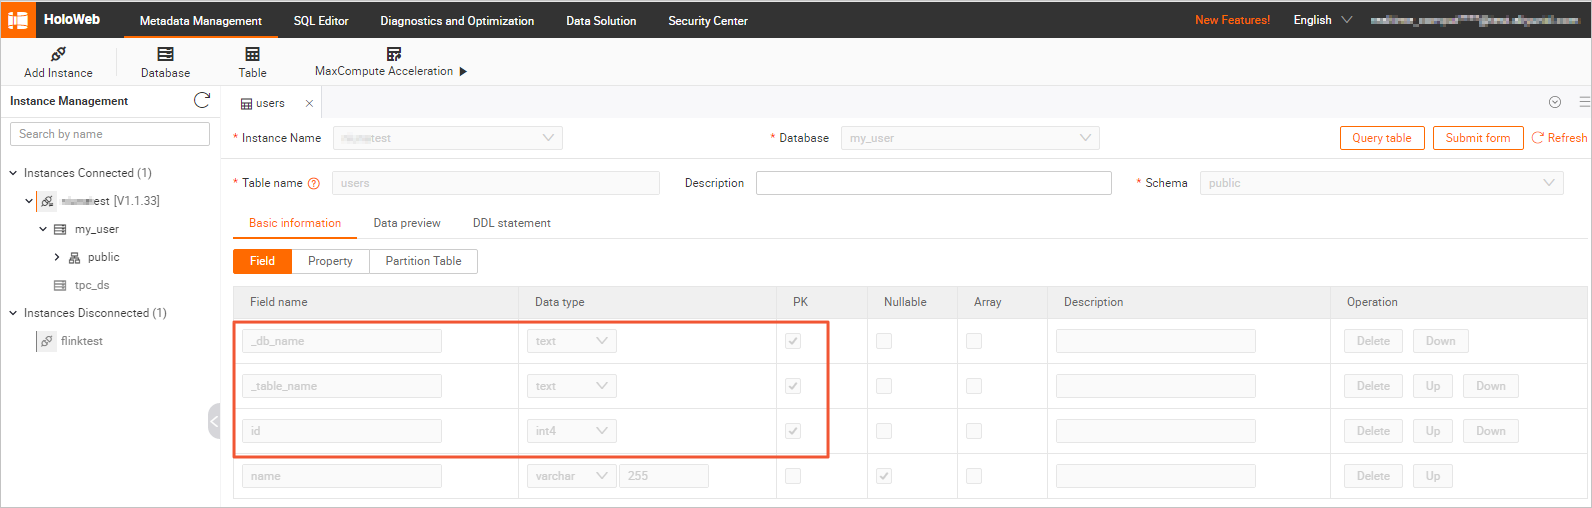
The
userstable schema includes two additional columns not found in the source MySQL tables:_db_nameand_table_name. These columns indicate the source database and table for each row and are part of the composite primary key, ensuring data uniqueness after the sharded tables are merged.Table data
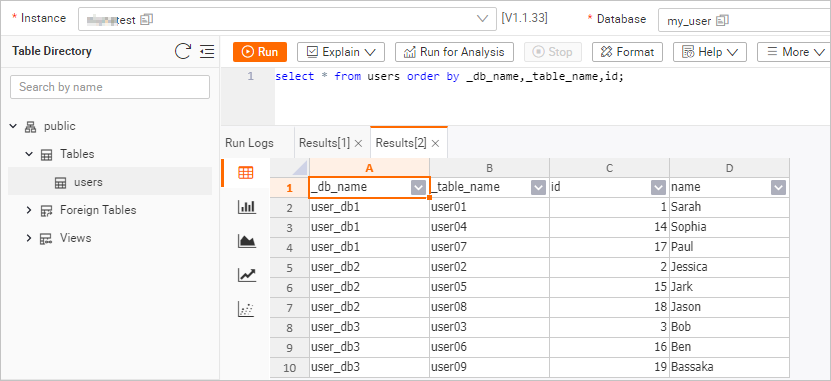
In the upper-right corner of the
userstable information page, click Query Table. Enter the following command, and then click Run.select * from users order by _db_name,_table_name,id;The query result is shown in the following figure.
Step 4: Verify incremental synchronization
After full synchronization completes, the job automatically switches to the incremental synchronization phase without manual intervention. You can check the currentEmitEventTimeLag value on the Monitoring and Alerts tab to determine the data synchronization phase.
Log on to the Realtime Compute for Apache Flink console.
Click Console in the Actions column for the target workspace.
On the page, click the name of the target job.
Click the Monitoring and Alerts (or Metrics) tab.
Examine the
currentEmitEventTimeLagchart to determine the data synchronization phase.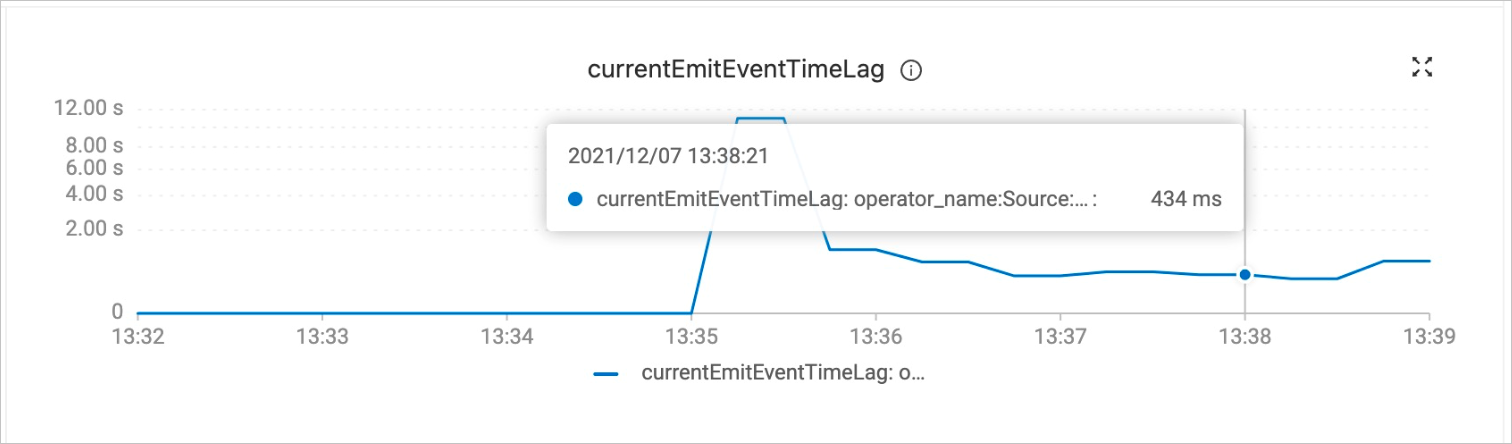
A value of 0 indicates the full synchronization phase.
A value greater than 0 indicates the incremental synchronization phase.
Verify real-time data and schema change synchronization.
The MySQL CDC source supports real-time data and schema synchronization during the incremental phase. To verify this, modify the schema and data of a sharded user table in MySQL after the job enters this phase.
Log on to the ApsaraDB RDS for MySQL instance by using DMS.
For more information, see (Deprecated, redirects to "Step 2") Log on to an ApsaraDB RDS for MySQL instance by using DMS.
In the
user_db2database, execute the following commands to modify the schema of theuser02table and to insert and update data.USE `user_db2`; ALTER TABLE `user02` ADD COLUMN `age` INT; -- Add the age column. INSERT INTO `user02` (id, name, age) VALUES (27, 'Tony', 30); -- Insert a row that includes the age data. UPDATE `user05` SET name='JARK' WHERE id=15; -- Update another table and change the name to uppercase.In the Hologres console, check the changes to the schema and data of the
userstable.In the upper-right corner of the
userstable information page, click Query Table, enter the following command, and then click Run.select * from users order by _db_name,_table_name,id;The following figure shows the query result. The schema change on
user02and the data modifications are propagated in real time, even though the sharded tables have different schemas. The Hologresuserstable now shows the newagecolumn, the inserted record for Tony, and the updated record for JARK.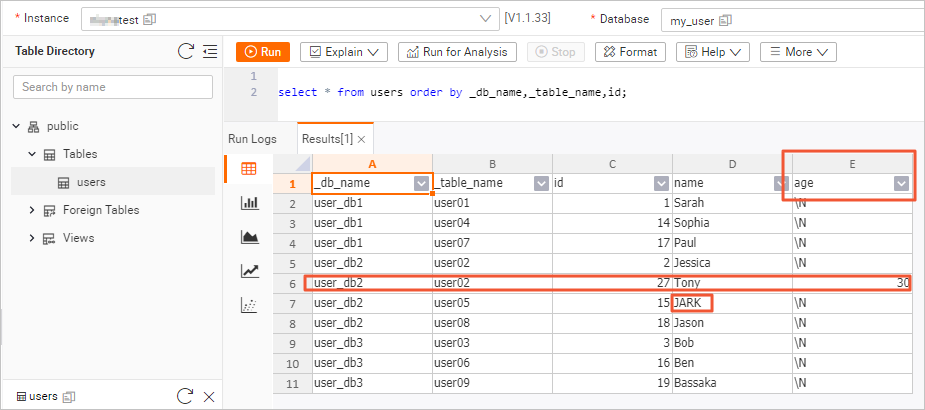
(Optional) Step 5: Configure job resources
For better performance, you can adjust job resources such as concurrency, TaskManager memory, and CUs based on your data volume.
On the page, click the name of the target job.
On the Deployment Details tab, click Edit in the upper-right corner of the Resource Configuration section.
Manually set resource parameters such as TaskManager memory and concurrency.
On the right side of the Resource Configuration section, click Save.
Restart the job.
Resource configuration changes take effect only after you restart the job.
Related documents
For the syntax of each data ingestion module, see Flink CDC data ingestion job development reference.
If you encounter issues while your data ingestion job is running, see Common issues and solutions for data ingestion jobs.