Use this guide to identify which file type is consuming storage on your ApsaraDB RDS for SQL Server instance, reclaim available space, and expand capacity when needed.
Key concepts
Understanding the distinction between allocated and used storage is a prerequisite to evaluating every reclaim method in this guide.
| Quantity | Definition |
|---|---|
| Data space used | Storage actually holding data rows and index pages. Increases on inserts; decreases on deletes. |
| Data space allocated | Storage formatted and reserved for a database file. Once allocated, it does not shrink automatically — even after deletes. |
| Data space allocated but unused | The difference between allocated and used space. This is the maximum amount that shrinking data files can reclaim. |
| Unallocated storage | Extents (64 KB each) not yet assigned to any database object. Shrinking a data file releases this back to the operating system. |
If your data workload grows continuously, the unallocated portion is typically small. Shrinking data files reclaims only unallocated storage — optimize and reclaim the allocated-but-unused storage first.
Check storage usage
Four methods are available to view storage usage. Choose the one that matches what you need to see.
Method 1 — Basic Information page: Log on to the ApsaraDB RDS console and go to the Basic Information page. The Usage Statistics section shows overall storage usage only — no breakdown by file type, no historical data.

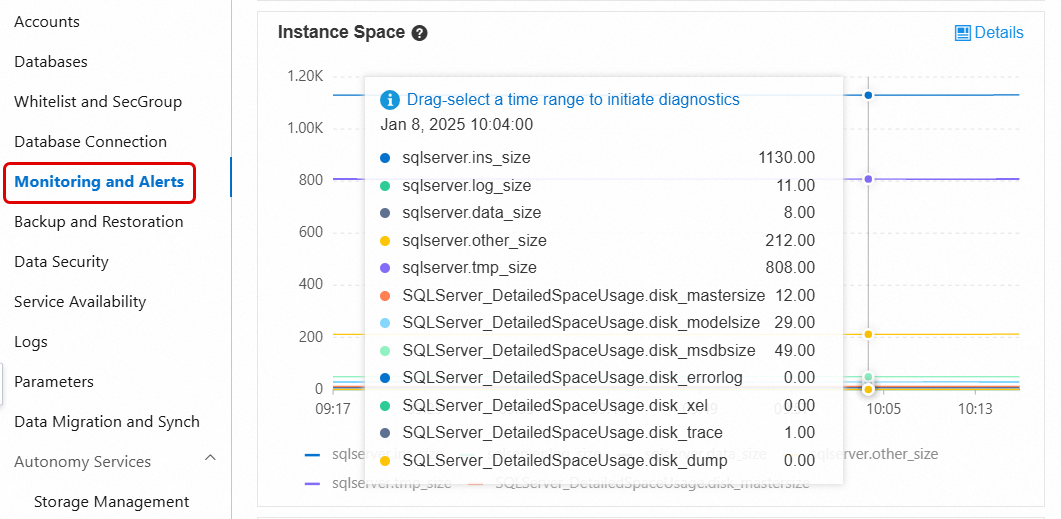
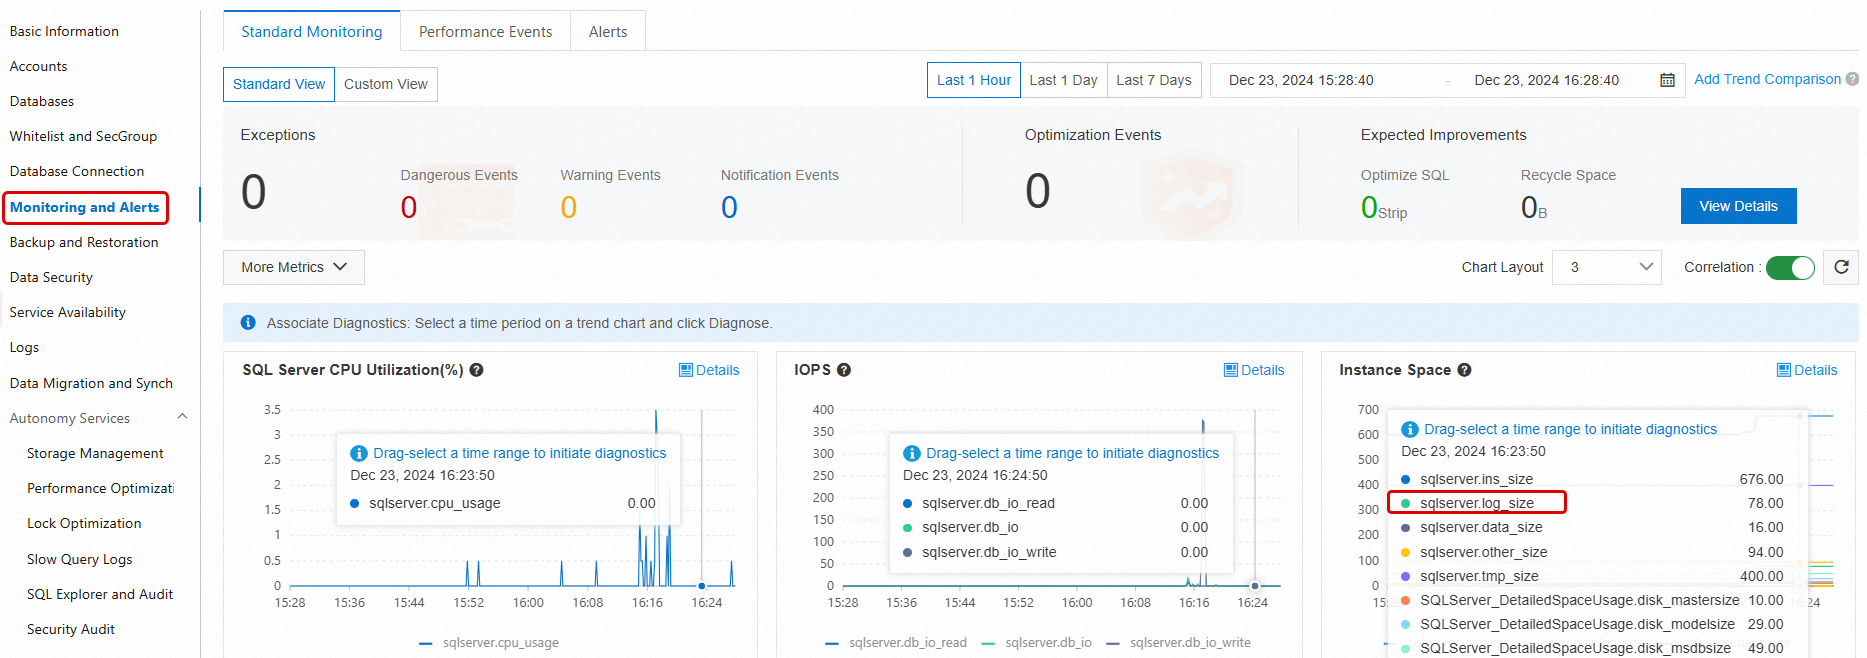
Method 2 — Monitoring and Alerts: Navigate to the Monitoring and Alerts page and open the Standard Monitoring tab. This shows both current and historical storage usage broken down by data files, log files, temporary files, and system files. For details, see View standard monitoring information.
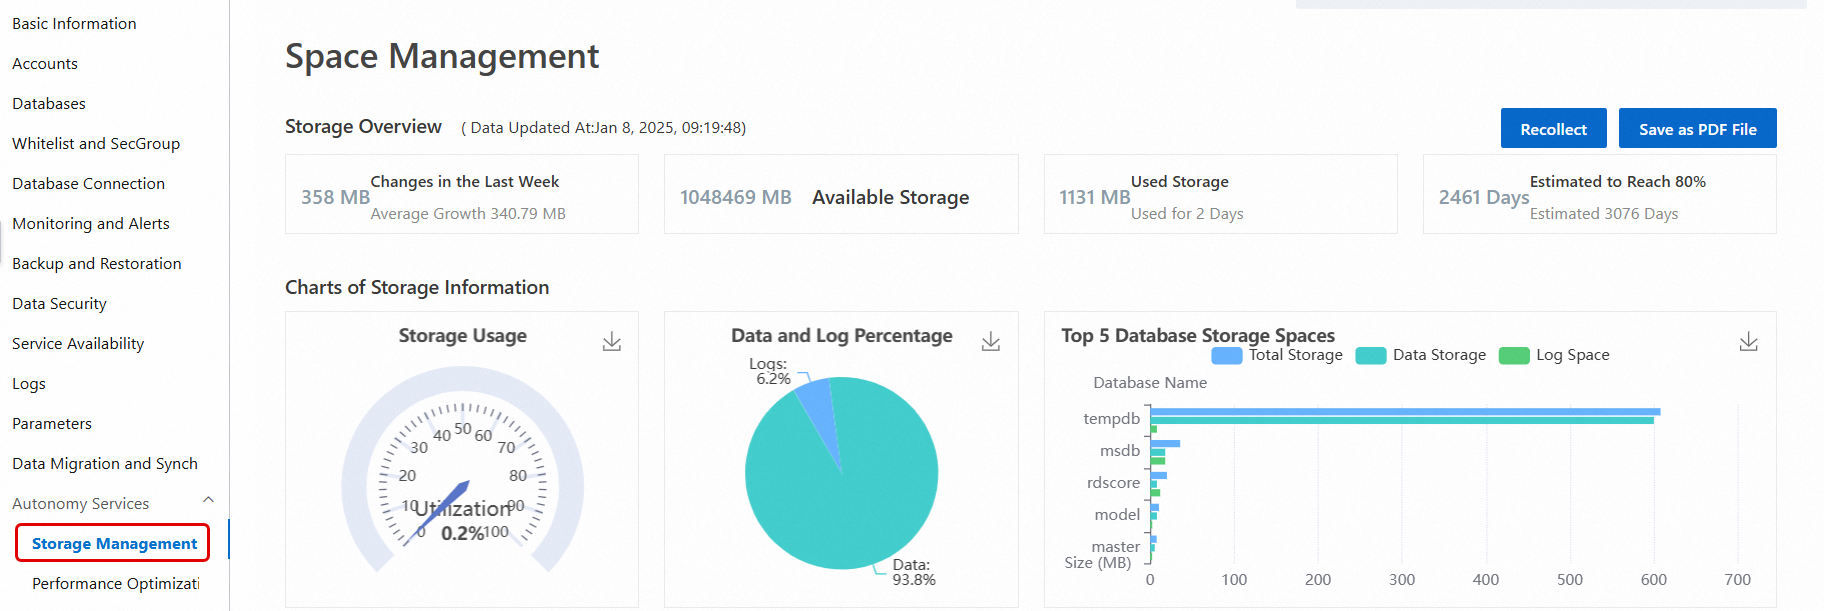
Method 3 — Autonomy Services > Storage Management: In the left-side navigation pane, choose Autonomy Services > Storage Management. This view shows the percentage of used data and log storage, consumption trends, and the top 10 databases and top 20 tables consuming the most storage. For details, see Storage management.
This option is not available for instances running SQL Server 2008 R2 with cloud disks.
Method 4 — SQL Server Management Studio (SSMS): Connect to your instance using SSMS or another client tool and run the following system commands. For connection instructions, see Connect to an ApsaraDB RDS for SQL Server instance by using SSMS.
Command What it reports sp_helpdbTotal storage of each database (data files + log files) sp_spaceusedName, used storage, and unallocated storage of the current database DBCC SQLPERF(LOGSPACE)Total and used log storage for each database DBCC SHOWFILESTATSTotal and used data storage for the current database SELECT * FROM sys.master_filesTotal size of data files and log files across all databases SELECT * FROM sys.dm_db_log_space_usageTotal and used log storage for the current database (SQL Server 2012 or later) SELECT * FROM sys.dm_db_file_space_usageTotal and used data storage for the current database (SQL Server 2012 or later)
If storage usage is abnormally high, go to the Monitoring and Alerts page and check the Standard Monitoring tab to identify which file type is the source. Then follow the corresponding section below.
Reclaim data storage
Archive historical data
Delete, migrate to another RDS instance, or archive historical data that is no longer frequently queried. This reduces the total data stored on the instance.
This method is effective at reducing long-term growth, but requires changes to application logic and cooperation with application designers and developers.
Enable data compression
Data compression is available for:
SQL Server 2016 or later
SQL Server Enterprise Edition earlier than SQL Server 2016
Compression supports row compression and page compression, and can be applied to individual tables, indexes, or partitions. The compression ratio ranges from 10% to 90%, depending on the schema, column data types, and value distribution.
Use the sp_estimate_data_compression_savings stored procedure to estimate how much space compression will save on a specific table or index before enabling it.
Enabling or changing compression requires data definition language (DDL) operations, which lock the table during execution. Run these operations during off-peak hours.
On SQL Server Enterprise Edition, set theONLINEparameter toONto avoid long-term table locking.
Data compression increases CPU overhead. Enable compression only on large tables where the storage savings justify the CPU cost.
For details, see the Microsoft documentation on Data compression.
Defragment indexes
High index fragmentation causes the index to consume more storage than its actual data requires. Defragmenting reclaims that excess allocated space.
View index fragmentation: In the left-side navigation pane, choose Autonomy Services > Performance Optimization, then click the Index Usage tab. This tab shows fragmentation levels per table and suggestions to rebuild or reorganize specific indexes.
Fragmentation rate measures the percentage of pages whose logical order does not match their physical order — not the percentage of empty space per page. To analyze average idle space per page, querysys.dm_db_index_physical_statsinSAMPLEDorDETAILEDmode and check theavg_page_space_used_in_percentcolumn. See sys.dm_db_index_physical_stats (Transact-SQL).
Choose the method based on the fragmentation level:
Rebuild (high fragmentation): Produces better results and reorganizes storage more completely. By default, the table is locked during the rebuild. On SQL Server Enterprise Edition, set
ONLINE = ONto allow concurrent access.ImportantAn index rebuild can cause a significant, short-term increase in both data storage and log size. Reserve at least twice the size of the index being rebuilt as available storage before starting. Check available space on the Basic Information page under Instance Resources.
ALTER INDEX <IX_YourIndexName> ON <YourTableName> REBUILD WITH (ONLINE = ON);After the rebuild completes, the console updates fragmentation data asynchronously. Click Recollect to pull the latest data immediately, then click Export Script to download the results for verification.

Reorganize (low fragmentation): Less intrusive than a rebuild but also less effective. Use this when fragmentation is low and you cannot accept a table lock.
Run defragmentation operations during off-peak hours — reading many index pages during a defragmentation operation can degrade query performance.
Shrink data files
Shrinking data files only reclaims unallocated storage. If your workload will re-grow the files to the same size, shrinking wastes time and generates unnecessary transaction log records. Shrink data files only when the unallocated space is significant and the data that caused it will not return.
Capture a baseline before shrinking. Run the following query to record current file sizes. Run it again after the shrink to confirm the result.
SELECT
    file_id,
    name,
    CAST(FILEPROPERTY(name, 'SpaceUsed') AS bigint) * 8 / 1024.0 AS space_used_mb,
    CAST(size AS bigint) * 8 / 1024.0 AS space_allocated_mb
FROM sys.database_files
WHERE type_desc = 'ROWS';Shrinking many data files at once generates a large volume of transaction logs and can block services for an extended period. Shrink in small increments using Method 1.
Method 1 — Batch shrink (recommended): Shrink 5 GB at a time to limit the impact on transaction logs and service availability.
DECLARE @dbName NVARCHAR(128) = 'YourDatabaseName'  -- Database name
DECLARE @fileName NVARCHAR(128)  -- Data file name
DECLARE @targetSize INT = 1024   -- Target size (MB)
DECLARE @shrinkSize INT = 5120   -- Amount to shrink per iteration (MB); 5 GB recommended
DECLARE @currentSize INT         -- Current size
DECLARE @sql NVARCHAR(500)
DECLARE @waitTime INT = 10       -- Wait time between iterations (seconds)

-- Get the data file name
SELECT @fileName = name
FROM sys.master_files
WHERE database_id = DB_ID(@dbName)
AND type_desc = 'ROWS'

-- Shrink in a loop
WHILE 1 = 1
BEGIN
    -- Get current file size
    SELECT @currentSize = size/128
    FROM sys.database_files
    WHERE name = @fileName

    -- Stop when the target size is reached
    IF @currentSize <= @targetSize
    BEGIN
        PRINT 'Shrink complete, current size: ' + CAST(@currentSize AS VARCHAR(20)) + 'MB'
        BREAK
    END

    -- Calculate the new target for this iteration
    DECLARE @newSize INT = @currentSize - @shrinkSize
    IF @newSize < @targetSize
        SET @newSize = @targetSize

    -- Run the shrink
    SET @sql = 'DBCC SHRINKFILE (N''' + @fileName + ''', ' + CAST(@newSize AS VARCHAR(20)) + ')'
    PRINT 'Executing shrink: ' + @sql
    EXEC (@sql)

    -- Wait before the next iteration
    PRINT 'Waiting ' + CAST(@waitTime AS VARCHAR(10)) + ' seconds before continuing...'
    WAITFOR DELAY '00:05:00'
END
Method 2 — Shrink a single file: Run DBCC SHRINKFILE directly to shrink one data file to a target size.
DBCC SHRINKFILE(<File ID>, <Expected file size after shrink in MB>)Before running this command, check how much space is allocated versus used. The minimum target size is the allocated space, not the used space. For example, if sys.database_files shows a total of 1,673,344 pages and 1,313,432 allocated pages, the extent size is 64 KB:
Total size: (1,673,344 x 64) / 1,024 = 104,584 MB
Minimum target (allocated): (1,313,432 x 64) / 1,024 = 82,089.5 MB
To shrink to 90,000 MB:
DBCC SHRINKFILE(1, 90000)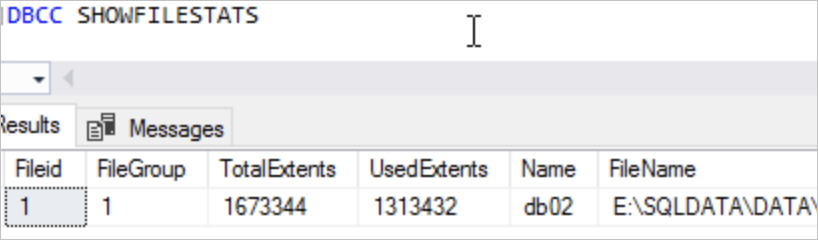
For reference, see Shrink a database and DBCC SHRINKFILE (Transact-SQL).
FAQ
After running an index rebuild on a high-fragmentation index, why does the fragmentation rate in the Index Usage tab remain unchanged?
The console updates fragmentation data asynchronously after a rebuild — this is expected. Click Recollect to trigger an immediate data collection. Once complete, click Export Script to download the results and verify that fragmentation has decreased.
Reclaim log storage
Check why log space cannot be reclaimed
Run DBCC SQLPERF(LOGSPACE) or check the Storage Management page to see the percentage of used log storage. If the percentage is high, shrinking the log files will have almost no effect — the issue is that the log space cannot yet be truncated, not that the log file is too large.
Query sys.databases to find out what is blocking truncation:
SELECT name, log_reuse_wait, log_reuse_wait_desc
FROM sys.databases;
log_reuse_wait_desc value | Cause | Action |
|---|---|---|
NOTHING | No blocker. Log truncation can proceed normally. | None. |
CHECKPOINT | A checkpoint is required before truncation. | None required unless this persists. If it does, contact support. |
LOG_BACKUP | A log backup must complete before truncation. | Wait for the scheduled log backup to finish. |
ACTIVE_TRANSACTION | A long-running or open transaction is holding the log. | Identify and commit or roll back the transaction. |
DATABASE_MIRRORING | Log is waiting for the mirror to synchronize. | Check database mirroring health. |
REPLICATION | Log is waiting for replication to consume the records. | Check replication agent status. |
For the full list of values, see sys.databases (Transact-SQL).
Shrink transaction logs
If your instance displays a "transaction log is full" error, you cannot shrink transaction logs through the console. Manually executing SQL statements to resolve this carries risk — see Solutions for insufficient log space (emergency situations only). When log space is critically low, expand the disk capacity first.
Do not shrink transaction logs as a routine maintenance operation. Log files that grow due to regular business activity will simply re-grow after shrinking.
Choose the method based on your situation:
| Method 1: Single database (no backup) | Method 2: Instance-level backup + shrink | |
|---|---|---|
| Scope | Single database | Entire instance |
| Backup | None | System automatically backs up all transaction logs first |
| Speed | Fast | Slow — backup runs before the shrink |
| When to use | Logs growing fast; must reclaim space before the next scheduled backup | Global log optimization needed across the instance. Note that shrinking transaction logs itself occupies a specific amount of log storage. |
| Impact on other databases | None | Entire instance is affected |
| Procedure | Shrink database transaction logs | Back up and shrink transaction logs |
After shrinking, go to the Monitoring and Alerts page to verify that log storage usage has decreased.
Reclaim temporary file storage
How tempdb grows
Temporary file storage is the space used by the tempdb system database. tempdb uses only the SIMPLE recovery model, so its log files stay small. However, tempdb data files can grow rapidly when queries create many temporary tables, join large tables, or sort large datasets.
Reduce tempdb usage
At the application level: reduce unnecessary temporary tables, avoid large table joins where possible, and break large transactions into smaller ones.
Restart the RDS instance during off-peak hours. After a restart, tempdb returns to the size it had when the instance was first created.
Reclaim other file storage
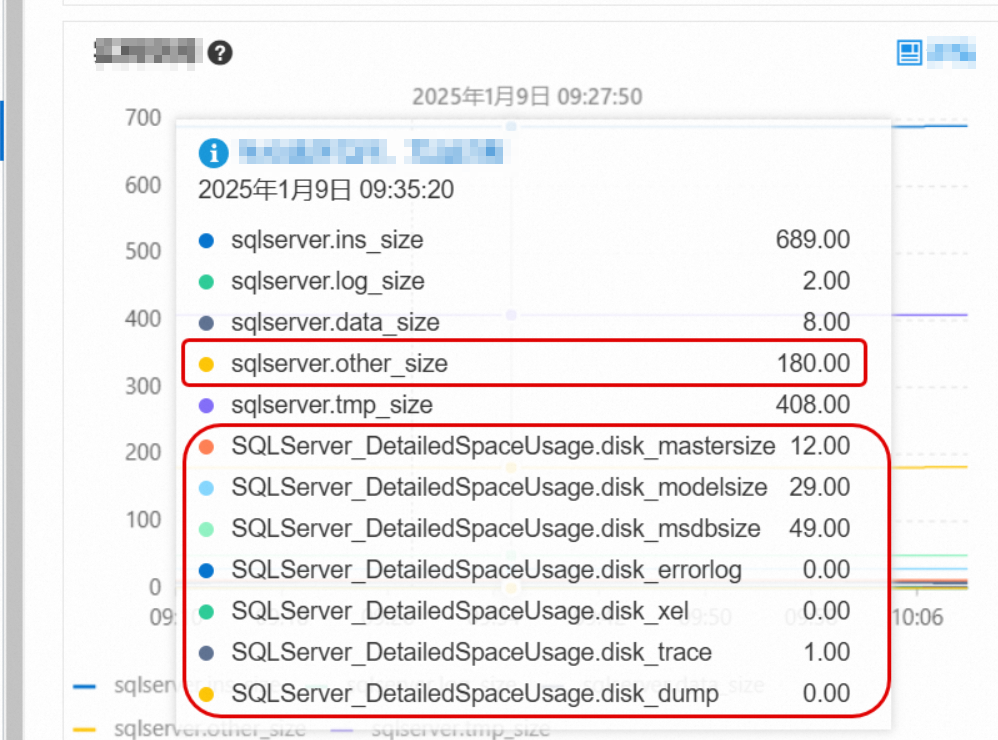
What counts as other file storage
Other file storage includes space used by sqlserver.other_size, mastersize, modelsize, msdbsize, and similar system files. These files are normally small, but can grow in two situations:
Many errorlog files have accumulated and grown to several GB or larger.
Memory dump files were generated during a severe exception.
Reduce other file storage
Go to the Monitoring and Alerts page and open the Standard Monitoring tab to see how much space each file type is consuming. For metric descriptions, see View standard monitoring information.
If errorlog files are consuming significant space, clear them on the Log Management page. For details, see Manage logs.
If sqlserver.other_size or other system files are consuming an unexpectedly large amount of space, contact the helpdesk. They will help identify the root cause.Expand storage capacity
If storage usage remains critically high after applying the methods above, expand the storage capacity of the instance. For details, see Change instance specifications.