You must follow these steps to use the Web/H5 SDK. Skipping any step will cause data loss.
SDK information
SDK name | Version | MD5 value |
QuickTracking Web SDK | Latest version: 2.4.26 Release notes: Web SDK release notes | qt_web.umd.js: e249e96acdf752cc57882705c30833d4 qt_web.cjs.js: de68c017e7a0eec626c2e7c5c714f516 qt_web.iife.js: 49e715c2da7deeb45d6ced5be3012fac qt_web.amd.js: 247a8b1919bea5b959a6edb97cd75dde |
Procedure
1. Quick integration
QuickTracking provides a unique integration code snippet for each Web application. Follow the guided steps within the product to integrate the SDK.
Navigation
From the Quick Tracking home page, navigate to the management console > organization list. Find your application's organization and click Manage Applications. On the application management page, find your application and click Integrate.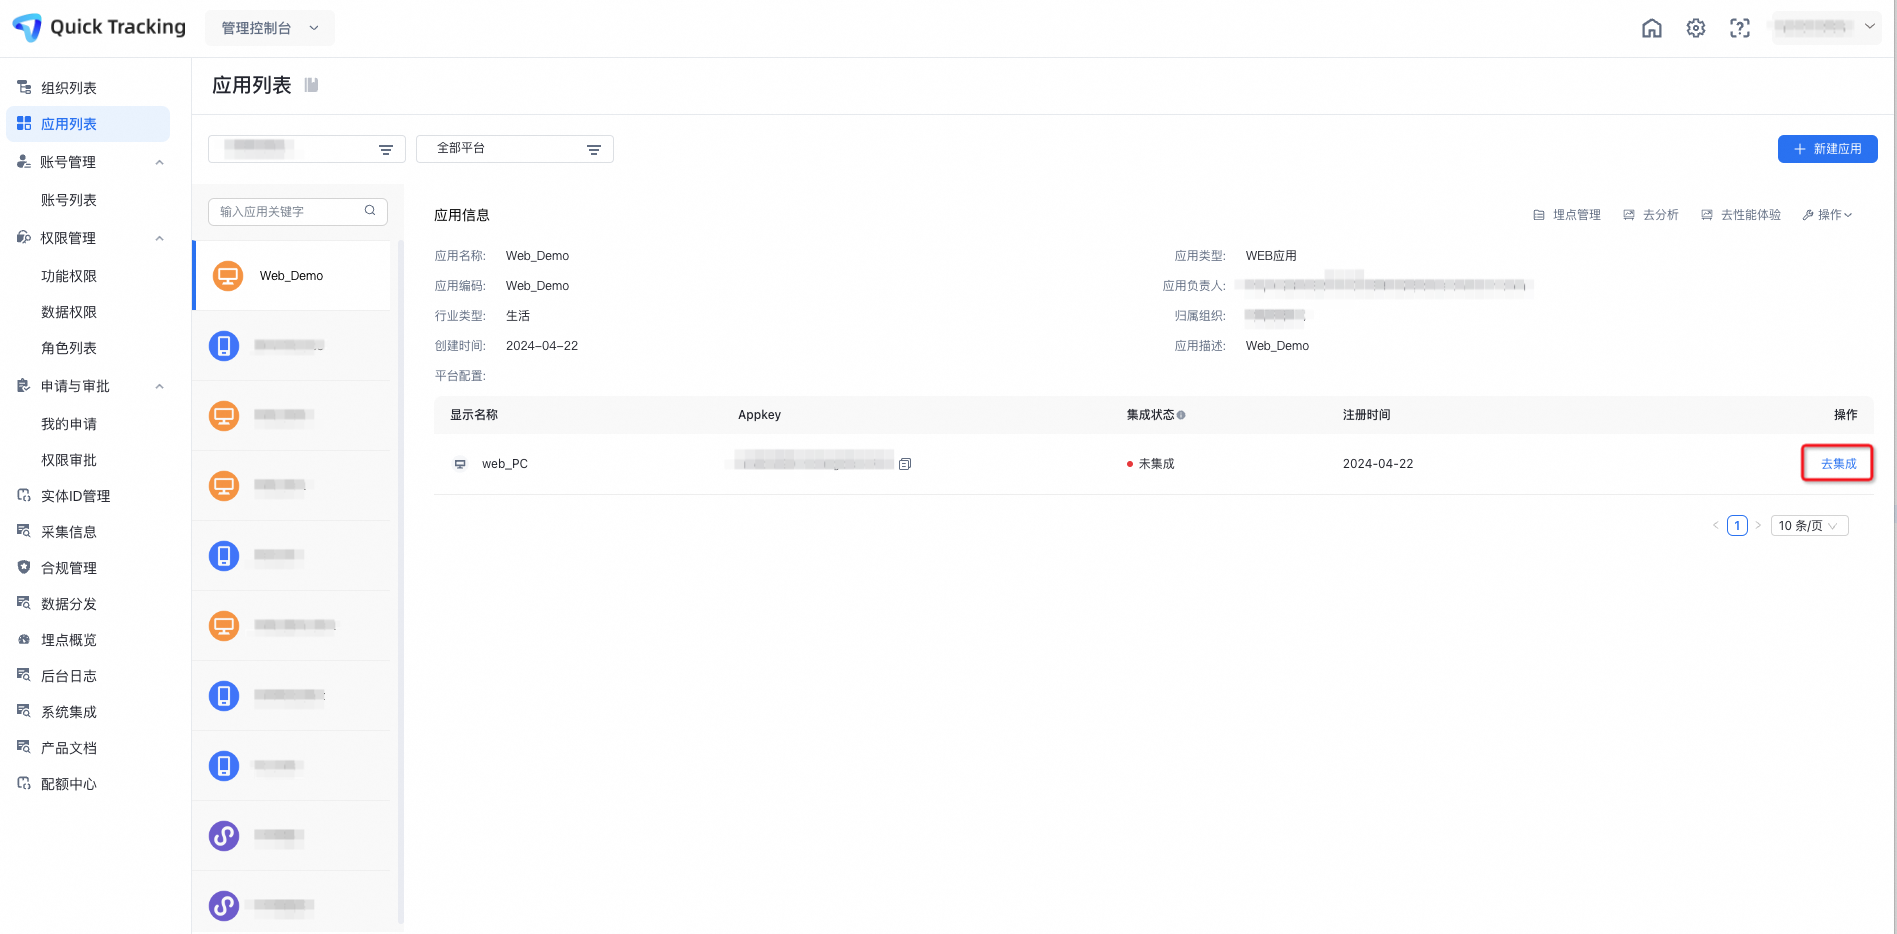
After clicking Integrate, you are sent to a new page to get the unique integration code snippet. Click Next to proceed to Integration Verification and confirm that the integration was successful.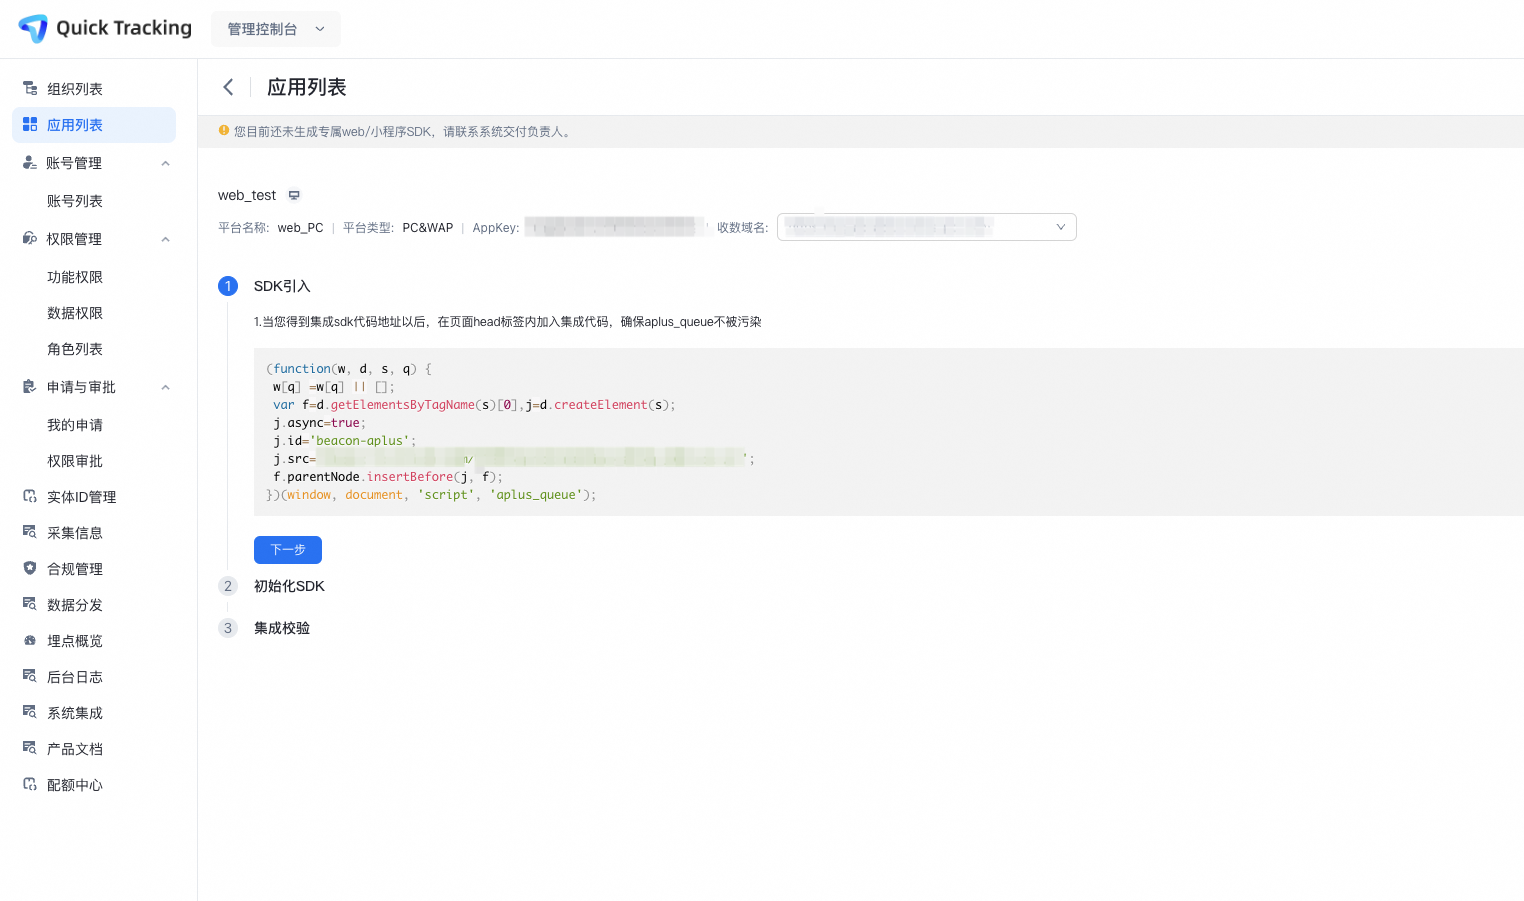
2. Manual integration
If you cannot access the integration page, follow these instructions to integrate the SDK manually. The required code is provided below.
2.1. Prepare parameters
appkey: Get this from the application list page.
data collection domain: Get this from the Data Collection Information section in the management console.
SDK URL: Get this from the Data Collection Information section in the management console.
2.2. Include and initialize the SDK
To enable tracking, obtain the SDK URL and add the integration snippet inside your page's <head> tag. Ensure that aplus_queue is not overwritten.
(function(w, d, s, q) {
 w[q] =w[q] || [];
 var f=d.getElementsByTagName(s)[0],
 j=d.createElement(s);
 j.async=true;
 j.id='beacon-aplus';
 j.src='YOUR_SDK_URL';
 f.parentNode.insertBefore(j, f);
})(window, document, 'script', 'aplus_queue');
Set the domain and appkey. Add the following code immediately after the SDK inclusion snippet.
// The appkey for your application
aplus_queue.push({
    action: 'aplus.setMetaInfo',
    arguments: ['appKey', 'YOUR_APPKEY']
});

// For a private cloud deployment, you must also add the log domain name immediately after the previous snippet.
// The domain for a private cloud log server typically looks like xxx-web-api.xxx.com.cn. You can find the specific domain in the Data Collection Information section of the management console.
aplus_queue.push({
    action: 'aplus.setMetaInfo',
    arguments: ['trackDomain', 'YOUR_DATA_COLLECTION_DOMAIN']
});
2.3. Listen for SDK initialization status
You can listen for the SDK's initialization status. If your tracking operations must wait until the SDK is fully initialized, you can add a listener for the aplusReady event.
Example code:
aplus_queue.push({
    action: "aplus.aplus_pubsub.subscribe",
    arguments: ["aplusReady", function(status) {
        if (status === 'complete') {
        }
    }]
})
2.4. Get event reporting status
The SDK provides a callback for event reporting status. If your scenario depends on receiving this status, enable POST mode and add a listener for aplus-error-listener.
Parameter | Description | Default |
|
|
|
|
|
|
Callback description:
After you enable aplus-post-mode, you can get API error callback information through the aplus_error_listener property or the onError method.
Parameter | Type | Description |
| string | The network error reason. |
| string | The reported payload. |
| string | The URL used for reporting. |
Example code:
// Enable POST mode
aplus_queue.push({
  action: 'aplus.setMetaInfo',
  arguments: ['aplus-post-mode', true],
});
// Enable the error listener
aplus_queue.push({
  action: 'aplus.setMetaInfo',
  arguments: ['aplus_error_listener', (err,data,url)=>{
    // err: The network error reason.
    // data: The payload being reported.
    // url: The URL used for reporting.
  }]
});
Resubmission:
Method | Parameter |
|
|
|
Example code:
// Trigger resubmission
aplus_queue.push({
  action: 'aplus.retrySendData',
  arguments: [url, data] // The URL and data for reporting
});

// Alternative method
aplus.retrySendData(url, data) // The URL and data for reporting
Use this feature for error tracing only, and only when necessary. Do not use it for core business logic reporting or in high-frequency loops.
Synchronous blocking: Standard XHR requests, even when asynchronous, consume network resources and are not prioritized by the browser for delivery on page unload.
Performance issues: This method lacks the "send on page unload" capability of
sendBeacon. Requests are aborted when the page is closed, so 100% delivery cannot be guaranteed.Network dependency: In poor network conditions,
resubmissionmay still fail and does not address the underlying issue.Browser compatibility: Implementations of XHR may differ across browsers, which can cause this feature to fail in some environments.
3. FAQ
3.1. How do I get the offline SDK?
In the QuickTracking management console, navigate to the Data Collection Information section to get the SDK URL. Click the URL and press Ctrl+S (or Cmd+S on macOS) to download and save the SDK file.