Dataset owners and workspace administrators with the dataset Q Chat configuration permission can perform Q Chat configuration and Q Chat permission configuration. For information on how to obtain the required permissions, see role management.
This feature is currently available only in the China (Hong Kong) , Malaysia (Kuala Lumpur) and Singapore regions. It is being progressively rolled out to other regions.
Q Chat configuration
Before using Q Chat in Quick BI, you must configure the Q Chat settings for your dataset.
Entry points
You can access the Q Chat configuration page in one of two ways.
-
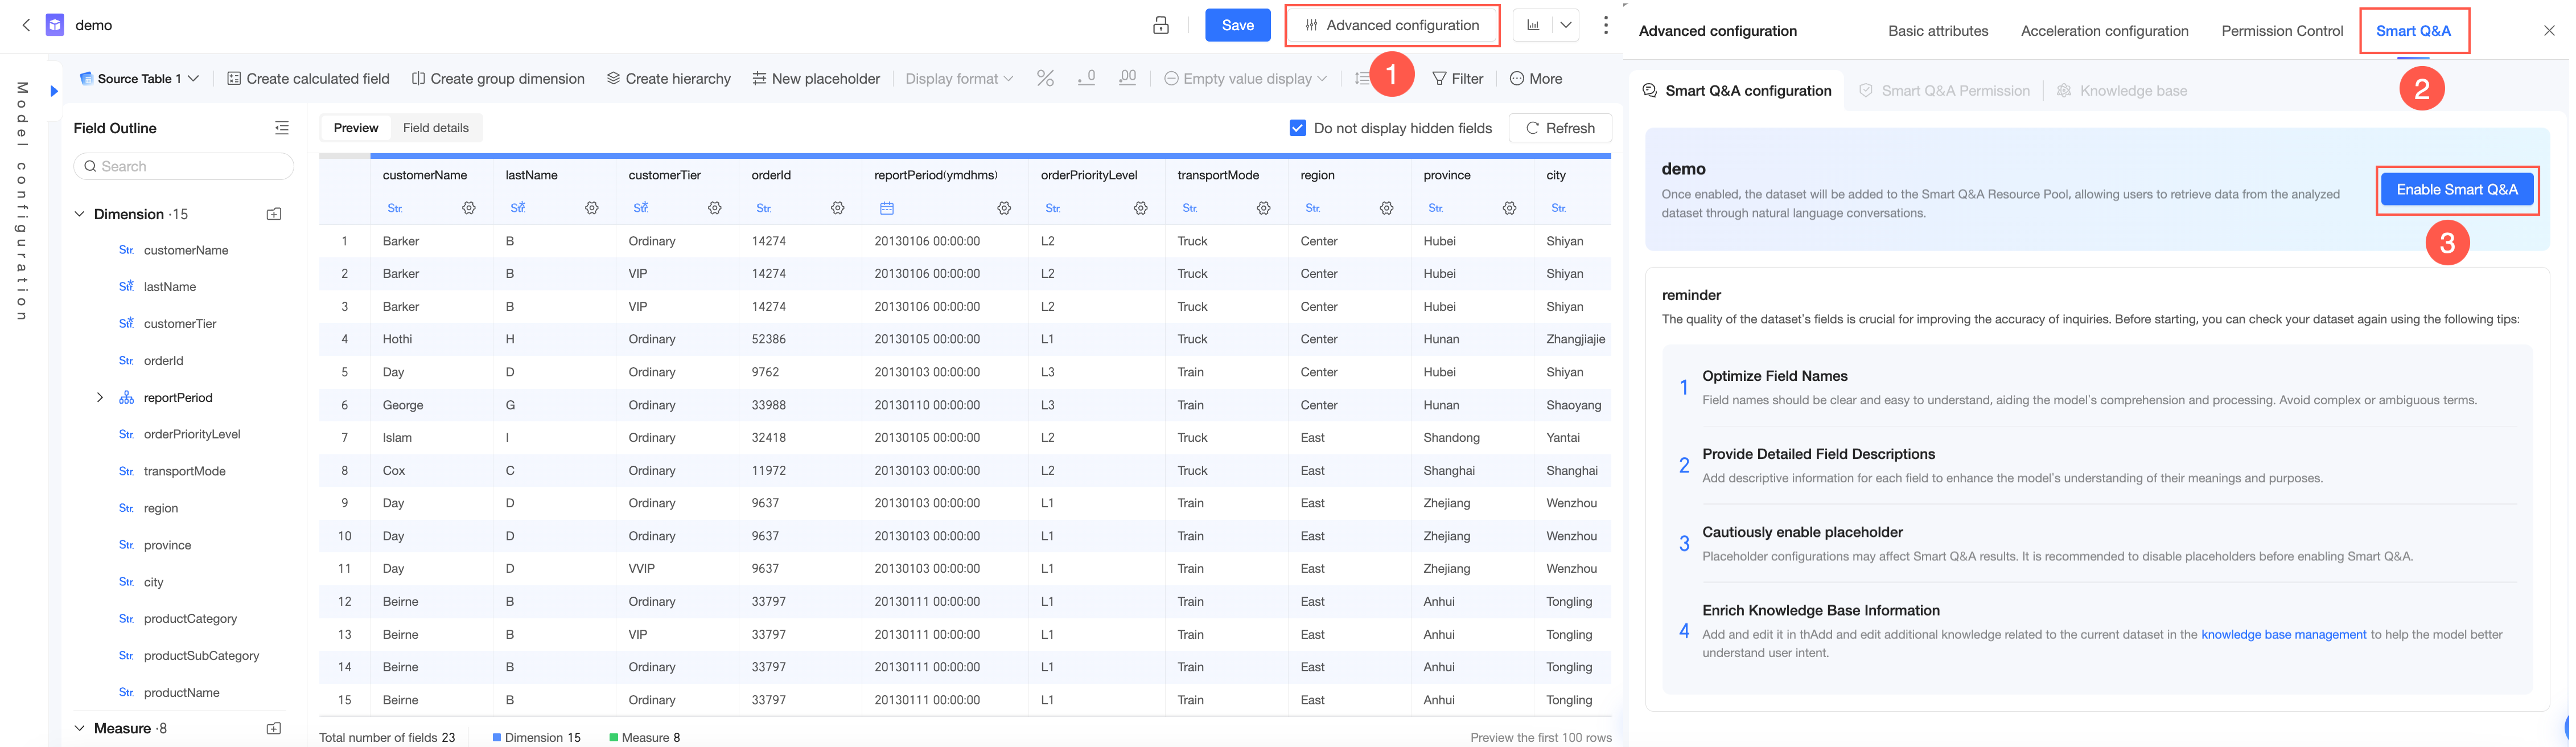
Method 1: On the dataset editing page, open Q Chat configuration.
-
Method 2: When you create a dataset, open Q Chat configuration.

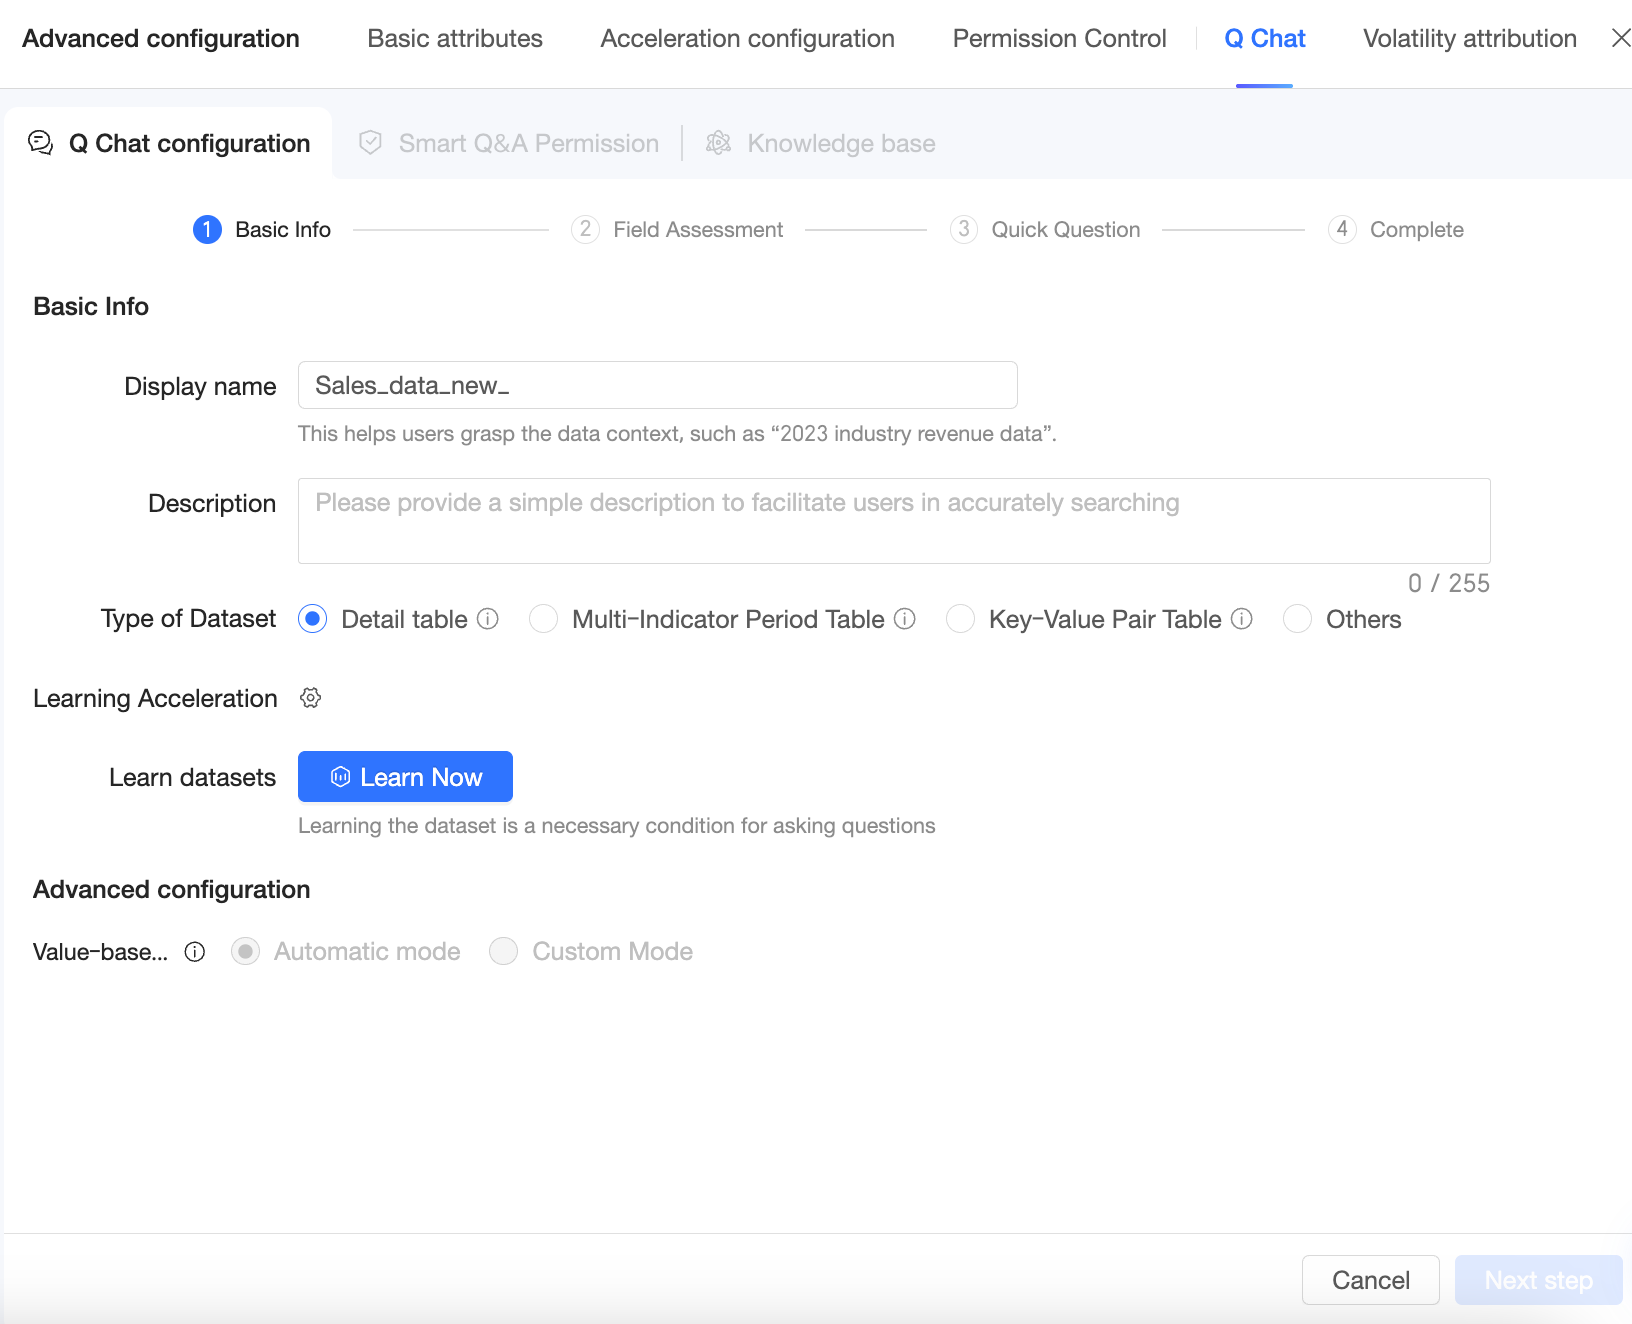
Basic information
Go to the Q Chat configuration page and configure the Basic Information.
The quality of your dataset's fields is crucial for improving Q Chat accuracy. Before you begin, review your dataset using the following best practices:
-
Optimize field names
Field names should be clear and understandable so the large model can process them correctly. Avoid complex or ambiguous names.
-
Provide detailed field descriptions
Add a description for each field to help the model better understand its meaning and purpose.
-
Use placeholders with caution
Configuring a placeholder can affect query results. We recommend that you disable placeholders before enabling the Q Chat feature.
-
Enrich the knowledge base
In the knowledge base management section, add and edit supplemental information about the current dataset to improve the large model's understanding of user intent.
-
You can modify the Display Name of the dataset.
NoteYou can set a business-friendly display name for the dataset that is visible to users. This name helps users understand the dataset's content, for example, "2023 Revenue Data by Industry".
-
Description
Provide a brief description to help users find the dataset easily.
-
Dataset Type
Select a dataset type to help the AI assistant understand the structure of your data and improve response accuracy. Supported types are details table, multi-metric period table, key-value table, and other.
-
Details table
Shows detailed information, with one record per row. Each record contains multiple dimension values or measure information, such as "Or****ID, Us***ID, Order Status, Order Amount".
-
Multi-metric period table
Shows statistical values of metrics over different periods, such as "7-day cumulative sales", "15-day cumulative sales", and "30-day cumulative sales".
-
Key-value table
A key-value table that mainly contains fields for date, dimension, metric name, and metric value, such as "Statistics Date", "KPI Name", "KPI Actual Value", and "KPI Target Value".
-
-
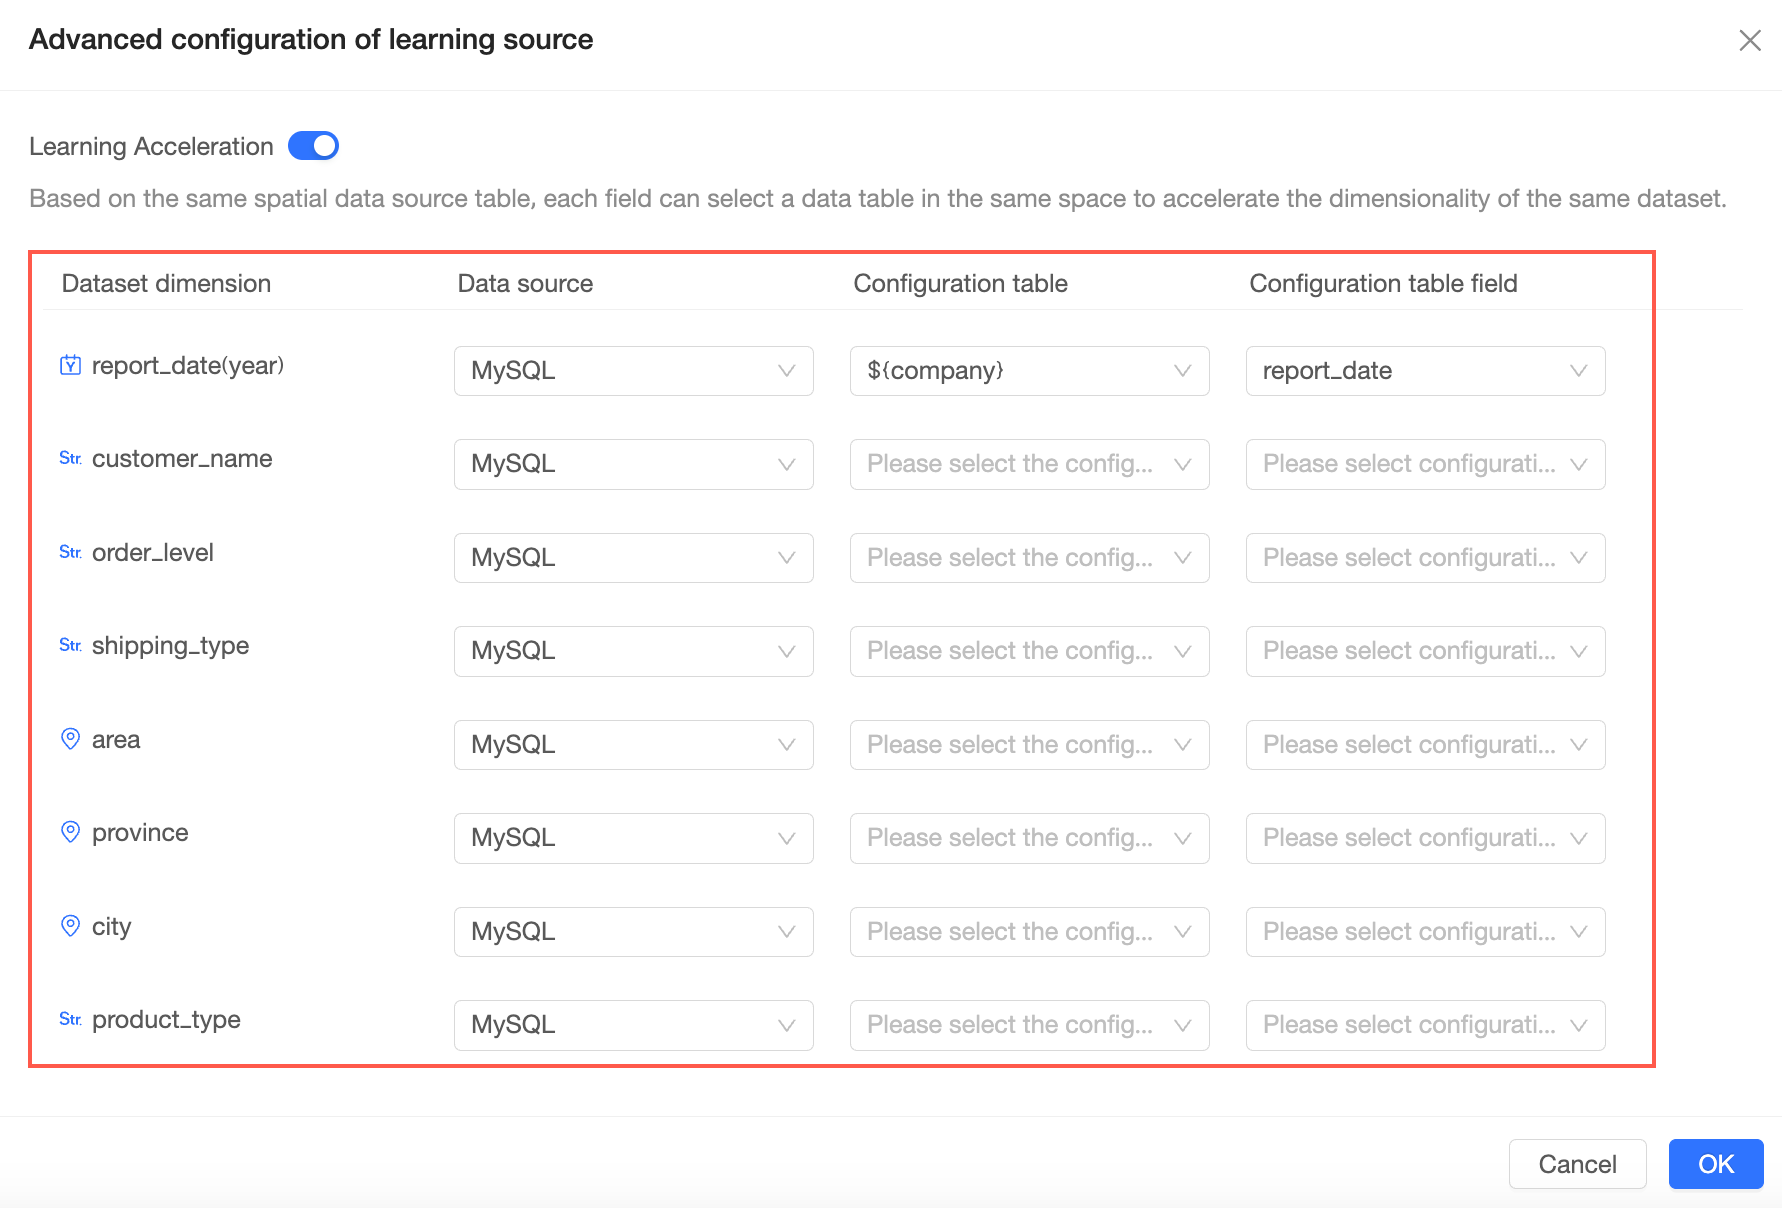
Learning acceleration
You can select a source table within your workspace to provide dimension values for each field. This process is also known as dimension value acceleration.
-
Click the
 icon next to Learning Acceleration and turn on the learning acceleration switch.
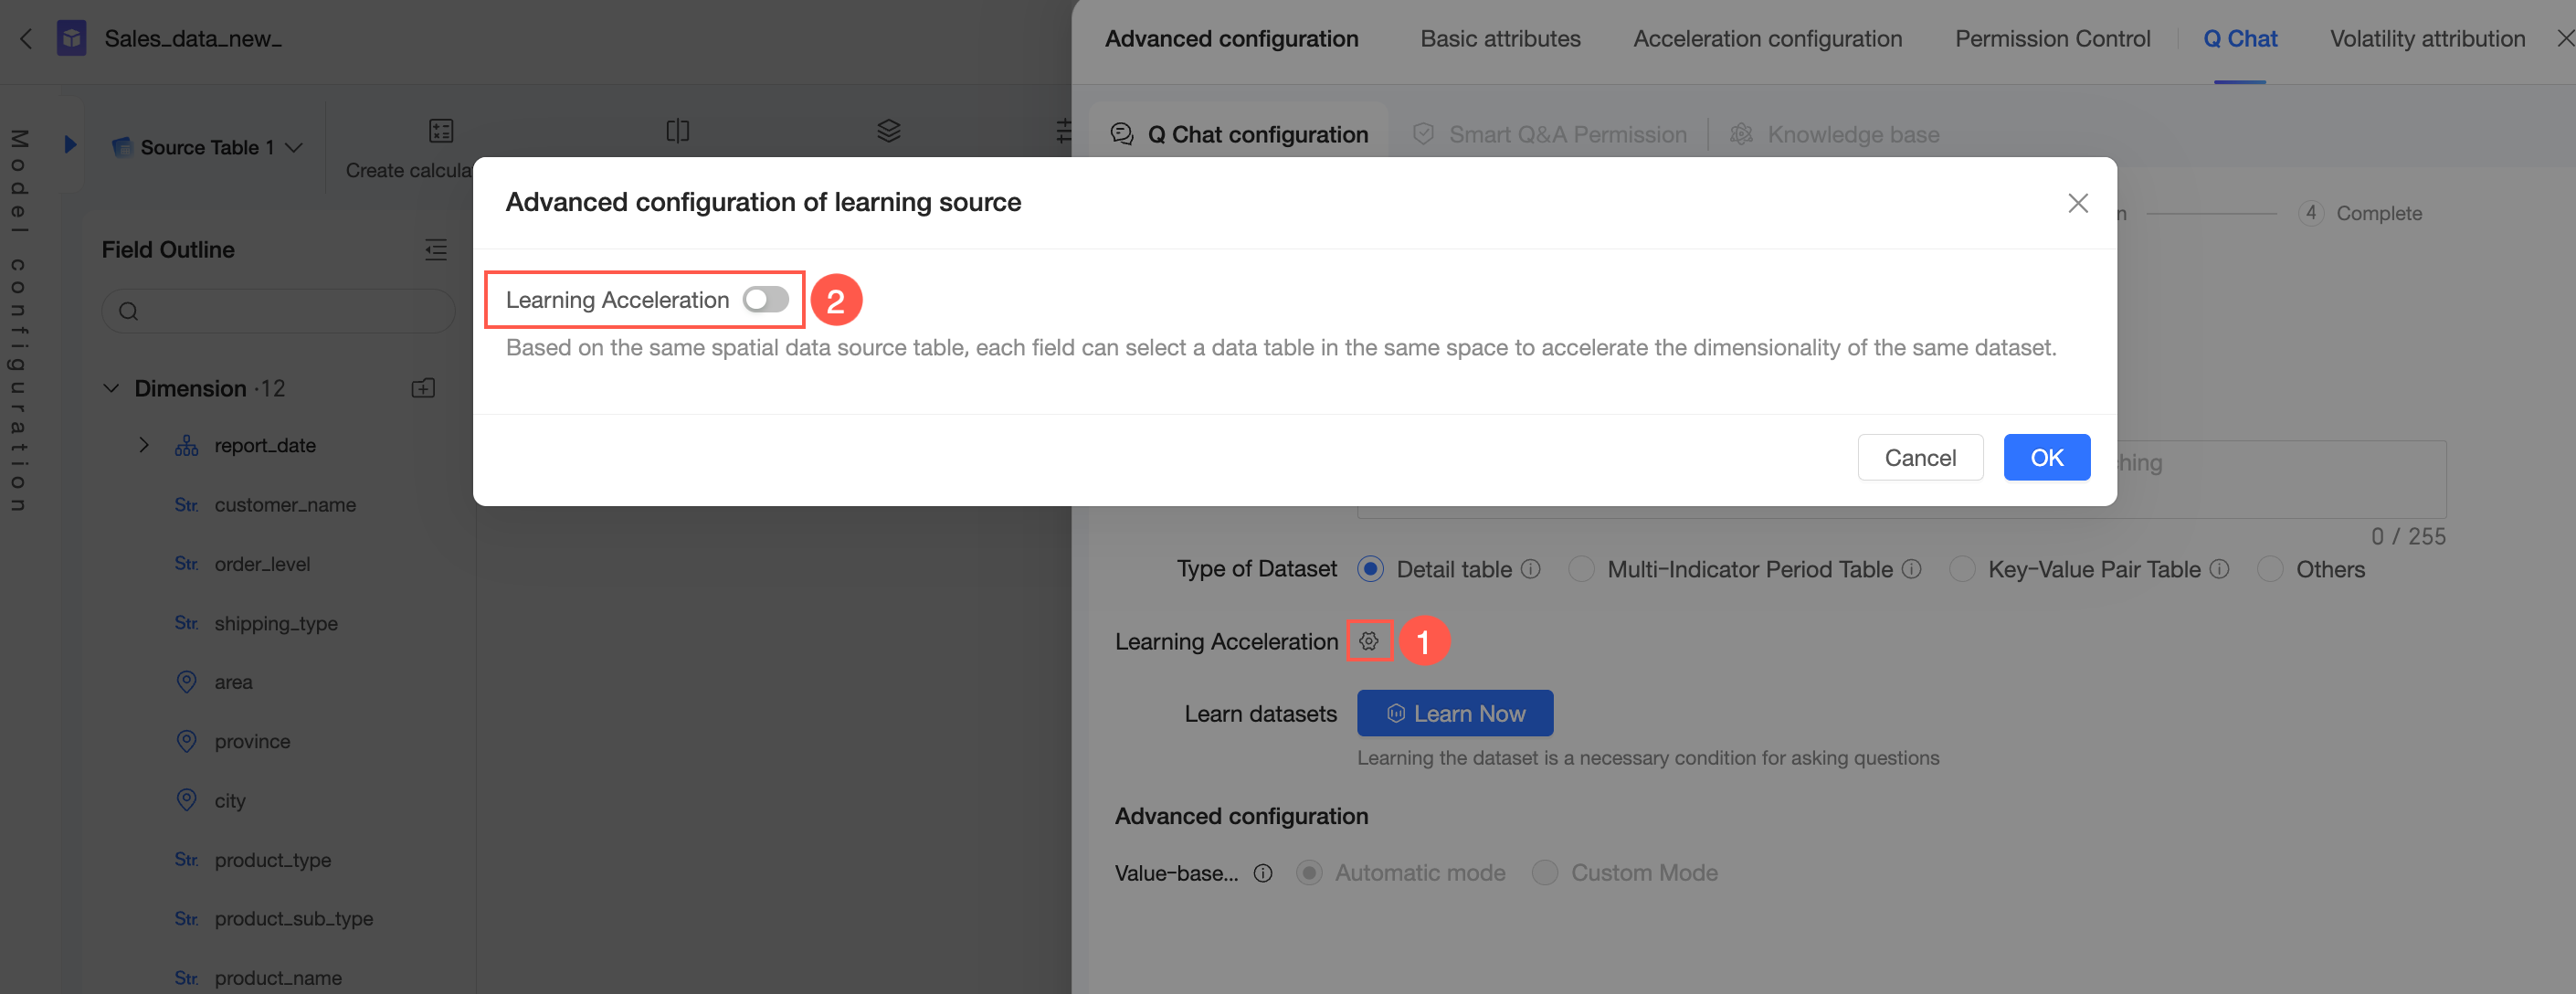
-
On the advanced configuration page for the learning source, map the dimension fields of your dataset to the fields in the source table.
-
After you configure all mappings, click OK.
-
-
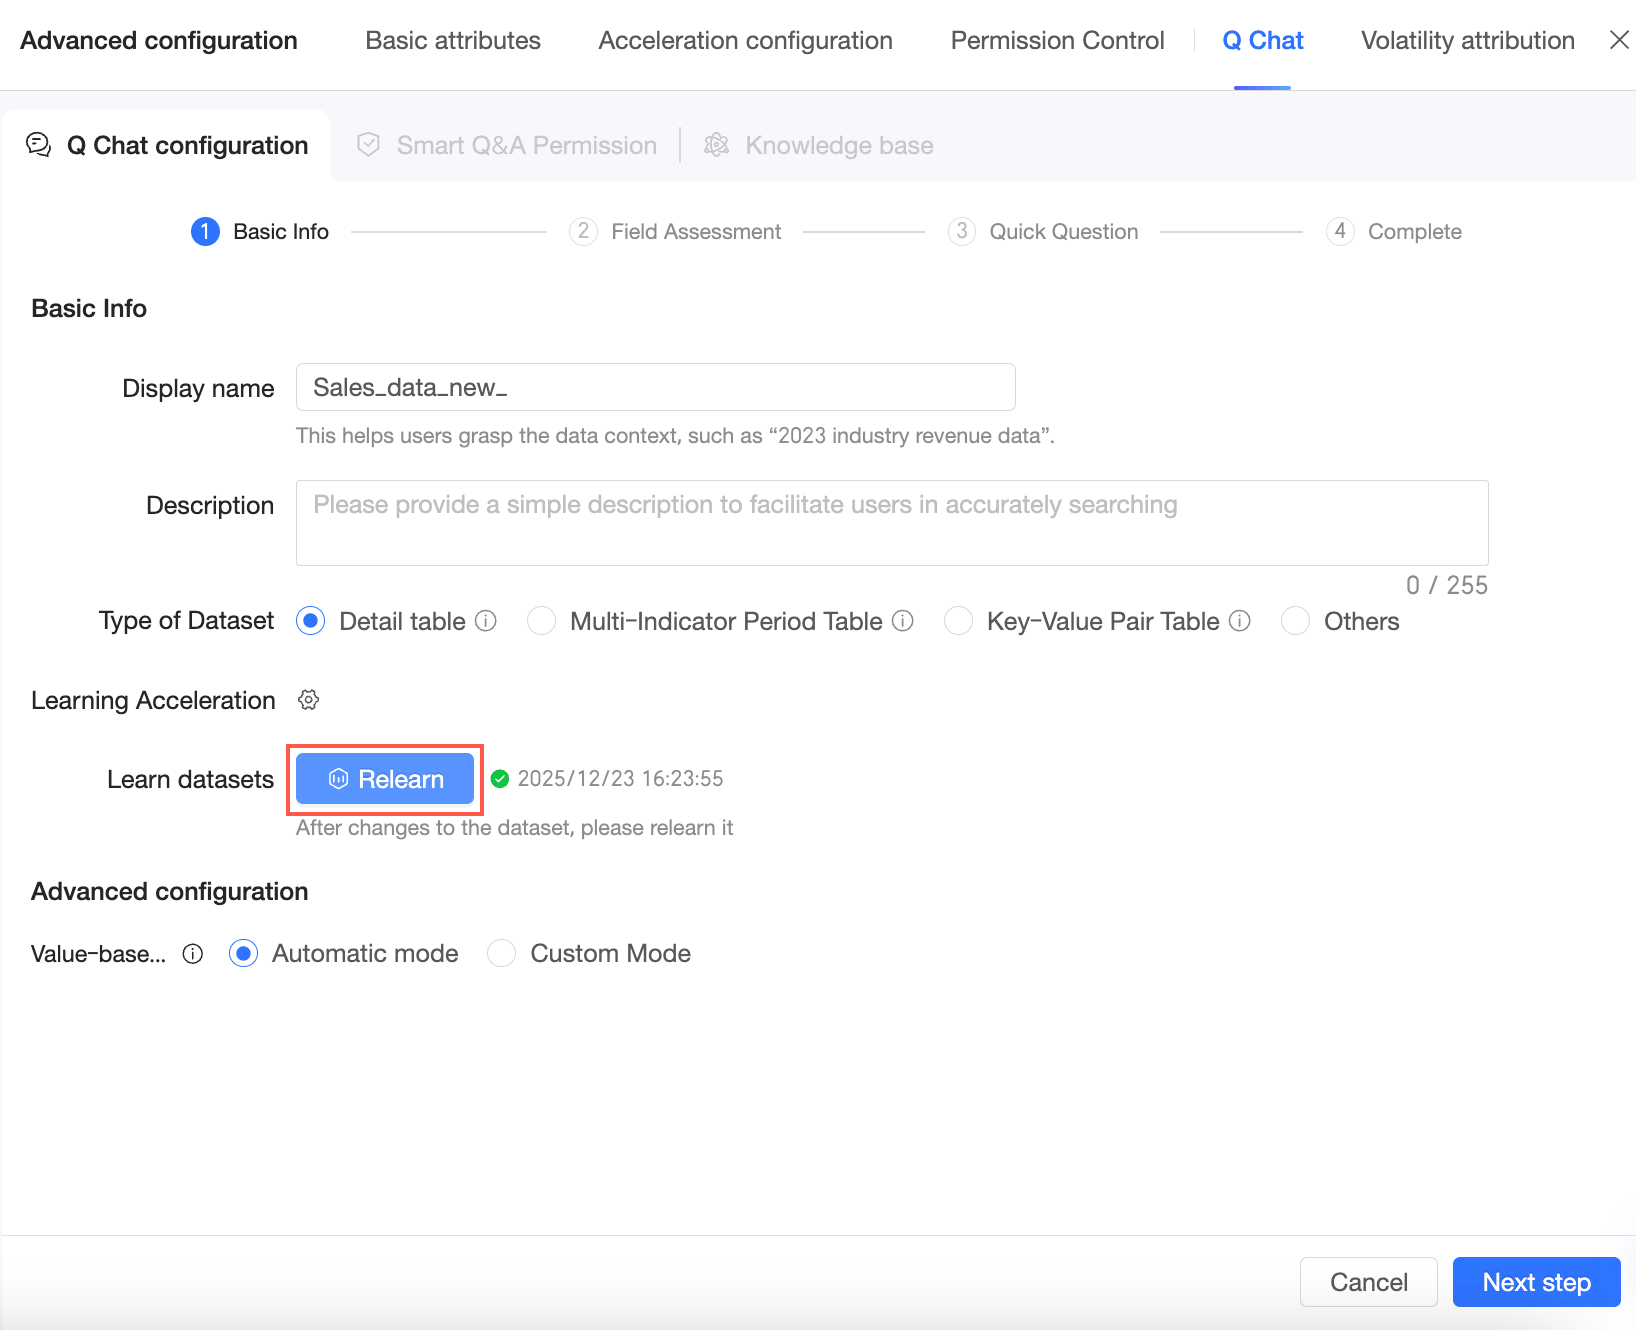
Click Learn Now to start the learning process for the dataset.
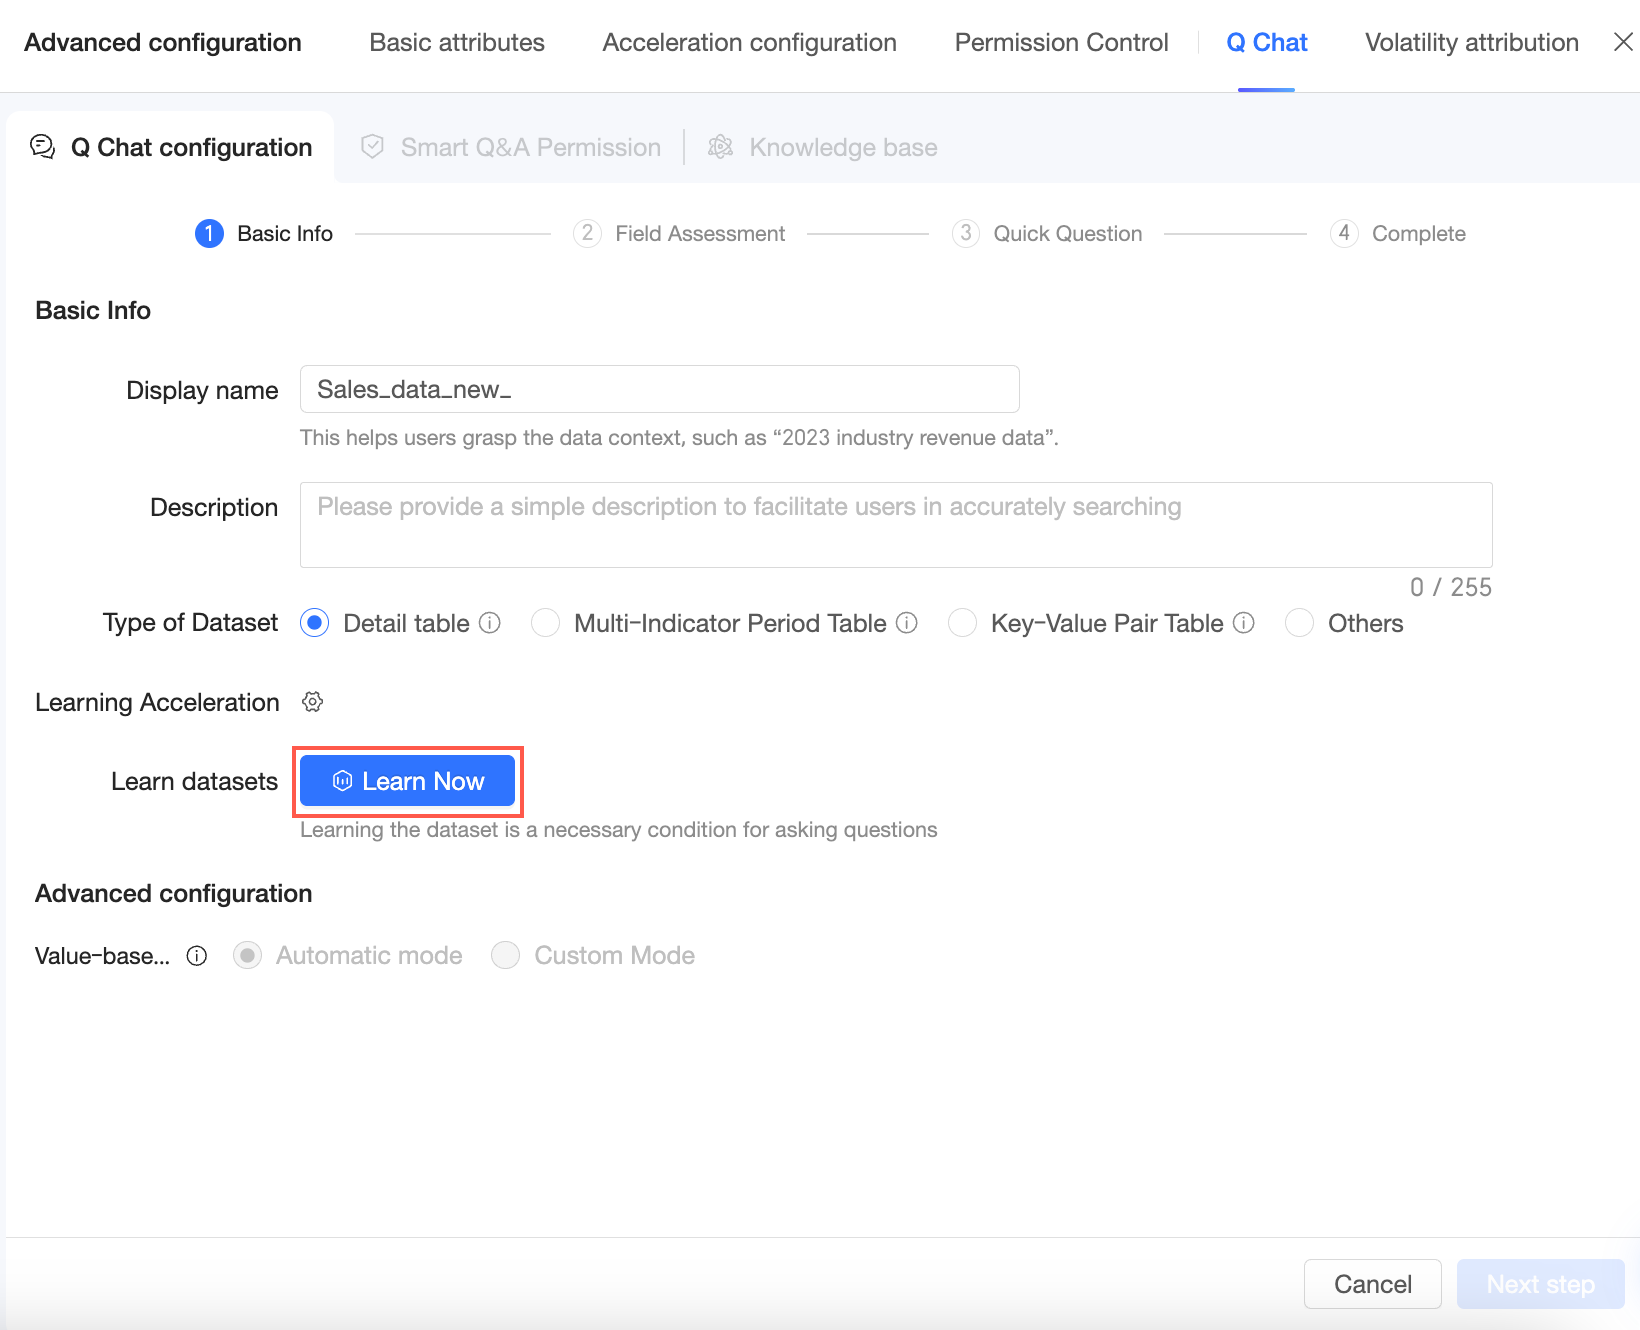
After the learning process is complete, you can click Re-learn if the dataset changes.
-
In the advanced settings, configure the dimension value matching mode. You can choose between automatic mode and custom mode.
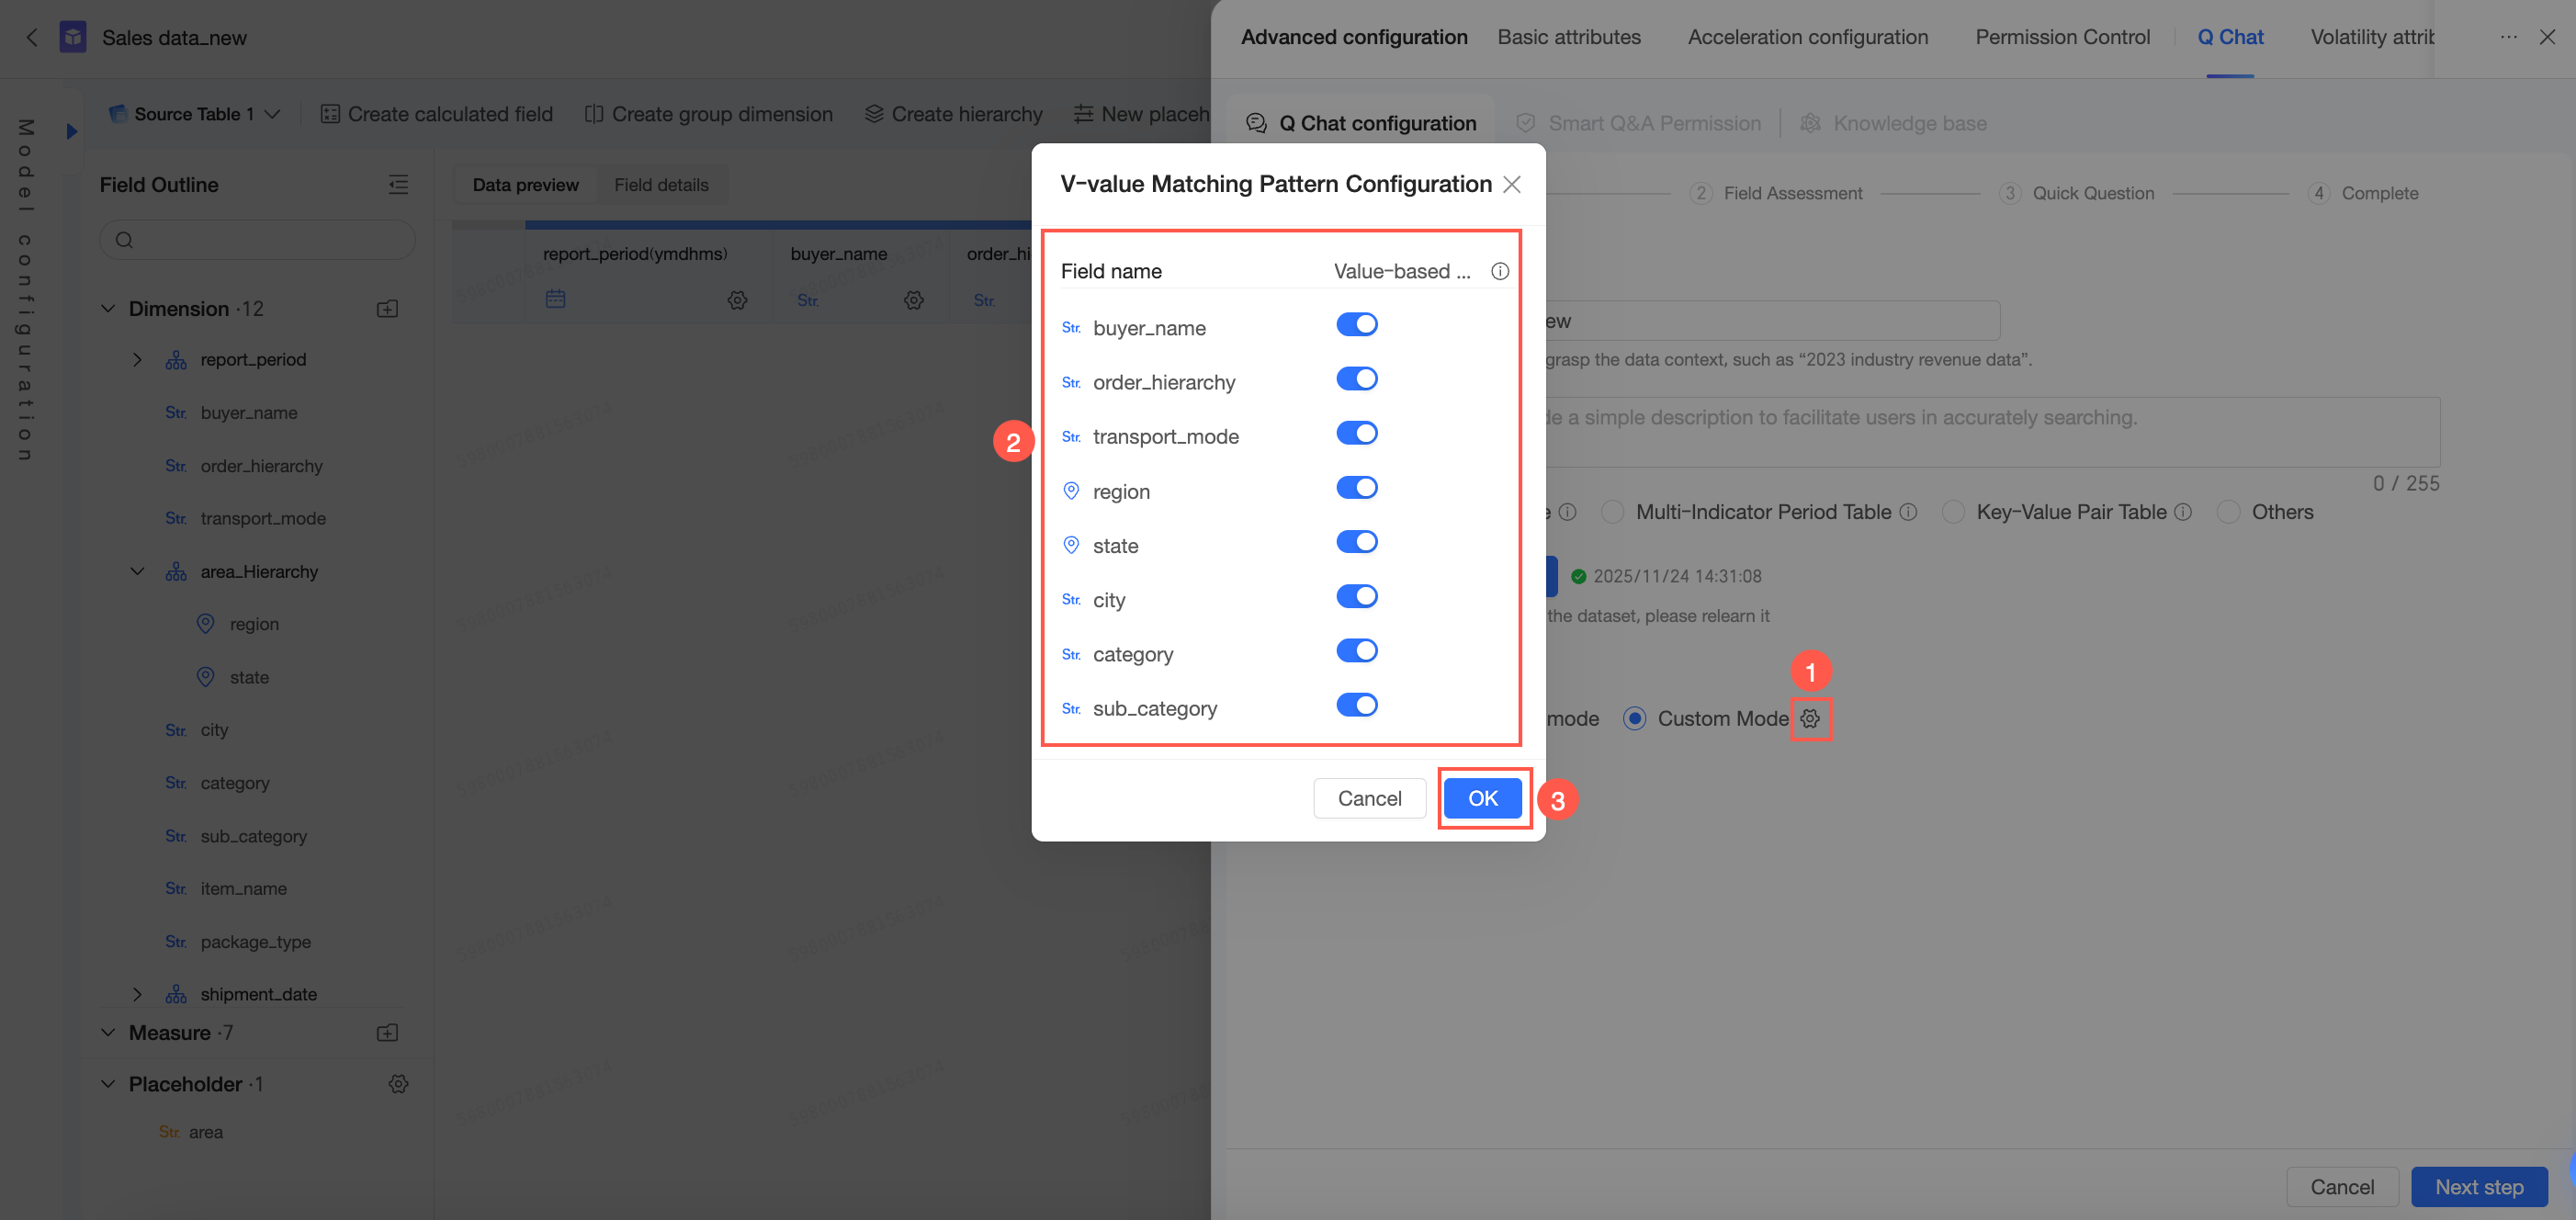
If a user query contains a dimension value that the system has not learned because the value count exceeds the learning limit, you can choose one of two matching strategies:
-
Automatic mode: The system automatically determines whether to rewrite the user-provided value to a s*****r, learned value.
-
Custom mode: The administrator can individually set whether to enable rewriting for each dimension.
-
Enable rewriting: Allows the system to map the user-provided value to a learned value.
-
Disable rewriting: Strictly matches the user's input without rewriting it.
-
-
-
Click Next to proceed to the field quality assessment page.
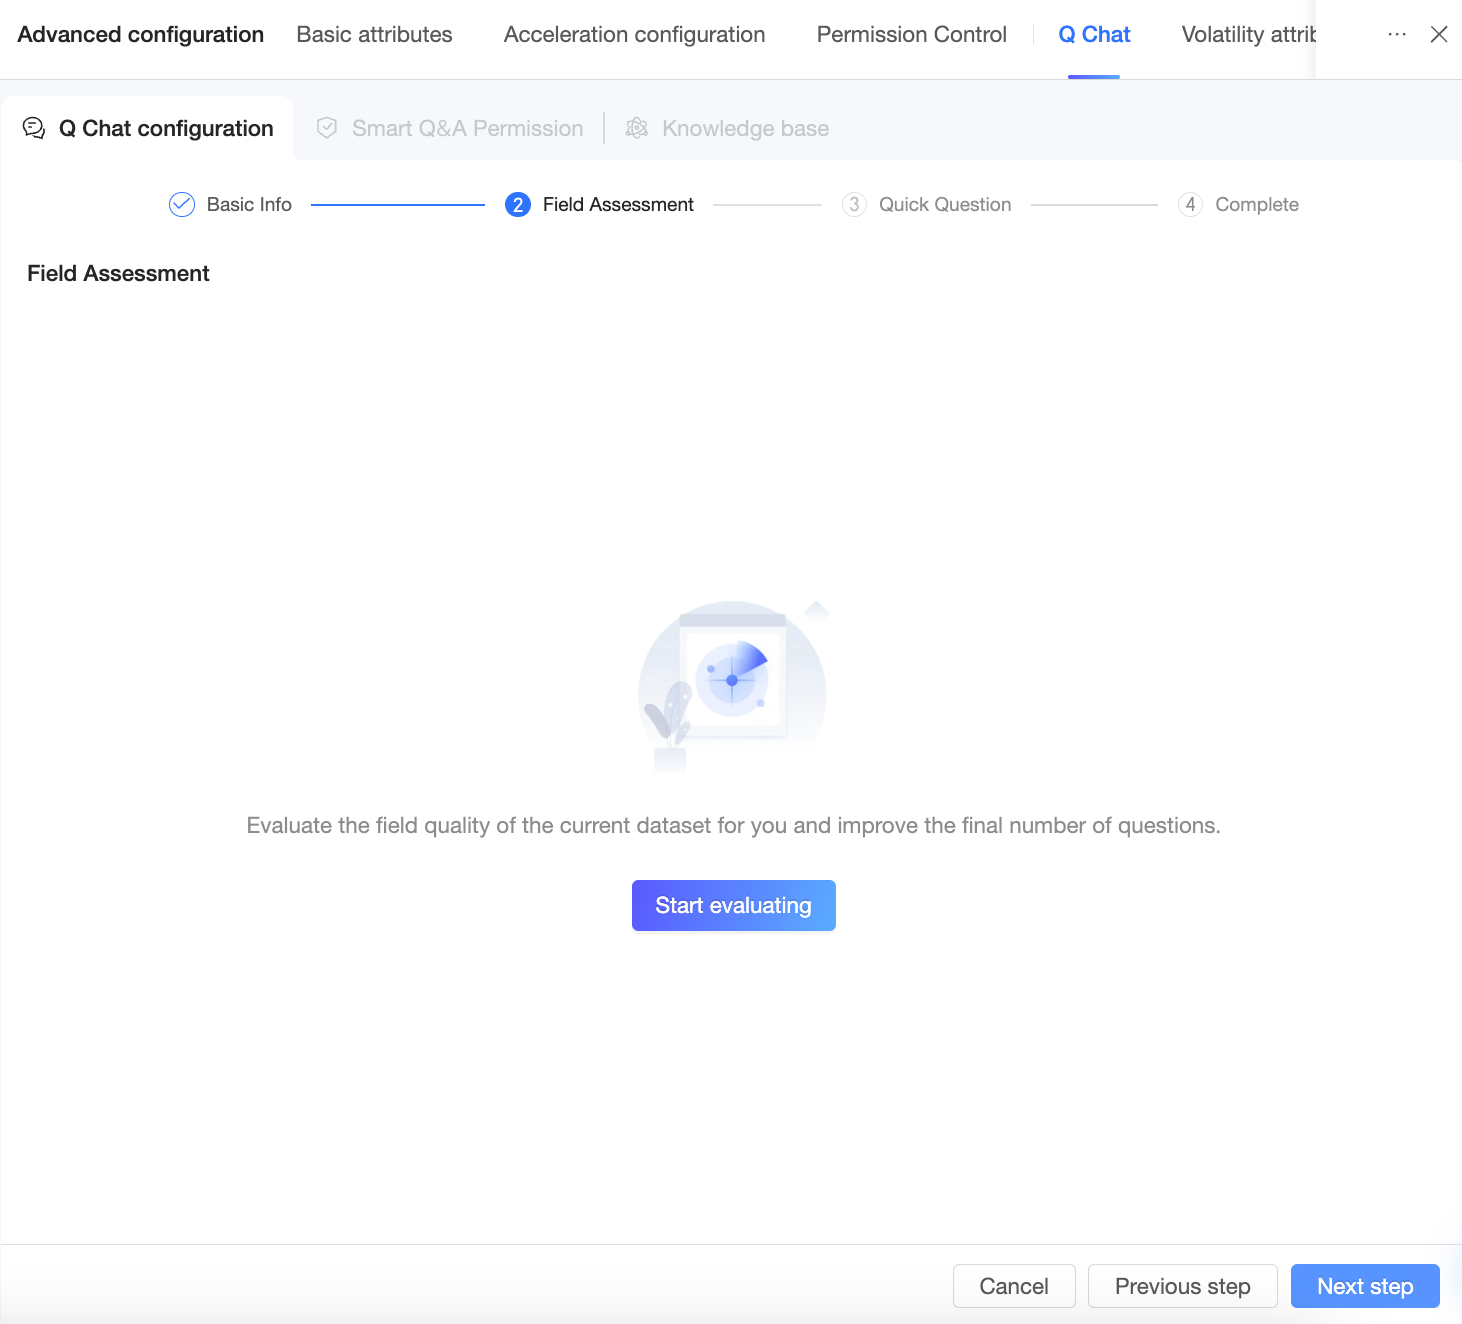
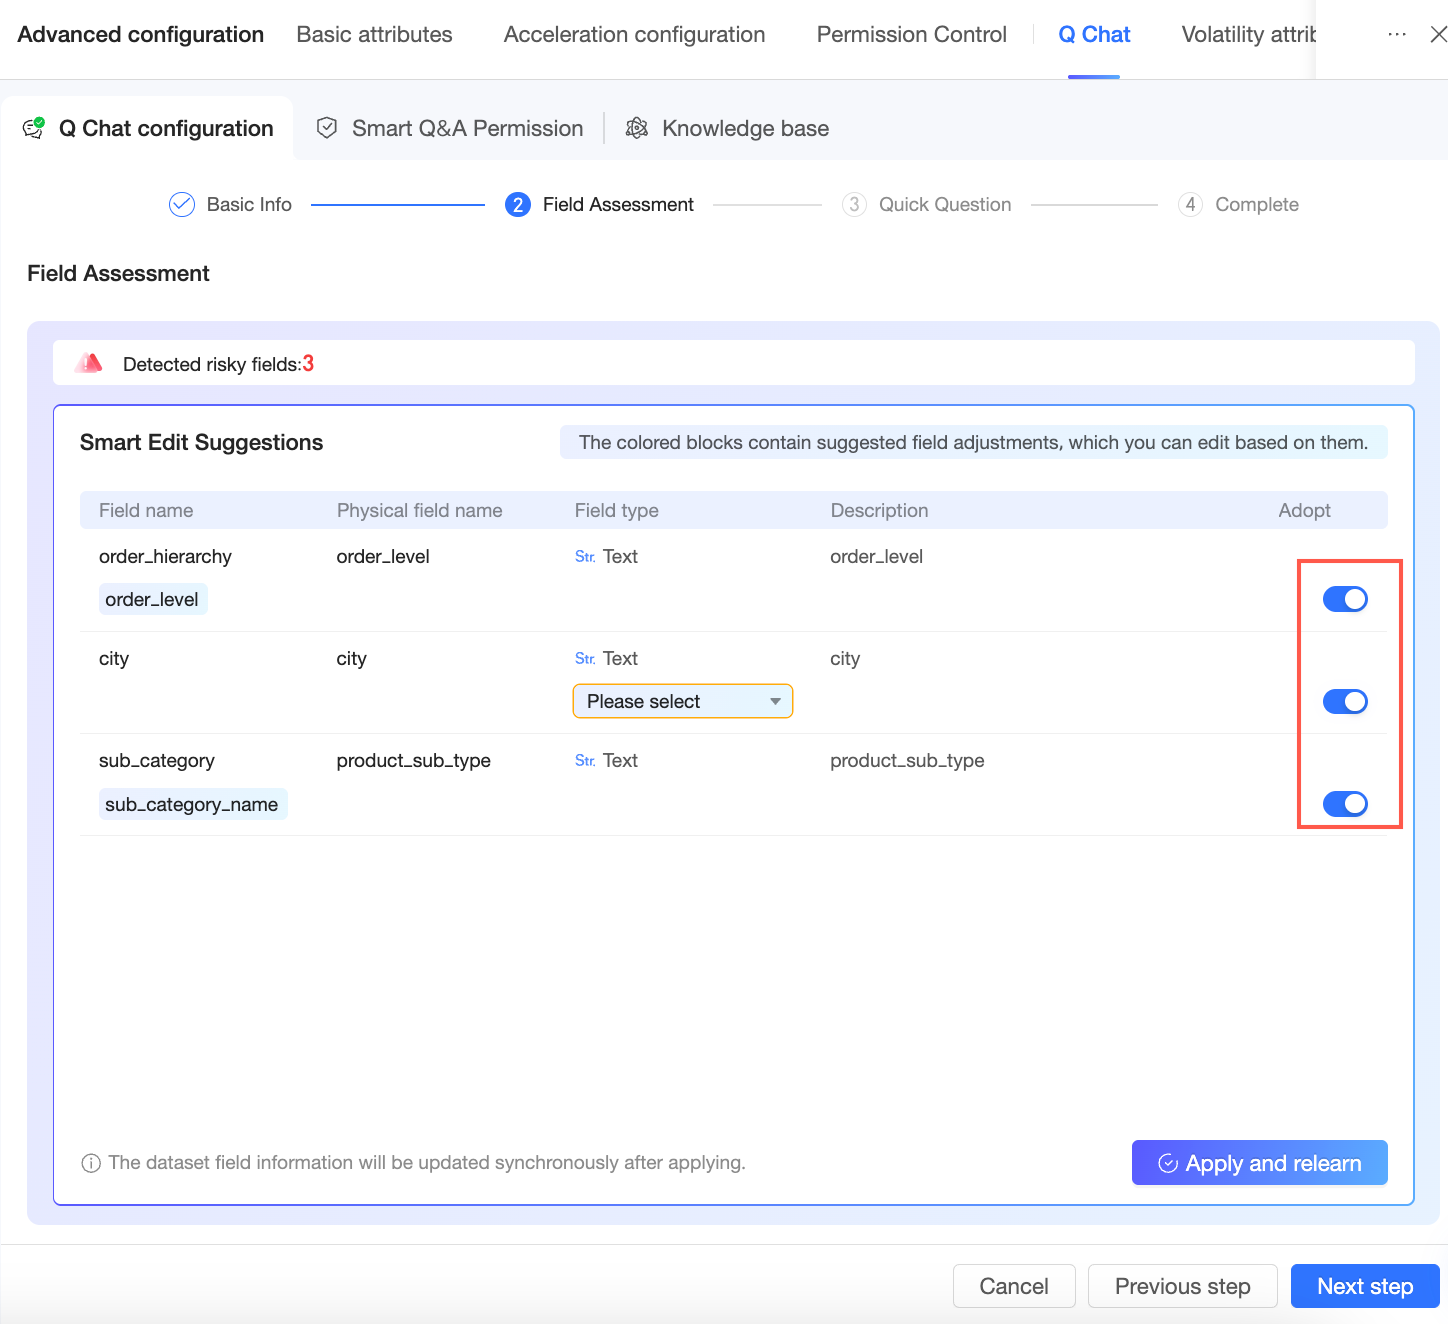
Field quality assessment
On this page, the system evaluates your dataset's field quality to improve query results.
-
Click Start Assessment.
NoteThe field quality assessment may take 1 to 2 minutes. You can proceed to the next steps, and you will be notified when the results are ready.
-
After the assessment, the system provides modification suggestions that you can accept or ignore.
-
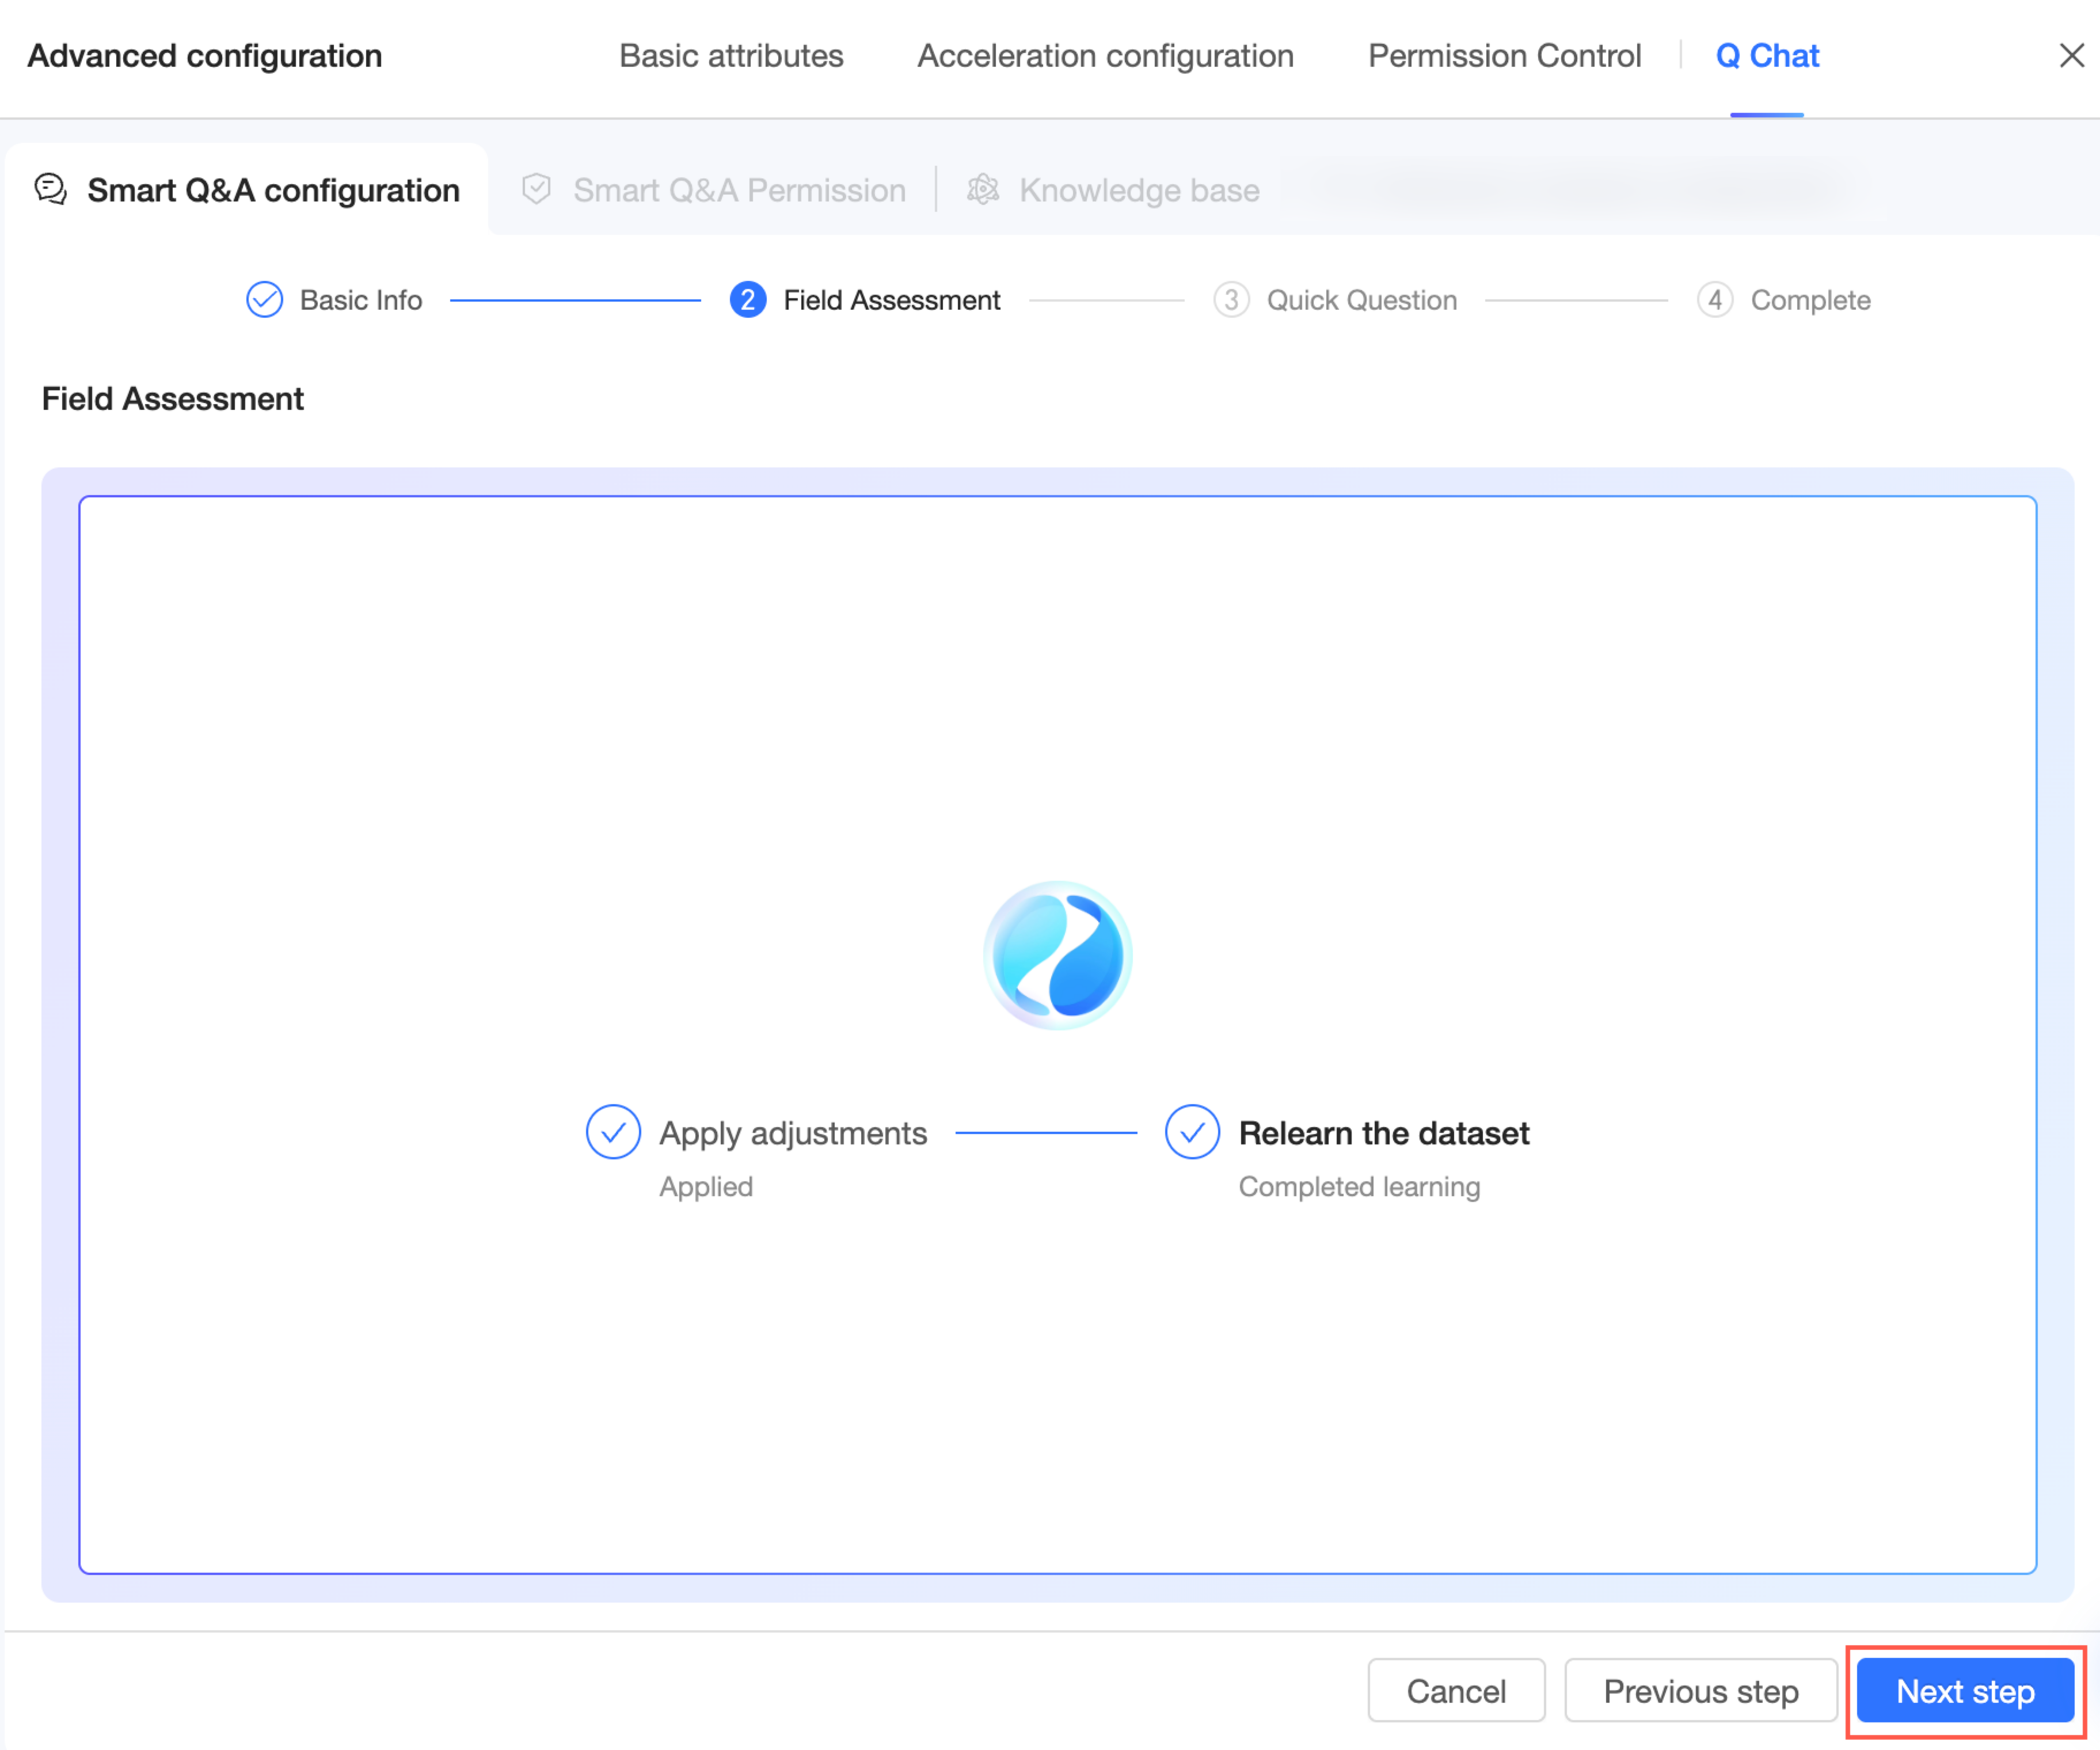
Click Apply and Re-learn to update the dataset's field information, then click Next to go to the quick question page.
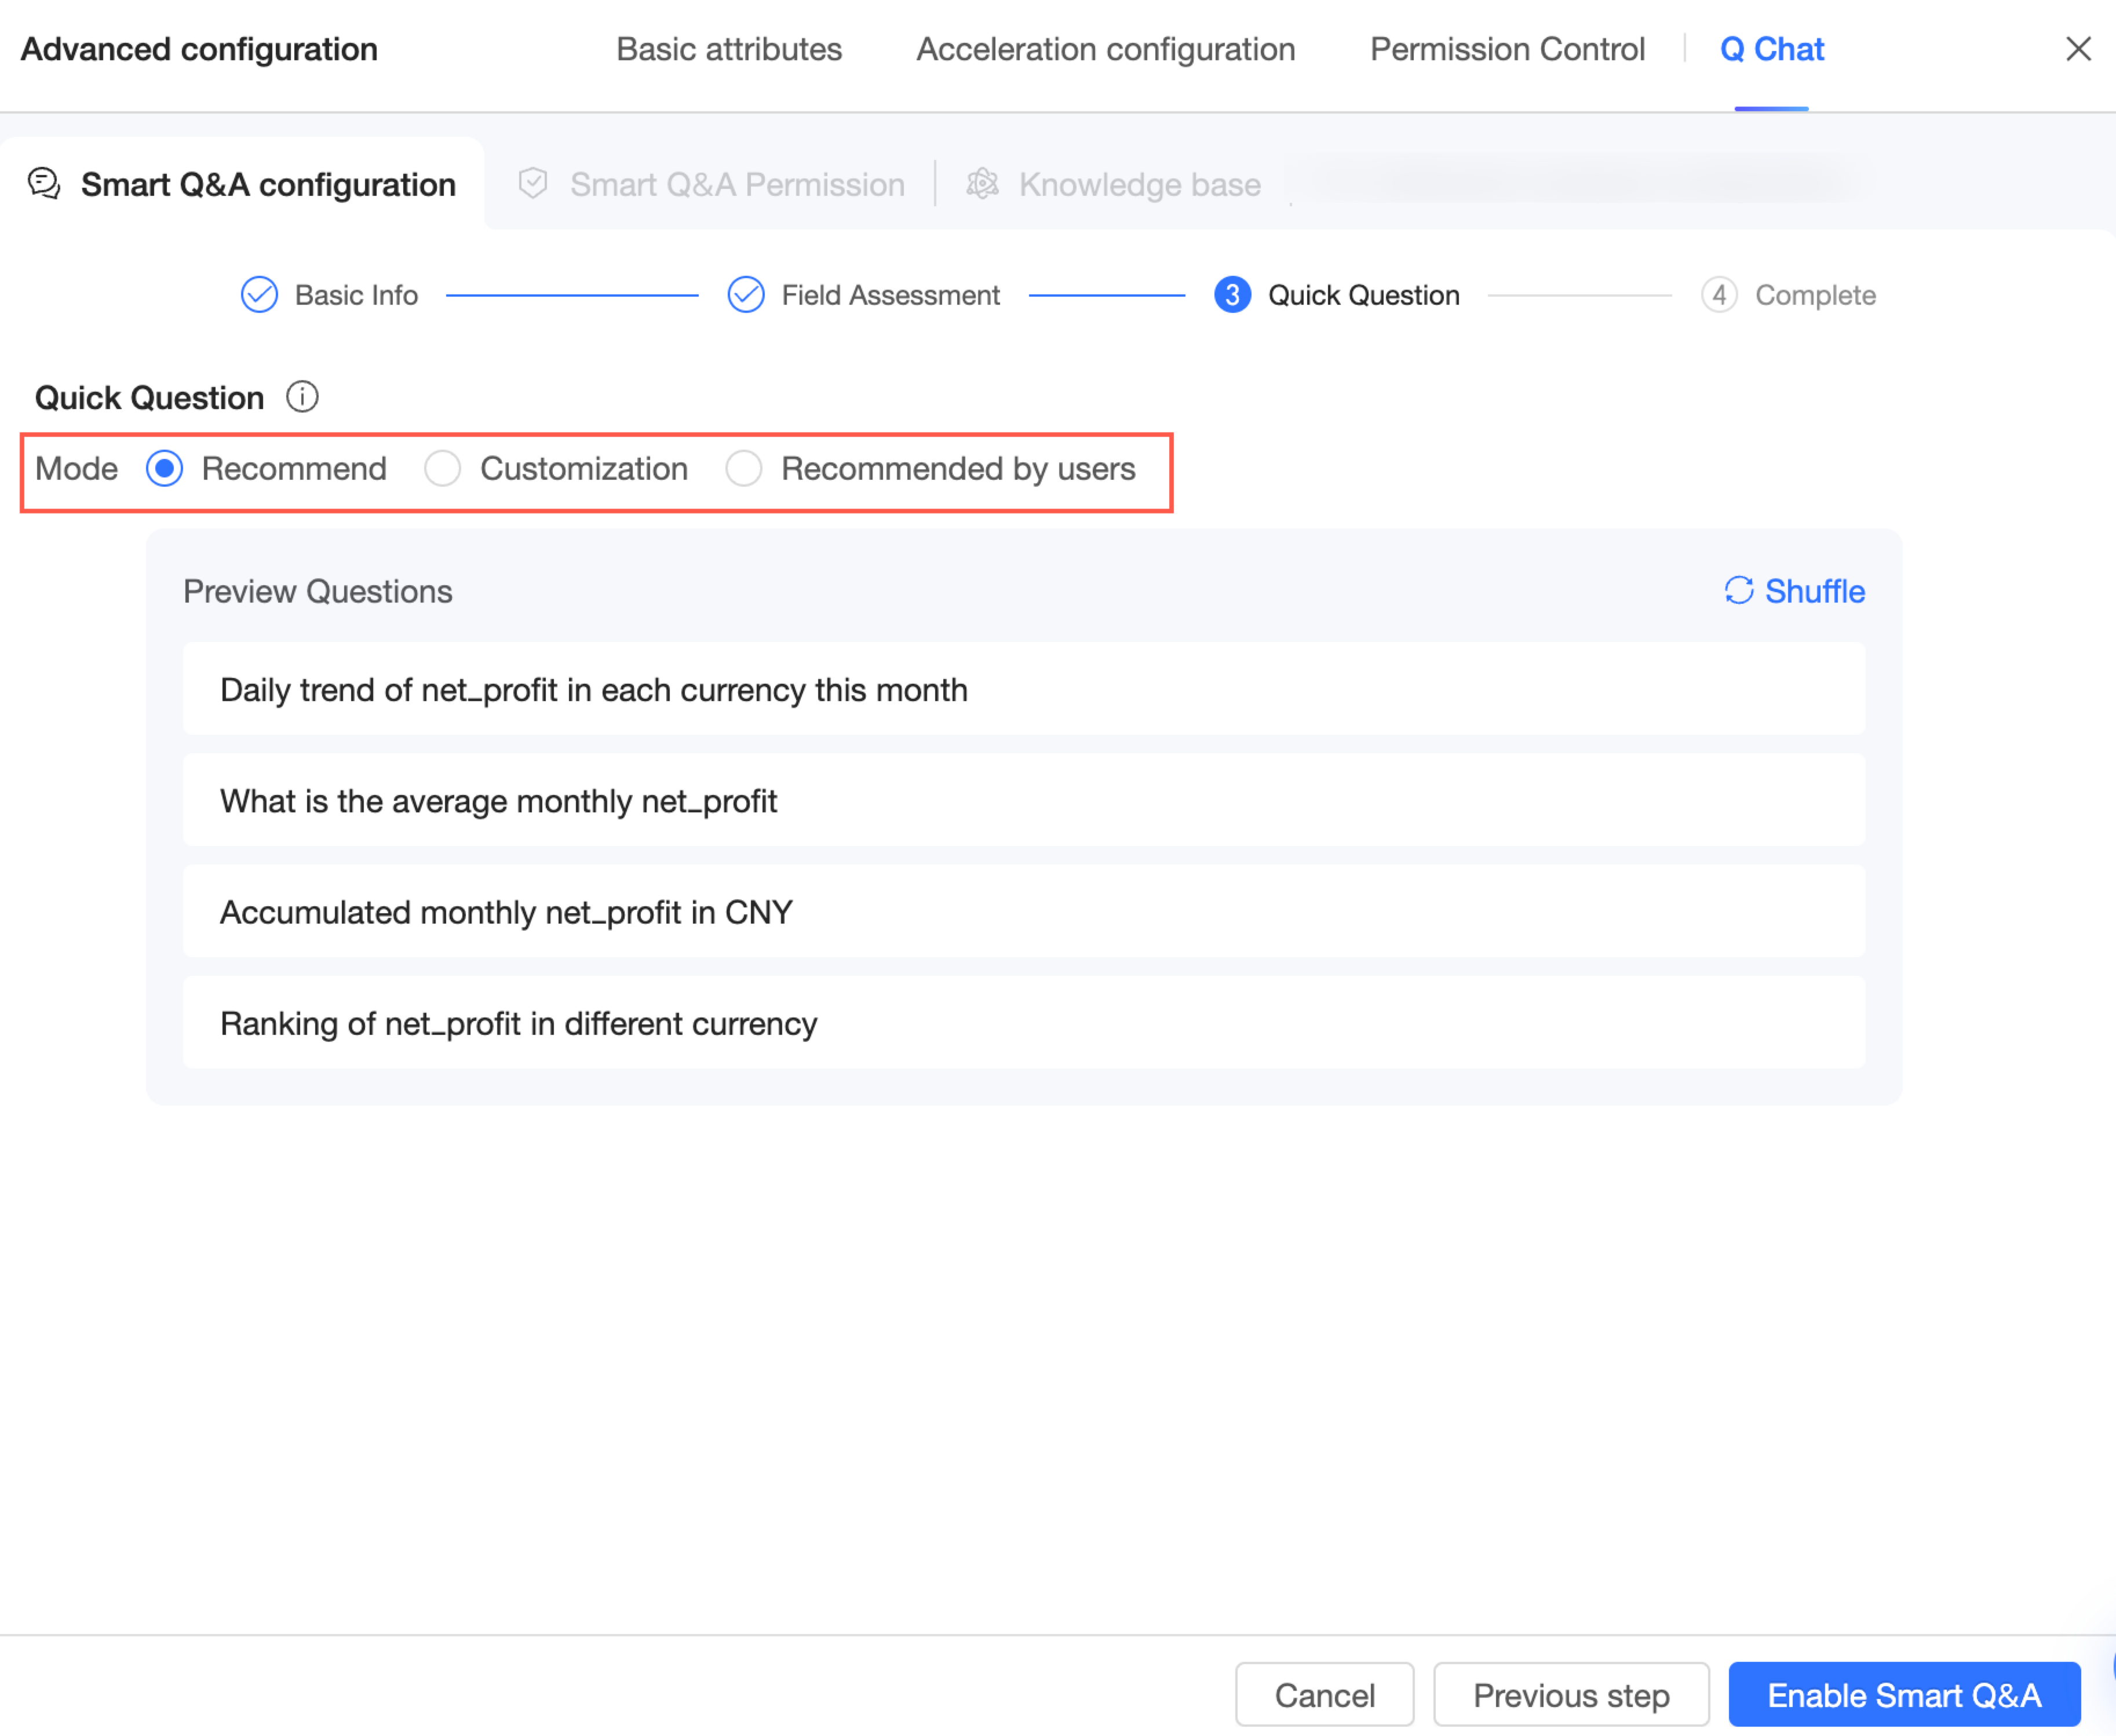
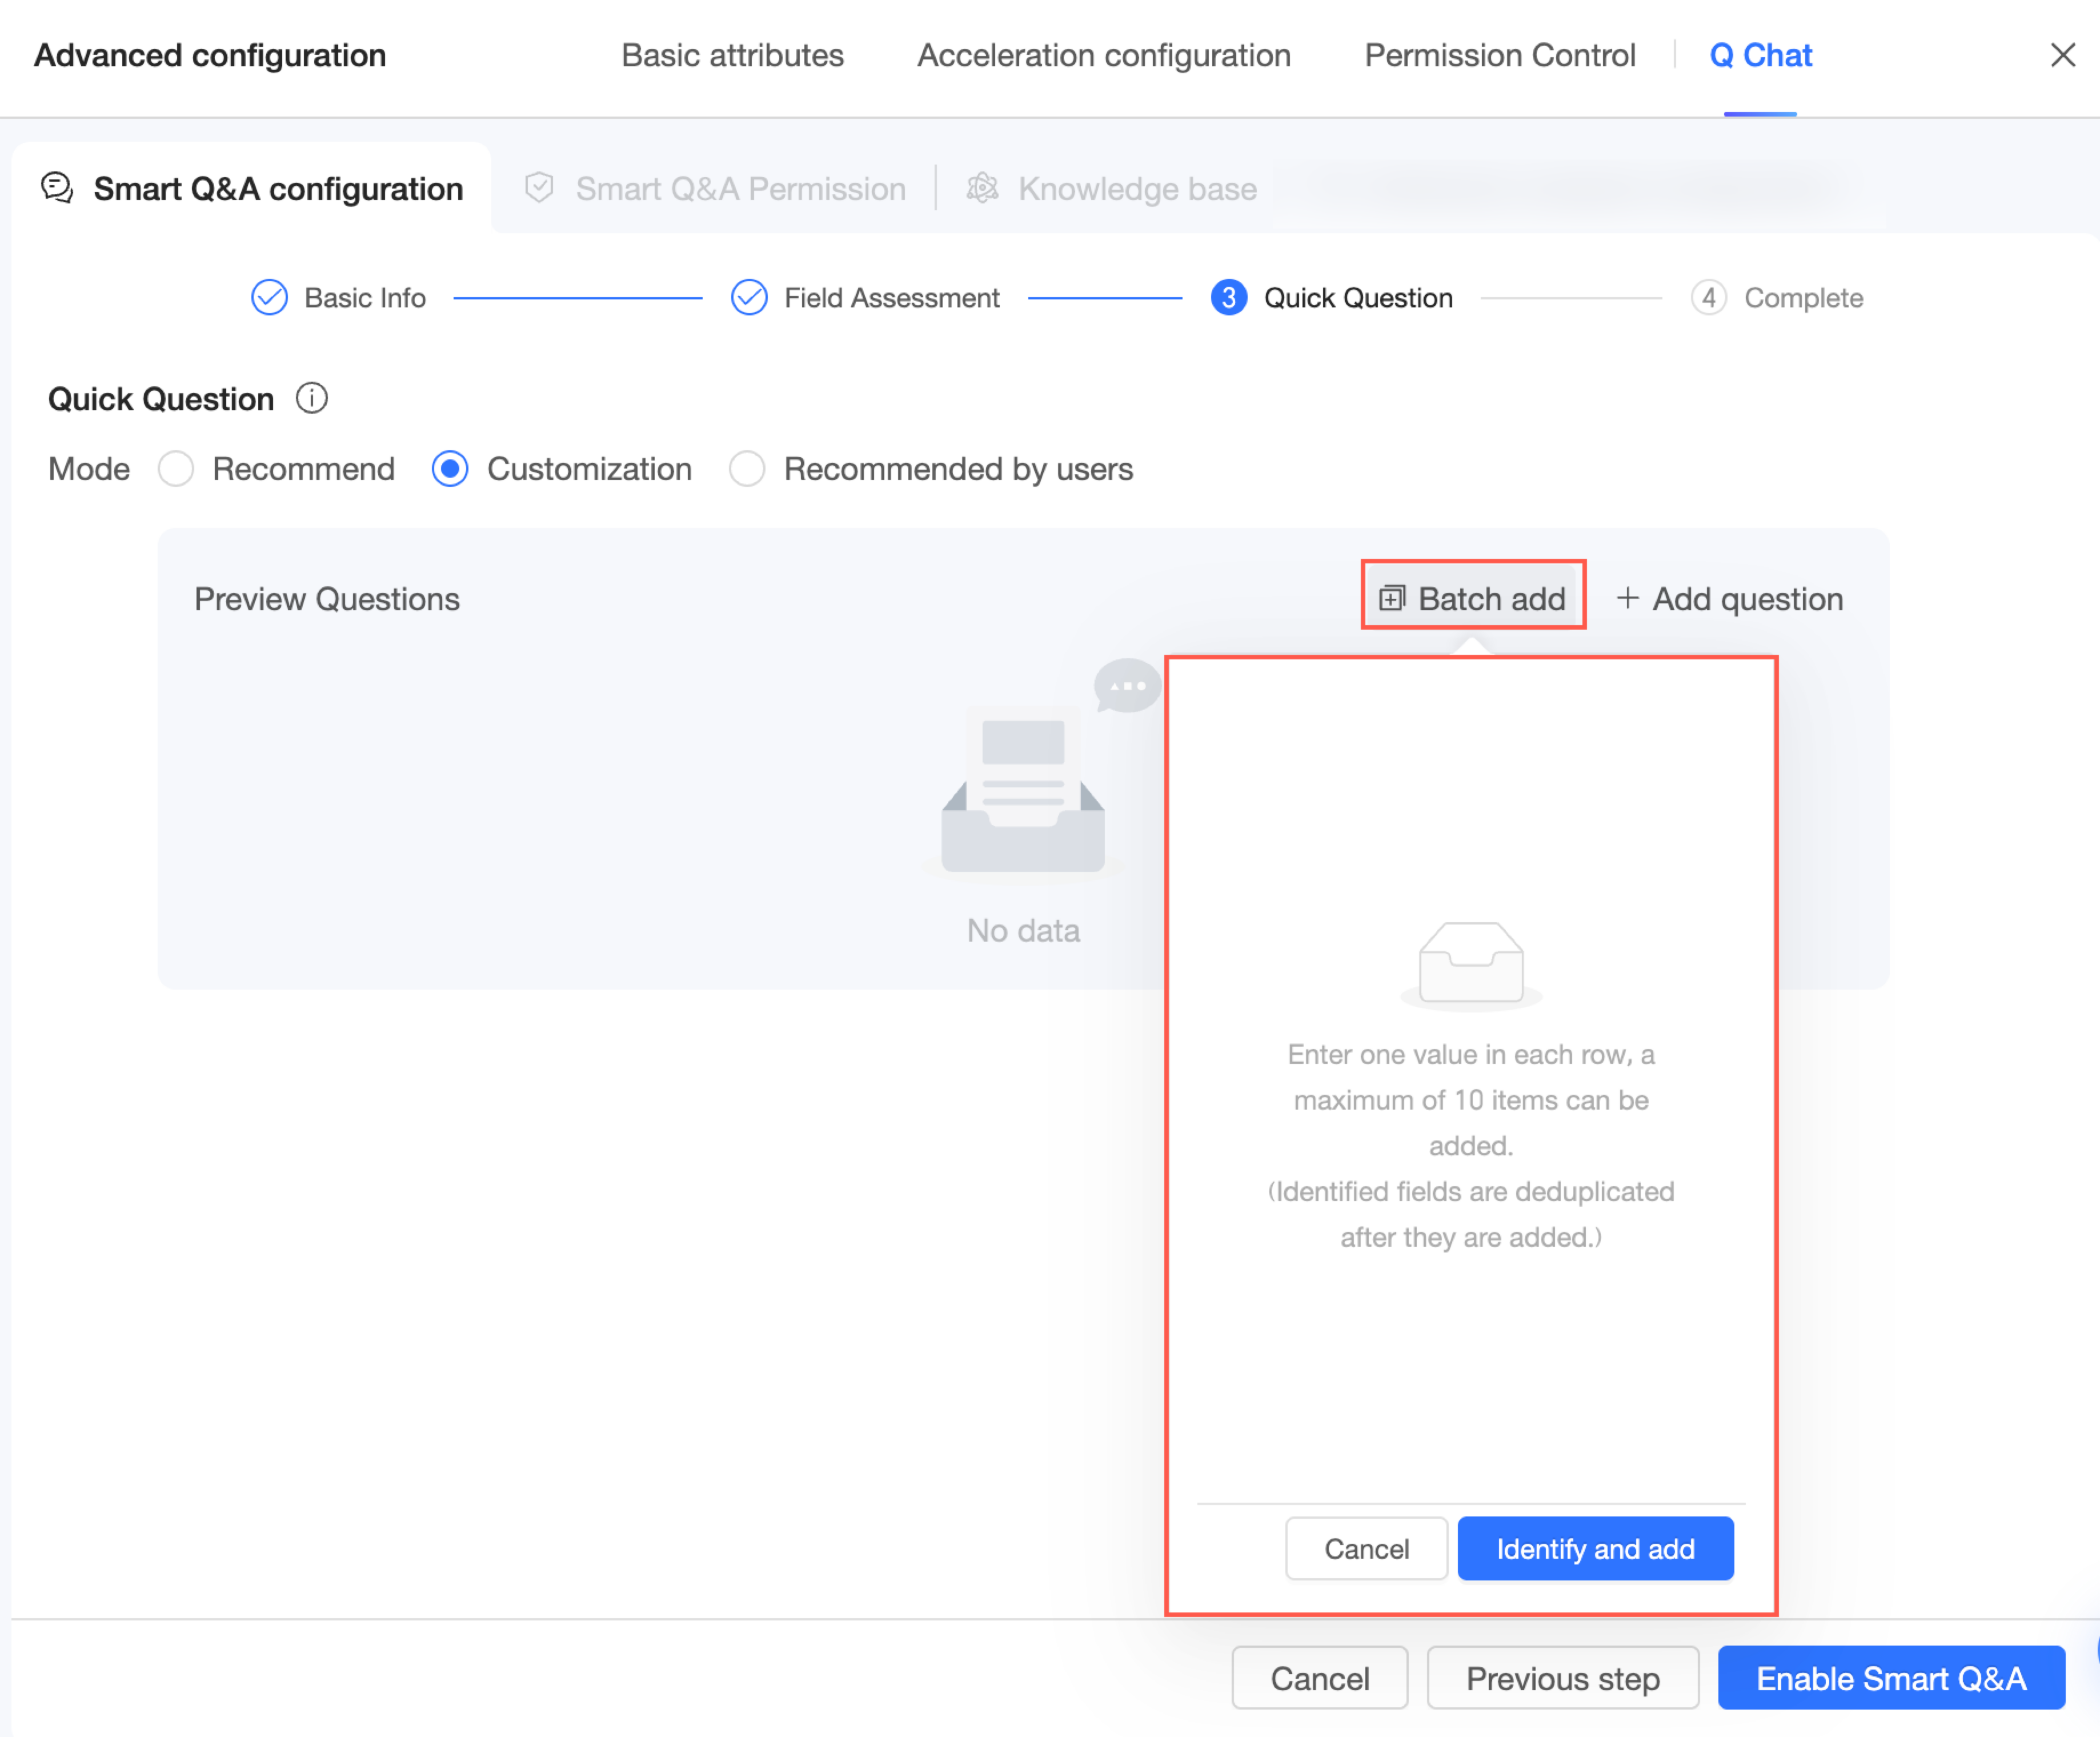
Quick questions
Quick questions are displayed after a user selects the dataset, helping them get started. Three modes are available: system recommendation, expert customization, and recommendation by recipient.
-
System recommendation
You can preview the quick questions. Click Refresh to see a different set of questions.
-
Expert customization
In this mode, you can click Add Question to enter the questions you want users to see. The first four questions are displayed by default. If you add more than four, users can click Refresh to cycle through them.
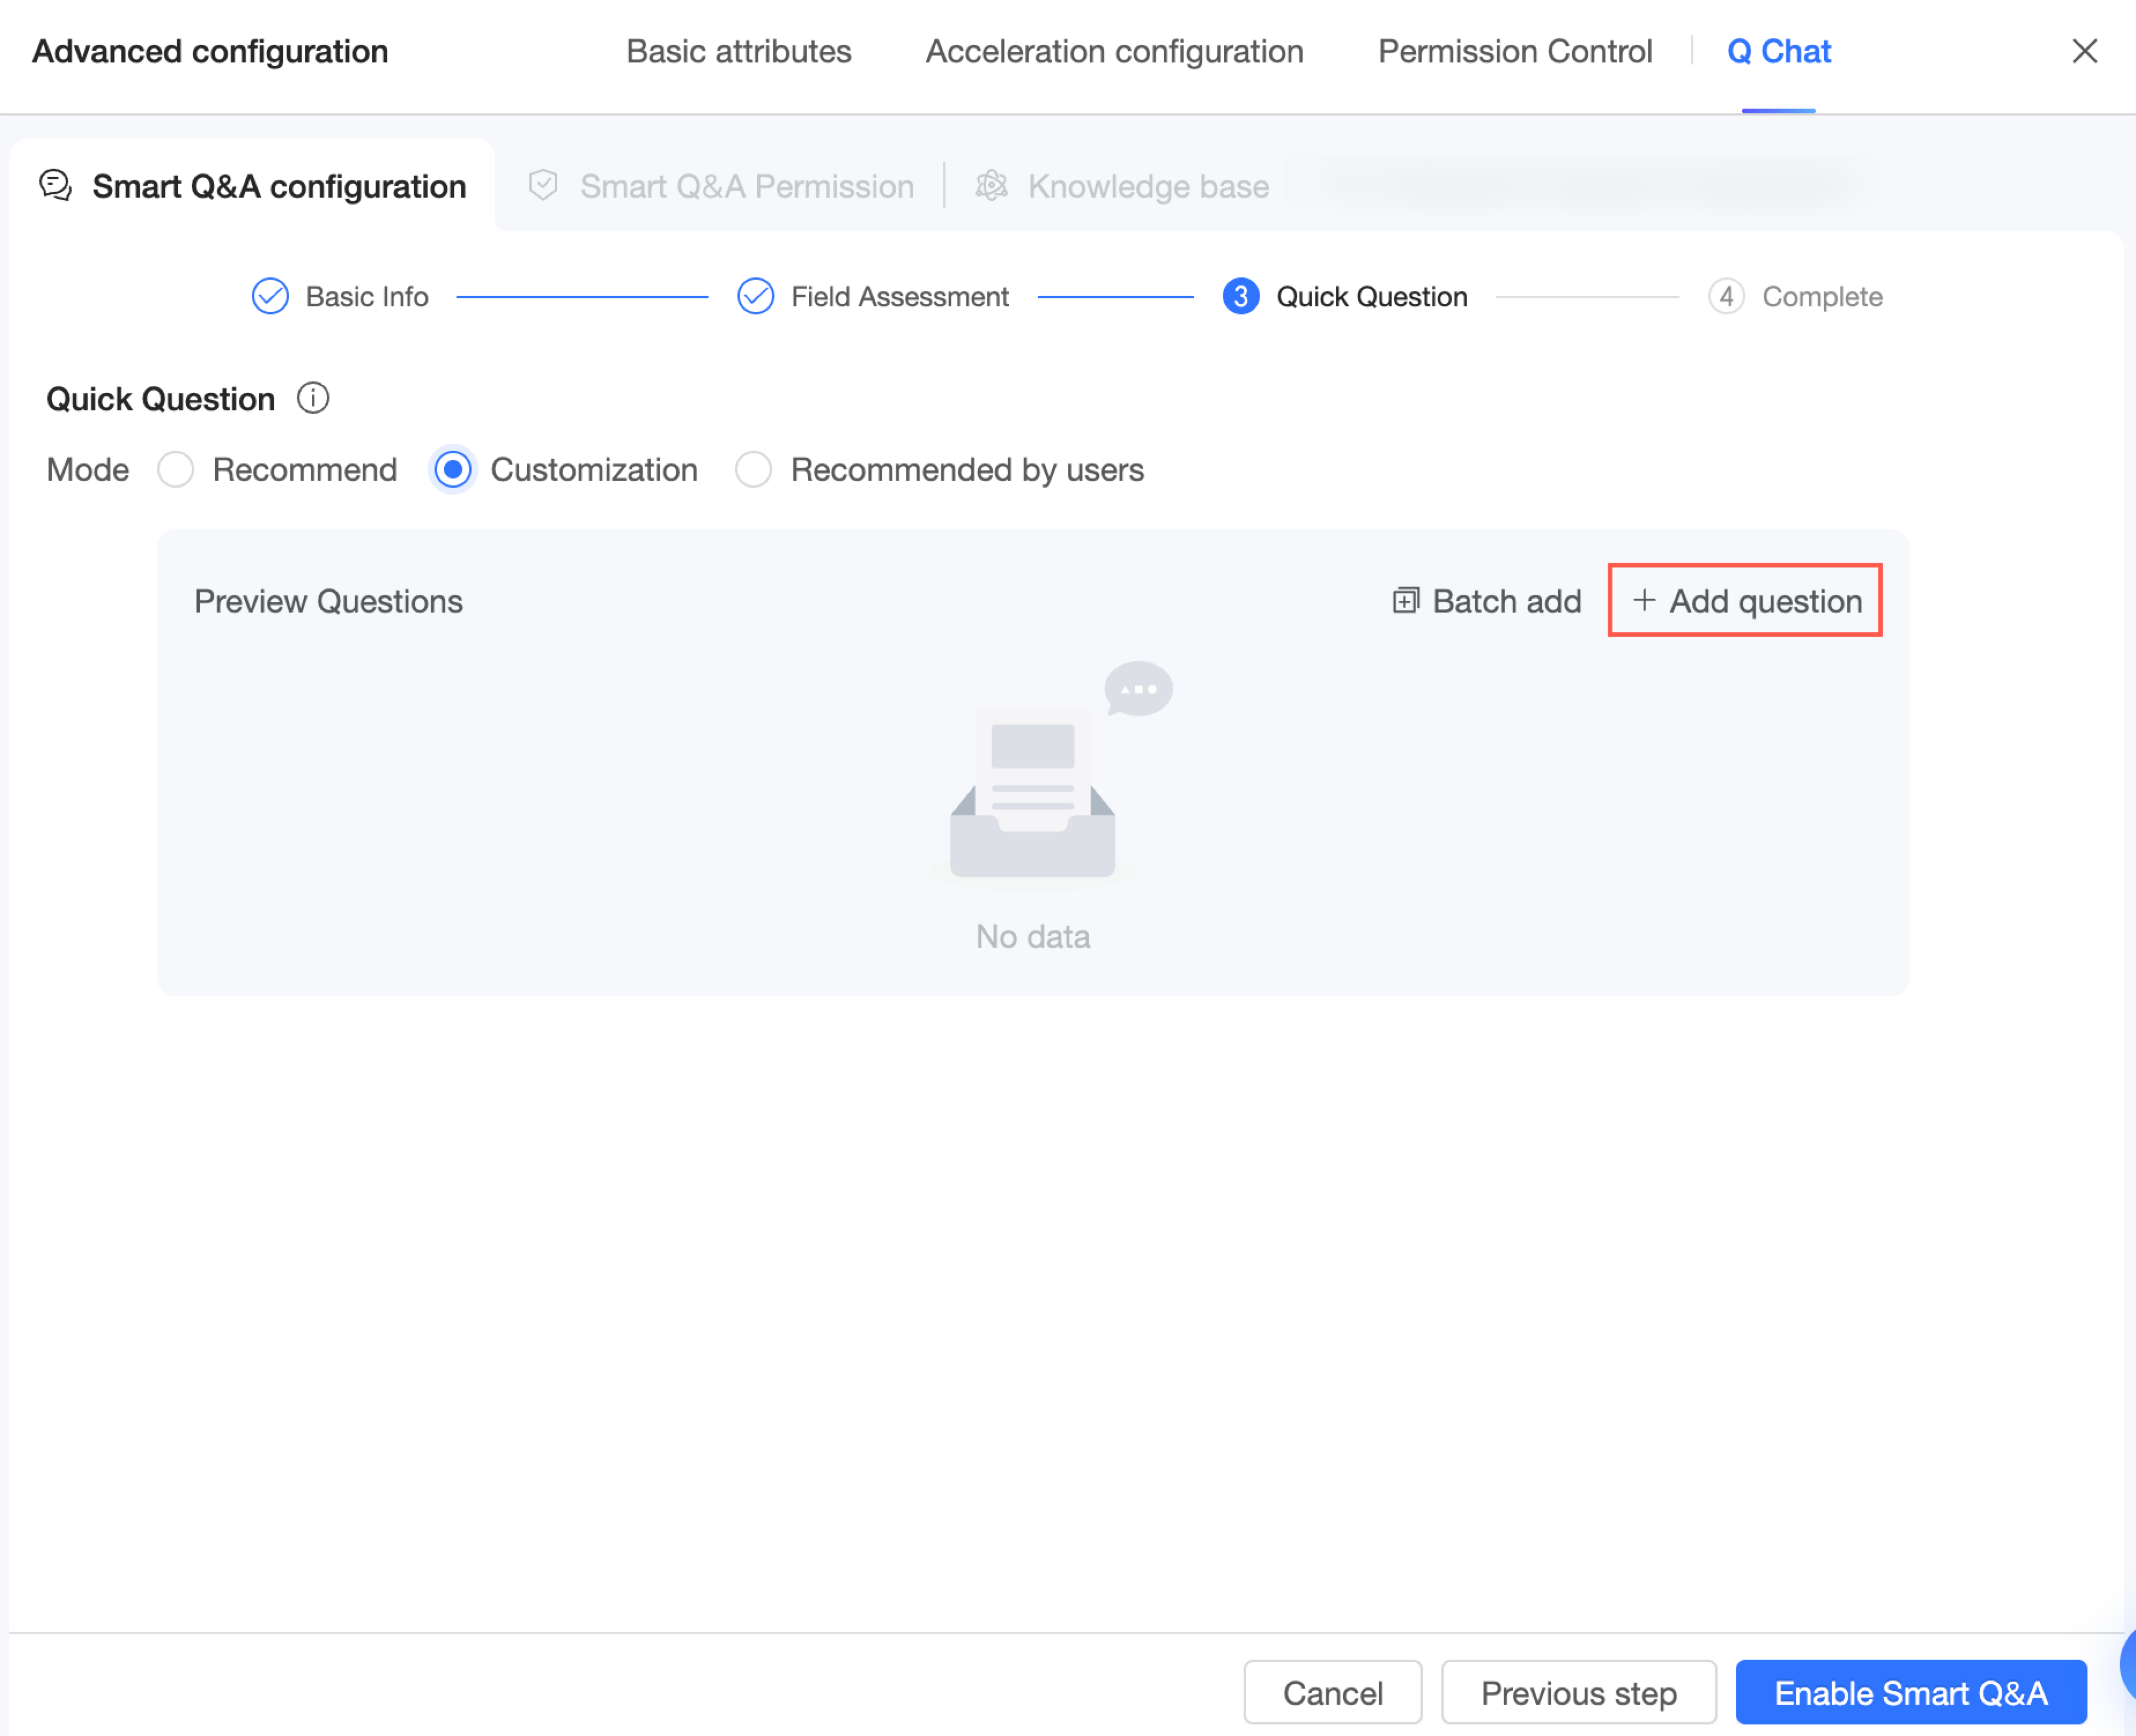
If you need to add multiple questions at once, click Batch Add and enter them.
NoteEnter one question per line. You can add up to 10 questions.
-
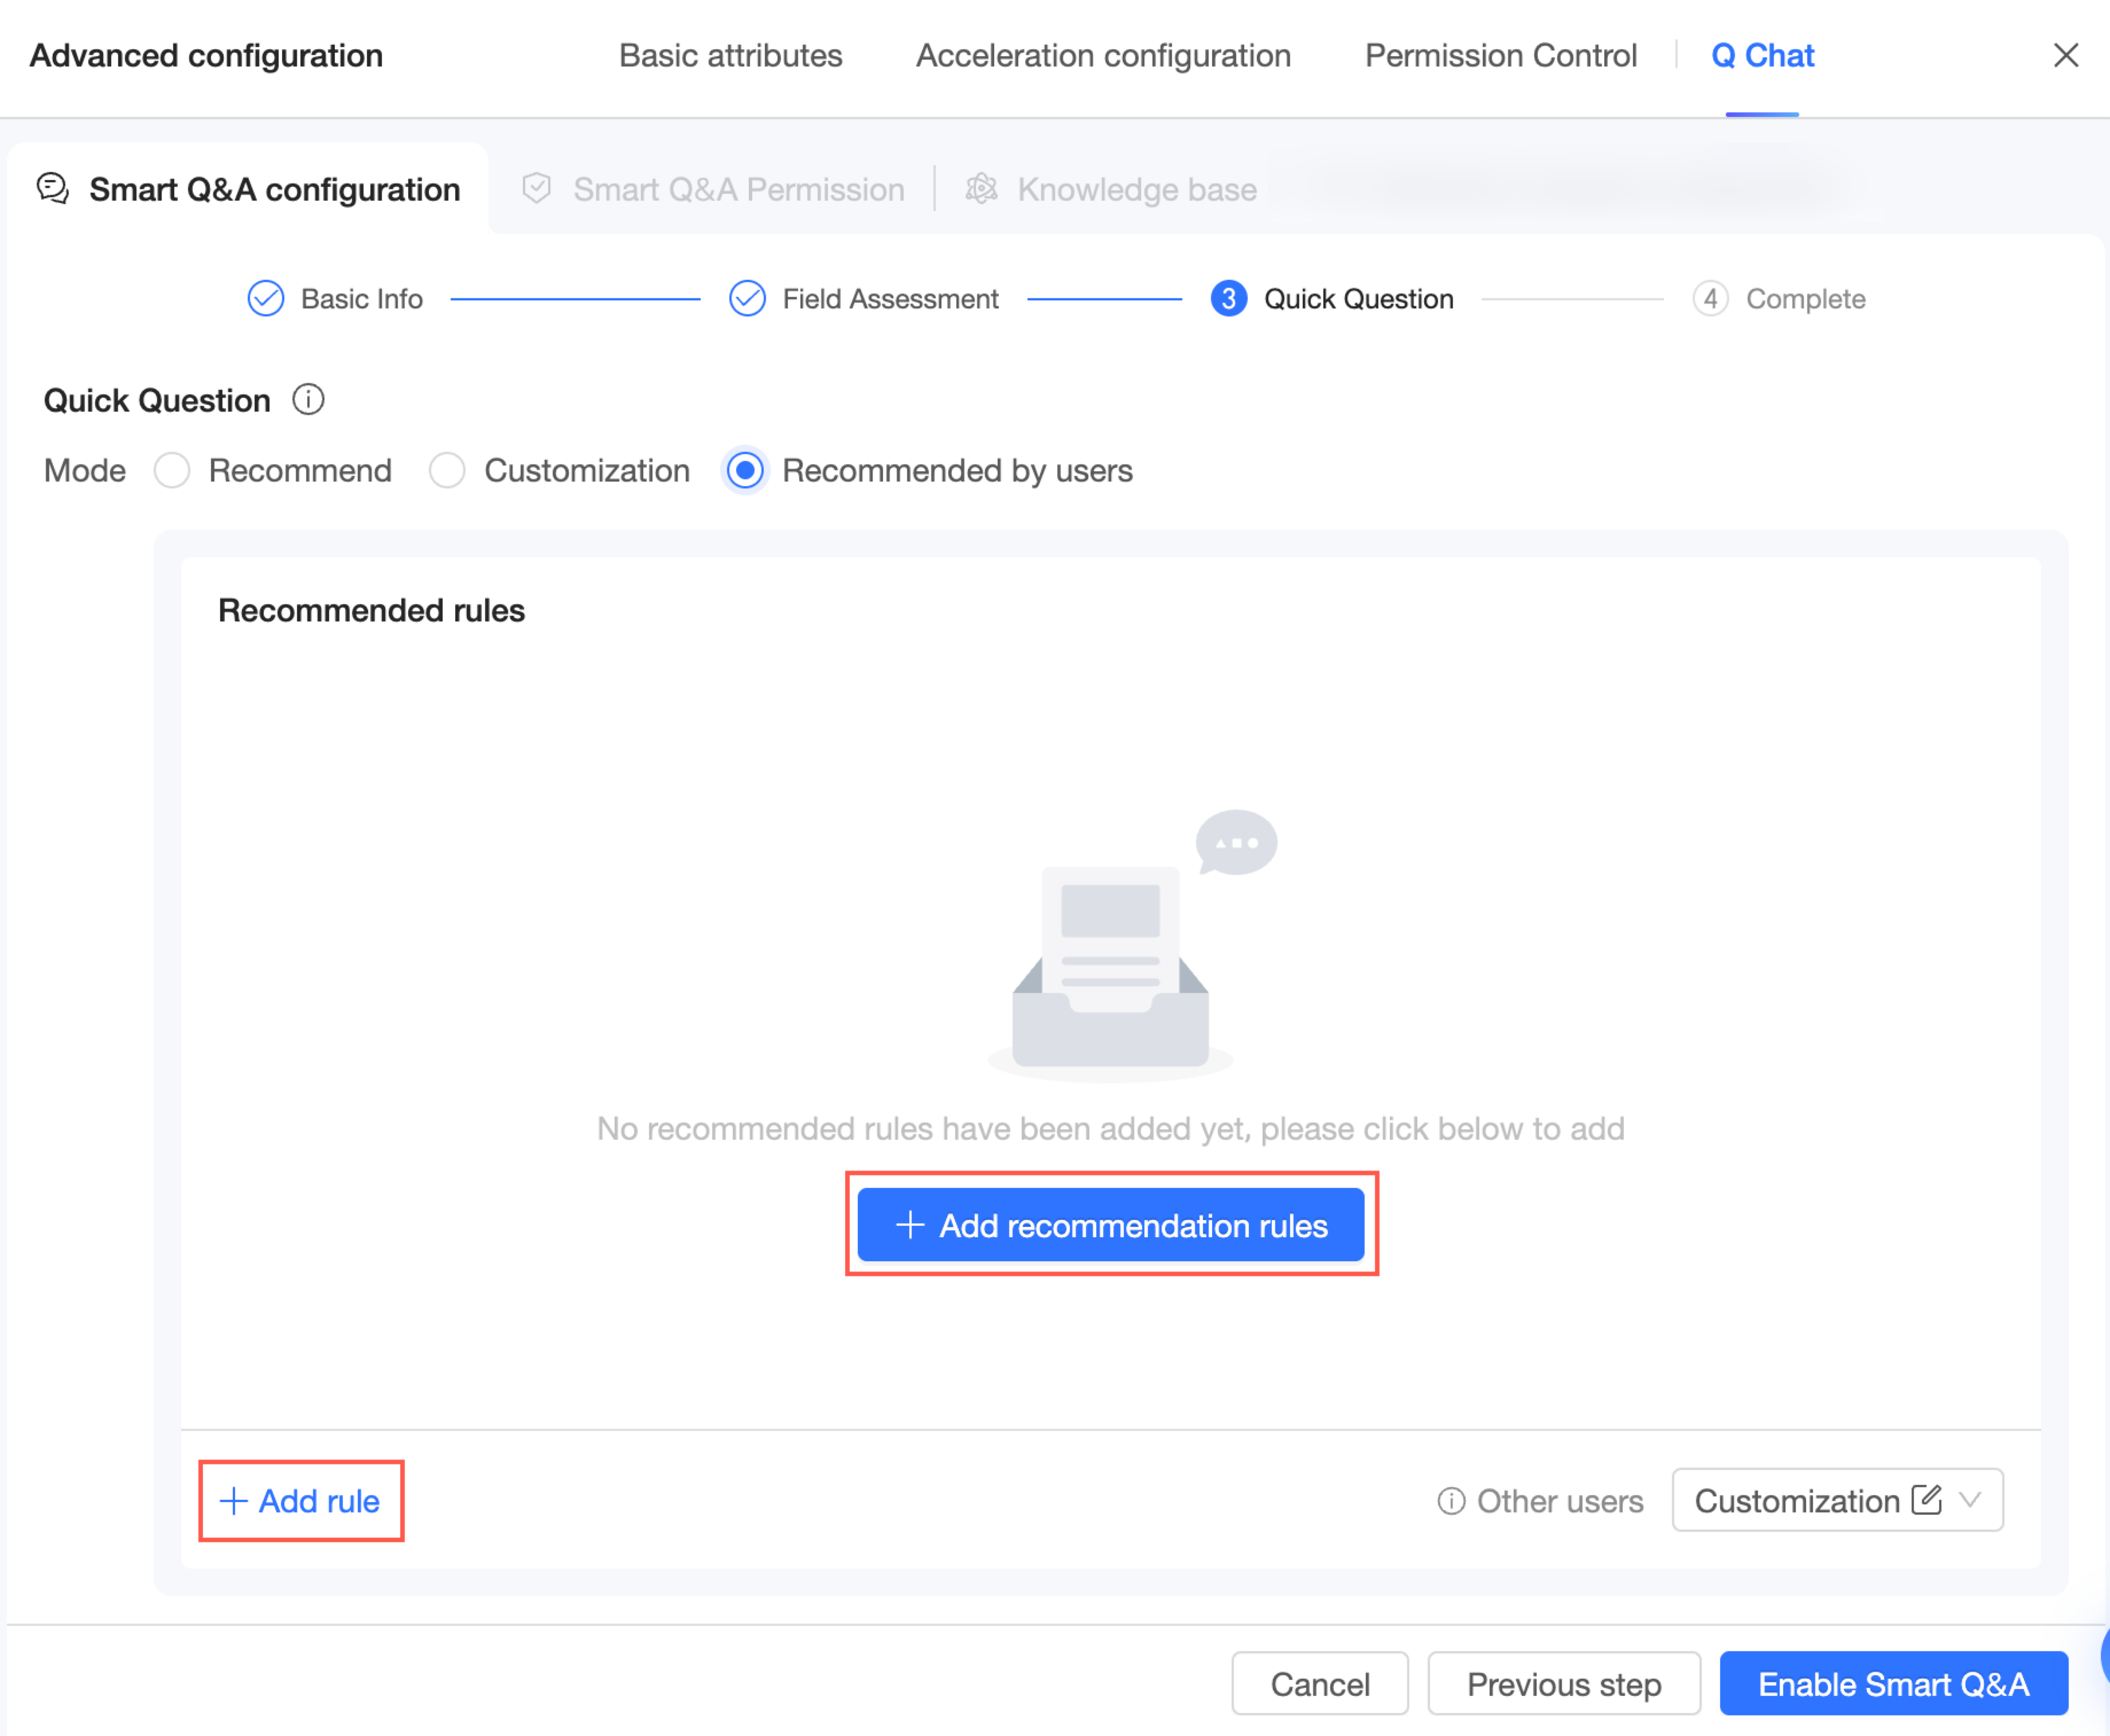
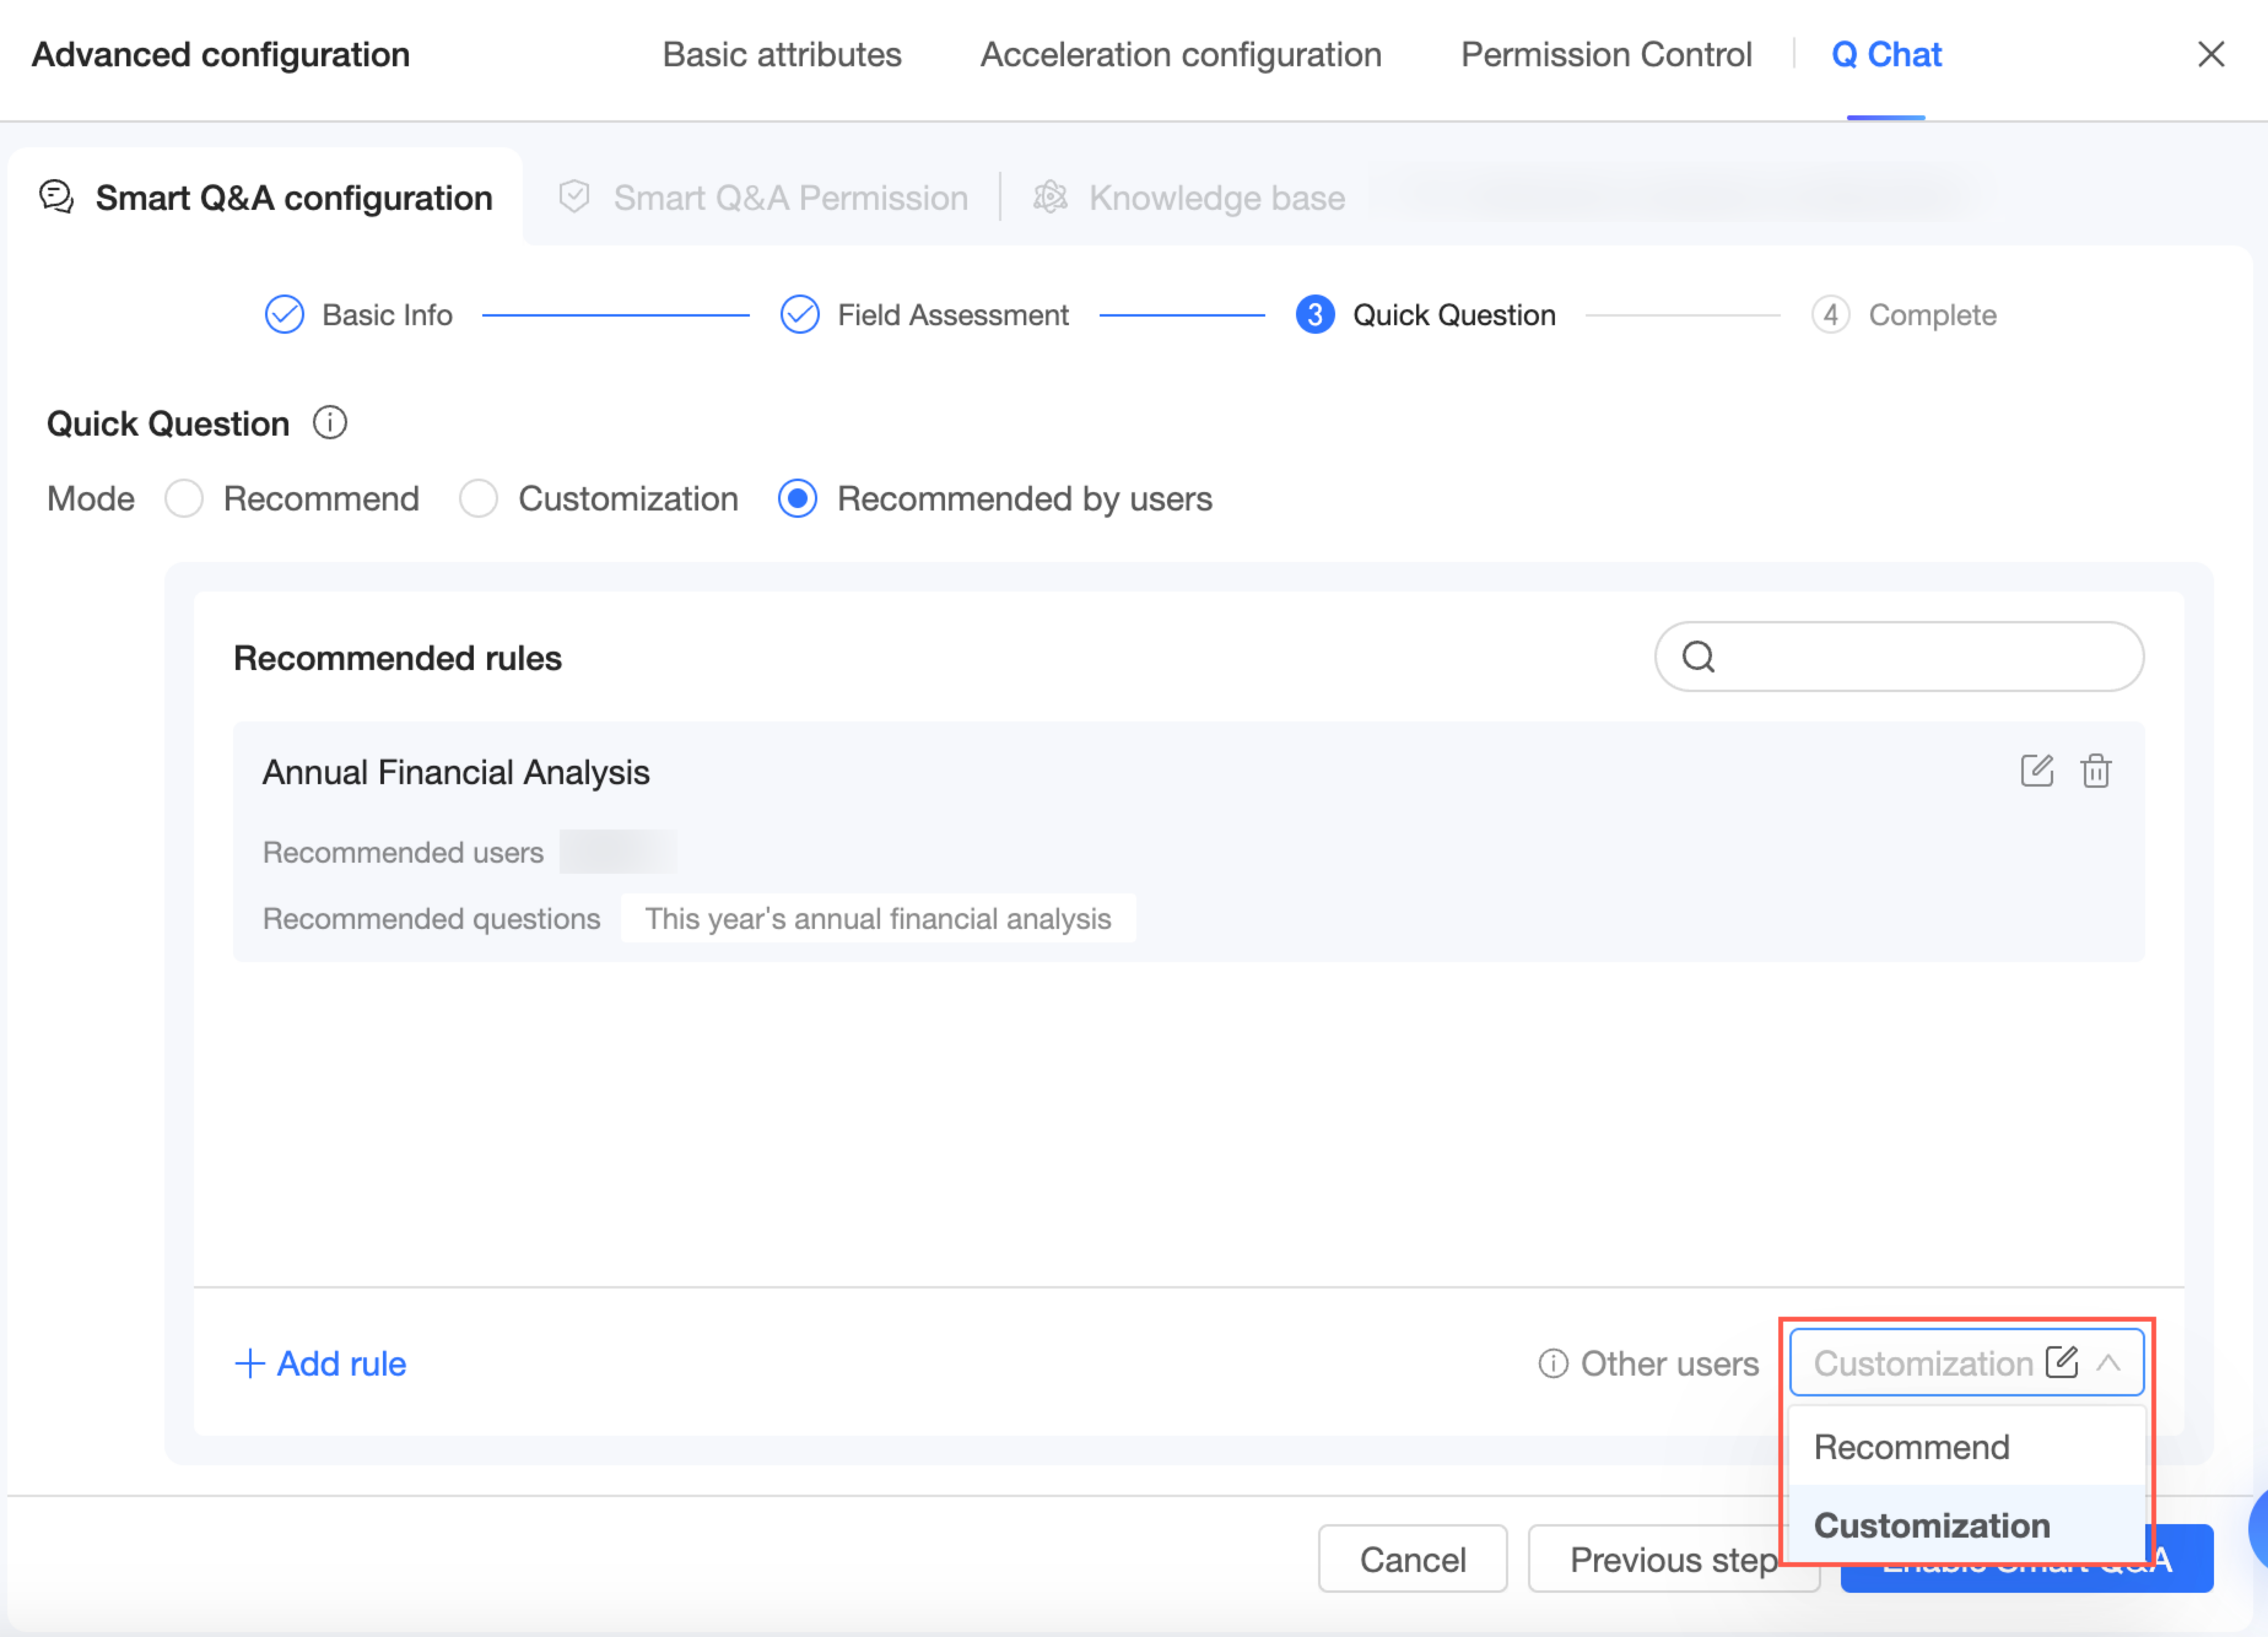
Recommendation by recipient
When you select the recommendation by recipient mode, follow these steps to add rules:
-
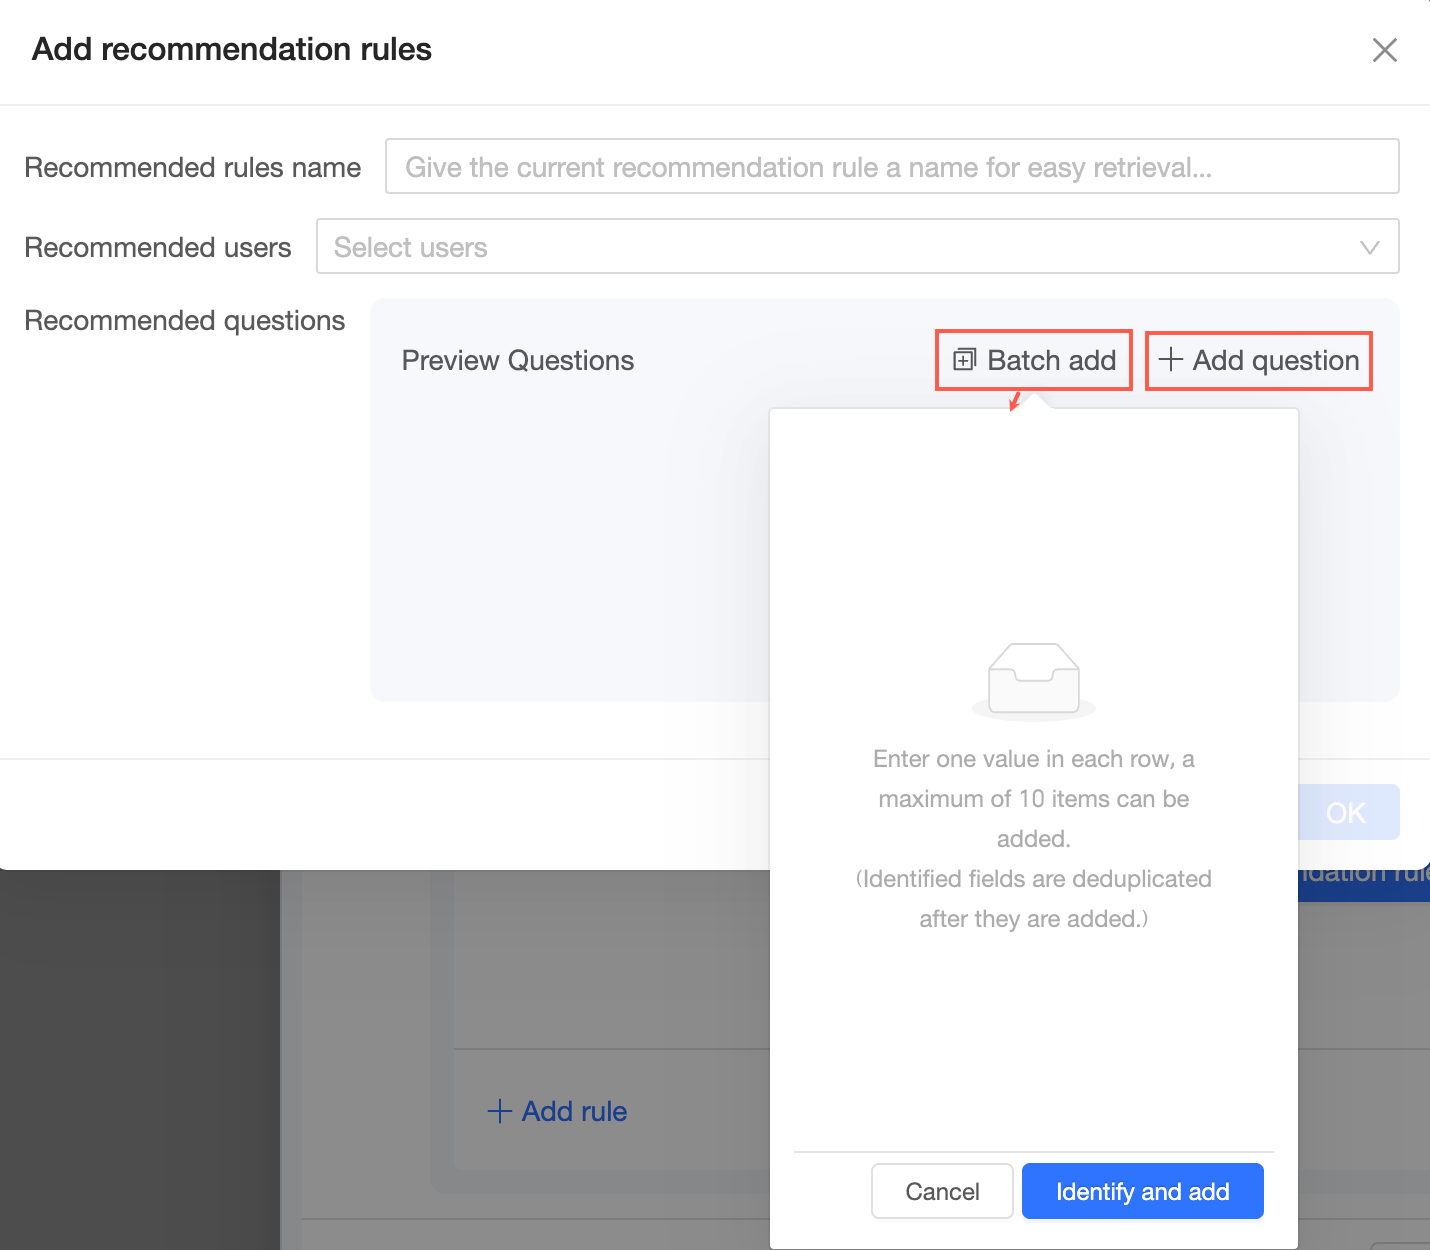
Click Add Recommendation Rule or Add Rule in the lower-left corner.
-
On the Add Recommendation Rule page, enter a rule name, specify the recommendation recipients, and add the recommended questions.
-
Recommendation rule name: Give the rule a name for easy identification.
-
Recommendation recipient: Select users as the target audience for the recommendations.
-
Recommended questions: Click Add Question to add a single question, or click Batch Add to add multiple questions.
NoteYou can add up to 10 questions.
-
-
Select either system recommendation or expert customization as the fallback rule for other users.
-
Click Confirm Changes to save your configuration.
After completing the configuration, you can click Go to Quick BI Q Chat Permission Management or click the Q Chat Permissions tab to go to the Q Chat permission configuration page. On this page, you can grant users access to this Q Chat-enabled dataset. For more information, see Q Chat permission configuration.
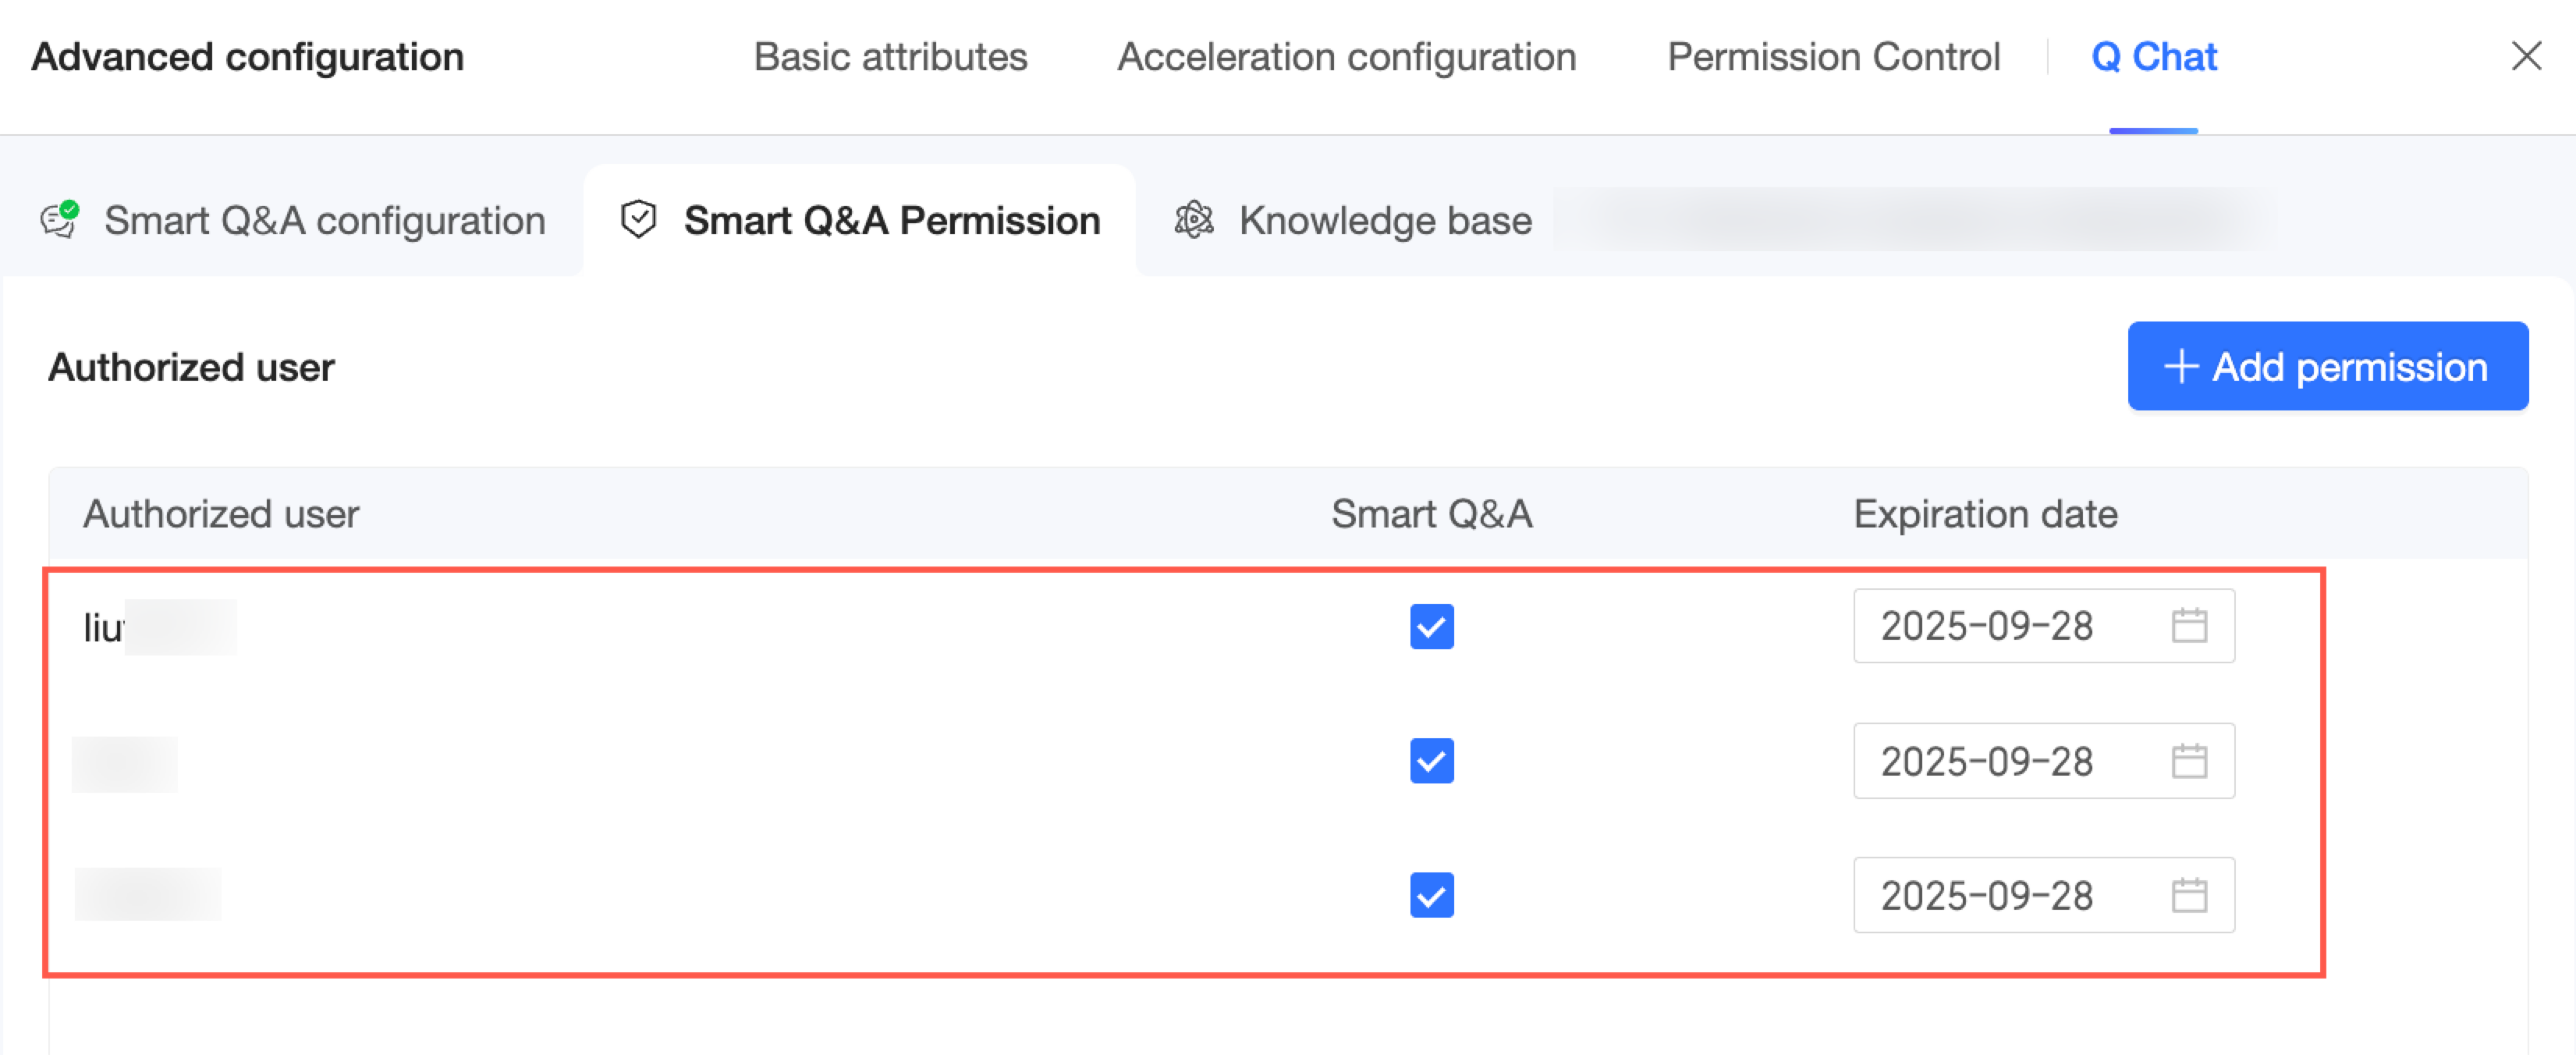
Q Chat permissions
After configuring the Q Chat settings, you can manage access permissions.
-
Go to the Q Chat Permissions configuration page.
-
On the Q Chat Permissions configuration page, click Add Authorization.
Alternatively, you can click Add Authorization on the Q Chat configuration page from the previous step.

-
Select the users you want to authorize. You can also set an expiration date for the access.
-
Click Done. You can now view and manage the list of authorized users for this Q Chat-enabled dataset.
If you have centralized management permissions, you can also manage permissions on the Quick BI -> Permission Management page. For more information, see Permission Management.
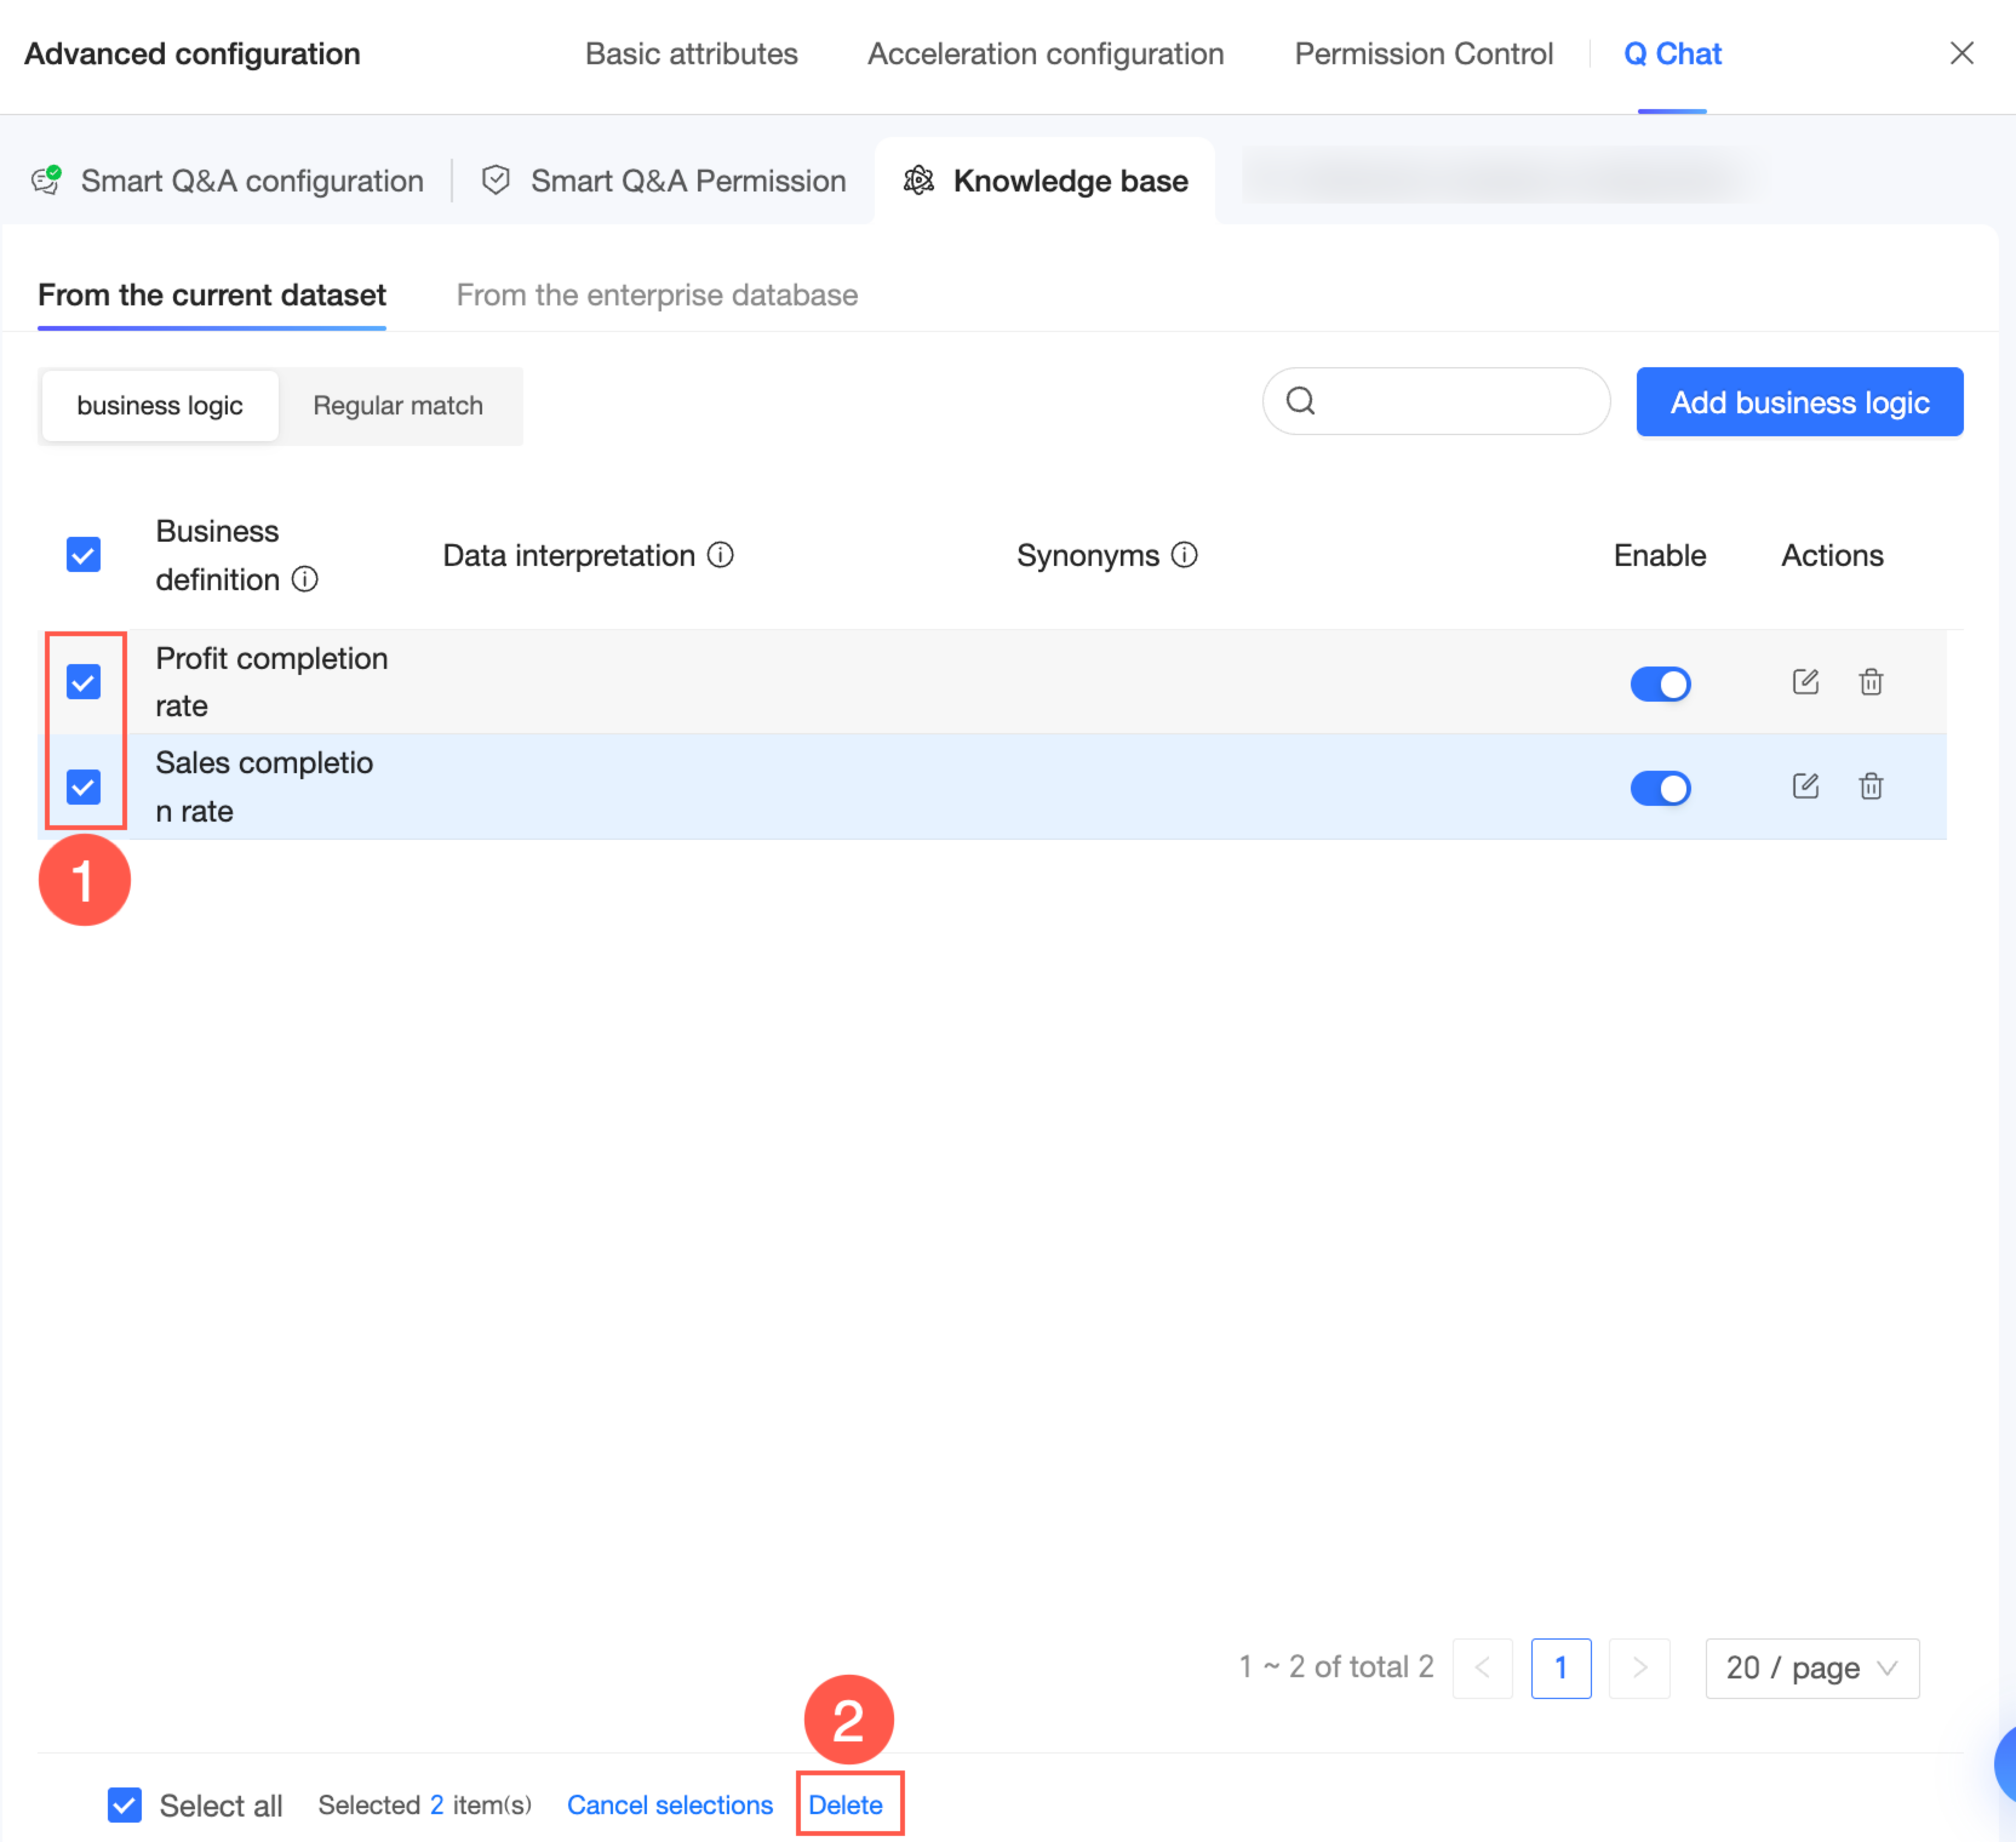
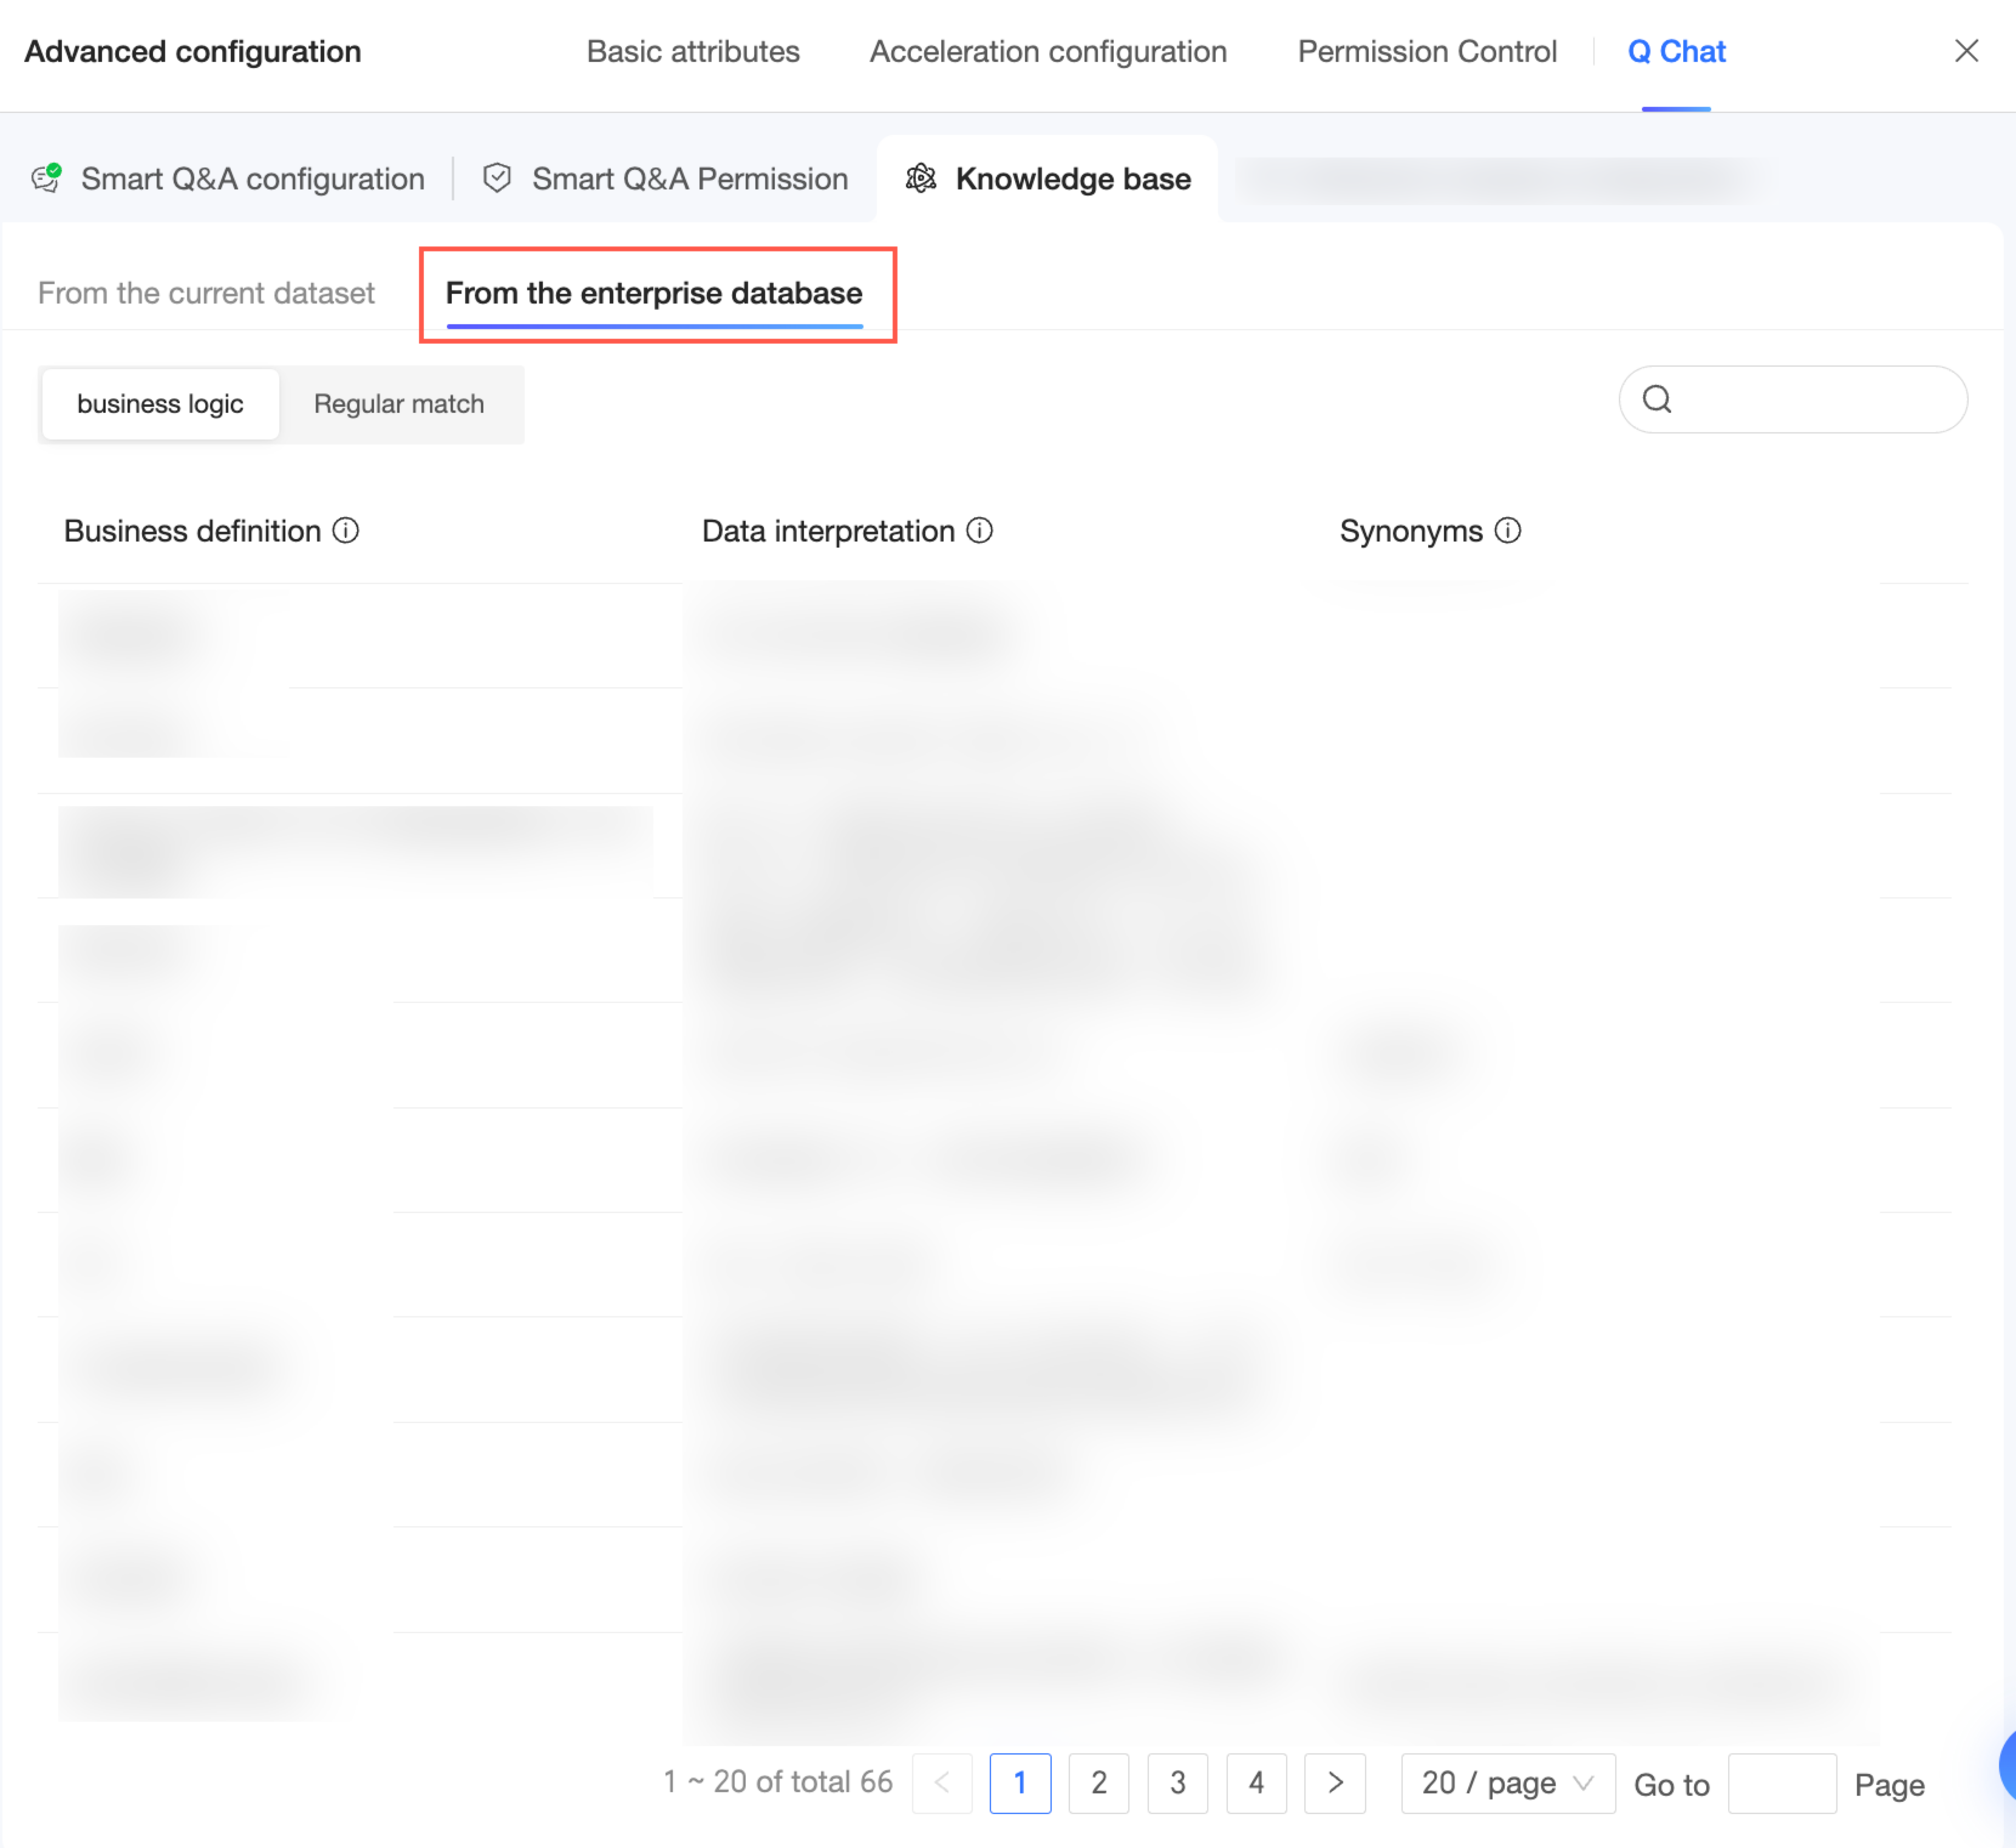
Knowledge base
The knowledge base stores enterprise-specific knowledge and vocabulary preferences that the model uses for data retrieval and analysis. You can manage the knowledge base from the dataset editing page, where you can configure Business Logic and Regex Matching rules.
The dataset knowledge base has a higher priority than the corporate knowledge base. For more information about managing the corporate knowledge base, see Q Chat Knowledge Management.
Access
Go to the Knowledge Base Management page.
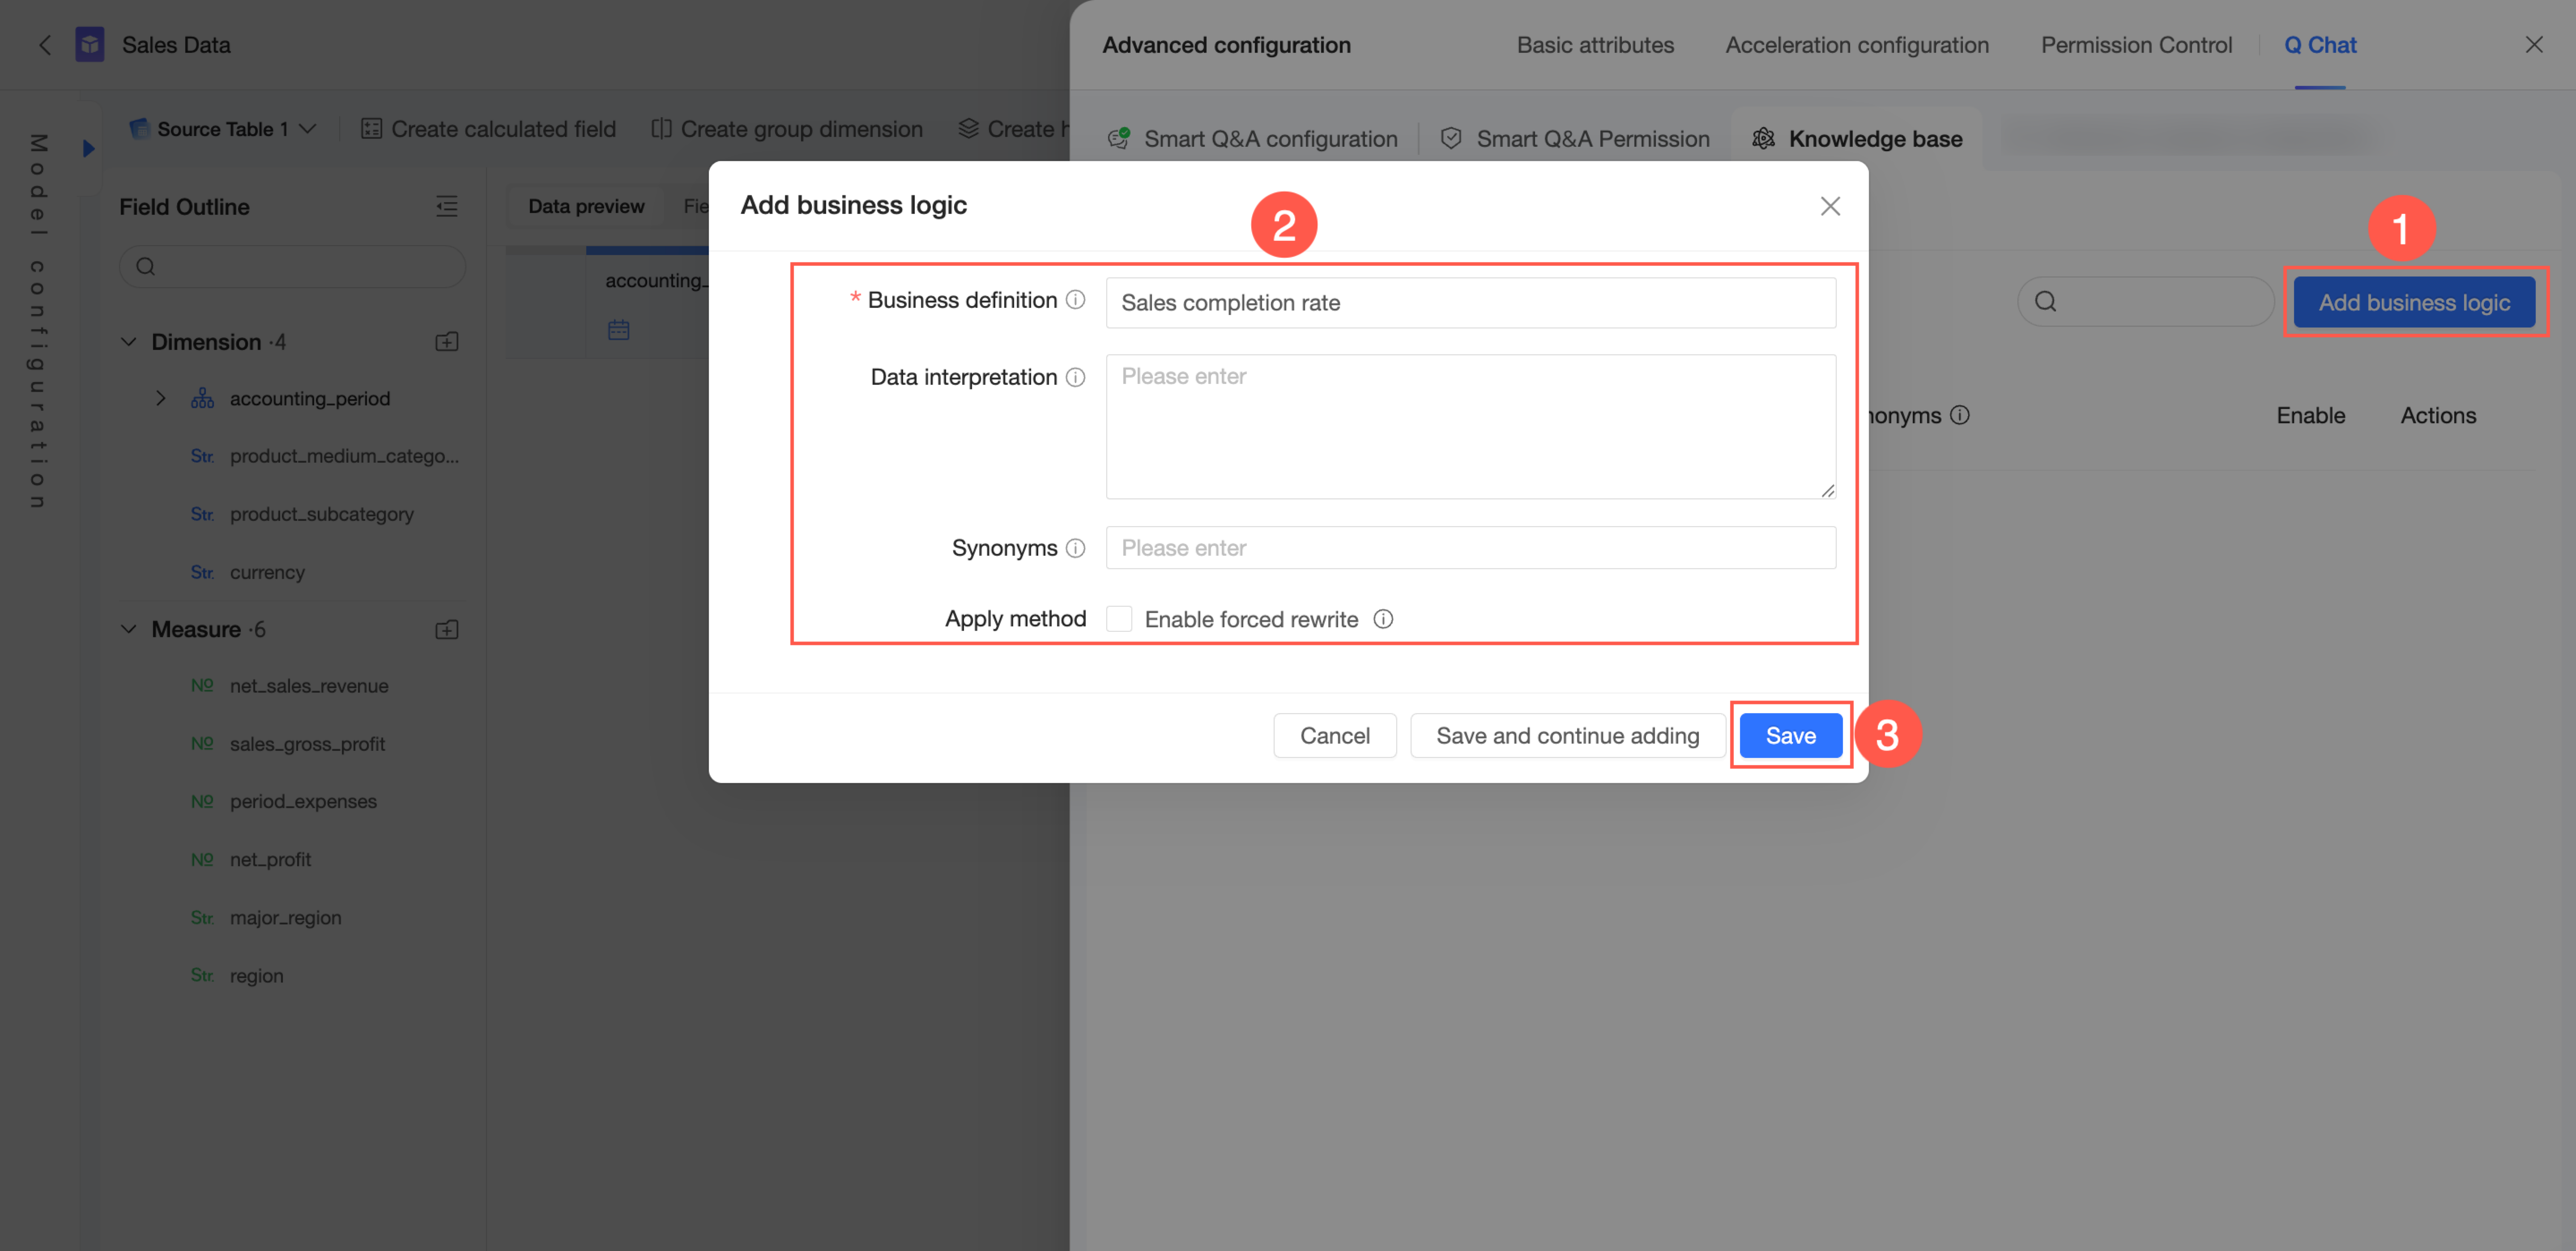
Business logic
On the Knowledge Base Management -> From Current Dataset -> Business Logic tab, you can add business logic.
-
In the upper-right corner, click Add Business Logic.
-
Configure the Business Definition, Data Interpretation, and Synonyms. In the other settings, choose whether to Enable Forced Rewriting.
-
Business definition: Defines a common business concept within your organization, such as "sales progress" or "fiscal year". This field must be globally unique and has a maximum length of 100 characters. You can enter frequently used query terms here.
-
Data interpretation: Provides a detailed explanation of the business definition and associates it with data measures, helping the model identify and understand related measures. The maximum length is 3,000 characters.
-
Synonyms: Defines alternative names for the business term used within your enterprise, allowing the model to recognize different ways of asking the same question.
-
Enable forced rewriting: If enabled, any user query that matches the Business definition or its Synonyms will be rewritten to the content in the Data interpretation field. Use this option with caution.
-
-
Click Save.
To add another entry, click Save and Continue Adding.
Regex matching
On the Knowledge Base Management -> From Current Dataset -> Regex Matching tab, you can add a regex matching rule.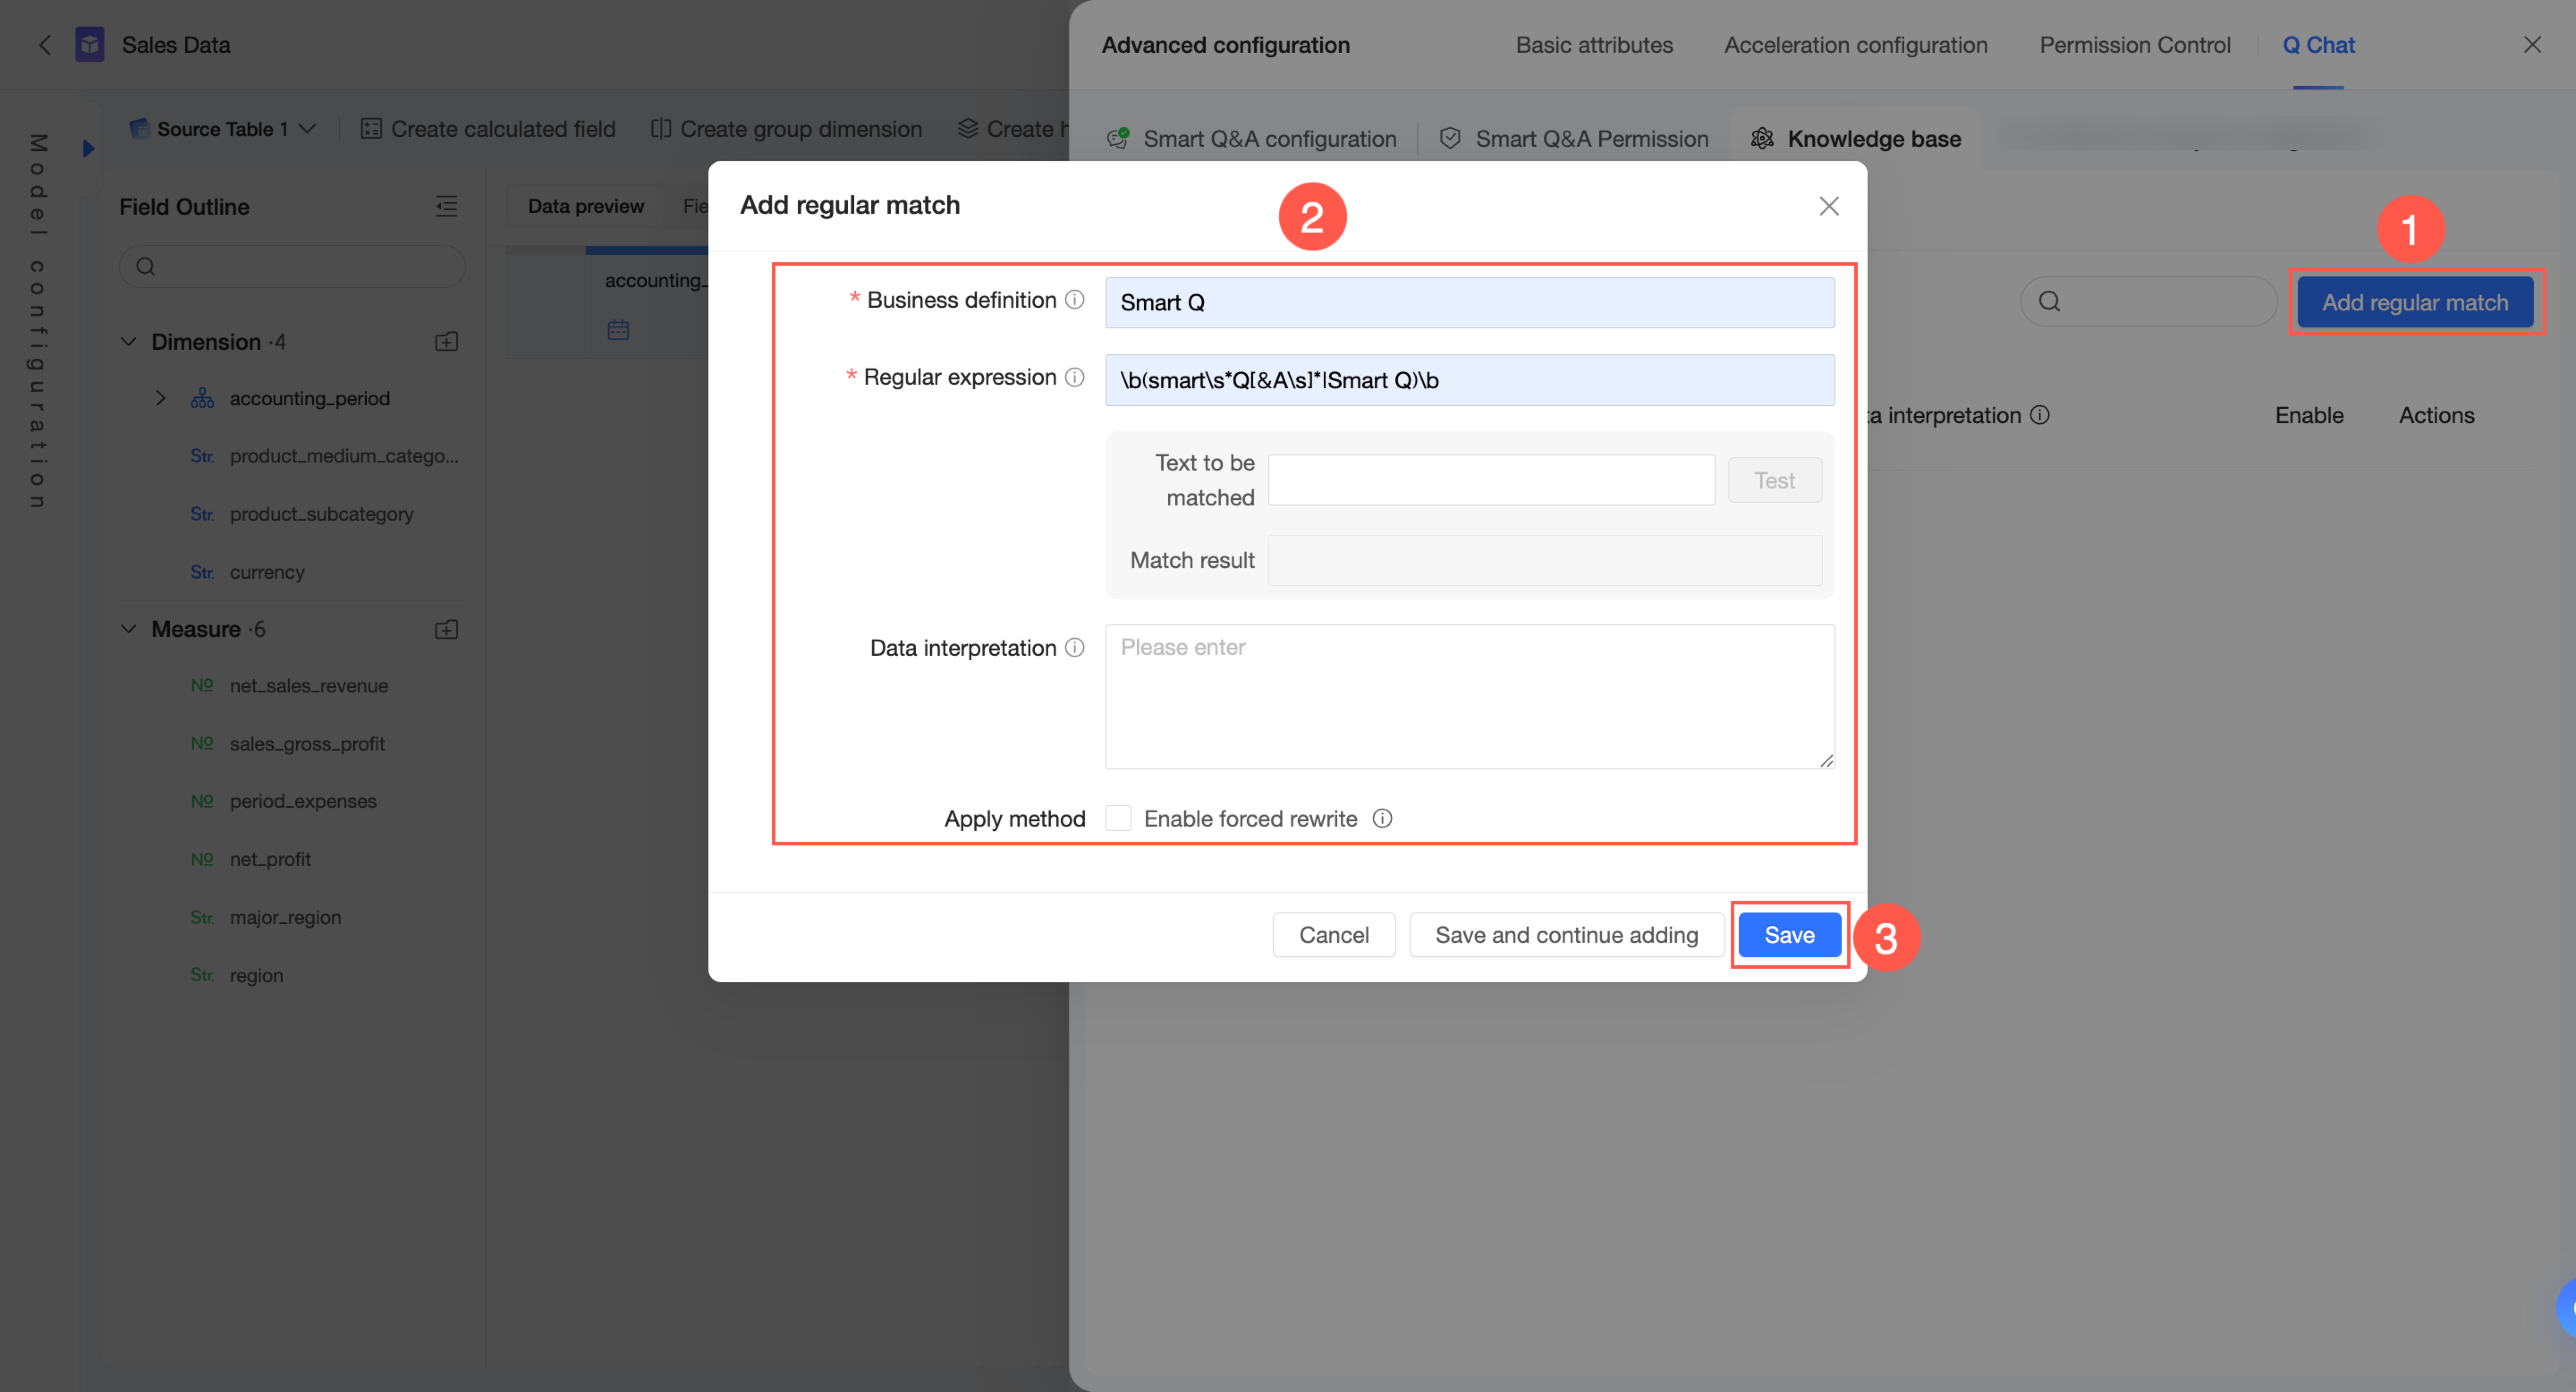
-
In the upper-right corner, click Add Regex Matching.
-
Configure the Business Definition, Regular Expression, and Data Interpretation. In the application method, choose whether to Enable Forced Rewriting.
-
Business definition: Used only to name the regular expression for identification and is not used for matching user questions. It must be unique within the dataset and has a maximum length of 100 characters.
-
Regular expression: Used to identify patterns in user questions and performs an action based on the application method. Write the expression in Python-style, with a maximum length of 100 characters.
You can enter text to match to test the expression and view the match result.
-
Data interpretation: Provides a specific explanation for the content matched by the regular expression. It can be used to explain or rewrite the matched content, depending on the application method.
-
Enable forced rewriting: If enabled, any part of a user's query that matches the Regular expression will be rewritten to the content in the Data interpretation field. Use this option with caution.
-
-
Click Save.
To add another rule, click Save and Continue Adding.
Entry management
On the Knowledge Base Management -> From Current Dataset page, you can manage the knowledge base.
-
You can view the enabled status of each entry in the Enabled column.
-
When the icon for an entry is
 , it is enabled. You can click the icon to disable it.
 -
When the icon for an entry is
 , it is disabled. You can click the icon to enable it.
-
-
Click the
 icon to the right of an entry to edit it.
 -
Click the
 icon to the right of an entry to delete it.
You can also select multiple entries and delete them in a batch.
-
Click From Corporate Knowledge Base to view the knowledge entries that were added in the corporate knowledge base and are effective for this dataset.
Quick BI insight
On the dataset editing page, click advanced settings and select Quick BI insight to open the Quick BI insight configuration page.
For detailed instructions, see Quick BI insight.
Dataset configuration
-
For calculable dimension attributes, set the default aggregation method to average. This prevents incorrect calculations later.
-
For attributes like price, height, and width of car models, which may involve aggregate calculations such as maximum, minimum, or average, we recommend treating them as a measure. To prevent them from being automatically summed up in queries, setting the default aggregation method to average is more logical. For example: "What are the sales amounts for car models priced over 300,000 from each brand?"
-
-
Include units in data field names or descriptions to ensure correct filtering.
-
For a query like "What are the sales for brands with prices over 100,000?", if the unit of the price field is "ten thousand", the backend calculation will use a filter of >10 instead of >100000.
-
-
Add a calculated field for frequently counted dimensions. The current version does not support counting dimension fields directly as measures.
-
For a query like "In 2020, how many customers had sales over 10,000 in each province?", creating a calculated field in the dataset allows for a correct answer. The system will automatically perform a distinct count based on the calculation conditions.
-
-
Follow these basic principles for configuring dataset field names and descriptions.
-
Field names:
-
Field names should be clear, standardized, and reflect how users ask questions. Avoid duplicate field names.
-
Do not use raw English names from the underlying data source, and remove unnecessary comments.
-
Avoid including specific time information like "last 1 day" in names, as it can cause ambiguity.
-
-
Field type: For date/time data, change the field type to a date type in the dataset. Otherwise, they will not be recognized correctly. Other field types, such as geographic dimensions, must also be set correctly.
-
Field aggregation method: For measures, choose an appropriate default aggregation method. When a user's query does not specify an aggregation, the model will use this setting (for example, for "conversion rate", you can set the default to average based on business semantics; for "cumulative XX", set the default to average or maximum instead of sum).
-