This topic describes how to use the Q&A with AI Ticket embedding solution to embed Quick BI into third-party systems without requiring a login. It also explains how to use ticket management to prevent data breaches from maliciously shared links. This feature is available only in the Professional Edition.
Background information
Quick BI provides a security-enhanced embedding analytics solution called the Q&A with AI Ticket embedding solution. If you use the Quick BI Professional Edition, you can implement comprehensive security controls for various scenarios, including links, access, and data queries. This lets you integrate Quick BI with your business systems at a low cost and efficiently build data products with your own brand identity.
Currently, this feature is available only in the China (Hong Kong) and Malaysia regions. Support for other regions will be available soon.
Limits
Only the Professional Edition supports Q&A with AI embedding.
Precautions
You must purchase the Q&A with AI and Ticket embedding modules.
Data Q&A API
For more information about the API operations for Q&A with AI, see Q&A with AI embedding.
Examples
When you embed a dataset using the By data resource option or a single analysis subject using the By analysis subject option, the embedded interface displays all authorized datasets in a tile layout.

When you embed multiple analysis subjects using the By analysis subject option, the embedded interface displays datasets under All and under each analysis subject.

Step 1: Add a Q&A with AI embedding
To add a Q&A with AI embedding, perform the following steps:
On the Quick BI homepage, navigate to the Organization Management > Q&A with AI > Embedding Management page.

Click Add Embedding Module and set the parameters.
 Note
NoteCurrently, only one embedding module is supported.
Category
Configuration item
Description
Basic configuration
Embedding module name
This name is the identifier for the module and cannot be changed after it is created.
Embedding module type
The default value is Q&A with AI. This parameter cannot be changed.
Timestamp range
Select a timestamp range By data resource or By analysis subject.
By data resource
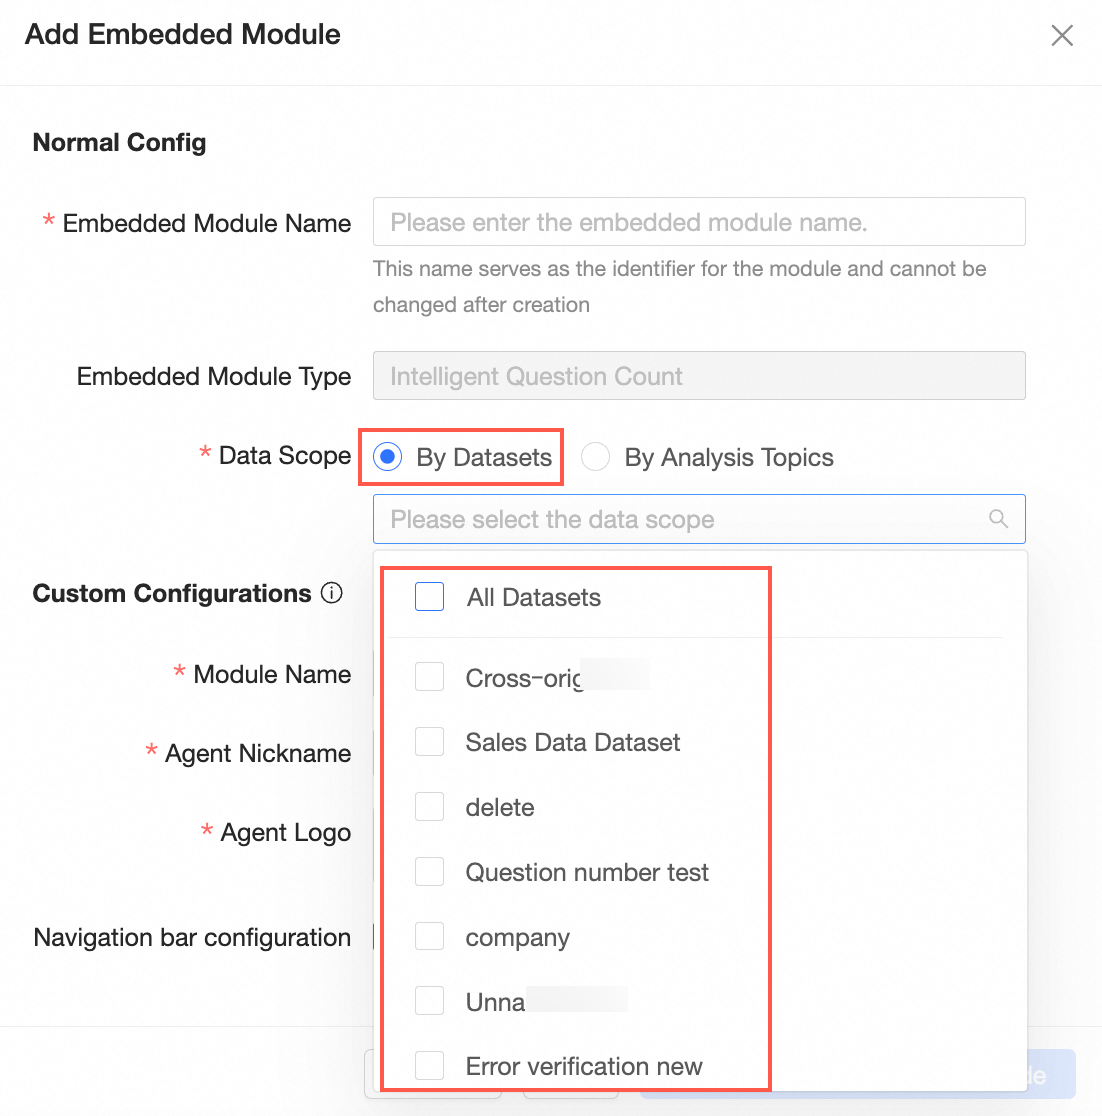
By analysis subject

Custom configuration
Module name
Customize the module name. The name can be up to 20 characters long.
Robot nickname
Customize the robot nickname. The nickname can be up to 10 characters long.
Robot Logo
Use material or upload a custom image.
NoteThe robot logo is displayed in the Q&A with AI area. The custom image must be 48 × 48 pixels or smaller, in PNG or JPG format, and no larger than 200 KB.

Navigation bar configuration
Specifies whether to Display conversation history.
If you select this option, the navigation bar displays the conversation history, as shown in the following figure:

Click OK and Debug Embedding Code. In the Debug Embedding Code dialog box, set the parameters.

Configuration item
Description
Ticket link
Manually enter a ticket link or click Quick Generate to generate a ticket.

On the ticket generation page, you can set Bound User, Validity Period, and Access Count.
Bound User: You can bind the permissions for the embedded report to a specific user.
Validity Period: The default validity period is 240 minutes. You can customize the validity period. The maximum validity period is 240 minutes.
Access Count: If you enter 1, the generated link can be accessed only once. The default value is 1. The maximum value is 9999.
Get embedding code
You can generate a URL and iframe code.
Click Copy.
Step 2: Generate an AccessTicket by calling an API operation
Call the create4Copilot API operation to generate the ticket required for embedding.
The following table describes the parameters for generating an AccessTicket.
Parameter
Type
Description
CopilotId
String
The ID of the Q&A with AI module for which embedding is enabled.
TicketNum
Integer
The number of times the ticket can be used.
Default value: 1.
Recommended value: 1.
Maximum value: 99999.
Each time the ticket is used for access, the number of remaining uses decreases by 1.
UserId
String
The ID of the Quick BI user. This is not your Alibaba Cloud account ID.
You can call the QueryUserInfoByAccount API operation to obtain the UserId. Example: fe67f61a35a94b7da1a34ba174a7****.
NoteYou only need to specify UserId or AccountName. If you leave both parameters empty, the owner who enabled Q&A with AI embedding is used by default.
AccountName
String
The name of the user account.
If the user is an Alibaba Cloud account named wangwu, the format is [Alibaba Cloud account]. Example: wangwu.
If the user is a RAM user named zhangsan**@aliyun.cn, the format is [Alibaba Cloud account:RAM user]. Example: wangwu:zhangsan**.
NoteYou only need to specify UserId or AccountName. If you leave both parameters empty, the owner who enabled Q&A with AI embedding is used by default.
AccountType
Integer
The type of the user account.
1: Alibaba Cloud account
3: Quick BI account
4: DingTalk
5: RAM user
9: WeCom
10: Lark
NoteIf you specify AccountName, you must also specify AccountType.
ExpireTime
Integer
The validity period of the ticket.
Unit: minutes
Default value: 240
NoteTo prevent link sharing, we recommend that you set the TicketNum parameter to 1. This ensures that the generated third-party embedding link can be accessed only once.
Generate the AccessTicket.
For sample code, see CreateTicket4Copilot.
The following code shows a sample response:
{ "requestId" : "7D784AB0-5B77-****-B628-E782B58D3898", "result" : "fd138bcb-****-4fde-b413-81bcee59bdb6", "success" : true }NoteThe value of the result parameter is the AccessTicket generated by this API call. In this example, the AccessTicket is fd138bcb-****-4fde-b413-81bcee59bdb6.
Step 3: Construct the no-login URL
The following table shows the construction process and an example.
Process
Q&A with AI module example
1. Get the Quick BI domain name
bi.aliyun.com
2. Get the Q&A with AI embedding URL
token3rd/copilot
3. Get the Q&A with AI module ID
dd0****83f
4. Get the AccessTicket
fd138bcb-****-4fde-b413-81bcee59bdb6
The format of the Q&A with AI URL is as follows:
https://<Quick BI domain name>/<Q&A with AI embedding URL>?copilotId=<Q&A with AI module ID>&accessTicket=<AccessTicket>
Example: https://bi.aliyun.com/token3rd/copilot?copilotId=dd0****83f&accessTicket=fd138bcb-****-4fde-b413-81bcee59bdb6
For information about the embedded display, see Examples.
Manage embeddings
On the Embedding Management page, you can edit, debug, and shut down existing embedding modules.

Click the
 icon to edit the embedding module.Note
The embedding module name cannot be edited.

After you finish editing, click OK to return to the Embedding Management page, or click OK and Debug Embedding Code to open the debug interface.
Click the
 icon to debug the embedding code.
Click the
 icon, and then click OK in the confirmation dialog box to shut down the embedding module.