Configure the embedding channel in Quick BI Professional Edition, enable embedding for reports, and set up audience selection to allow users to select audiences directly from embedded reports.
Embedded channel configuration
The Quick BI administrator must configure the embedding channel before reports can be embedded.
Procedure
-
Log on to the Quick BI Console.
-
In the left-side navigation pane, choose Developer Center > Publish Channel. On the Publish Channel page, click Add Channel.
-
Configure the parameters, as shown in the following table.

Item
Example value
Channel Name
Enter a channel name.
Recommended value: Quick Audience. If you use Quick Audience in multiple regions, use Quick Audience (region name) to distinguish them.
This name appears in the pop-up window when you configure report embedding in Quick BI.
Channel remarks
Enter the description of the channel.
Channel configuration URL
Enter the channel configuration URL. When you configure report embedding, you are redirected to this URL.
The format of the Quick Audience channel configuration URL is:
https://Quick Audience domain name /analysisInsight/customMenu/menuSetFor public cloud Quick Audience, the domain name is:
-
Zhangjiakou region:
quicka.aliyun.com -
Shenzhen region:
quicka-shenzhen.aliyun.com -
Shanghai region:
quicka-shanghai.aliyun.com
-
-
Click OK to save the configuration.
Enable report embedding
After a report is published, a Quick BI workspace member must enable embedding for the report before it can be embedded into Quick Audience.
You can embed a report in Quick Audience only when the Quick BI Report Data Source is ADB3.0.
Procedure
-
Log on to the Quick BI Console.
-
Choose console > Workspace> Dashboards to go to the dashboard list.

-
Right-click the report that you want to embed and select Publish Channel. Alternatively, click the
 icon in the row that contains the report and select Publish Channel.
 -
In the dialog box that appears, click Enable Embed, as shown in the following figure.

After activation, a success message and the following pop-up window appear. You can click To Configure in the Actions column to embed the report. For more information, see Report Embedding Configuration.

Select audience configuration
To enable audience selection in a report, turn on the audience generation switch and configure the exportable ID field for each chart.
-
The audience selection feature is supported only when the Quick BI Report Data Source and the Analysis Source used by the Quick Audience workspace are the same AnalyticDB for MySQL 3.0 database.
-
The following types of charts are supported:
-
Trend charts: line charts, area charts, stacked area charts, 100% stacked area charts, and combination charts
-
Charts for comparison: column charts, stacked column charts, 100% stacked column charts, bar charts, stacked bar charts, and 100% stacked bar charts
-
Charts that show relationships between data: scatter charts and bubble charts
-
Procedure
-
Log on to the Quick BI Console.
-
Choose console > Workspace> Dashboards to go to the dashboard list.

-
Click the name of the report to be embedded, or click the
 icon in the row where the report is located to enter the editing page.
 -
In the Page Settings section, click Advanced and select Allow Audience Generation.

-
Select the chart that you want to select. In the Chart Design > Advanced section, click the
 icon.
icon. 
-
In the dialog box that appears, select a field as the user ID field that can be exported to Quick Audience. Select whether the ID field is encrypted. If the ID field is encrypted, select an encryption method. You can select MD5, SHA256, or AES. Click OK to save your settings.
You can specify at least one ID field.

-
Save the configurations or publish the dashboard.
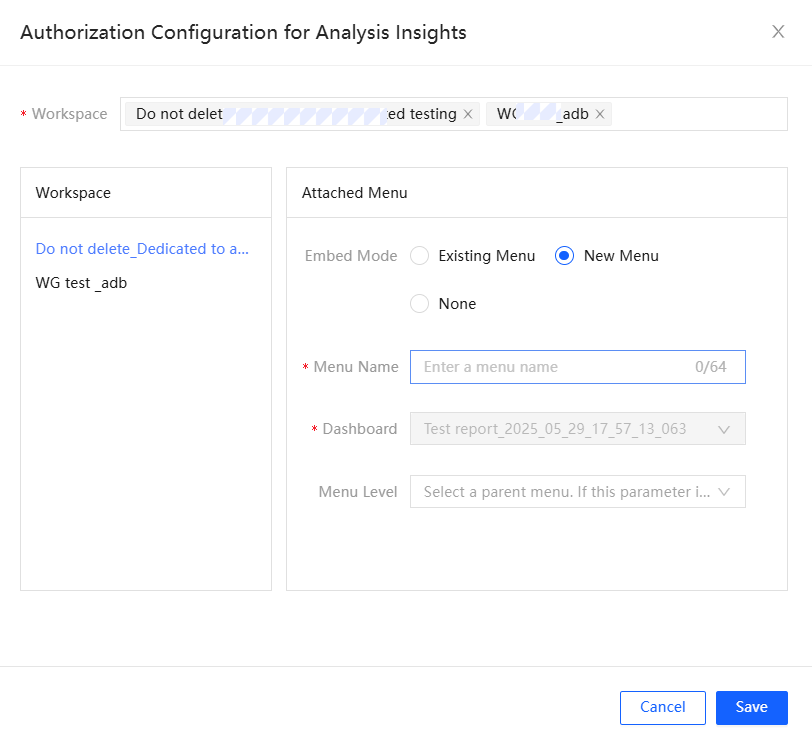
Report embedding configuration
After embedding is enabled, organization administrators or workspace administrators of Quick Audience can configure the embedding from Quick BI or directly in Quick Audience.
When configuring from Quick BI, you can embed the report into an existing menu, create a new menu for embedding, or assign the report to a space without mounting it to a menu.
Menus appear as a hierarchical structure in the left-side navigation pane when viewing reports in Quick Audience. Two-level menus are supported.
Procedure
-
Log on to the Quick BI Console.
-
Choose console > Workspace> Dashboards to go to the dashboard list.

-
Right-click the report that you want to embed and select Publish Channel. Alternatively, click the
icon in the row that contains the report and select Publish Channel. -
As shown in the following figure, click To Configure to go to the report embedding configuration page.

-
In the pop-up window, select a space. You can select multiple spaces. The selected space is displayed in the left-side space list. Click a space in the list and configure the space on the right.
-
Mount the report to an existing menu: Select Existing Menu and select the menu to which you want to mount the report from the drop-down list.

-
Create a menu to mount: Select New Menu and enter the name of the menu that you want to create. If you want to create a second-level menu, select an existing menu from the drop-down list as the parent menu. If you want to create a first-level menu, do not select.
NoteWhen you select an existing menu, if the menu is already embedded with a report, only the newly embedded report will be displayed.
-
Allocate the report only to the specified space: Select Do Not Mount.
-
-
Click Save to save the configurations.
For more information about how to embed reports in Quick Audience or grant the permissions to view reports to a specified account, see Menu Configuration and Report Embedding.