View, edit, authorize, filter, update, and delete tags on the Tag Management page.
Choose Workspace> User Insight > User Tags > Tag Management. 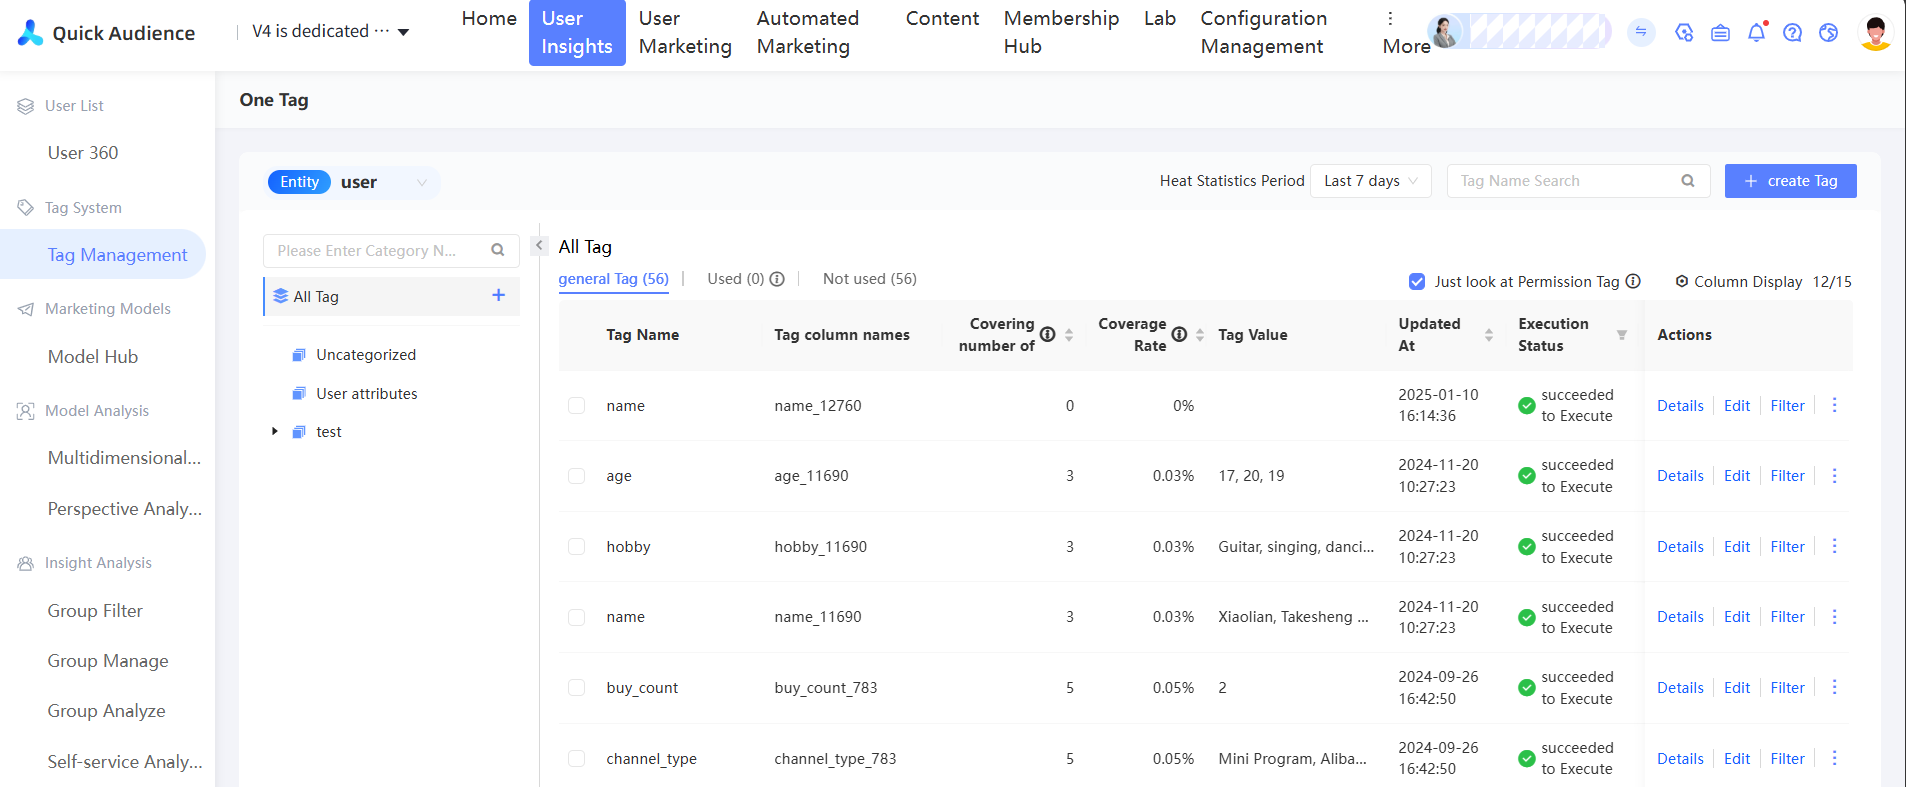
The left side shows the Uncategorized and other custom categories. By default, all tags across all categories are displayed.
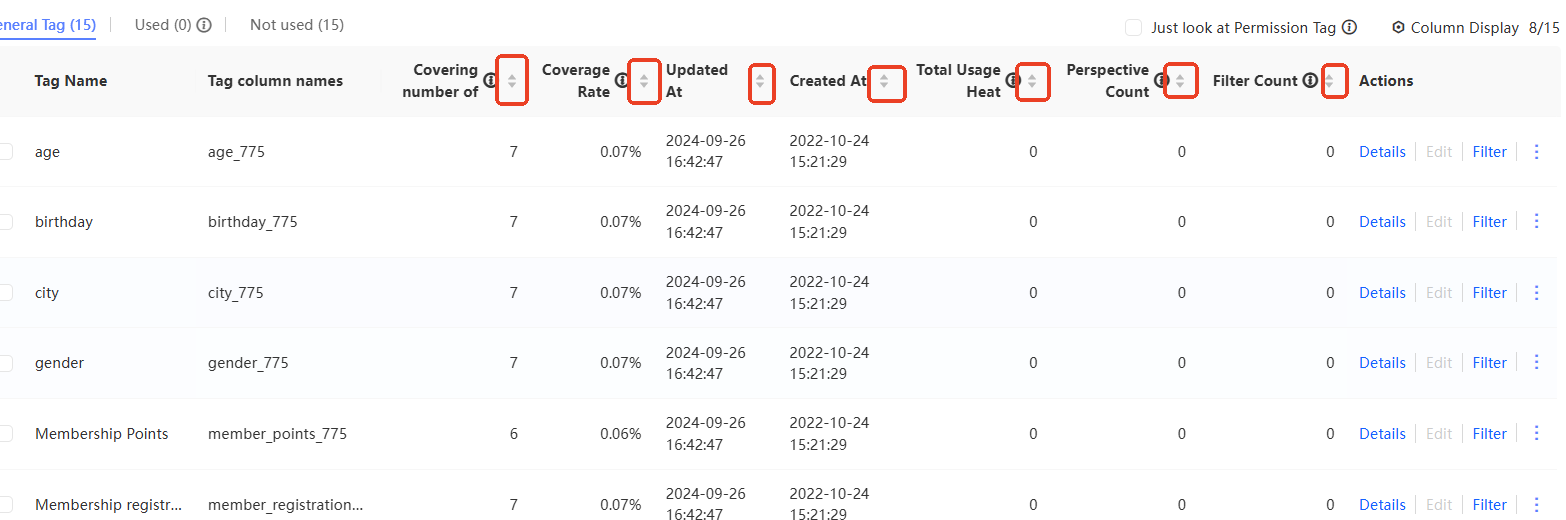
The tag list on the right displays the tag name, number of users covered, coverage rate, tag value, update time, execution status, creator, creation method, tag source, creation time, tag description, tag type, total popularity, and number of data transmission times. Click Show Columns in the upper-right corner to select which columns to display. 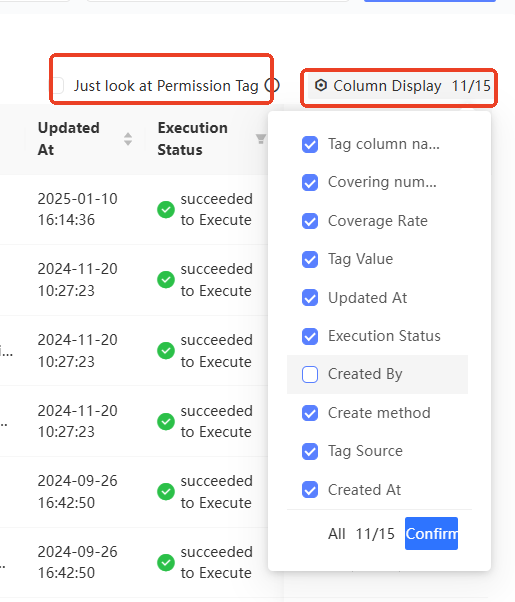
Non-administrators can select Only View Permitted Tags to display only tags on which they have management or use permissions.
Tag creation method
Tags are created in the following ways:
-
Data source import: The User Tag Table records a series of attribute fields of users. When you Import data from a data source to Quick Audience, you can configure tag aliases for the fields to add tags to users. When you use tags later, the corresponding fields are essentially used.
ImportantWhen you import a user tag table, if you select the corresponding user attribute for a field, the field is subordinate to the user attribute and is no longer displayed as a tag on the Tag Management page.
-
API import: Similar to data source import, except data is imported through APIs instead of the console.
-
System presets: User Attributes. User attributes define the basic information system of users. The actual values are derived from the fields in the imported user tag table. If a field is associated with a user attribute, the value of the tag is used for the user attribute. If fields from different tables are associated with the same user attribute, the user attribute values may conflict with each other. You can resolve the conflict based on the specified assignment logic.
User attributes are displayed in the User Attributes category. User properties are displayed as System Preset regardless of whether they are preset or custom.
-
Custom rules: You can customize tags based on imported data, uploaded and stored behavioral event data, and order details to tag users who meet the rules. You can also use the tags for analysis and filtering.
You can create four custom tags: Preference Tags, Loyalty Tags, Purchasing Power Tags, and User Stage Tags. For more information, see the corresponding documentation.
-
Social Interaction: Tags from the Social Interaction module.
-
Retail CRM: Tags from the Retail CRM module.
Tag popularity statistics
The Tag Management page shows tag usage statistics. The total number of tags, used tags (tags applied in analysis or filtering), and unused tags are displayed at the top of the list. Click Used or Unused to filter the list accordingly.
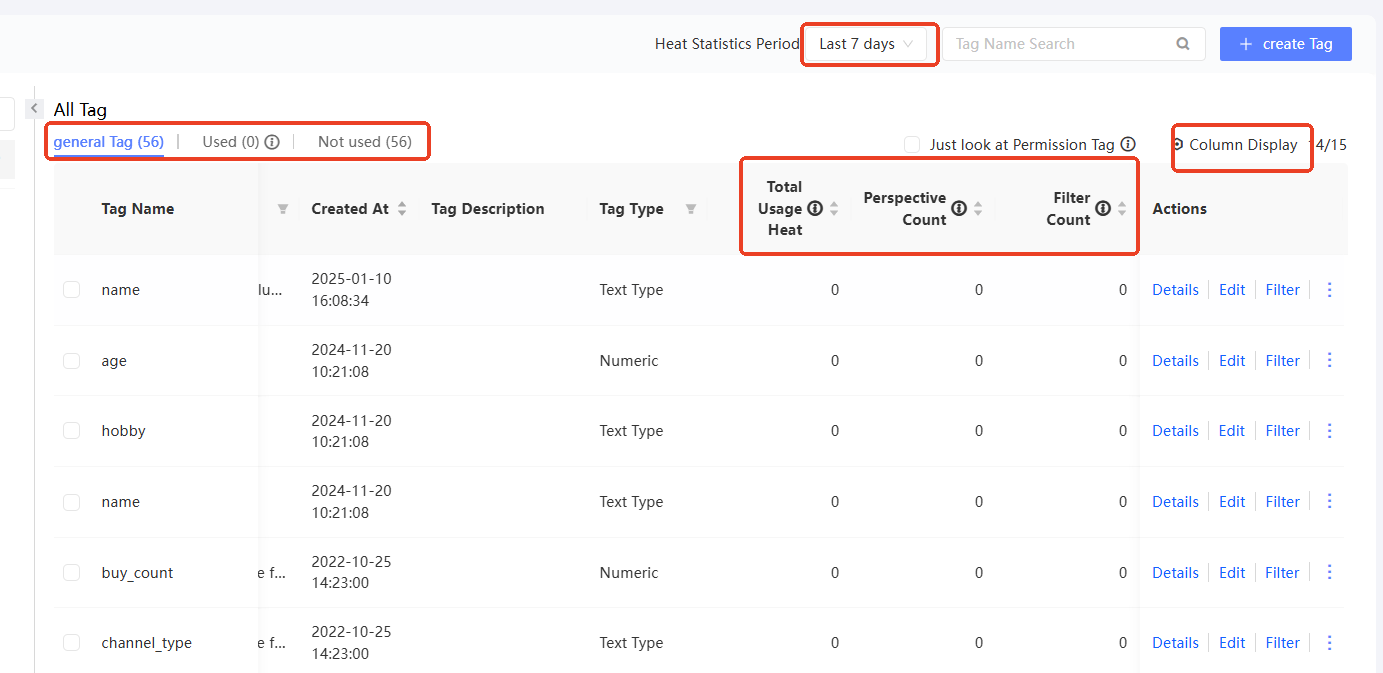
The list shows usage details for each tag. Select Total Usage, Pivot Times, and Filter Times from the Columns drop-down list in the upper-right corner and select a Statistics Period. Total usage equals the sum of pivot times and filter times.
Filter, sort, and search
Filter CLB instances by tag
You can filter tags by creation or update status, creator, creation method, tag source, tag type, and whether they are pivotable.

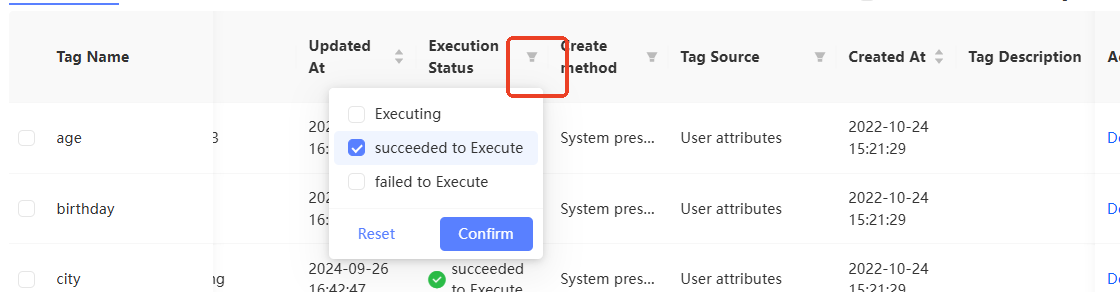
Sort tags
You can sort tags by the number of people covered, coverage rate, creation time, update time, total popularity, pivot times, and filter times. 
Search for bastion hosts by tag
You can search for tag names in the search box in the upper-right corner of the tag list.
After a search, the tag categories on the left highlight categories that contain matching results. 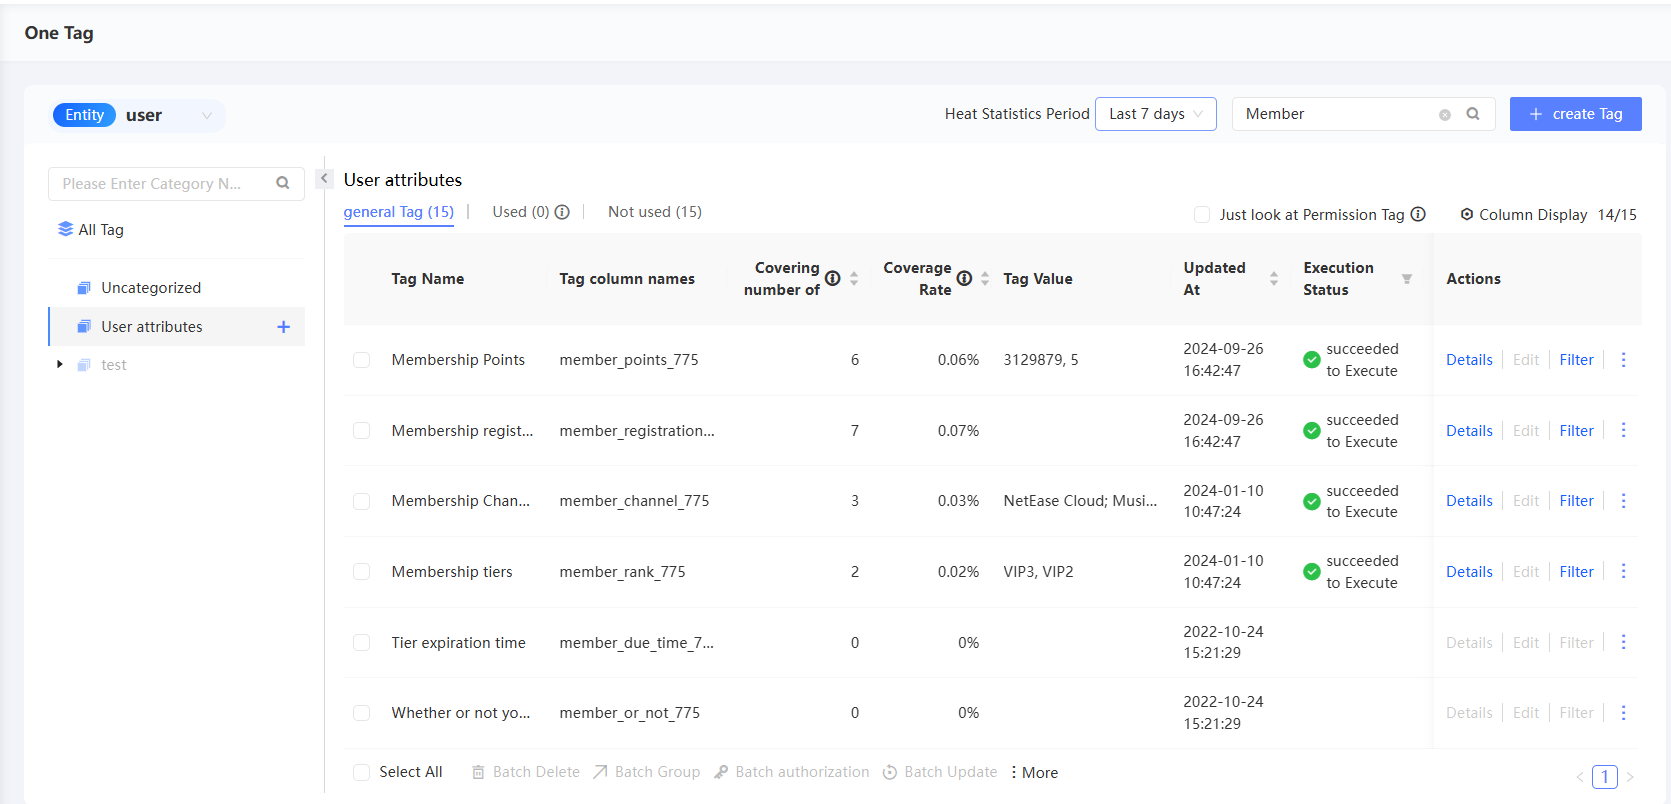
Tag category permissions
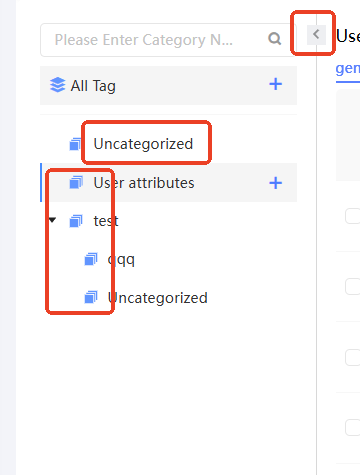
Tag categories are displayed on the left side of the page.
-
Tags that are not included in any category are included in Unclassified. You can add tag categories and put tags into different categories to manage tags.
-
A maximum of three levels of categories are supported. You can click the arrow icon in front of a category name to expand /collapse lower-level categories. The "Order 1_A area" in the preceding figure is a three-level category.
-
The search box above the category list allows you to search for category names.
-
Click the arrow icon
 in the upper-right corner of a category to collapse or bring up the category view.
Add and move categories
You cannot add child categories for a user attribute category.
To add a maximum of three categories, perform the following steps:
-
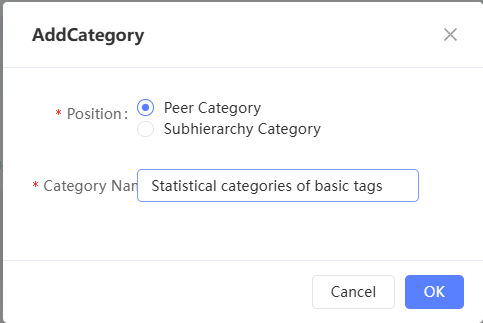
Move the pointer over any category or all tags. The plus icon
 appears, as shown in the following figure. Click the plus icon.
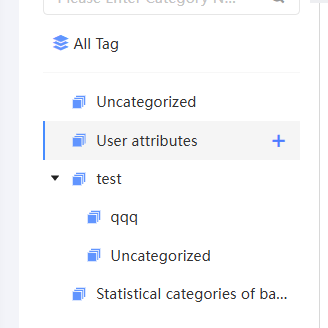

-
In the dialog box that appears, select whether the new category is a sibling or a child of the original category and enter a new category name.
In this example, a sibling category of the base tag is created.
-
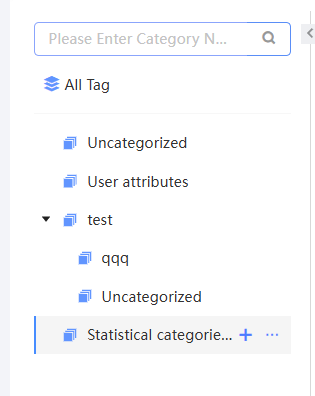
Click OK. The new category will be added to the directory.
-
Drag a category to the required position to change the order and level of the category.
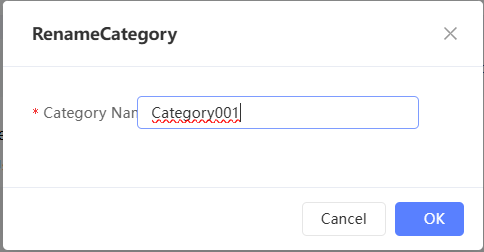
Rename Category
You cannot rename a user attribute category.
Procedure
-
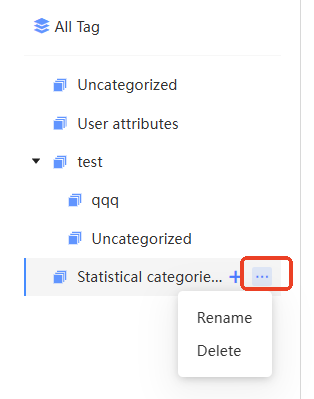
Move the pointer over the custom category. The ellipsis icon
 appears, as shown in the following figure. Click the ellipsis icon. The Rename button appears. Click Rename.
-
In the dialog box that appears, enter a new category name and click OK.
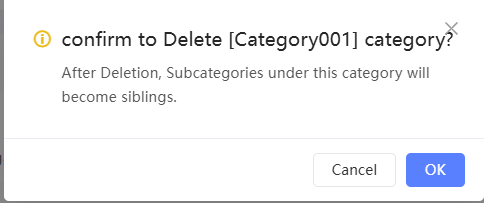
Delete a category
You cannot delete a user attribute category.
Procedure
-
Move the pointer over the custom category. The ellipsis icon
appears, as shown in the following figure. Click the ellipsis icon. The Delete button appears. Click Delete. 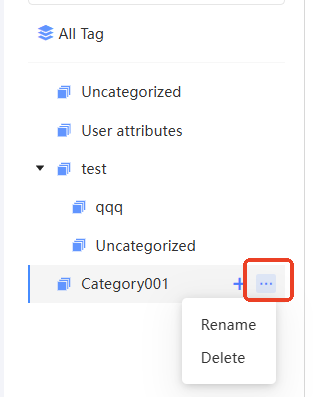
-
If a category does not contain tags or subcategories, the category will be deleted directly.
If the category contains tags or subcategories, click OK in the dialog box that appears. The tags of the original category are moved to Unclassified. The subcategories of the original category replace the tags of the original category.
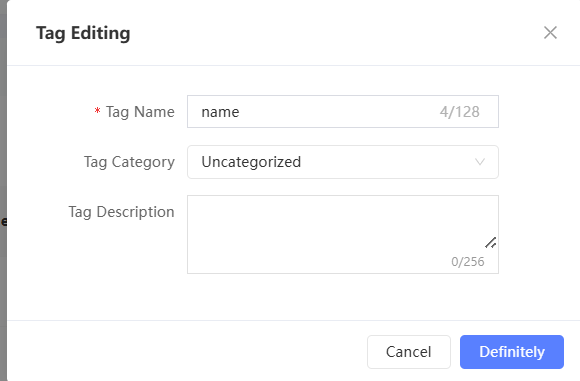
Modify tags
You can edit imported user tags and custom tags:
-
Click Edit in the Actions column corresponding to an imported tag. In the dialog box that appears, modify the tag name, tag category, tag type, and description. Click Save.
 Note
NoteAfter you modify the tag type, the modification takes effect only after scheduling again.
-
For a custom tag, click Edit next to the tag to go to the edit page. You can modify the tag configuration in the same way as when you create a custom tag. For more information, see Create tags.
NoteThe tag field cannot be modified.
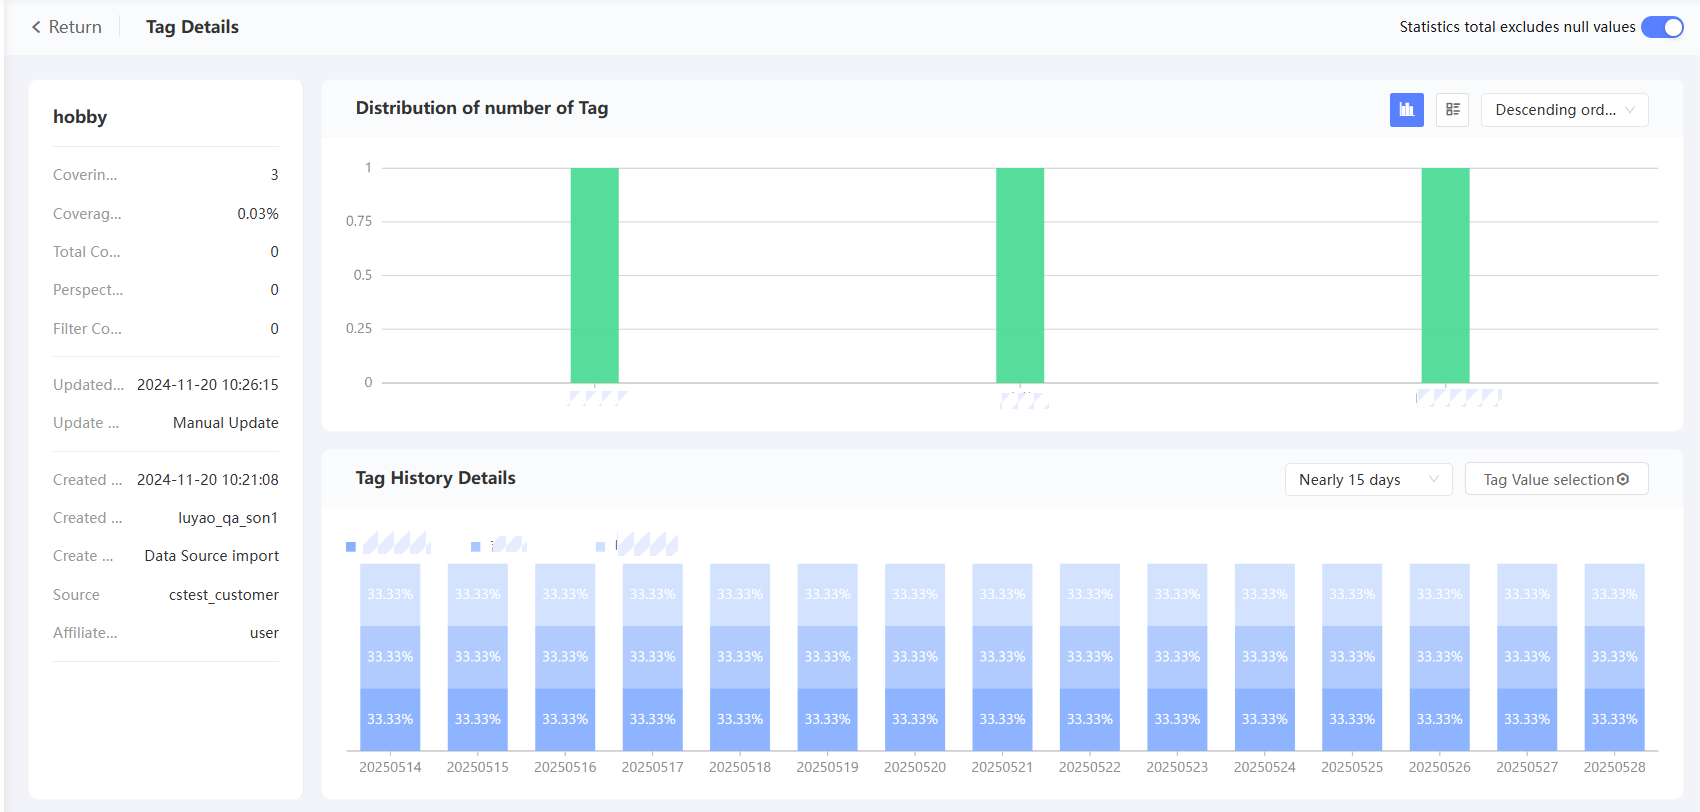
View tag details
Click Details in the Actions column of a tag to view basic tag information, tag population distribution, and tag history details.
-
Basic Information: displays the tag coverage, usage, update information, and creation information.
-
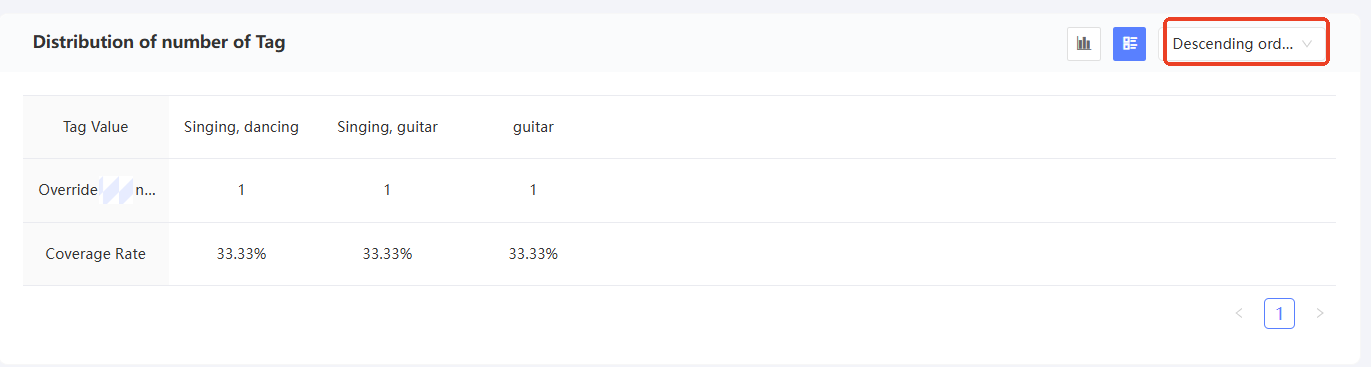
Tag Number Distribution: displays the coverage of each tag value. When you move the pointer over the graph of tag values, the specific number and coverage will appear. You can switch between chart and list formats, and switch the sorting mode, as shown in the following figure.
-
For text type and multi-value type tags: Ascending order by the number of people covered or descending order by the number of people covered. A maximum of 15 values with the highest coverage are displayed. If there are more than 15 values, the coverage data of the remaining values are added together and displayed as the "Others" tab value.
-
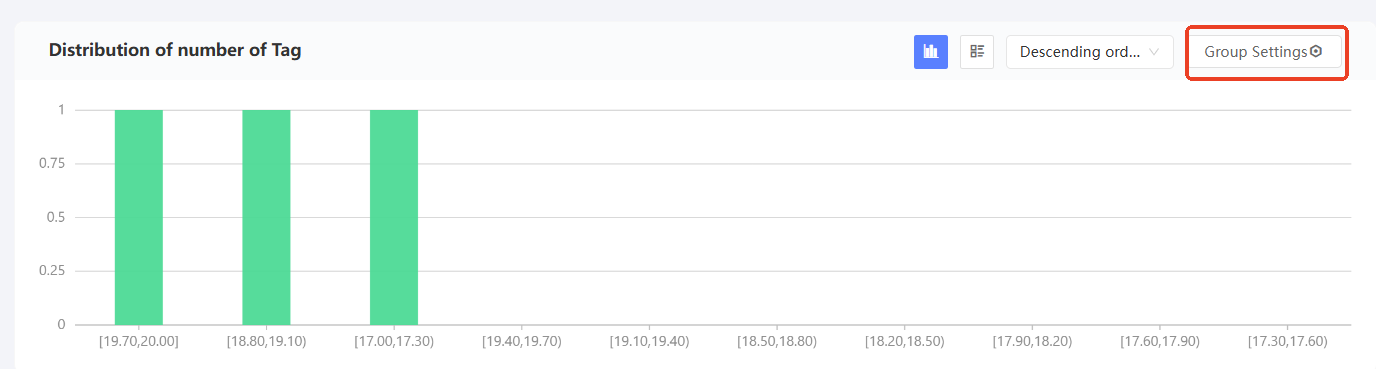
For numeric tags: By default, all numeric values are grouped and displayed by group. You can set the grouping interval, as shown in the following figure. You can order by number of people covered, by number of people covered, by tag value, or by tag value.
-
For time tags, you can group time tags by day, month, or year. You can sort by time in ascending or descending order. A maximum of 15 groups with the highest coverage are displayed. If there are more than 15 groups, the coverage data of the remaining groups are added together and displayed as "other" groups.
-
-
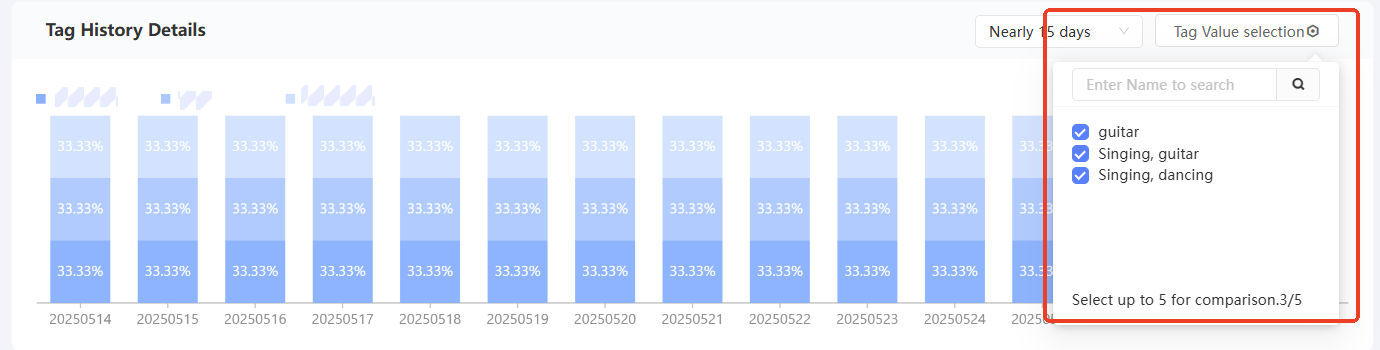
Tag history details: For text, multi-value, and numeric tags, you can display the coverage history data of tag values in the last 15 days, last one month, last two months, and last three months. When you move the pointer over the graph of tag values, the coverage appears. A maximum of five tag values can be displayed. You can select which tag values to display, as shown in the following figure.
 Note
Note-
For numeric tags, they will be displayed by group. The group settings are the same as those in the tag population distribution.
-
For time tags, the tag history details are not displayed.
-
Filter people by tag
Click Filter in the Actions column corresponding to a tag to go to the Group Filtering page. By default, this tag is selected for filtering. For more information about tag filtering, see Tag filtering.
Update custom tags
Custom tags can be updated manually regardless of whether they are automatically updated. Click the  icon of the tag and click Update. The tag is updated immediately.
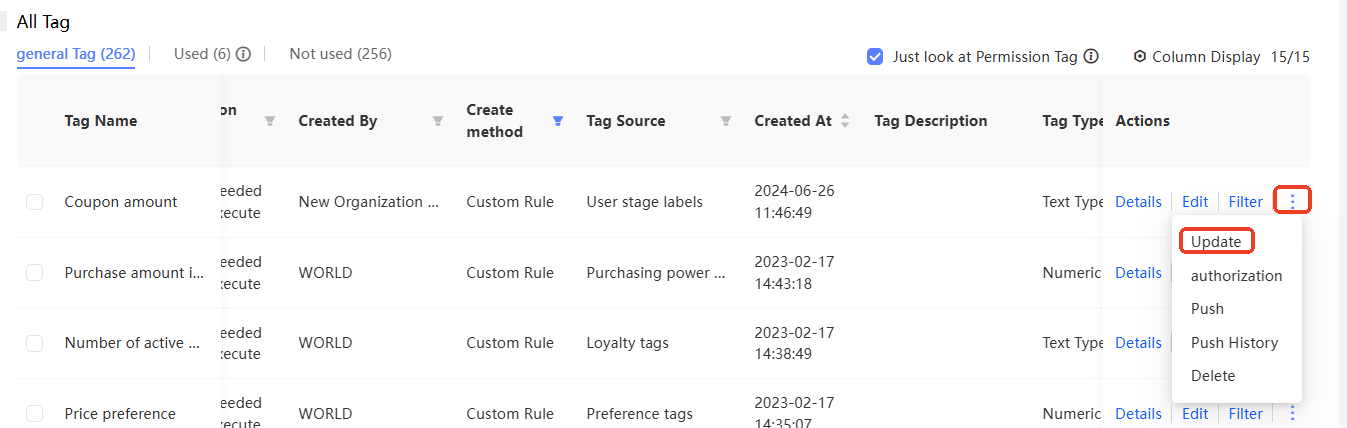
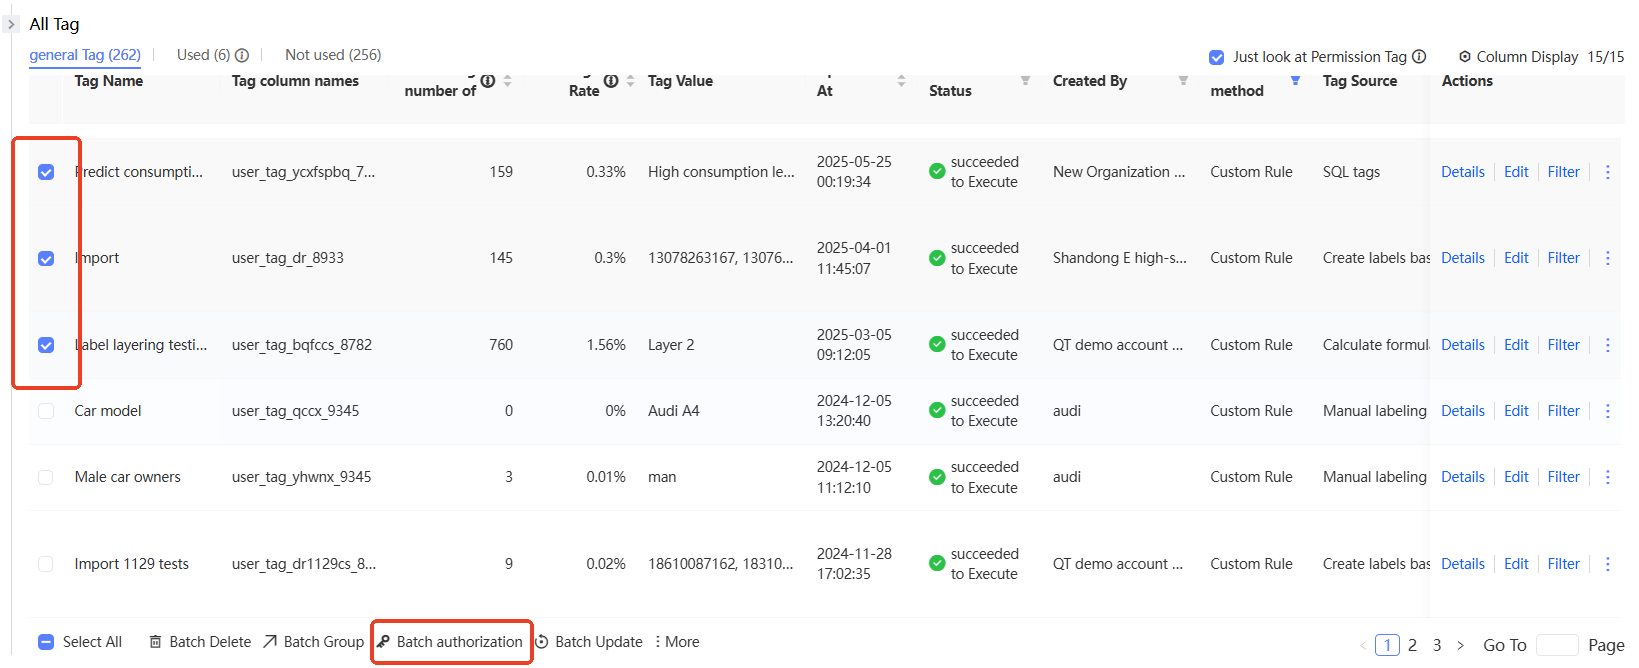
You can select multiple custom tags and click Batch Update below the tag list.
In addition, for imported tags, the tag value is updated with each import schedule of the data table.
Authorization
After a user tag table is scheduled and imported, only administrators can use and manage the data by default. Administrators can grant permissions to workspace members or member groups, allowing them to use or manage the authorized data.
authorization management permissions and usage permissions
Grant the following permissions on tags to non-administrators:
-
Use permission: the permission to use tags in scenarios such as perspective analysis, crowd filtering, Kafka push, and marketing.
-
Management permission: the permission to edit, authorize, and use the authorized tag.
-
After a non-administrator is authorized, the tag is displayed in its tag list.
-
The administrator does not need to be authorized. By default, the administrator has the management permissions on all tags in the workspace and is displayed in the list.
-
Administrators can also grant row-level permissions on user tags to non-administrators to isolate data. For more information, see Grant Row-level Permission.
The authorization operations for managing and using permissions are similar. Procedure:
-
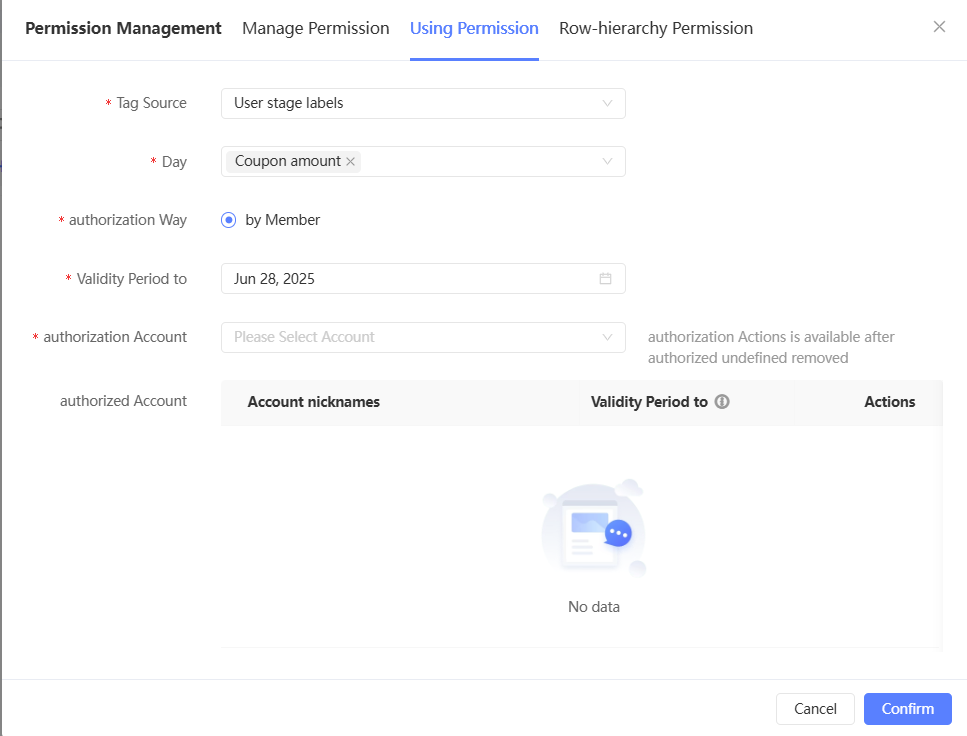
Click the
icon of a tag and click Authorize. The authorization page appears. By default, the tag is selected for authorization. 
You can also select multiple tags and click Batch Authorize in the lower part of the tag list.
-
Select Manage Permissions or Use Permissions.
-
Select the source table or custom tag category of the tag.
-
Select the tags you want to authorize. You can select multiple tags or select 「All tags (including future additions)」.
NoteIf you choose 「All tags (including future additions)」, you can authorize all tags in the selected source. Subsequent new tags in this source will be authorized by default, without the need to re-authorize the added tags to the user.
No matter which tag is authorized, the user's QAID will be authorized at the same time by default. Otherwise, a user cannot be uniquely identified.
-
Only By Member is supported.
The authorized member accounts with the selected tag and the authorization validity period are displayed in the lower part.
NoteIf you select multiple tags, the accounts that are authorized for multiple tags are displayed below. If the validity period is empty, the validity period of multiple tags is different. Please view the specific validity period by tag.
-
To cancel the authorization, click Remove in the Actions column corresponding to the account to cancel the authorization. The authorization immediately takes effect.
-
Authorization: Select the account to which you want to grant permissions. You can select multiple accounts, specify a validity period, and then click OK.
Authorize row-level permissions
Compared with simple Authorize Management or Usage Permission, row-level permission authorization facilitates data isolation.
For example, if a user tag table contains data for multiple brands and regions, you can use row-level permissions to authorize only brand A and North China data to a specific analyst, preventing access to other brands and regions.
-
Before you grant row-level permissions on a tag to a member, you must authorization management the permission or use the permission. Otherwise, you are not authorized to use any data of the tag. Members can use the filtered row data only if they are granted the management or usage permissions and then the row-level permissions.
-
If a member has been granted the manage or use permission on a tag, after row-level permissions are enabled for the tag, if the member is not granted row-level permissions, the member can no longer use all data of the tag. Members who have been granted the manage permission can still manage the tag.
Procedure
-
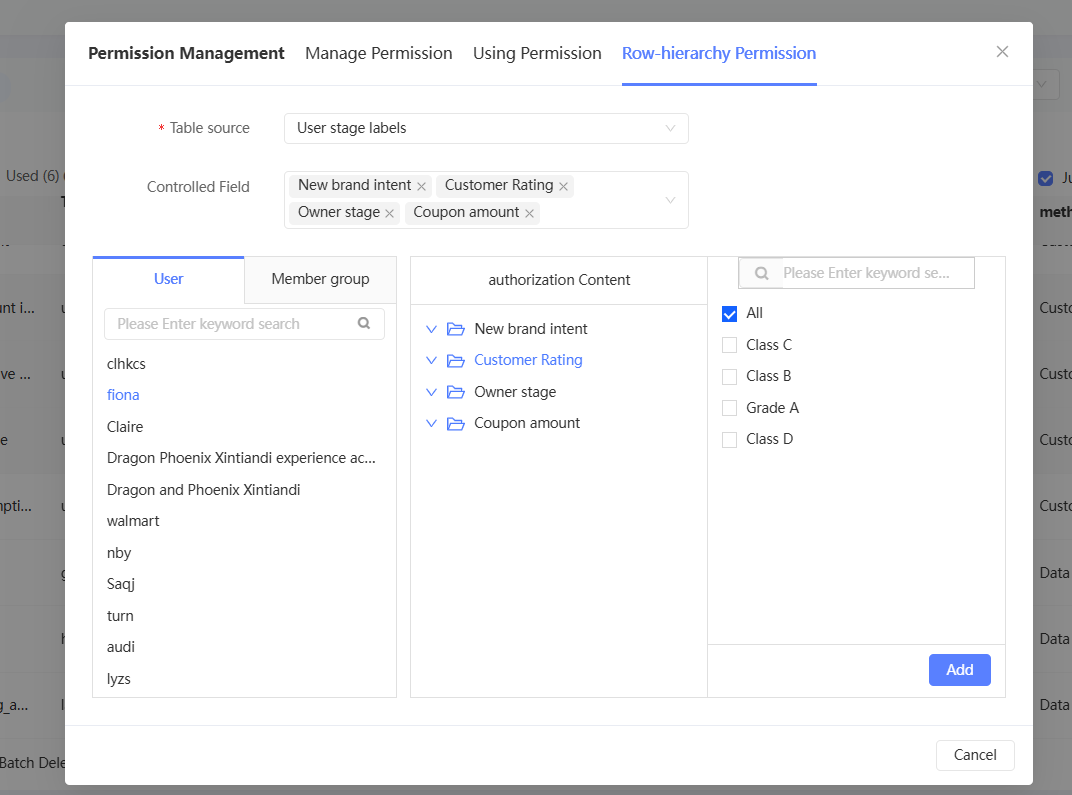
Click the
icon of a tag and click Authorize. The authorization page appears. By default, the tag is selected for authorization. You can also select multiple tags and click Batch Authorize in the lower part of the tag list.
-
Select Rrow-level Permission.
-
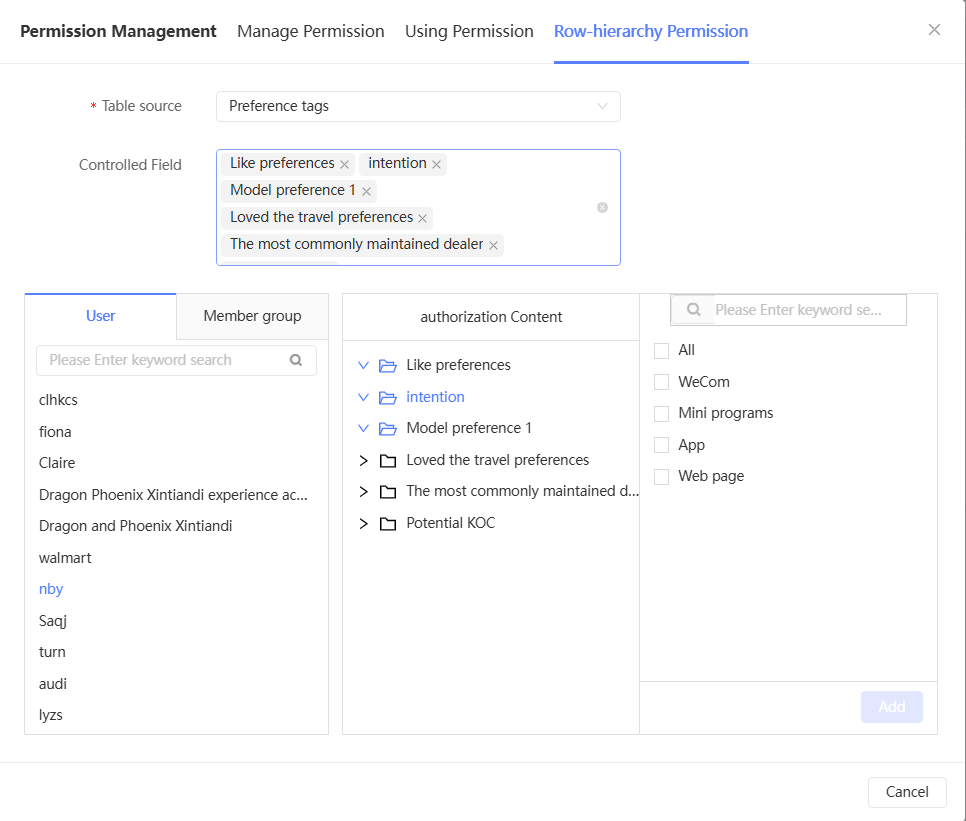
Set Controlled Fields: Select a tag source table or a custom tag category. The configured controlled fields are displayed in the lower part. Select the controlled fields that you want to add. You can select multiple fields or remove controlled fields that you no longer need.
After setting the controlled field, the message "Row-level permission controlled field set successfully" appears.
Note-
If you select multiple controlled fields, the authorized rows meet the value requirements of multiple fields at the same time.
-
The selected controlled fields will be valid for all members, that is, different controlled fields cannot be set for different members. If a member does not need to filter rows by a controlled field, select All for the value of the controlled field in Step 6.
-
An increase or decrease in a controlled field affects all rows of the field and takes effect immediately. If you remove a controlled field, the row-level permissions of all rows of the field are no longer restricted by the field. If you add a controlled field, set the authorization value of the field for all members that require row-level permissions. Otherwise, the member has no authorization value for the field and cannot get any rows.
-
Requirements for controlled field type: ID field and date field cannot be selected, that is, the line to be authorized cannot be specified by ID or date.
-
-
The authorization method. You can select Member or Member Group.
NoteThe two authorization methods can be used in a mixed way. Members will have permissions on the rows that are authorized as members alone and the rows that are authorized as members of a member group.
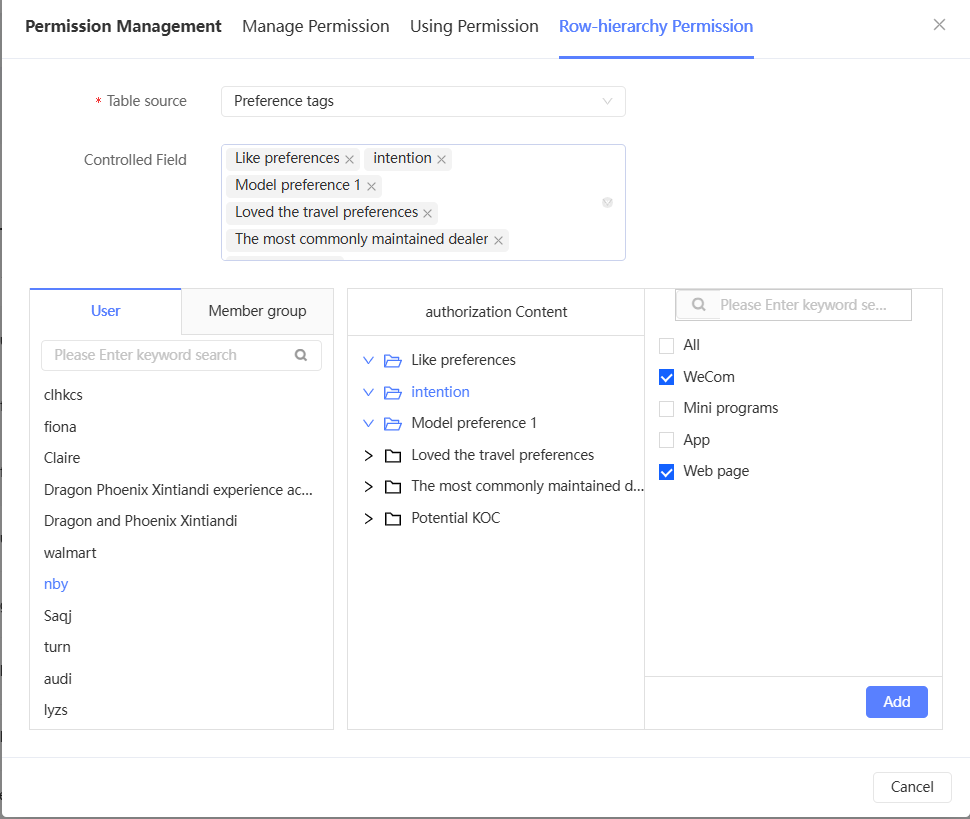
Click the member or member group to be authorized from the left side. The selected controlled fields are displayed on the right side. Click the controlled field. The drop-down list displays the authorized values, as shown in the following figure.
In the following figure, the member test4 is authorized to be female or male, and the resident city is Guangzhou, Tianjin, or Wuhan.
-
As shown in the preceding figure, move the pointer over an authorized value and click the
 icon to remove the value. The value takes effect immediately.
 If all values are removed, the member has no permissions on any rows.
-
Authorization: Click a controlled field. All values of the field are displayed on the right side. Select the values that you want to authorize and click Add to add the values to the authorized list. The permissions on the rows that are granted to the members immediately take effect, as shown in the following figure.
NoteIf you select All and click Add, the member has permissions on all the values of the field, including the values added in the future. This means that the row permissions granted to the member are no longer restricted by the field.
Delete a custom tag
For a custom tag, click the icon and click Delete. After you confirm the deletion, the custom tag is deleted. 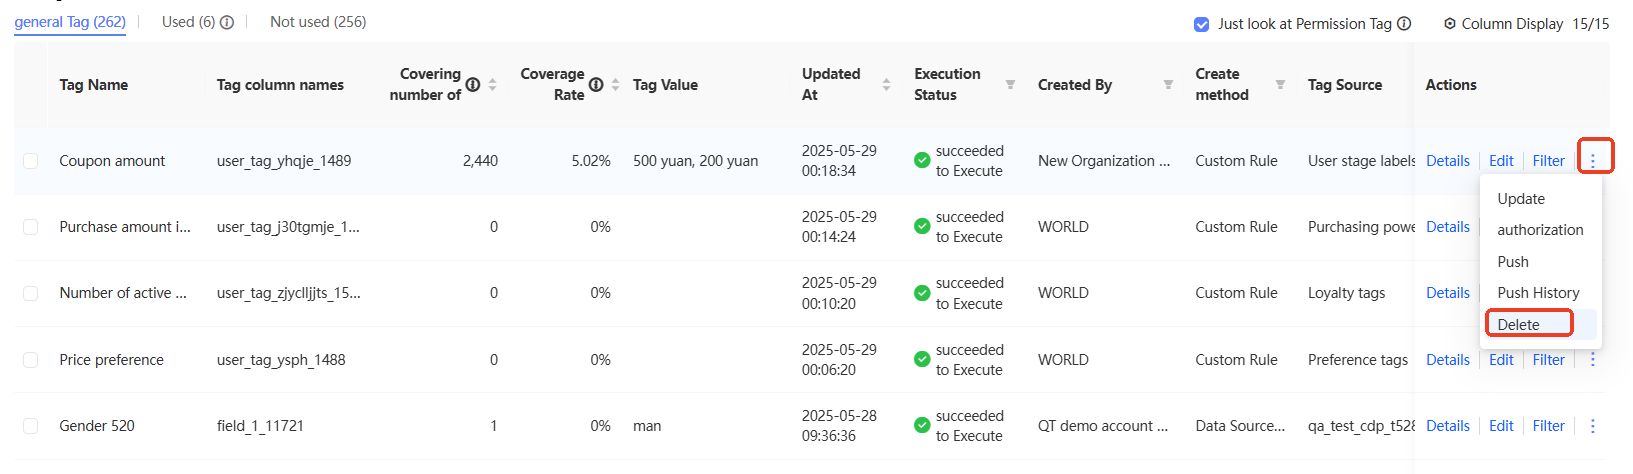
You can select multiple custom tags and click Batch Delete below the tag list to delete multiple custom tags at a time.