After you create a audience, you can upload an ID list or create an audience from an analysis source table on the Audience Management page. You can edit, update, push, download, copy, and delete the audience on the My Audience tab, and manage snapshots. You can also copy and download the audience on the Public Audience tab.
For administrators, the My Audience tab displays all audience in the workspace. The Public Audience tab displays all public audience.
For non-administrators, the My Audience tab displays the audience you created. The Public Audience tab displays all public audience.
The following example describes how to perform operations on the My Audience tab. The operations on the Public Audience tab are basically the same.
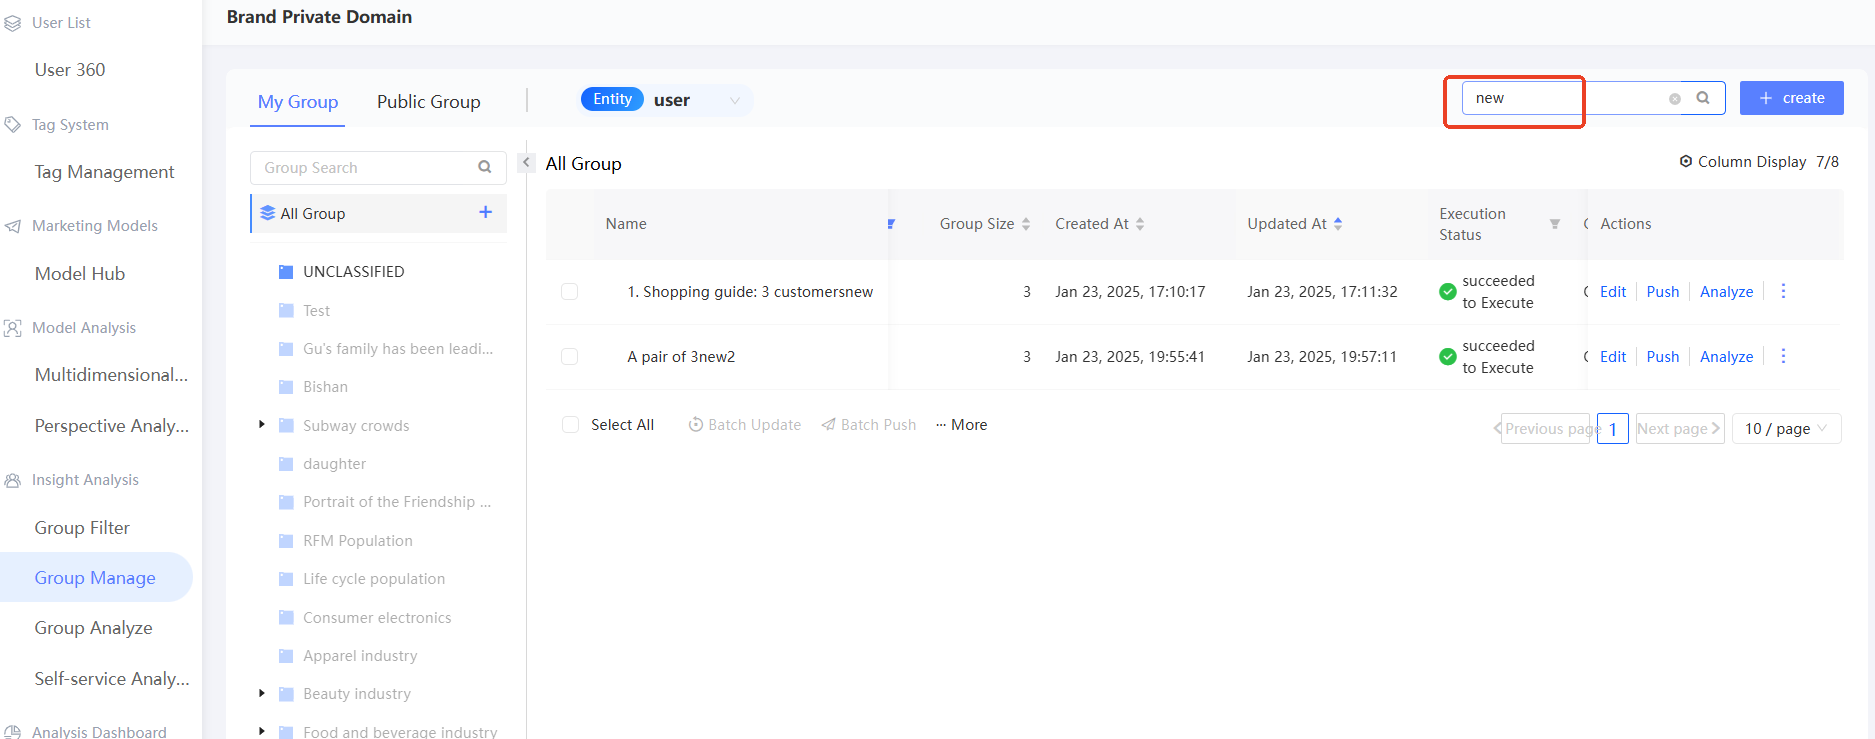
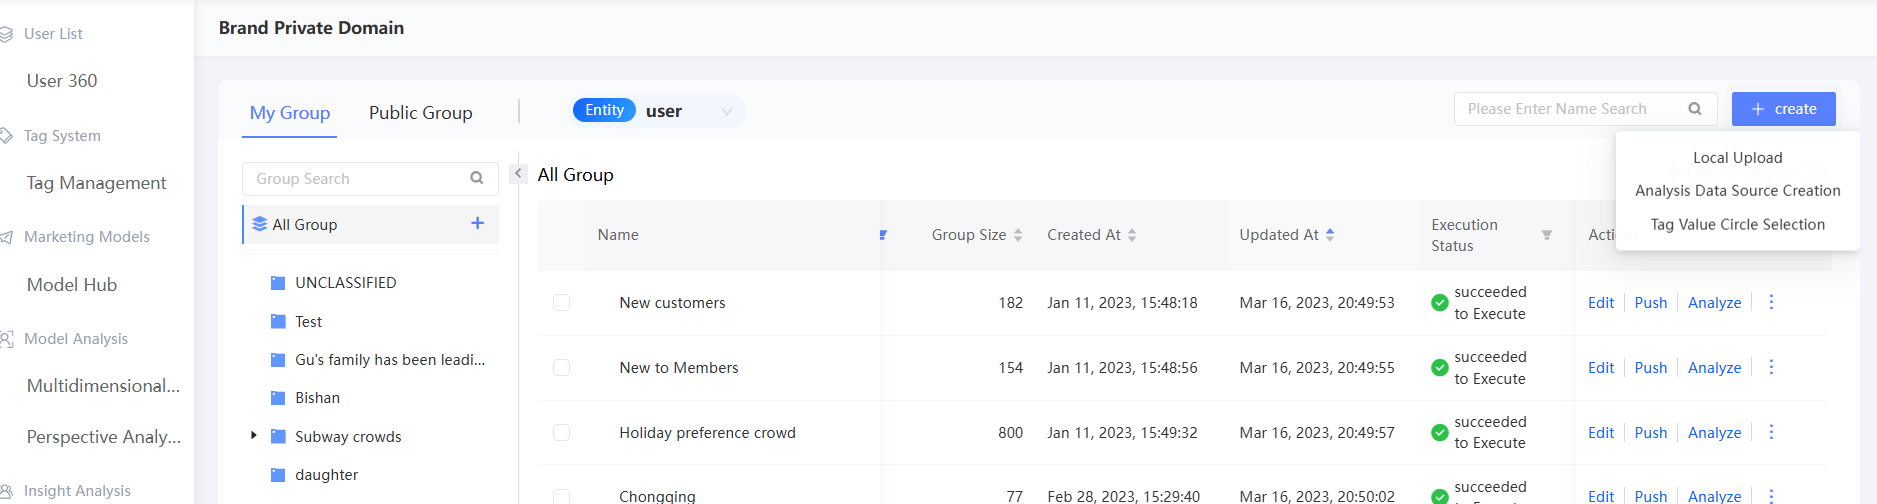
Choose Workspace> User Insights > Audience Insights > Audience Management > My Audience. The following figure shows the list of audience.
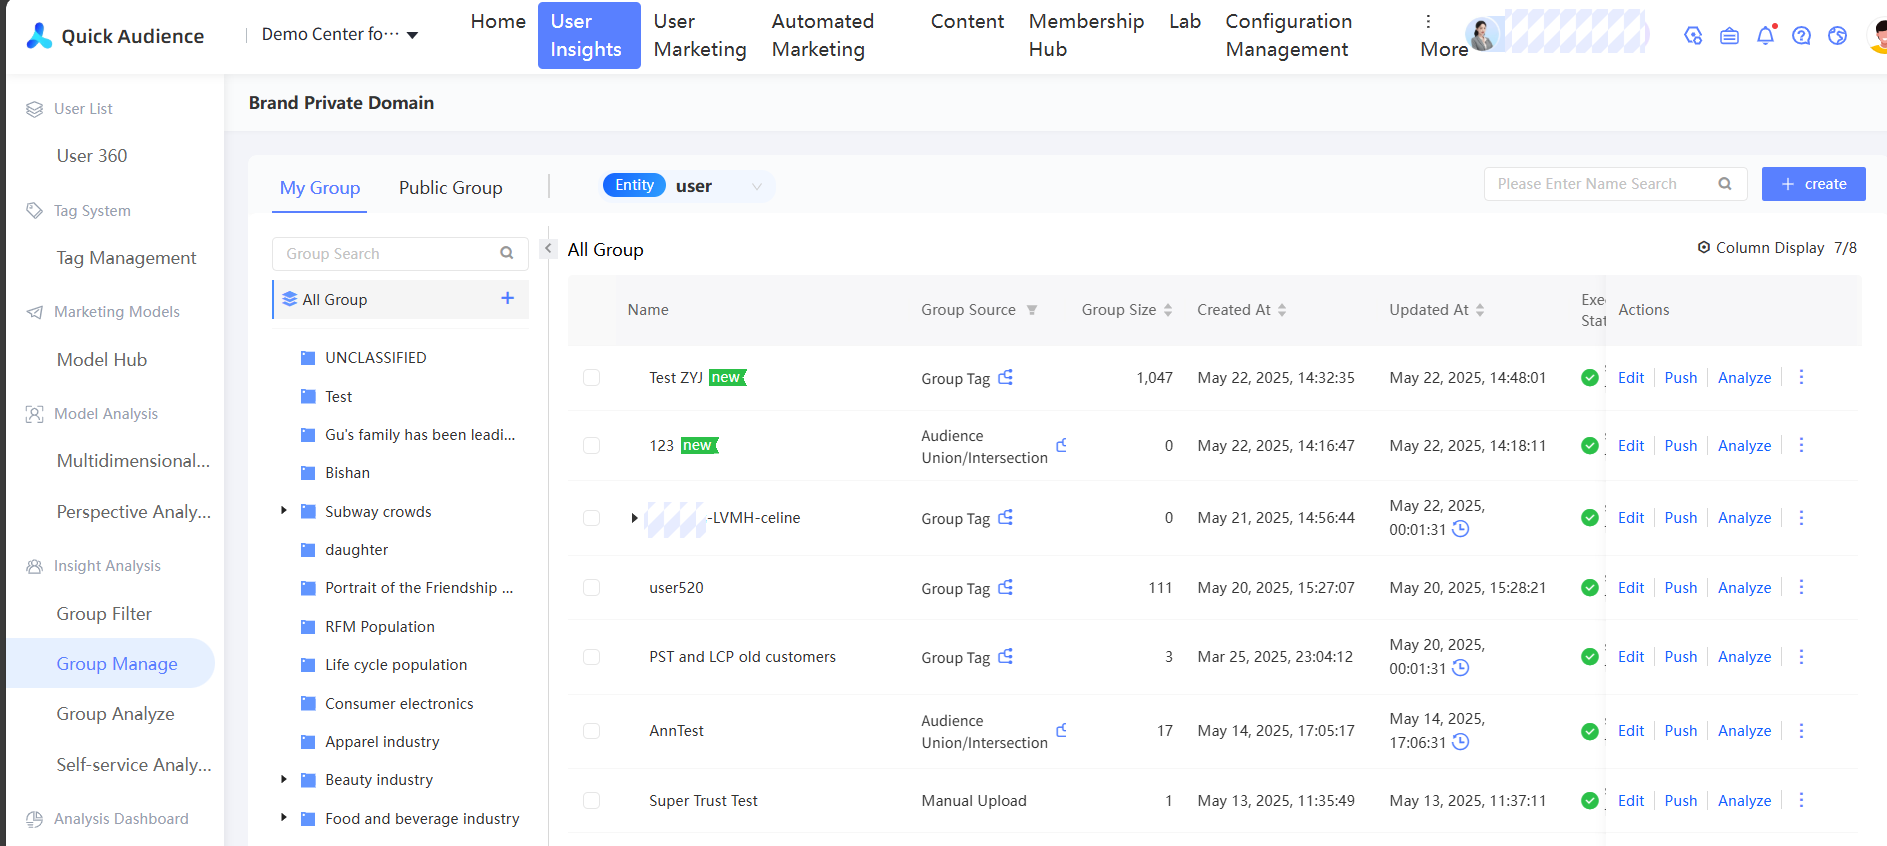
On the left side of the page, you can view the Ungrouped and other custom audience. By default, all audience are displayed.
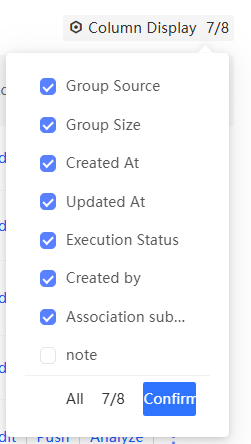
On the right side of the page, you can view the information of a audience, such as the source of the audience, the size of the audience, the time when the audience was created or updated, the execution status, and the associated sub-activity. You can click the activity name to go to the Sub-activity Details page. You can click Column Show in the upper-right corner of the list and select the information to be displayed from the drop-down list, as shown in the following figure.
In addition to the audience that are created by using the following methods: Audience Filtering, Manually Upload, Create from Analysis Source, Tag Value Selection, , audience that are created by using special methods are automatically added to the audience list:
The population generated by User Analysis. The source of the population is the same as the type of the object to be analyzed.
In Self-service Analysis, the audience of audience generated by the report circle is classified as Self-service analysis creation.
A audience of audience who receive results from users of Reach Marketing or Automatic Marketing, such as text messages, emails, PUSH, and webhooks. The audience source is classified into manual uploading.
The audience of audience that are generated by report selection on the Analysis Dashboard. The source of the audience is classified as Analysis Insight Report.
Filter, sort, and search
Filtering the audience
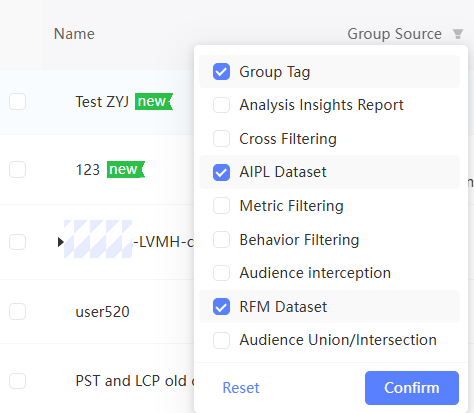
You can filter audience based on the audience source type and the creation /update execution status.

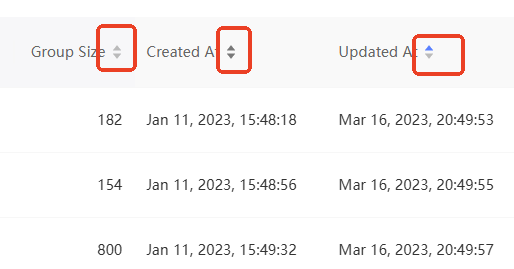
Sort audience
You can sort audience by audience size, creation time, and update time.

Search audience
In the search box in the upper-right corner of the audience list, you can search for an audience by name.
As shown in the following figure, after searching, the audience containing the search results will be highlighted in the audience directory on the left side of the page.
Upload audience
You can save a single type of user ID, such as a list of mobile phone numbers, as a CSV or TXT file. Create an audience by uploading a CSV or TXT file. These user IDs will also go through the ID Mapping process.
Documentation requirements:
One ID per row. Duplicate or blank rows do not affect the result.
You can use all the ID types that are enabled in ID Type Management. However, only one ID type is supported in the same file.
You can upload an ID in plaintext or an encrypted ID. Supported encryption types: MD5, SHA256, and AES. If you have used AES encryption for the ID field, you need to enter the key in the Organization System Configuration to decrypt it before pushing or using it.
The maximum size of a CSV or TXT audience file is 60MB.
Procedure
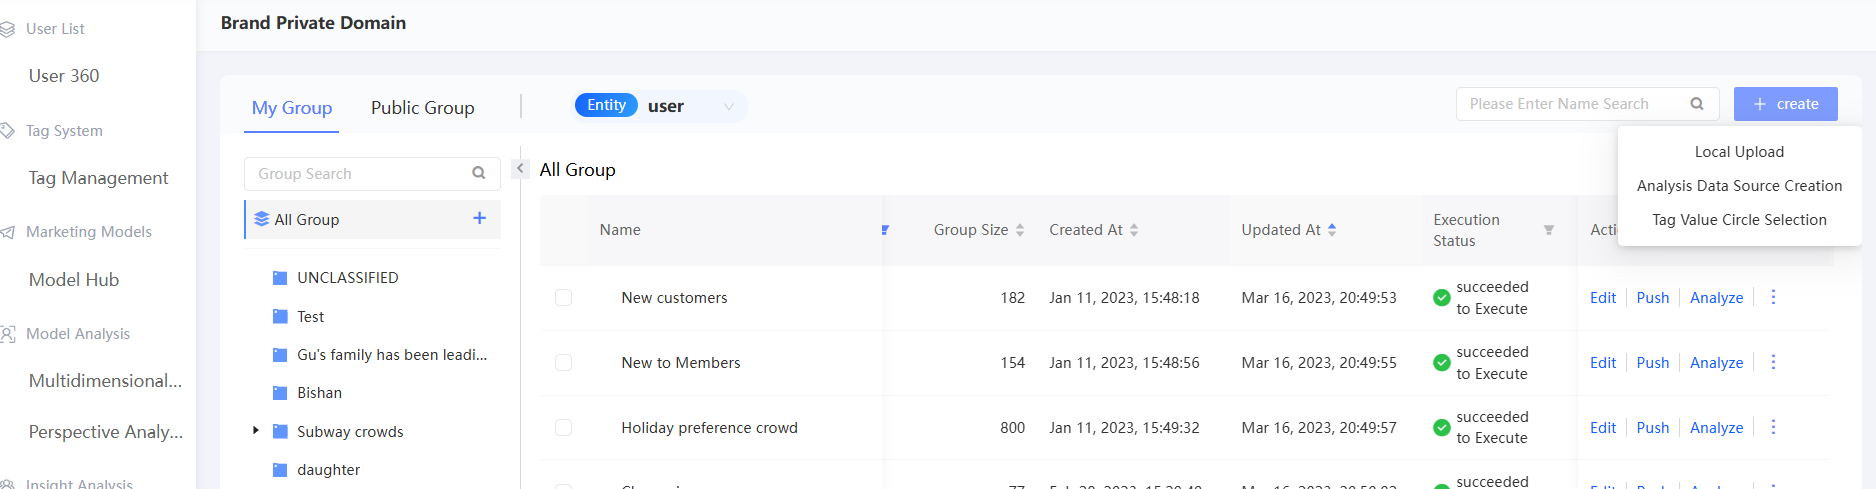
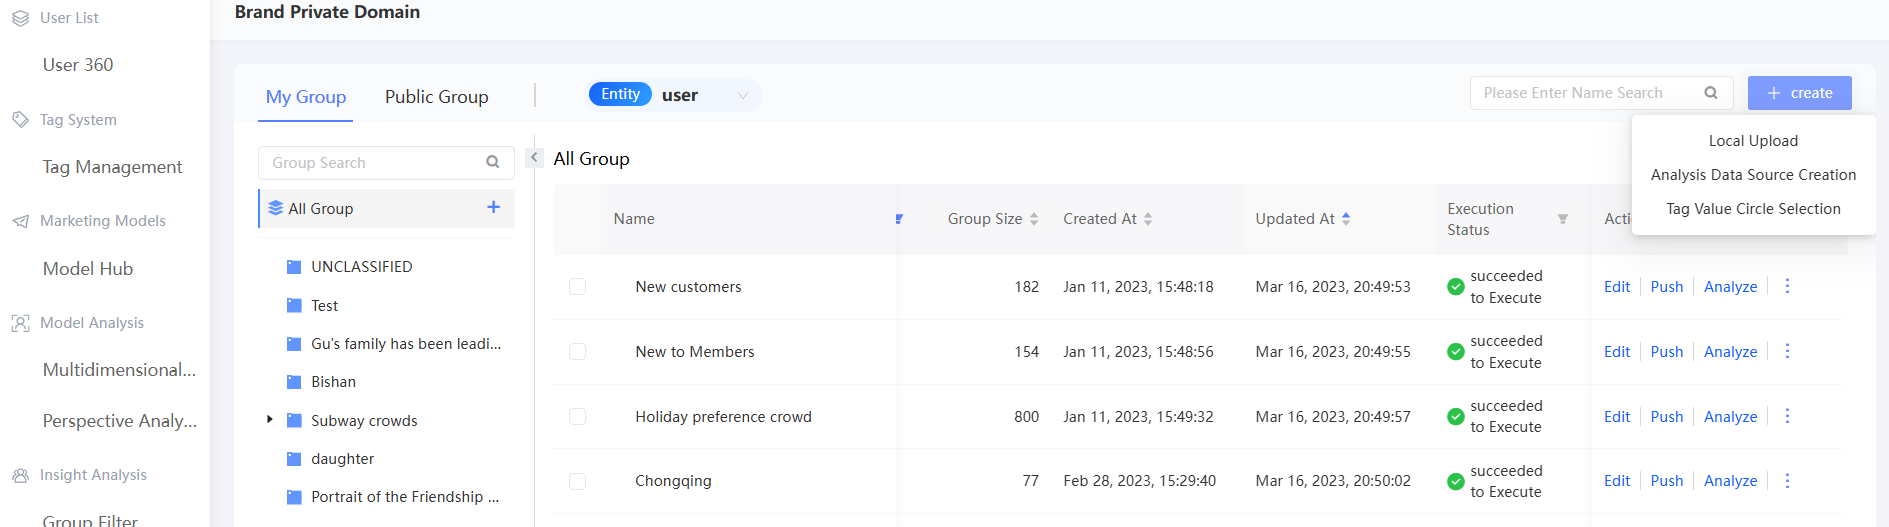
Choose New audience > Upload audience.
Select the ID type and ID encryption method, enter the name and description of the audience, select the audience to which the audience belongs, and select the associated sub-activity.
Drag a CSV or TXT file that contains the user ID to the specified area. You can click Get Uploading Template to obtain the file template.
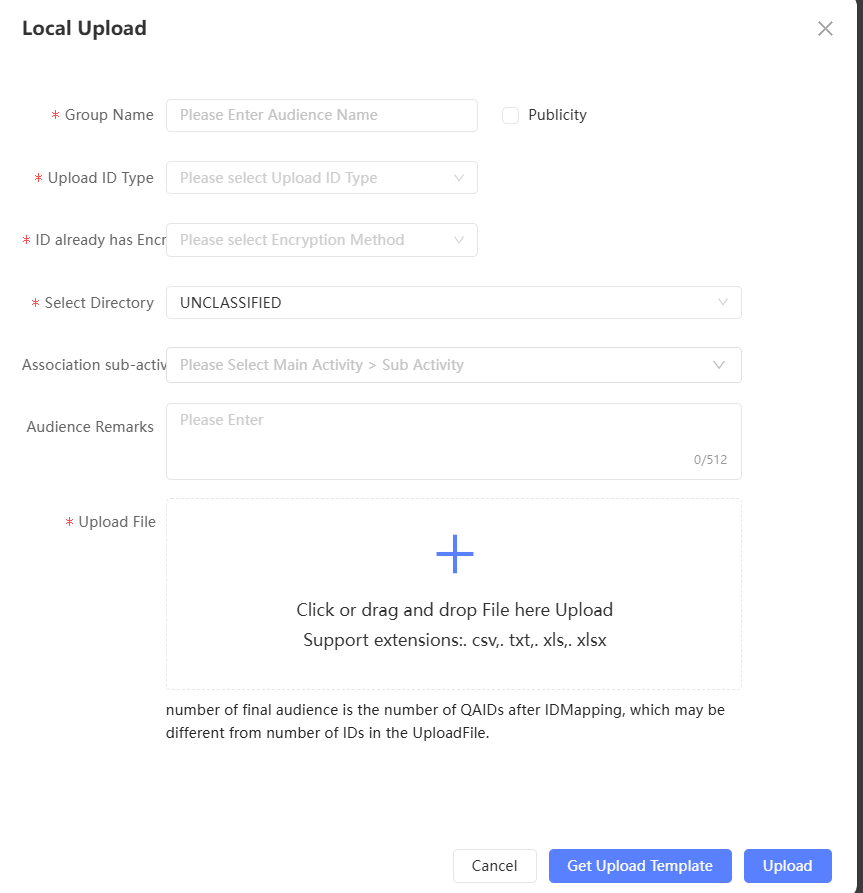
Click Upload.
Create an audience from an analysis source
You can save a single type of user ID, such as a list of mobile phone numbers, as a data table. Then, you can save the table in the connected analytics source and create a population by reading the table. These user IDs will also go through the ID Mapping process.
Table format requirements are as follows:
Contains only one column, the column name is user_unique_id, the user ID is saved, and the data type is numeric or text.
You can use all the ID types that are enabled in ID Type Management. However, only one ID type is supported in the same table.
You can upload an ID in plaintext or an encrypted ID. Supported encryption types: MD5, SHA256, and AES. If you have used AES encryption for the ID field, you need to enter the key in the Organization System Configuration to decrypt it before pushing or using it.
Procedure
Choose New audience > Create Analysis Source.
Select the analysis source, data table, saved user ID type, and ID encryption method. Enter a audience name and description, set whether the audience is public, and select the audience to which the audience belongs and the associated sub-activity.
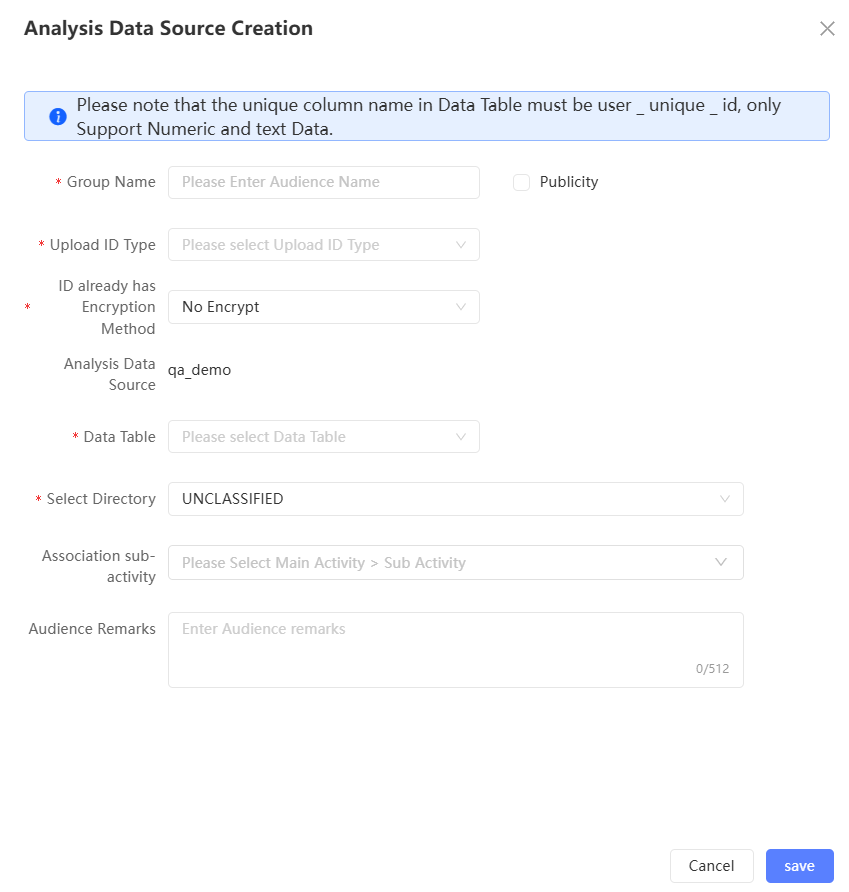
Click Save to create a population from the analysis source.
Select audience based on tag values
Supports generating a population for each selected tag value based on text and multi-value tags. You can select multiple tag values of the same tag to generate different audience of audience at a time.
Procedure
Choose New audience > Select Tag Value.
Select a tag from the left side and the tag value from the right side. You can select multiple or all tags. You can select a maximum of 100 tag values.

The selected tag values will be added to the list of audience below as the audience to be generated.
By default, the audience name uses the tag value. By default, the audience name is not stored in any audience and is not made public.
You can edit the name and description of a audience, specify whether the audience is a public audience, and select the audience to which the audience is saved, and the associated sub-activities, as shown in the following figure. Click the
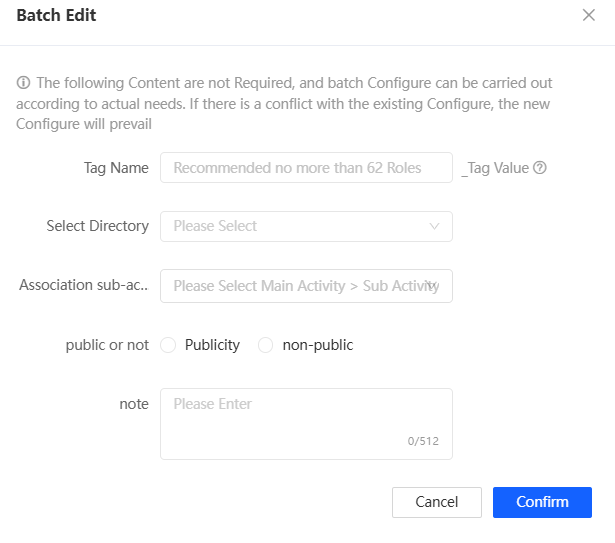
 icon to edit the audience. Select the audience and click Batch Edit to edit the audience.
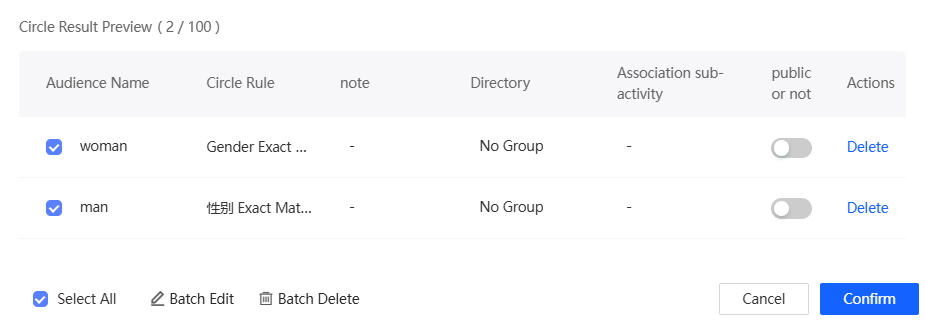
The following figure shows the batch editing interface. You can configure only the items to be customized. The items that you have not configured will use the default configurations in the list.
You can clear a tag value in the tag value list at the top of the list, or click Delete or Batch Delete in the lower part of the list.
Click OK. The corresponding audience is generated.
The audience that are generated by tag values. The audience are classified as user tags.
audience Source Query
Move the pointer over the  icon in the audience Source column. For an audience whose audience Source is audience Filtering, the source table or source population, filter condition, and calculation method of the audience are displayed. For an audience whose audience Source is Analysis Insight Report, the Source Table, Analysis Source, and View SQL Statement buttons are displayed.
Example

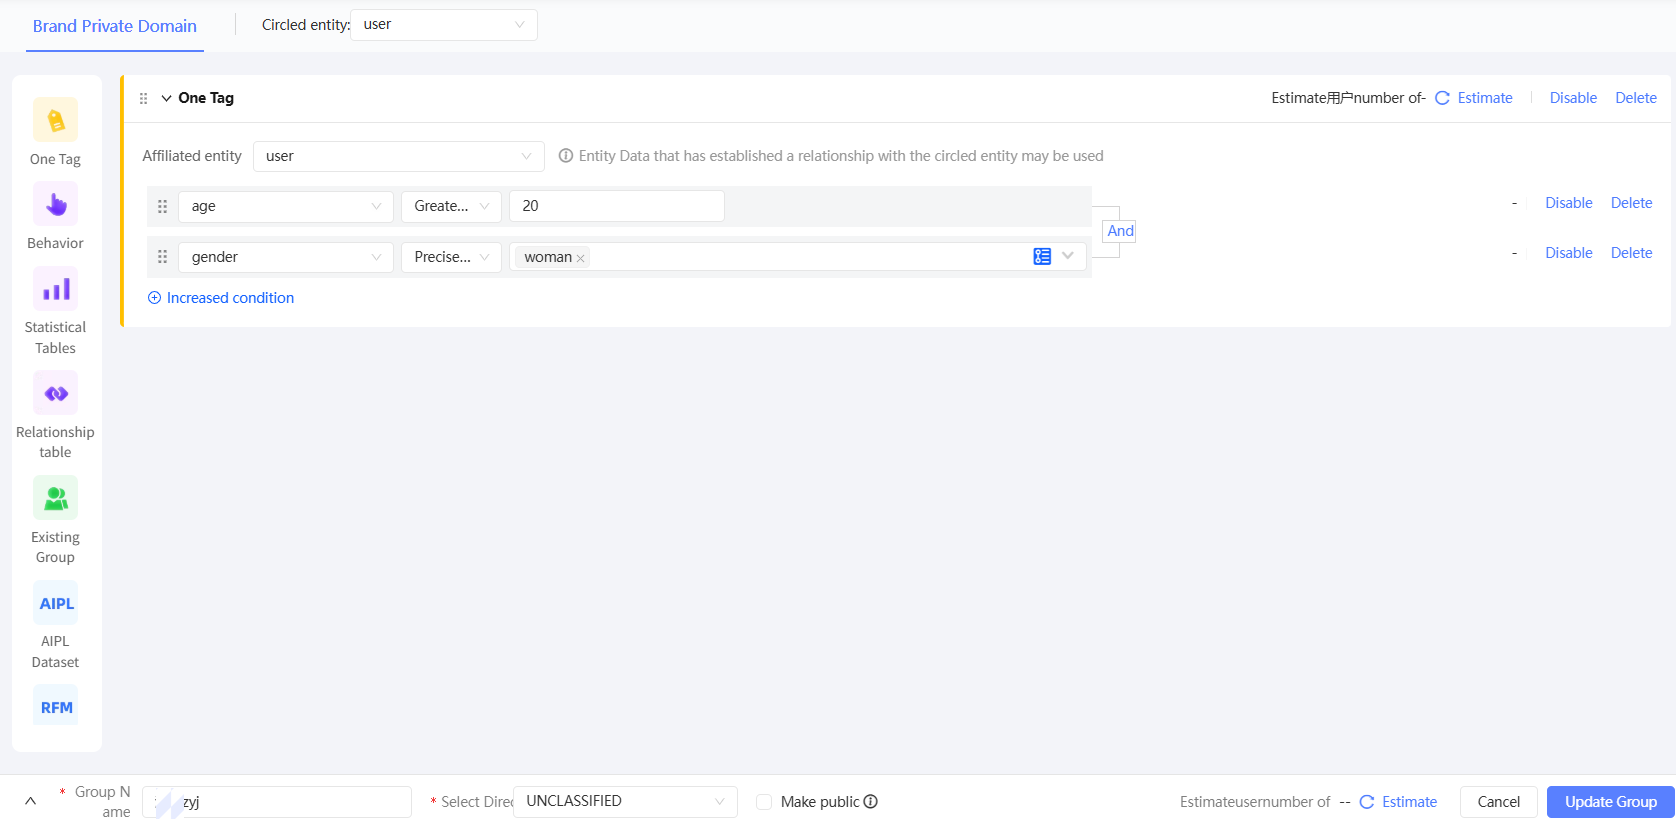
As shown in the preceding figure, "Official Mall Plus Purchase Users in the Month" is a audience of audience generated by tag screening and behavior screening. Click Edit. The following figure shows the configuration.

Modify
For a audience that is not manually uploaded, click Edit to edit the audience. For more information, see Create a audience.
For example, the following figure shows a audience generated by a audience filter. After you edit the audience, click Update Audience. The users included in the audience are calculated based on the latest filter conditions.
Analyze
Click Analyze to analyze the population. For more information, see Audience Analysis.
Update and snapshot
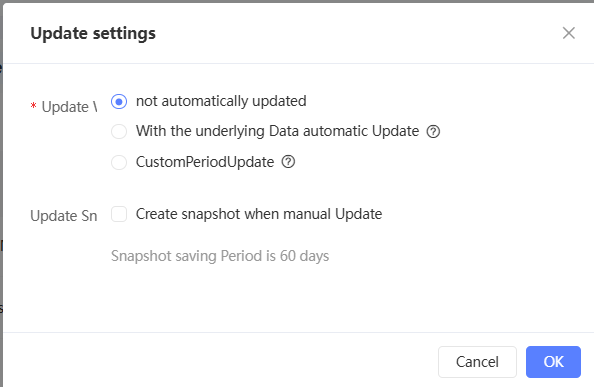
For non-manually uploaded audience, you can manually update or set automatic update to update audience based on the latest data.
Manual Update: After you have re-imported the underlying data table of the audience, you can manually update the audience.
Automatically updated with underlying data: During the update period, the audience is automatically updated as long as the import task of the underlying data table is scheduled once. This method is applicable to scenarios where daily /hourly periodic scheduling is configured for underlying data tables.
Custom auto update: The auto update is performed on a weekly /monthly basis within the validity period. This method is applicable to scenarios in which Automatic Marketing tasks are configured on a weekly or monthly basis.
Before manual update or automatic update, you can create audience snapshots to save the historical versions of the audience. Snapshots can be retained for up to 60 days.
If an audience is generated through audience interchange, the system will update its source audience before updating the audience. However, if a snapshot is generated before the update, the snapshot is not created for its source population.
If the update parallelism in the space has been set in the management center, the automatic update of the audience exceeding the limit needs to wait in line. For more information, see Workspace System Configuration.
Manually update
Set whether to automatically create snapshots during manual updates.
Choose
 /> Update Settings.
 Select Automatically Create Snapshot Upon Manual Snapshot.
 Note
NoteIn the preceding figure, Do not update indicates that the update is not performed automatically.
Click Save.
To perform a single update, choose
/> Update. Batch update: Select the audience to be updated and click Batch Update in the lower part of the page.
If the population to be updated has been set in the first step to automatically create a snapshot when updating manually, create a snapshot and start the update.
If the population to be updated is not set to automatically create a snapshot when it is manually updated in the first step, it is updated only, and no snapshot is created.
The selected audience will start to update and its source audience will be updated at the same time. After the update is complete, the Update succeeded message is displayed.
Automatically updated with underlying data
During the update period, as long as the import task of the underlying data table is scheduled once, the audience will be automatically updated. This method is applicable to scenarios where daily /hourly periodic scheduling is configured for underlying data tables.
Choose
/> Update Settings. Select Automatic Update with Underlying Data.
Set the update validity period. During this period, whenever a new import is completed for the underlying data table, the audience will start to be automatically updated, and its source audience will also be automatically updated.
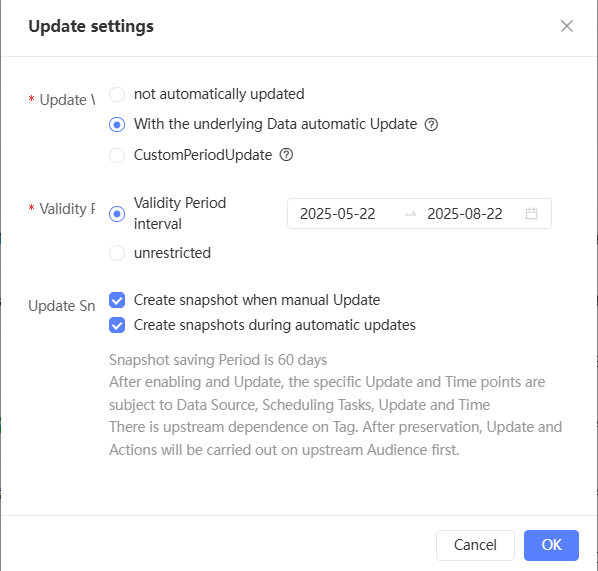
Select Automatically Create Snapshots on Auto-update.
Click Save to complete the settings. The
 icon appears in the Update Time column of the audience list.
Custom periodic update
During the validity period, automatic updates are performed on a weekly /monthly basis. This method is applicable to scenarios in which Automatic Marketing tasks are configured on a weekly or monthly basis.
Choose
/> Update Settings. The update method. Select Custom Cycle.
Set the update validity period and update cycle. During this time period, the audience will be automatically updated at the specified time, and its source audience will also be automatically updated.

Select Automatically Create Snapshots on Auto-update.
Click Save to complete the settings. The
icon appears in the Update Time column of the audience list.
Snapshot management
When an audience is updated, the name of the snapshot generated is: audience name_Snapshot time.
You can use audience snapshots for Audience Crossing and Audience Analysis.
An audience update may fail, but an audience snapshot may be successfully executed before the update.
Click the arrow icon  in front of the audience name. The snapshot list of the audience will be expanded below, as shown in the following figure.

Rename a snapshot
Click Snapshot Name, enter a new snapshot name in the input box, and press the Enter key to rename the snapshot. Clicking the  icon cancels the rename.
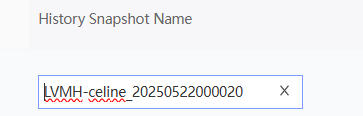
Download a snapshot
If a user other than the administrator wants to download audience snapshots, the user insight-audience insight-audience management-download permissions must be granted. For more information, see Workspace Role Management.
Click Download in the Actions column corresponding to the snapshot. You can download the snapshot as a ZIP file to your local computer and decompress the file as a CSV file. For more information, see Download Audience.
Remove snapshots
Click Delete to delete the snapshot.
Snapshots are retained for 60 days and are automatically deleted after 60 days.
Copy Snapshot Table Name
Click Copy Table Name in the Actions column corresponding to a snapshot to copy the name of the snapshot table. The snapshot is stored in the analysis source.
Copy the audience
For a audience that is not manually uploaded or created from a non-analytical source, choose /> Copy. In the dialog box that appears, enter the new audience name and description, select the audience to which the audience belongs and the associated sub-activity, and then click OK to copy the audience and generate a new non-public audience. 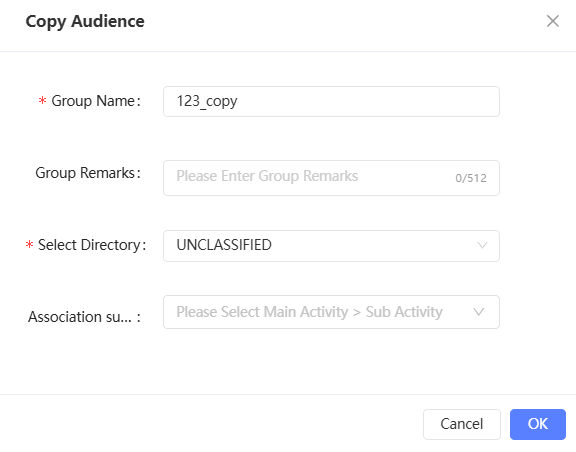
Copying an audience is essentially a copy of the filtering criteria, not the user ID of the audience.
If a message is prompted that data permissions on some filtering conditions are missing and replication fails, modify the filtering conditions or contact the administrator for authorization and try again.
When copying, the population results will be obtained according to the latest data, which may be different from the original population that has not been updated.
By default, the copied population has the same update settings as the original population and can be modified.
Download audience
Download the ID and tag fields associated with the audience as a ZIP file to your local computer and decompress the file as a CSV file. All ID types (not limited to encryption methods) and tags that can be matched by the QAID of an audience can be downloaded, regardless of the table from which the ID and tag come.
If a user other than the administrator wants to download a audience of users, the user insight-audience management-audience management-audience management-download permissions must be granted. For more information, see Workspace Role Management.
You can download only the IDs and tags for which the user has permissions in the tag table. For example, if a user has permissions on the mobile phone number of Table A but not on the mobile phone number of Table B, and the audience comes from both Tables A and B, the downloaded audience list contains only the mobile phone numbers from Table A but not from Table B.
Procedure
Choose
/> Download. In the dialog box that you want to download, select the ID, encryption method, tag, and source, and turn on the switch. Please select at least one ID.
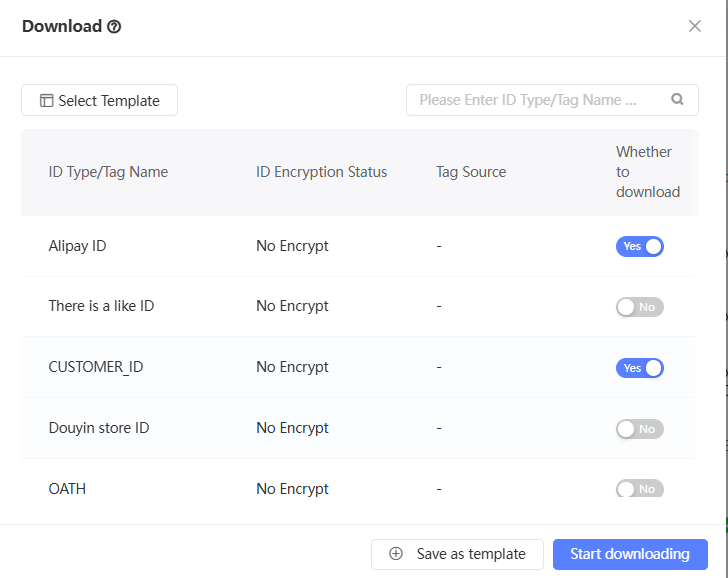
Click OK to download the audience file to your computer.
Download will get ZIP compressed file, need to decompress to get CSV file to use.
Unencrypted ID columns are labeled with "(UNENCRYPTED)", such as MOBILE(UNENCRYPTED).
Encrypted ID column names are labeled with the encryption method, such as MOBILE(AES).
The label column name will use the label name directly.
View storage details
Choose Details > Storage Details. In the dialog box that appears, the name of the audience table, audience ID, and ID mapping table are displayed, as shown in the following figure. Click Copy to copy the information.
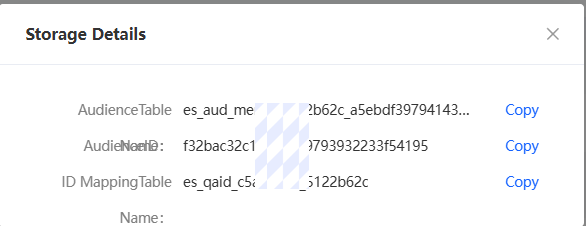
audience Table Name: stores the QAID of an audience user obtained by ID Mapping. The QAID is stored in the analysis source.
audience ID: the unique identifier of the audience. It can be used to create a Kafka push task through the API.
ID Mapping Table: stores all types of IDs that can be matched by audience users after ID mapping, and stores them in the analysis source.
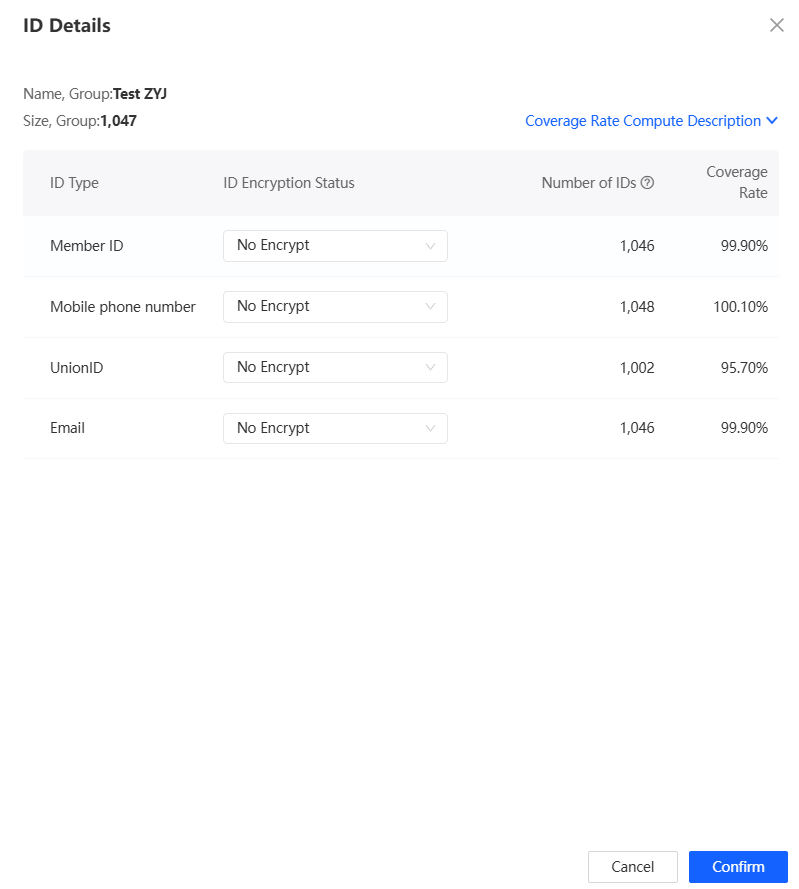
View audience ID details
You can view the ID details of a audience of audience, including the ID type, the number of IDs corresponding to each type of ID, and the ID coverage rate in the audience. You can display data in different encryption states for each type of ID.
The number of IDs is the number of IDs obtained by the users contained in the audience by querying other IDs through their QAID.
A user may not have a record of a certain ID, or a user may have multiple records of a multi-value ID. Therefore, the number of IDs does not accurately reflect the number of users covered by an ID. The number of IDs may be larger or smaller than the population size.
Coverage rate=ID number ÷ population size × 100%.
Procedure
Choose
/> Details > ID Details. The pop-up window displays the ID types contained in the population. By default, the ID number and coverage rate of each ID type in all encrypted states are displayed, as shown in the following figure.
NoteWhen the ID encryption status is All, the same ID may be recorded in different encryption statuses. As a result, the same ID is calculated repeatedly. Therefore, the coverage rate is not displayed.
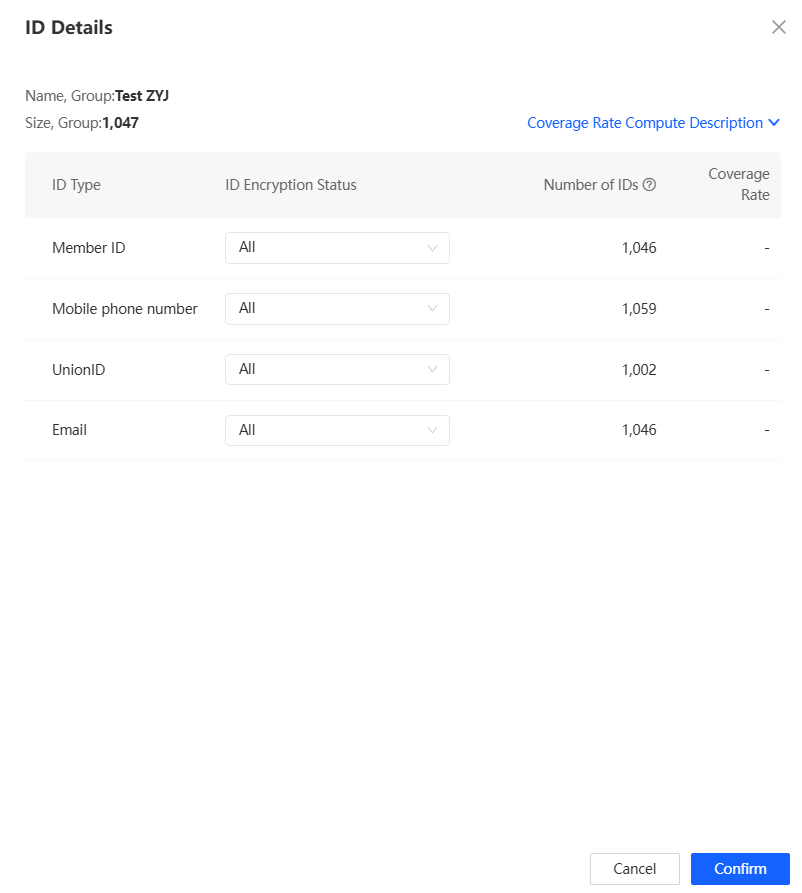
Select an encryption status from the ID Encryption Status drop-down list to view the number of IDs and coverage of the ID type in the encryption status, as shown in the following figure.
Push
Supports pushing audience to your brand data bank, Daimo Disk, and Kafka to make full use of your consumer data assets. In addition, if internal modules such as social interaction, retail CRM, and media delivery need to use the audience, the audience also needs to be pushed to the corresponding module. For more information, see Audience Push.
audience entry application
After you choose /> Apply, you can create the following types of marketing tasks for this audience of audience.
Automatic Marketing: You can create an automated marketing task for a specific audience of audience.
Tencent Advertising
Ocean Engine
The population must be able to match the ID type supported by the marketing channel to select the corresponding marketing task. For more information about the supported ID types, see the preceding documentation.
Audience Moving group
Supports moving audience to specified directories.
Batch move: Select the audience of audience to be moved from the list and click Batch move below the list. In the panel that appears, select a directory and click Save.
Delete audience
To delete a single audience, choose /> Delete and confirm to delete the audience.
Delete multiple audience of audience at a time: Select the audience of audience that you want to delete and click Batch Remove in the lower part of the page.
If the audience to be deleted is derived from other audience, the audience cannot be deleted, so that the derived audience cannot be updated.
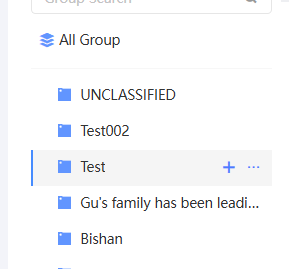
Audience group
As shown in the following figure, the audience group is displayed on the left side of the page.
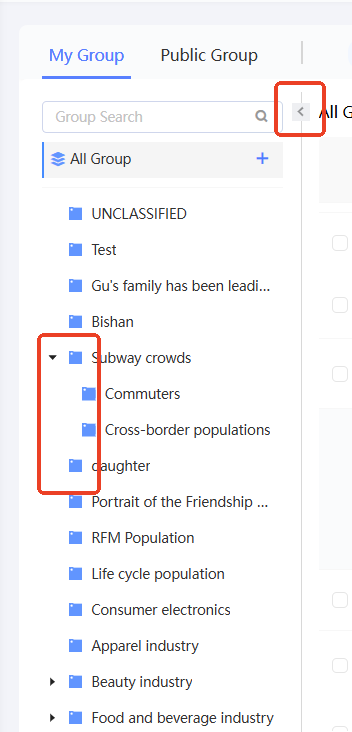
Audience who are not grouped are included in the Ungrouped section. You can add audience group to put audience into different groups for classifying and managing audience.
A maximum of three levels of groups are supported. You can click the arrow icon in front of a group name to expand or collapse child group. In the preceding figure, "All Children" and "newff" are three-level group.
A dark icon
 indicates that the group contains audience. A light icon
  indicates that the group does not contain audience.
 The search box above the group list allows you to search for group names.
Click the arrow icon
 in the upper right corner of the group to collapse /bring up the group view.
Add and move group
To add a maximum of three levels of group, perform the following steps:
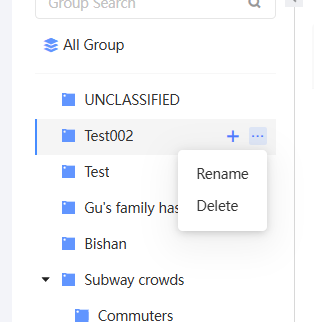
Move the pointer over any group or all audience. The plus sign
 appears, as shown in the following figure. Click the plus icon.
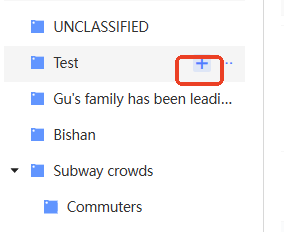
In the dialog box that appears, select whether the new group is a sibling or a child of the original group and enter a name for the new group.
In this example, a sibling group of "New group 002" is created.
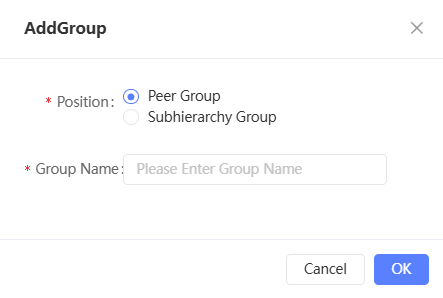
Click OK. The new group will be added to the category.
Drag the group to the required position to change the order and level of audienceing.
Rename a group
Move the pointer over the custom group. The ellipsis icon
 appears, as shown in the following figure. Click the ellipsis icon. The Rename button appears. Click Rename.
In the dialog box that appears, enter a new group name and click OK.

Delete a group
Move the pointer over the custom group. The ellipsis icon
appears, as shown in the following figure. Click the ellipsis icon. The Delete button appears. Click Delete. 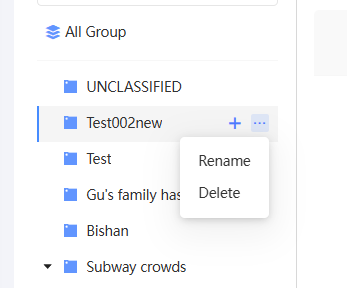
If the group does not contain audience or sub-group, the group will be deleted directly.
If the group contains audience or sub-group, you need to click OK in the pop-up window to complete the deletion. The sub-group under the original group will become the same-level group of the original group, and the audience in the original group will be moved to the ungrouped.

FAQ
What does the icon in the audience list mean?
Answer: As shown in the figure below, common icons in the audience list are: 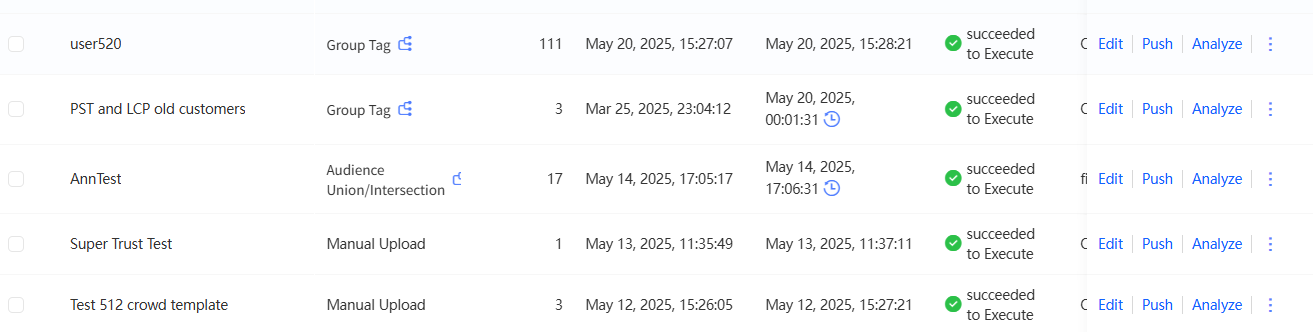
 : indicates a new audience. This icon appears within 24 hours after the audience is created.
  : indicates that a snapshot is generated during the audience update. Click the icon to expand the snapshot list.
  : indicates that there are multiple associated child activities. If you move the pointer over the icon, all associated child activities are displayed. Clicking a child activity name will take you to the corresponding child activity details page.
  : Move the pointer over the icon. For a audience of audience whose source is audience Filtering, the source table or source population, filter conditions, and calculation method are displayed. For a audience of audience whose source is Analysis Insight Report, the Source Table, Analysis Source, and SQL Statement buttons are displayed.
  : This icon is displayed for audience who have set automatic update. Move the pointer over the icon to display the automatic update type.
  : If an audience fails to be created or updated, this icon is displayed. If you move the pointer over the icon, an error message is displayed.
  : This icon is displayed when an audience is created or updated.
  : The update parallelism of the space has been set. audience who exceed the limit are waiting in line for the update, and the To Be Execute icon is displayed.
What operations are supported by all types of audience?
A: The following table lists the types of operations supported by various audience of audience:
Audience Source | Audience Source Query | Copy | Modify an inbound rule | Update, Update Settings | China Mobile | Deletion | Download | ID details and storage details | Push, push history | Analysis & | Applications |
The tags of the user. Behavior filtering Metric filtering AIPL model RFM model audience Intersection Cross-screening | Y | Y | |||||||||
Manual Upload | N | Y | N | ||||||||
Create from Analytics Source | Y | ||||||||||
Self-service analysis creation | Y | N | N | ||||||||
Analysis Insight Report | Y | ||||||||||
Some audience have a population size of 0. Is there a problem?
A: If the execution failure is not displayed, it is normal for the audience size to be 0. Root causes:
When the audience is generated by audience screening, if there is no user who meets the screening conditions, the audience size may be 0.
At the same time, the system saves the filtering criteria, and when updating the population, it will re-filter according to the updated data. The number of users meeting the filtering criteria may change, and there is a certain probability that it will become 0.
The analysis insight report population selected by the analysis board, the system saves the SQL statement of the selection condition, and the number of users who meet the selection condition may also change to 0 when updating the population.
Recommend reading
FAQ about User Insight
Audience Marketing
Audience Automatic Marketing