ComfyUI is a node-based user interface for Stable Diffusion that lets you build complex AIGC workflows for tasks such as short video content generation and animation production. This topic describes how to deploy and use ComfyUI in Elastic Algorithm Service (EAS).
Edition guide
Scenarios | Call method | |
Standard Edition |
|
|
API Edition |
| API call (asynchronous) |
Cluster Edition WebUI |
| WebUI |
Serverless Edition |
| WebUI |
The type of API call, synchronous or asynchronous, depends on whether the EAS queue service is used:
Synchronous call: Directly requests the inference instance without using the EAS queue service.
Asynchronous call: Uses the EAS queue service to send requests to an input queue and retrieve results through a subscription.
Because ComfyUI has its own asynchronous queue system, a synchronous call is still processed asynchronously. After you send a request, the system returns a prompt ID. You must then use this prompt ID to poll for the inference result.
Billing
Serverless Edition: Deployment is free of charge. You are billed based on the actual inference duration.
Other editions: You are billed for deployed resources and runtime duration. Charges apply after the service is successfully deployed, even if it is not in use.
For more information about billing, see Billing of Elastic Algorithm Service (EAS).
Deploy a service
The Serverless Edition can only be deployed using the scenario-based model deployment method. The Standard, Cluster, and API editions can be deployed using the simple scenario-based model deployment method or the custom model deployment method, which supports more features.
ComfyUI supports only single-card mode (single-machine single-card or multi-machine single-card) and does not support multi-card concurrent operations. Because an EAS instance has only one ComfyUI process, if you select an instance with multiple GPU specifications, such as 2 × A10, during deployment, only one GPU is used. A single image generation task is not accelerated.
Load balancing: You must deploy the API Edition and implement load balancing using an asynchronous queue.
Method 1: Scenario-based model deployment (recommended)
Log on to the PAI console. Select a region on the top of the page. Then, select the desired workspace and click Elastic Algorithm Service (EAS).
On the Elastic Algorithm Service (EAS) page, click Deploy Service. Under Scenario-based Model Deployment, click AI Video Generation: ComfyUI-based Deployment.
On the AI Video Generation: ComfyUI-based Deployment page, configure the following parameters.
Edition: Select a edition based on the Edition guide.
Mount storage: You must configure the model if you want to use your own models, install custom nodes, or make API calls. For example, if you use Object Storage Service (OSS), select a bucket and a directory. After the deployment is successful, the system automatically creates the required ComfyUI directories in the bucket. Ensure that the bucket is in the same region as the EAS service.
Resource Configuration: We recommend using GU30, A10, or T4 GPU types. The system defaults to , which is a cost-effective option.
Click Deploy. The deployment takes about 5 minutes. The deployment is successful when the Service Status changes to Running.
Method 2: Custom model deployment
Log on to the PAI console. Select a region on the top of the page. Then, select the desired workspace and click Elastic Algorithm Service (EAS).
Click Deploy Service. In the Custom Model Deployment section, click Custom Deployment.
On the Custom Deployment page, configure the following key parameters. For more information, see Custom Deployment Parameter Descriptions.
Set the Deployment Method to Image Deployment, and select the Enable Web Application check box.
Image Configuration: In the Official Images list, select comfyui > comfyui:1.9. In the image tag, x.x indicates the Standard Edition, x.x-api indicates the API Edition, and x.x-cluster indicates the Cluster Edition.
NoteBecause versions are iterated rapidly, you can select the latest image version during deployment.
For more information about the scenarios of each version, see Edition guide.
Storage Mount: To use your own models, install custom nodes, or make API calls, you must mount storage. For example, when using Object Storage Service (OSS), select a bucket and a directory. After the deployment is complete, the required ComfyUI directories are automatically created in the selected directory. Ensure that the bucket is in the same region as the EAS service.
Uri: Click
 to select an existing OSS storage directory. For example,
 oss://bucket-test/data-oss/.Mount Path: Set this to
/code/data-oss. This mounts the configured OSS file directory to the/code/data-osspath in the image.
Run Command:
After you configure the image version, the system automatically sets the run command to
python main.py --listen --port 8000. The port number is 8000.If you have mounted storage, you must add the
--data-dirparameter to the Startup Command and set its value to the mount directory. This mount directory must be the same as the Mount Path. For example,python main.py --listen --port 8000 --data-dir /code/data-oss.
Set Resource Type to Public Resources.
Deployment Resources: The resource specification must be a GPU type. We recommend ml.gu7i.c16m60.1-gu30, which is the most cost-effective option. If inventory is insufficient, you can select ecs.gn6i-c16g1.4xlarge.
Click Deploy. The service deployment takes approximately 5 minutes. The service is successfully deployed when the Service Status is Running.
Call the service
Use the WebUI
The Standard, Cluster, and Serverless editions support the WebUI.
Click the target service name to go to its overview page, then click Web applications in the upper-right corner.
If a page loads slowly, see The page freezes or takes a long time to refresh.
1. Use a template workflow
The WebUI supports custom workflow configurations and provides multiple preset templates. You can select a template on the page. This topic uses the Wan VACE Text to Video workflow template as an example.
For the Serverless Edition, this workflow is not included in the template. You can use a different template or select to load a workflow from your local file system.

After the workflow is loaded, you can ignore the error message about the missing model. We recommend that you select the check box to prevent this message from appearing again.
Because of a path change, running the workflow directly may cause the following error.
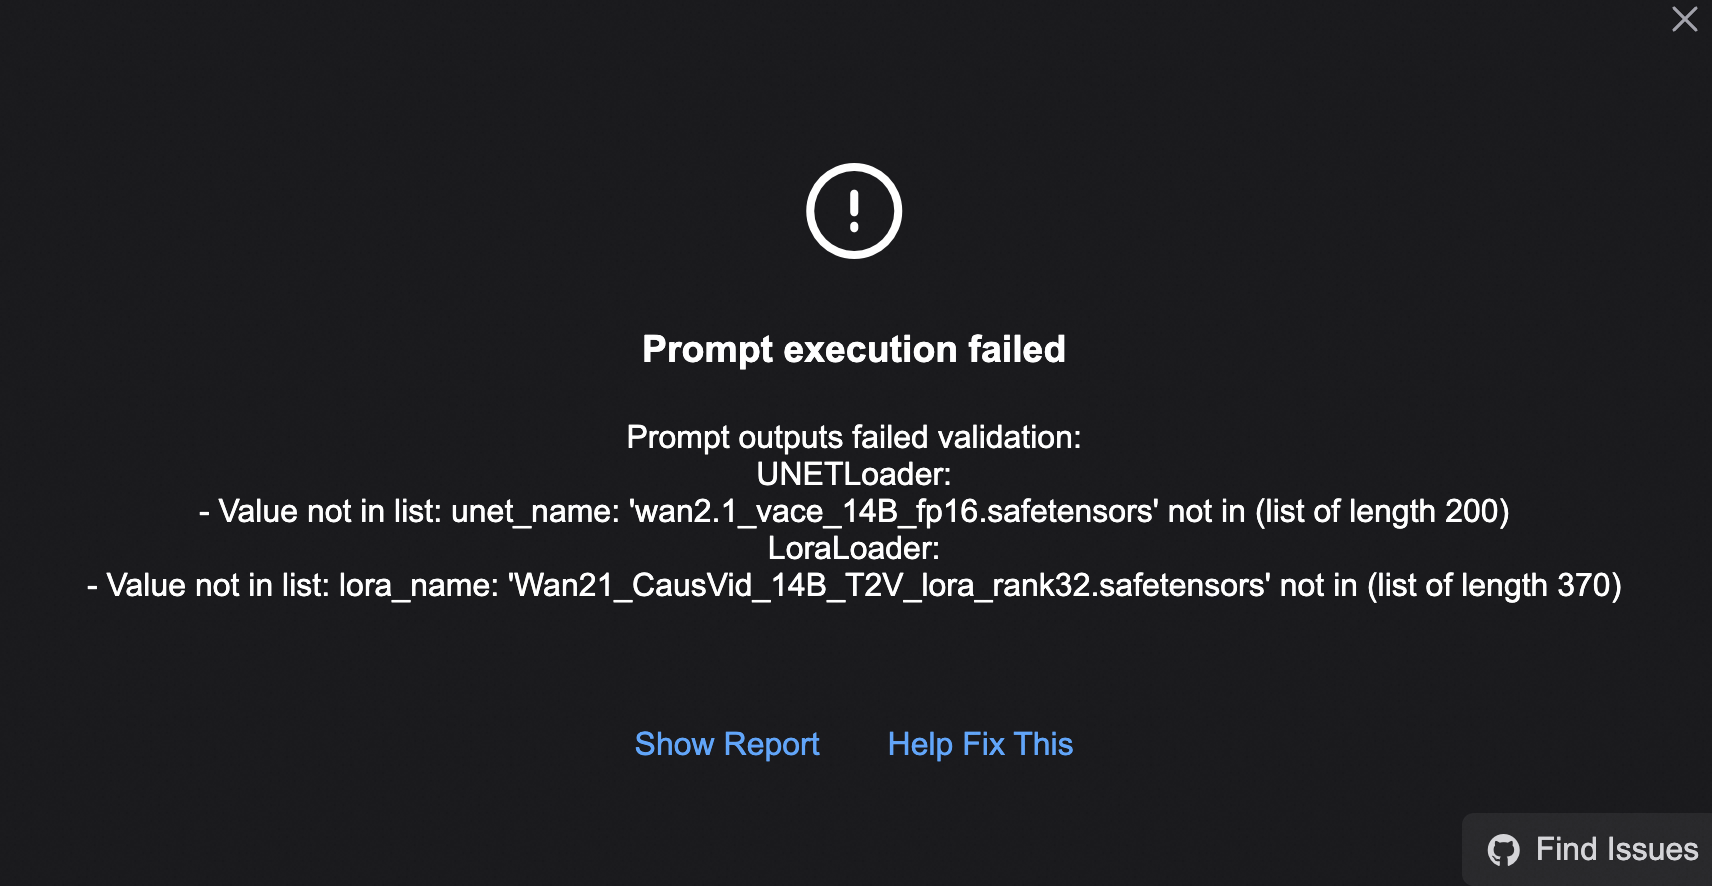
First, reselect the wan2.1_vace_14B_fp16.safetensors and Wan21_CausVid_14B_T2V_lora_rank32.safetensors models in the Load models here area.
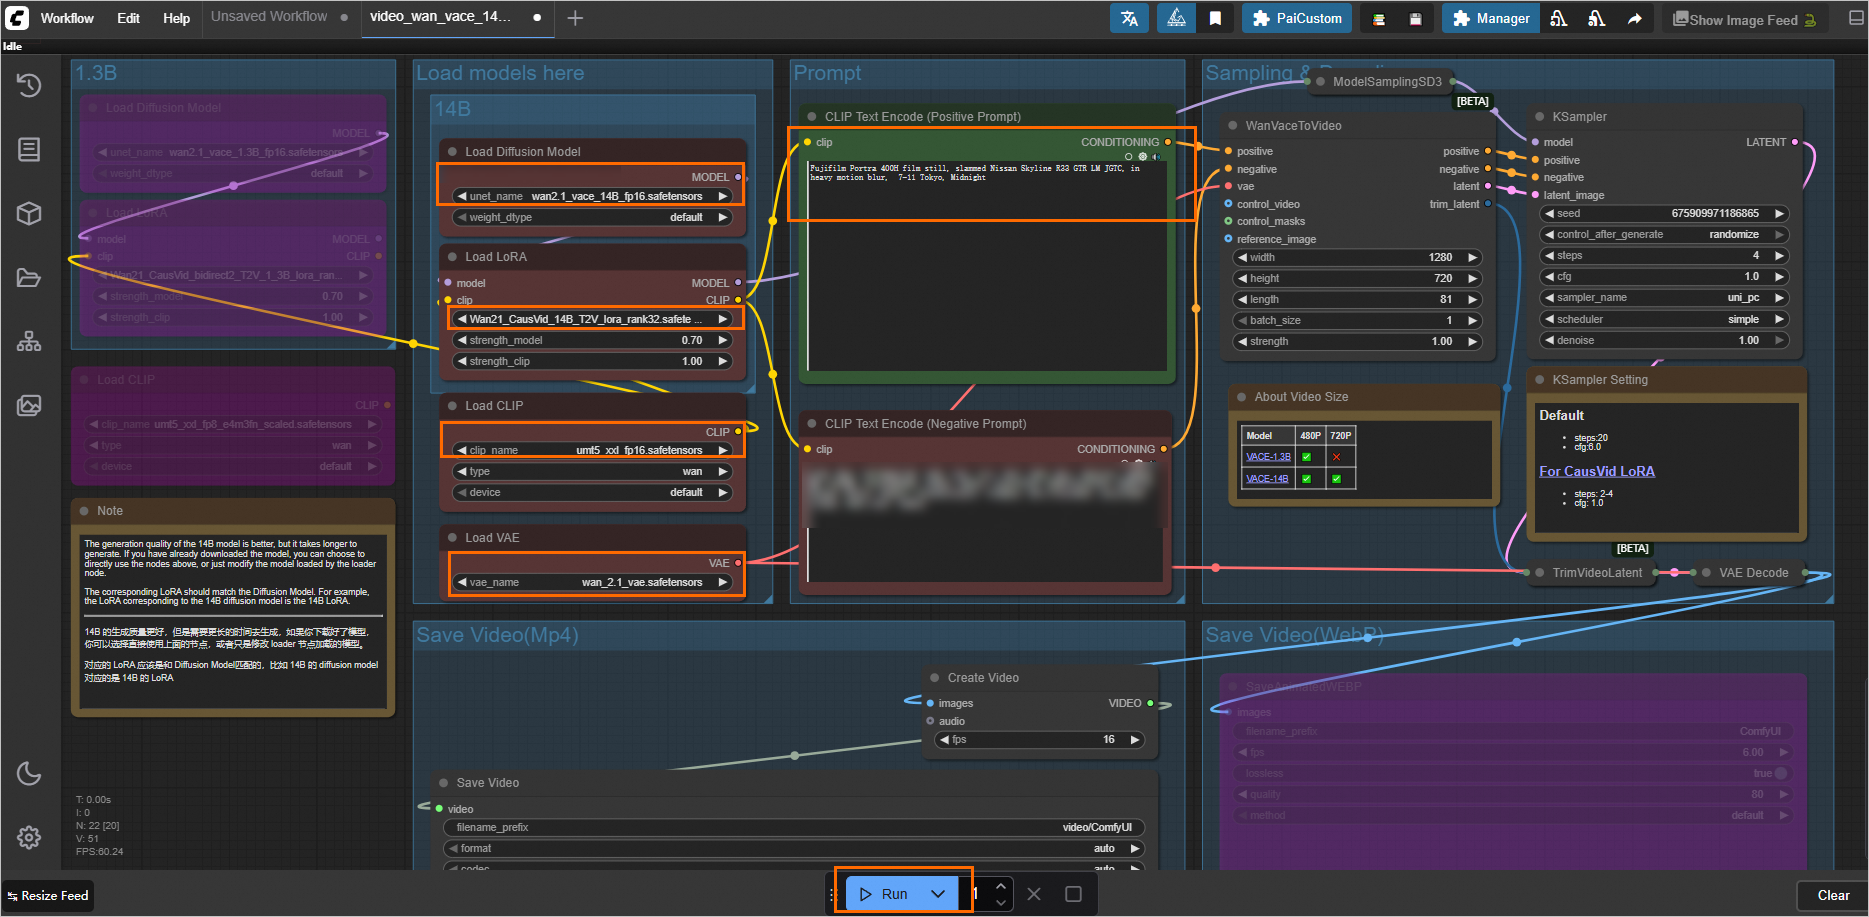
After the workflow runs successfully, the generated video is displayed in the Save Video area.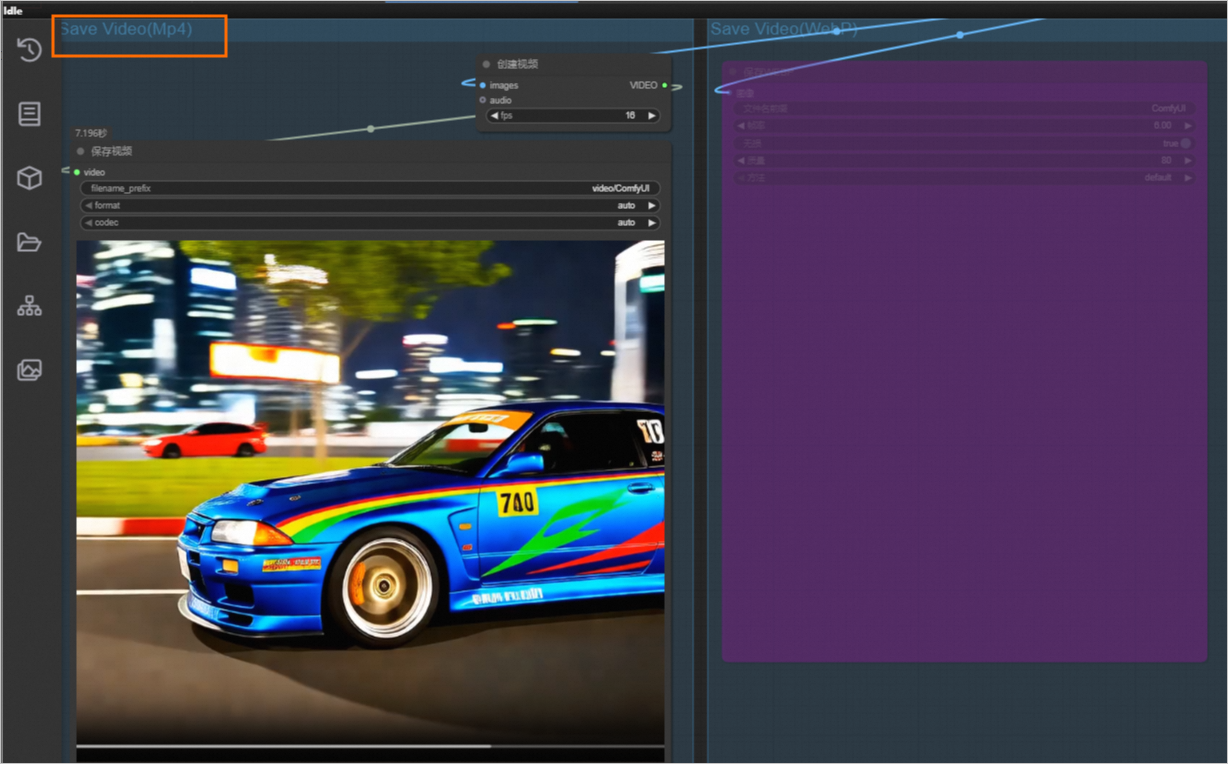
2. Use third-party models and install custom nodes (ComfyUI plug-ins)
Ensure that the deployed ComfyUI version is not the Serverless Edition. The Serverless Edition can only use built-in models and nodes.
A storage mount must be configured for the service. For a custom deployment, add the
--data-dirparameter to the Startup Command field to mount a directory. For more information, see Method 2: Custom Model Deployment.After the service is deployed, the system automatically creates the following directory structure in the mounted OSS or NAS storage.
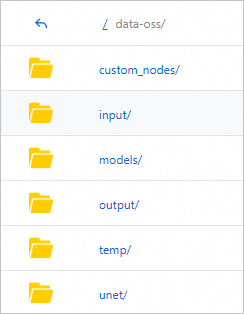
Where:
custom_nodes: This directory is used to store node files.
models: This directory is used to store model files.
Upload model or node files. To use OSS as an example, you can upload files to OSS in the console. For large files, see How to upload large files to OSS.
Upload model files: Upload the model to the corresponding subdirectory of
modelsbased on the instructions in the source project of the node that uses the model. For example:For the Checkpoint loader, the model should be uploaded to
models/checkpoints.For the style model loader, the model should be uploaded to
models/styles.
Upload node files: We recommend that you upload custom nodes to the
custom_nodesdirectory of the mounted storage.
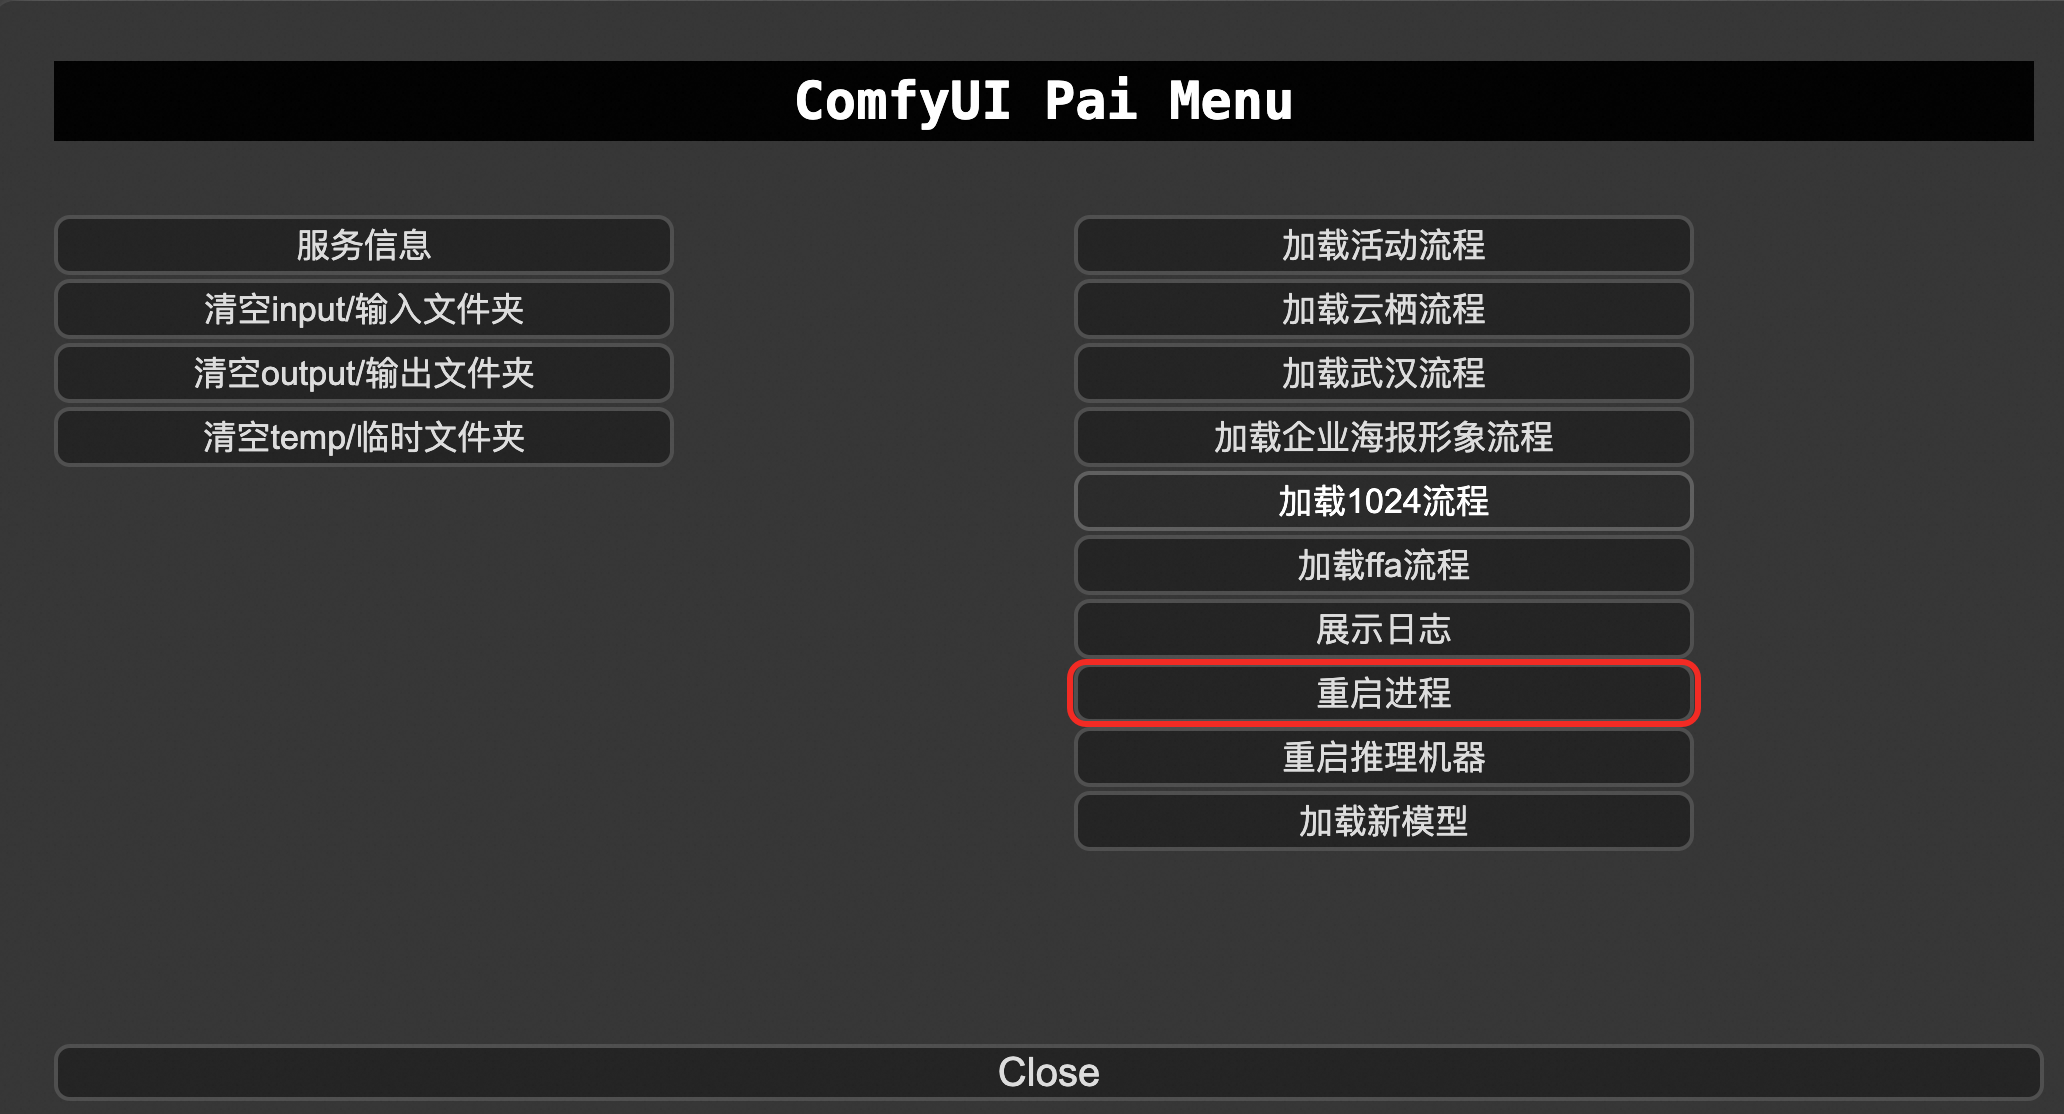
Load a new model or restart the process.
After you upload a model to the mounted bucket, click . If you still cannot find the model, click Restart Process. After the process restarts, refresh the page.
After you upload the node file, click Restart Process. After the process restarts, refresh the browser page.
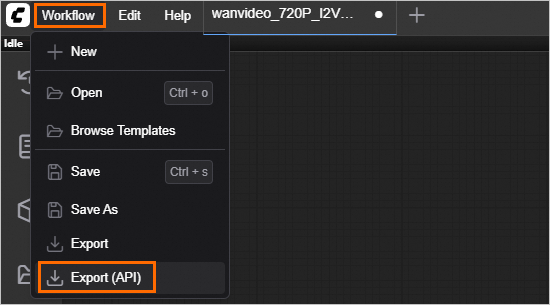
3. Export a workflow
After you debug the workflow, click to save the workflow as a JSON file. You can then use this file for API calls.
API call
The Standard Edition service supports only synchronous calls and provides an online debugging feature.
The API Edition service supports only asynchronous calls and only the api_prompt path.
The API request body for ComfyUI depends on the workflow configuration. You must first set up and export the workflow's JSON file from the WebUI.
Synchronous call: The request body must wrap the content of the workflow JSON file with the prompt key.
Asynchronous call: The request body is the content of the workflow JSON file.
Because the Wan VACE Text to Video workflow is time-consuming, the following workflow is provided for testing. It takes about 3 minutes to run.
Online debugging
On the Elastic Algorithm Service (EAS) page, find the target service and click Online Debugging in the Actions column.
On the debug page, in the Online Debugging Request Parameters section, enter the request body in the Body field. Then, add
/promptto the request URL text box.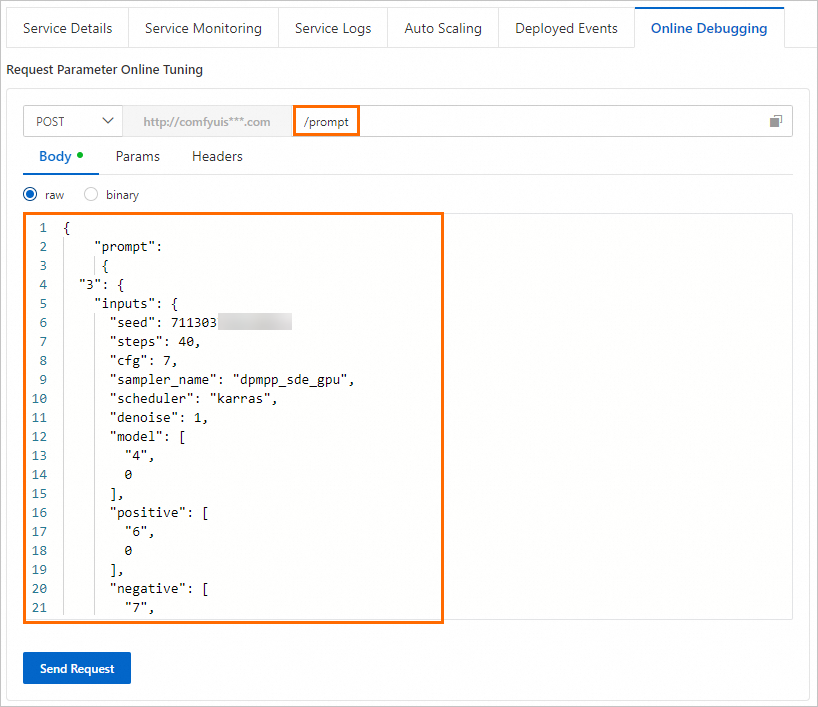
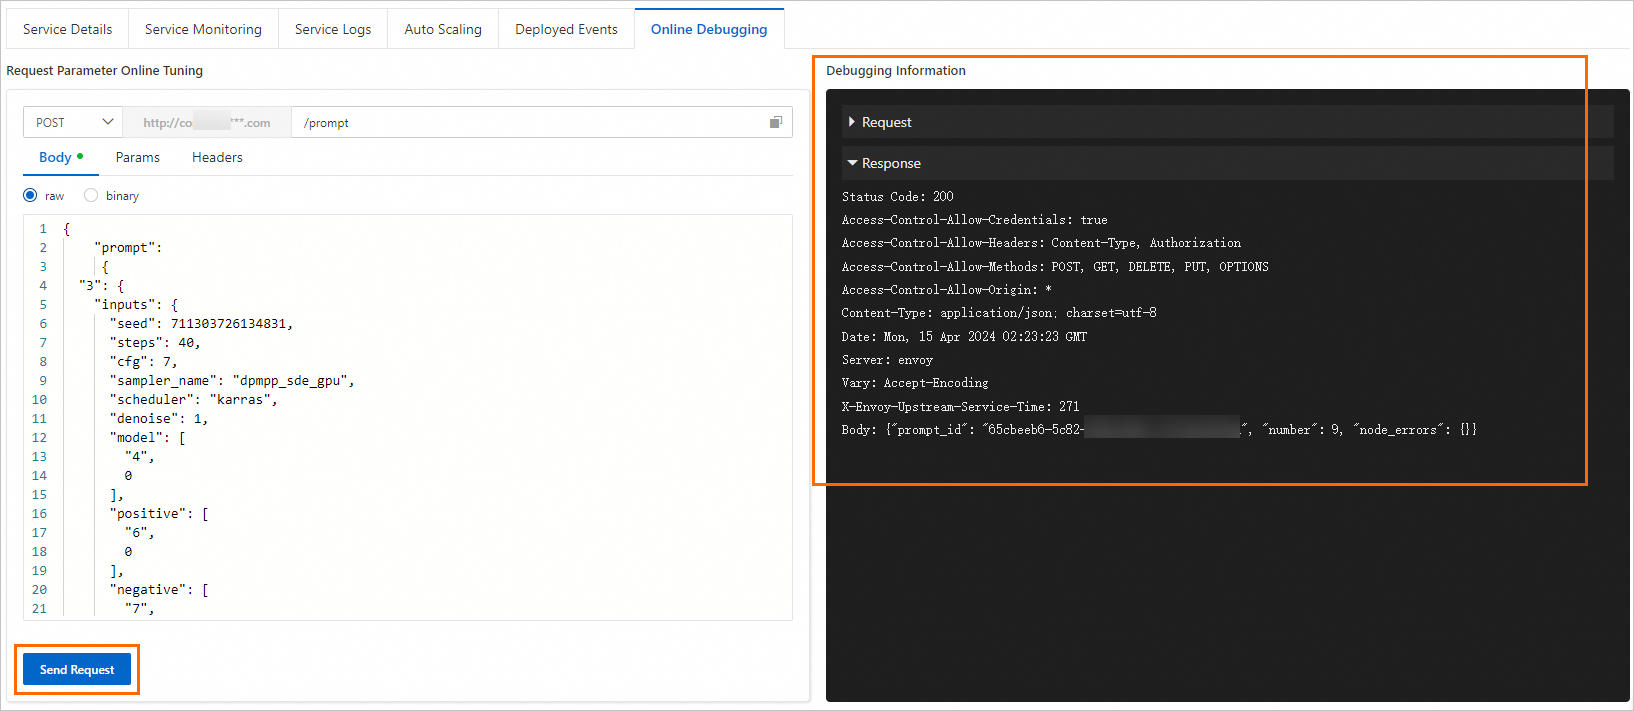
Click Send Request to view the response in the Debugging Information area, as shown in the following figure.
In the Online API Debugging Request Parameters area, set the request method to GET and enter
/history/<prompt id>in the text box, as shown in the following figure.
Replace
<prompt id>with the Prompt ID that you obtained in the previous step.Click Send Request to obtain the inference result.
You can view the generated inference result in the
outputdirectory of the mounted storage.
Synchronous call
On the Inference Service tab, click your service name to go to the Overview page. In the Basic Information section, click View Endpoint Information.
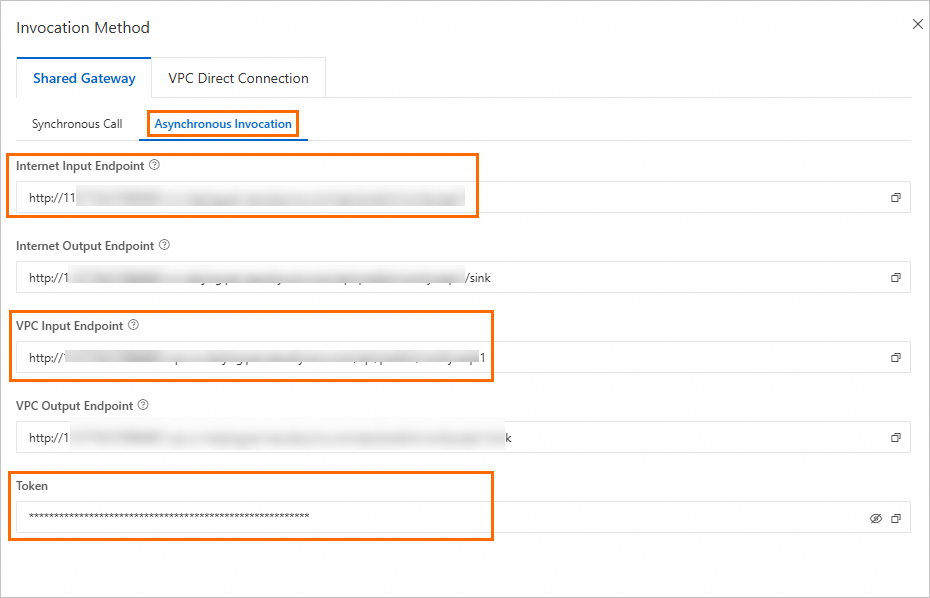
In the Invocation Method panel, you can obtain the endpoint and token. Select an Internet or VPC endpoint as needed. This topic uses <EAS_ENDPOINT> and <EAS_TOKEN> to represent the endpoint and token, respectively.

Asynchronous invocation
Asynchronous calls support only the api_prompt path. The task_id parameter is a key flag used to identify the request and result. You must assign a unique value to each request to match it with the corresponding result from the queue. The request path is as follows:
{service_url}/api_prompt?task_id={a unique value must be assigned}
On the Inference Service tab, click the target service name to open the Overview page. In the Basic Information section, click View Invocation Information. In the Invocation Information dialog box, on the Asynchronous Invocation tab, you can view the service endpoint and token.
The generated images or videos are stored in the mounted output directory. The API call result returns the file name and subdirectory name. For OSS, you must construct the full file path to download the file. For more information, see Use Alibaba Cloud SDKs to download files from OSS.
FAQ
Models and nodes
1. WebUI error: Missing model
Problem description: The following error is reported:
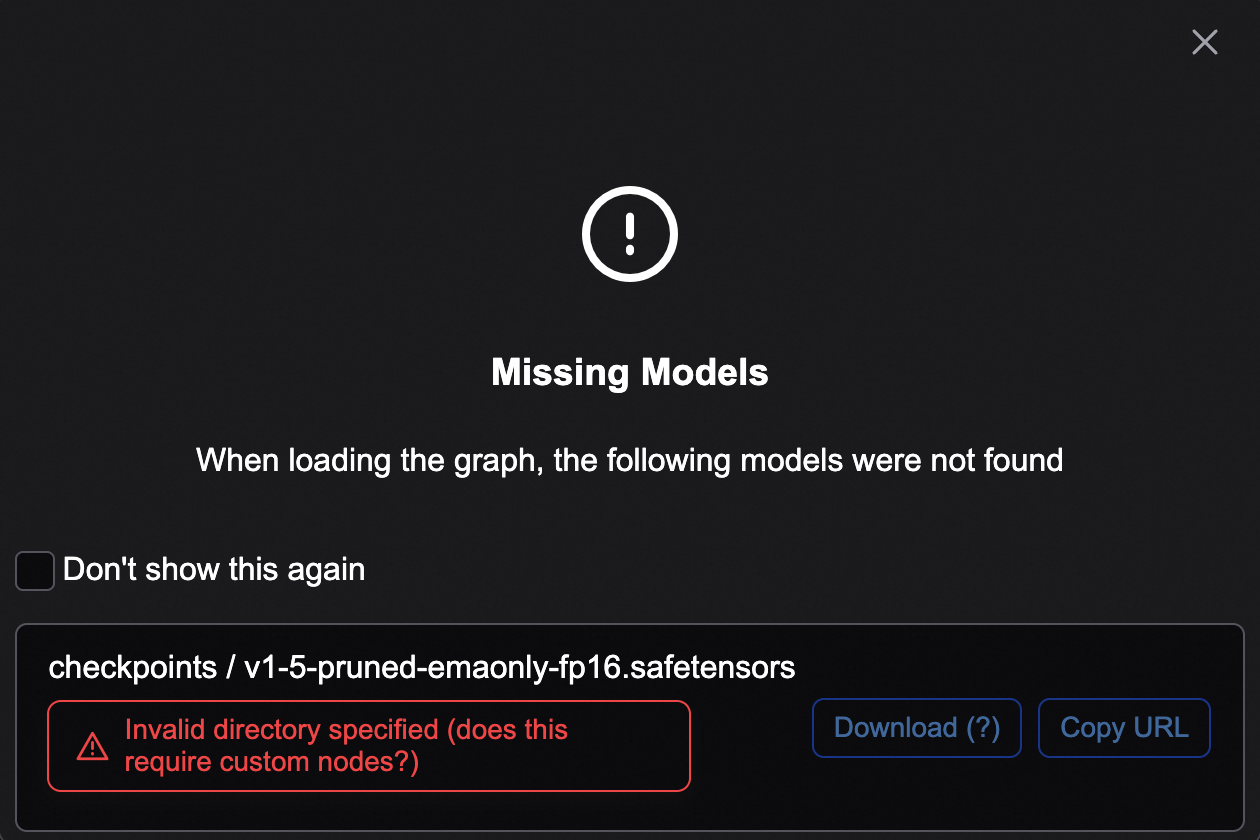
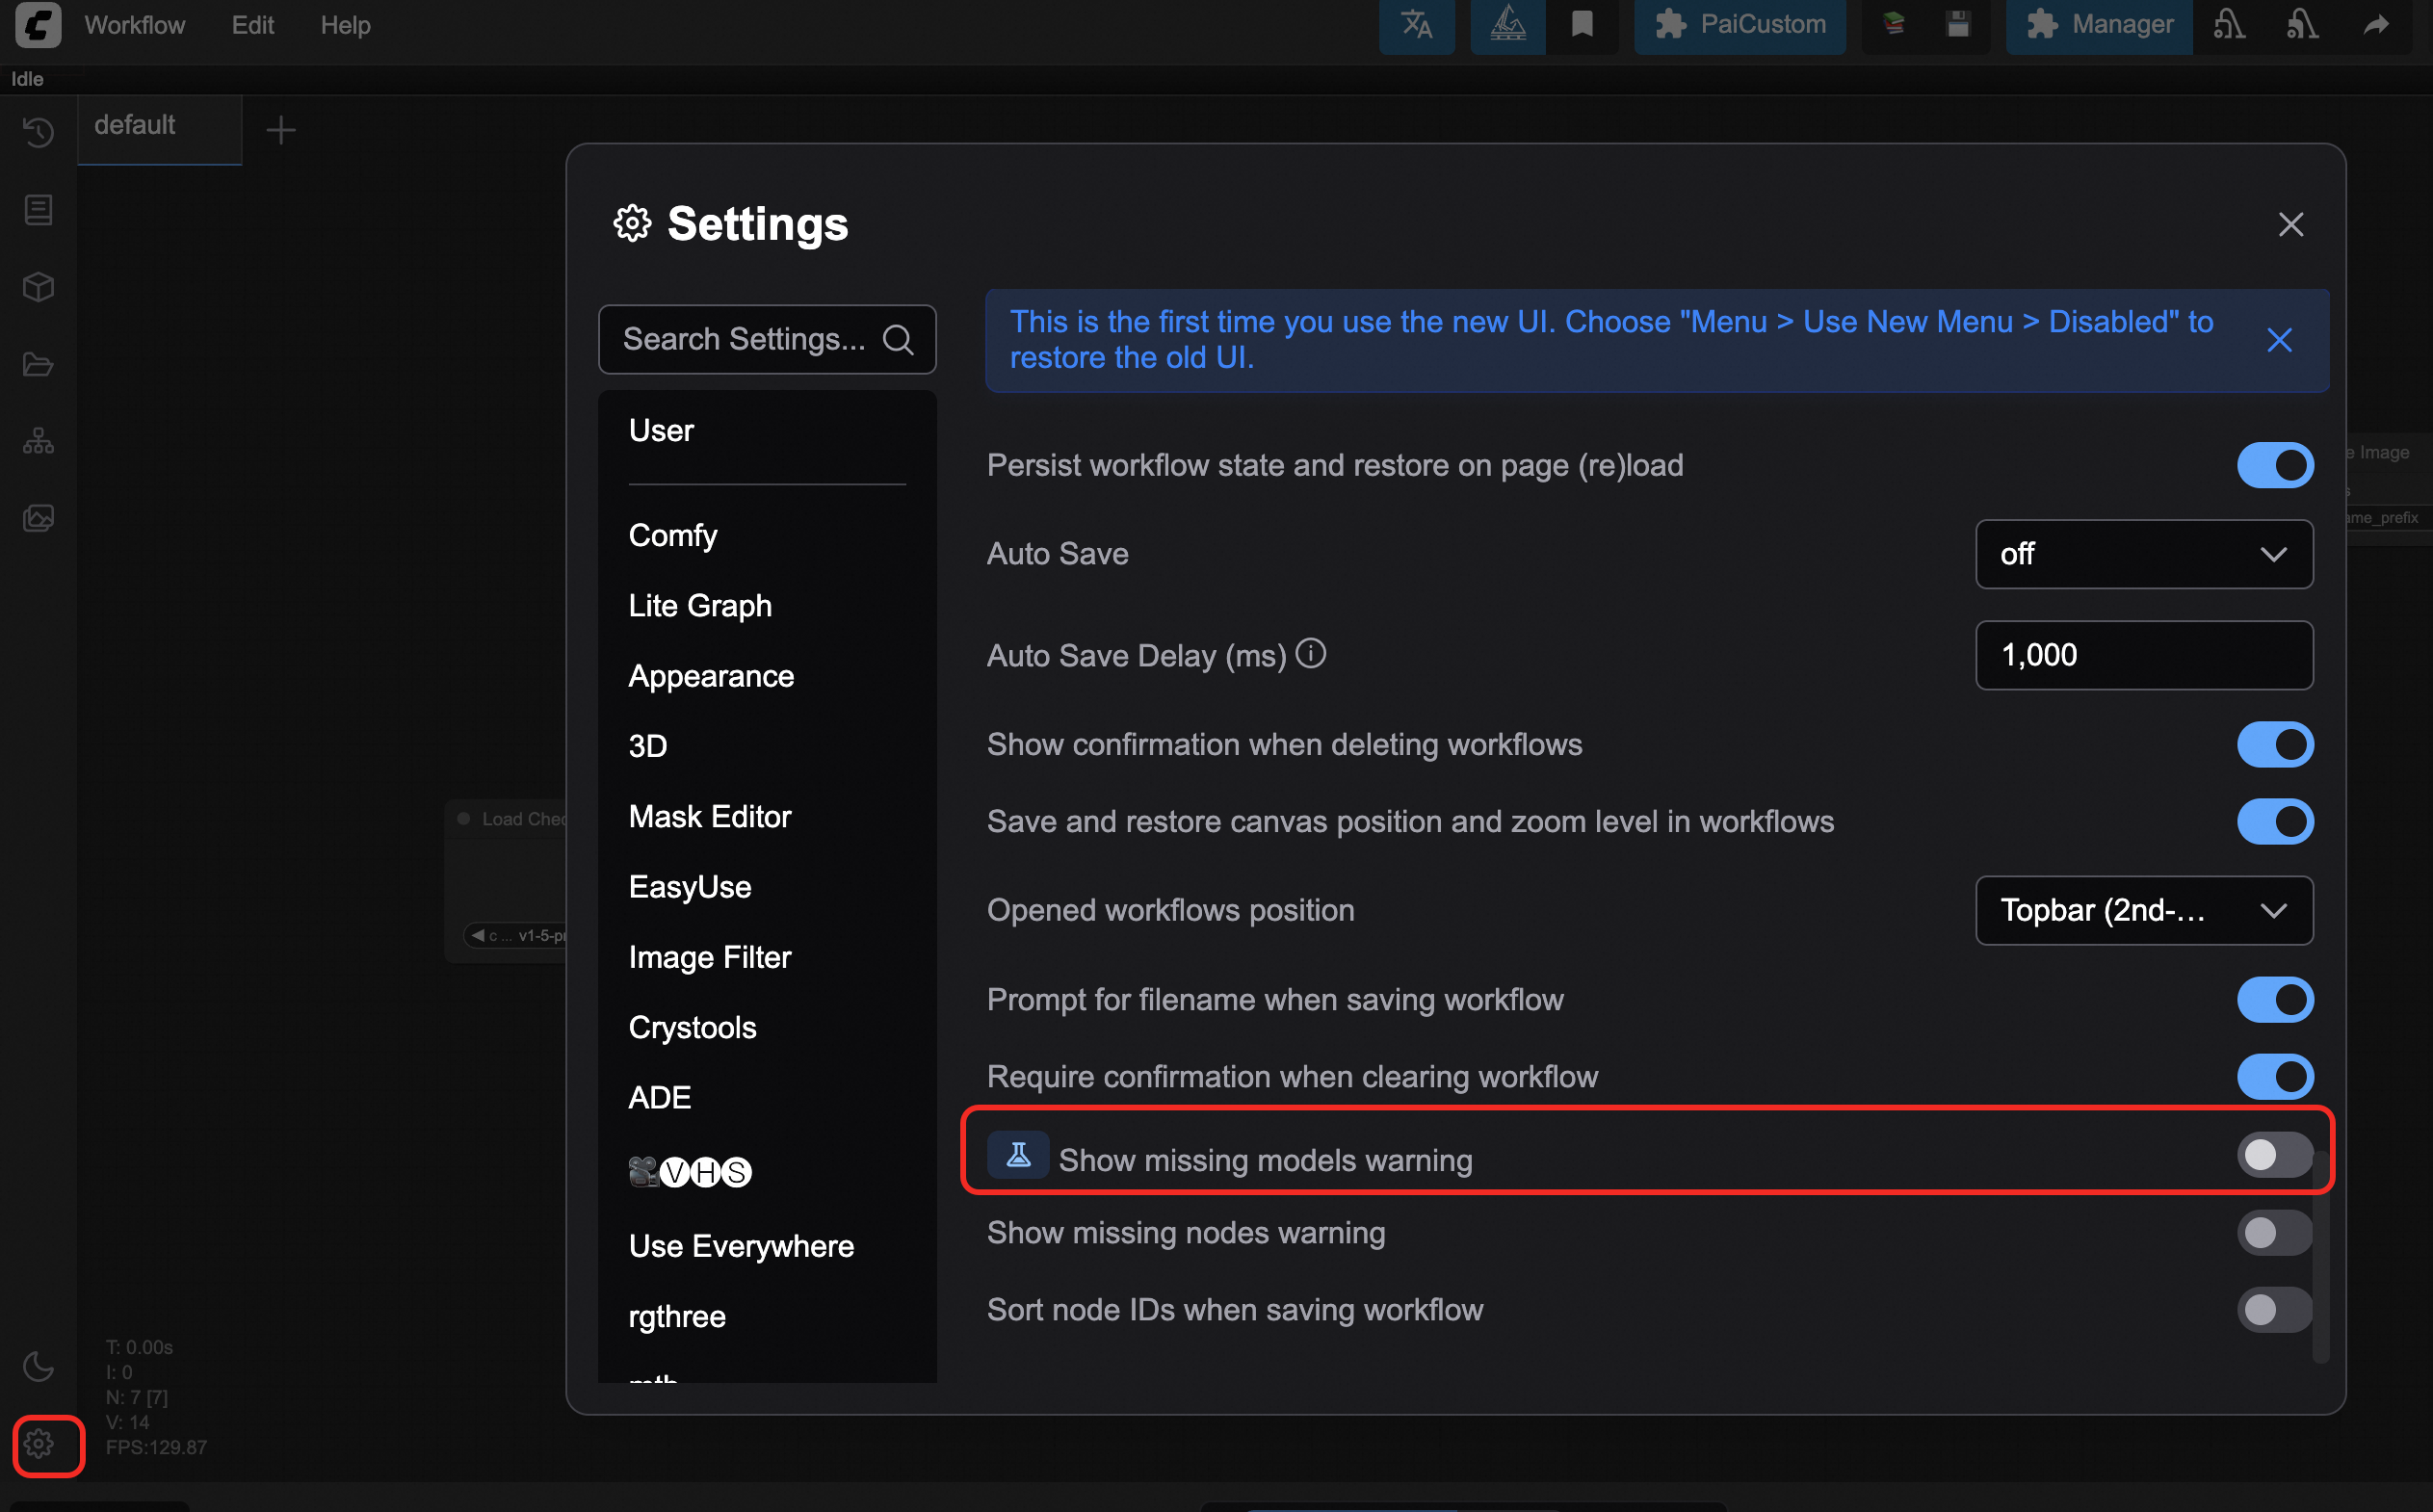
Solution: This check is not valid for ComfyUI deployed in PAI. The runtime error takes precedence. We recommend that you select the Do not show this message again check box or disable model validation in the settings.
2. I uploaded a new model, but I cannot find it
First, check whether you are using the Serverless Edition, which does not support uploading your own models. Use the Standard or Cluster Edition instead. If you are using a supported version, perform the following steps:
On the page, click PaiCustom and select Load New Model.
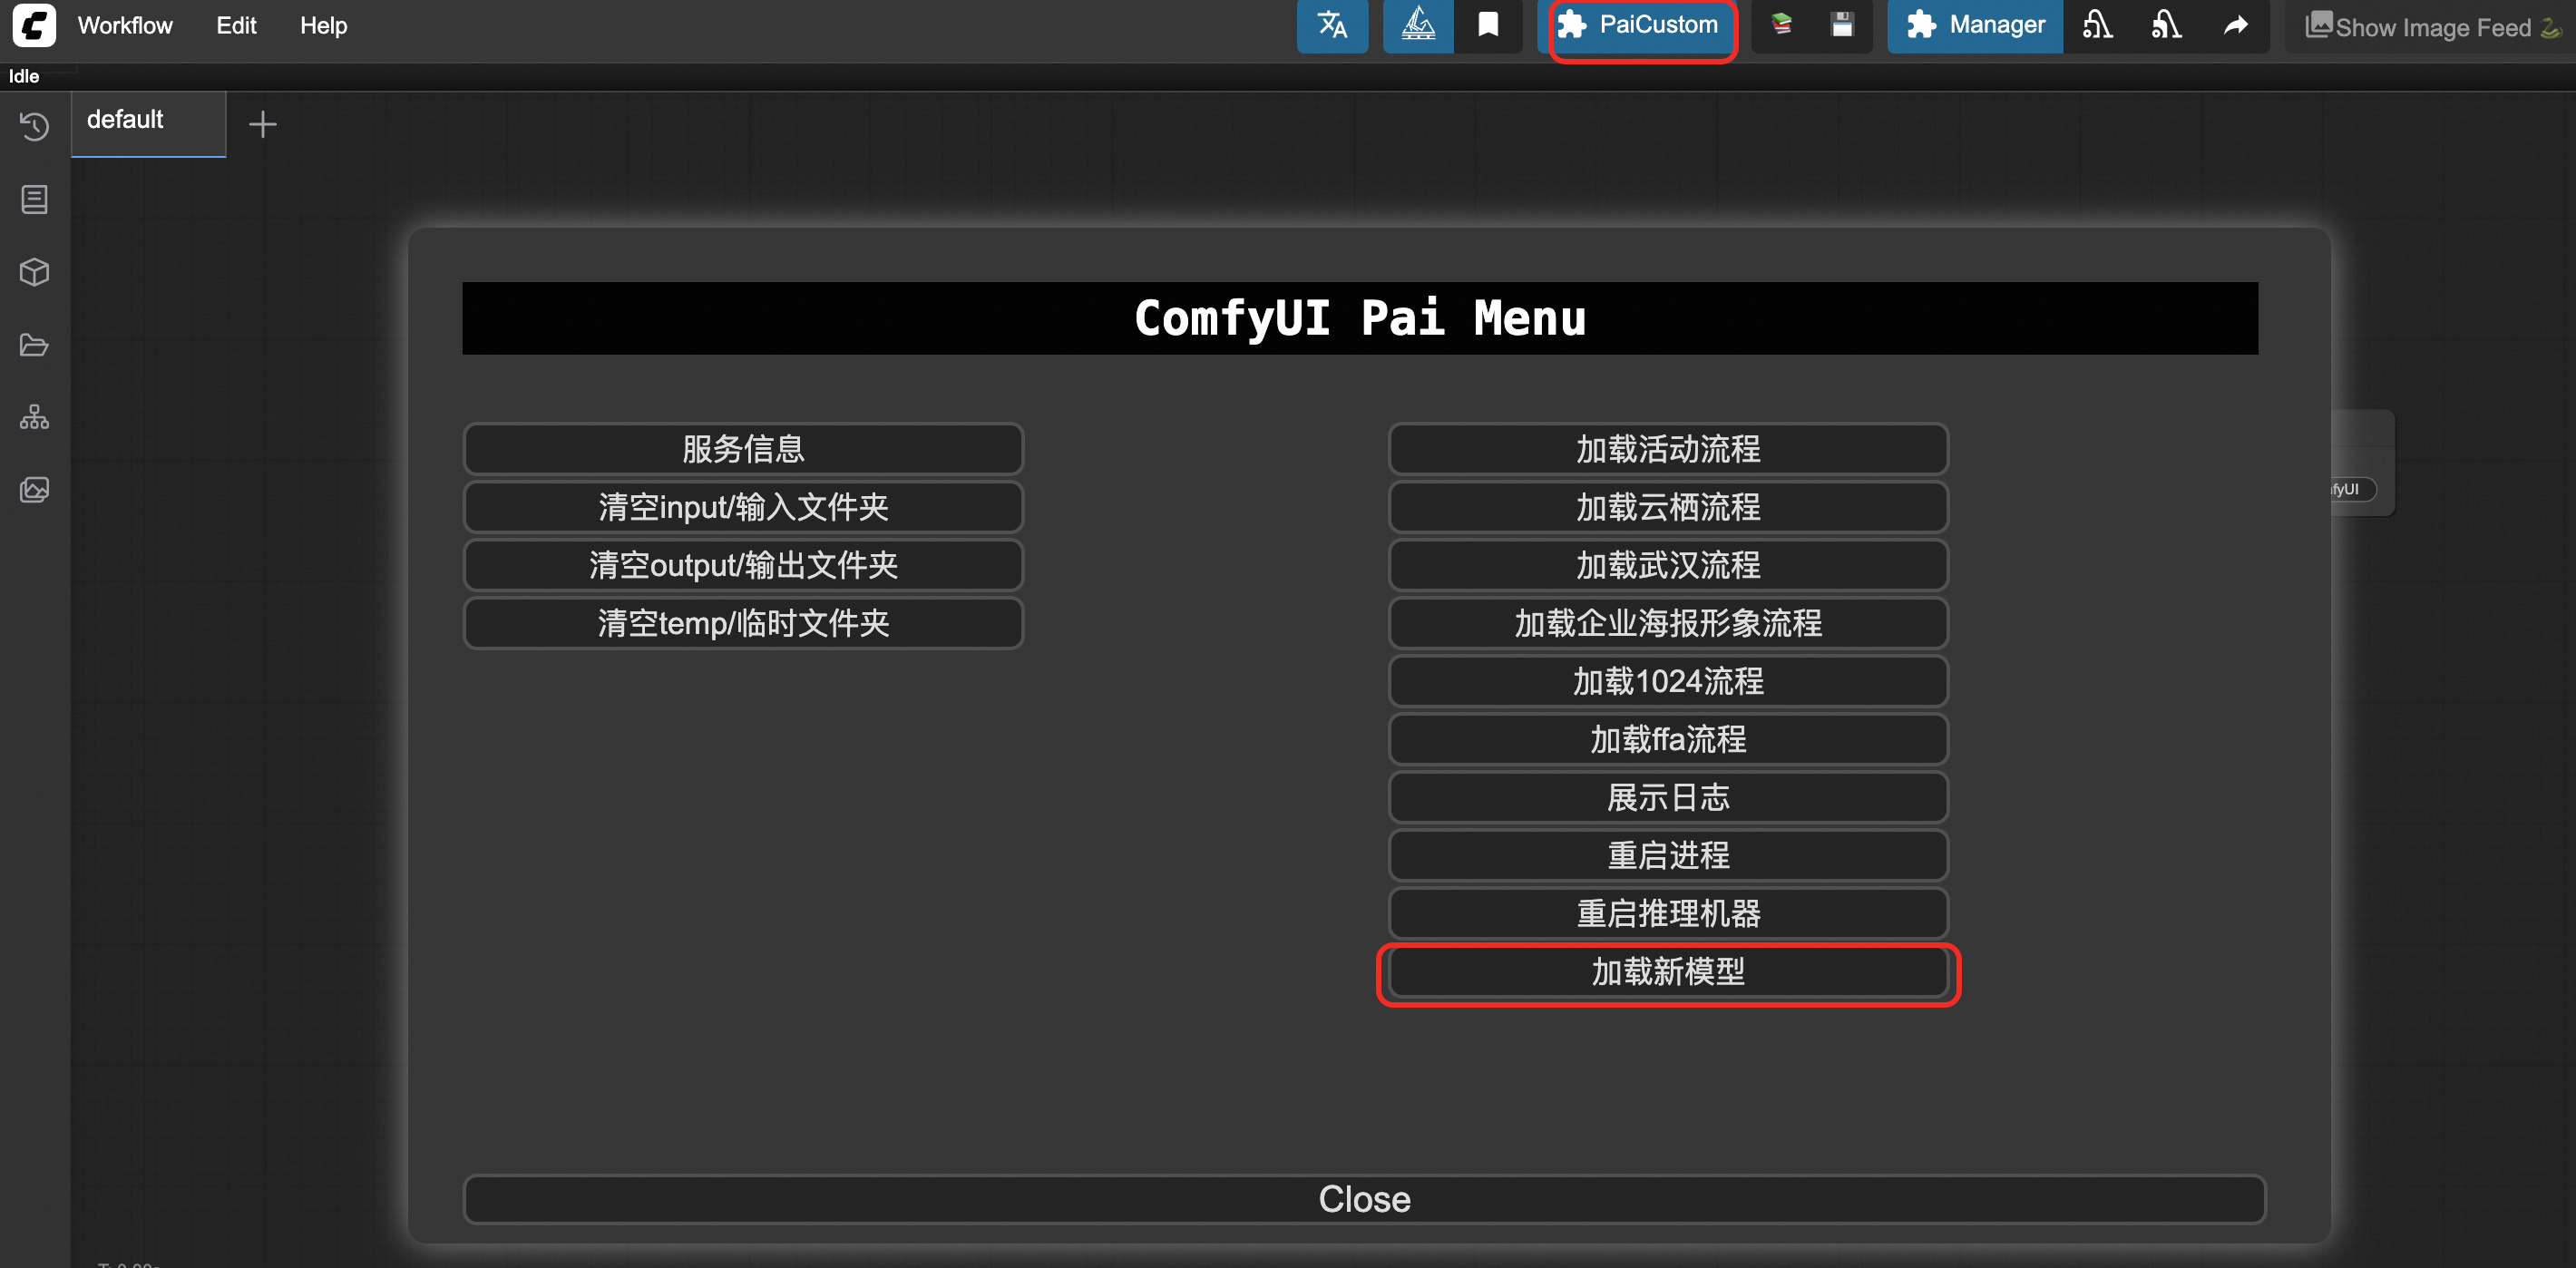
If it still does not work, click Restart Process.
3. The model loader displays "undefined"
4. Cannot find a node
5. ComfyUI Manager fails to download a model or install a node
6. How do I view the list of available model files and nodes (ComfyUI plug-ins)?
Images and dependencies
1. How do I install a wheel package?
Ensure that the mount configuration is complete. The following example assumes that the OSS path Uri is oss://examplebucket/comfyui.

Upload the wheel package to
oss://examplebucket/comfyui/models/whlin the mounted OSS. If thewhlfolder does not exist, create it.In this example, the OSS mount path is /mnt/data. Add the command
pip install /mnt/data/models/whl/xxx.whlbefore the run command. In this command, /mnt/data is your OSS mount path and xxx.whl is the name of your wheel package.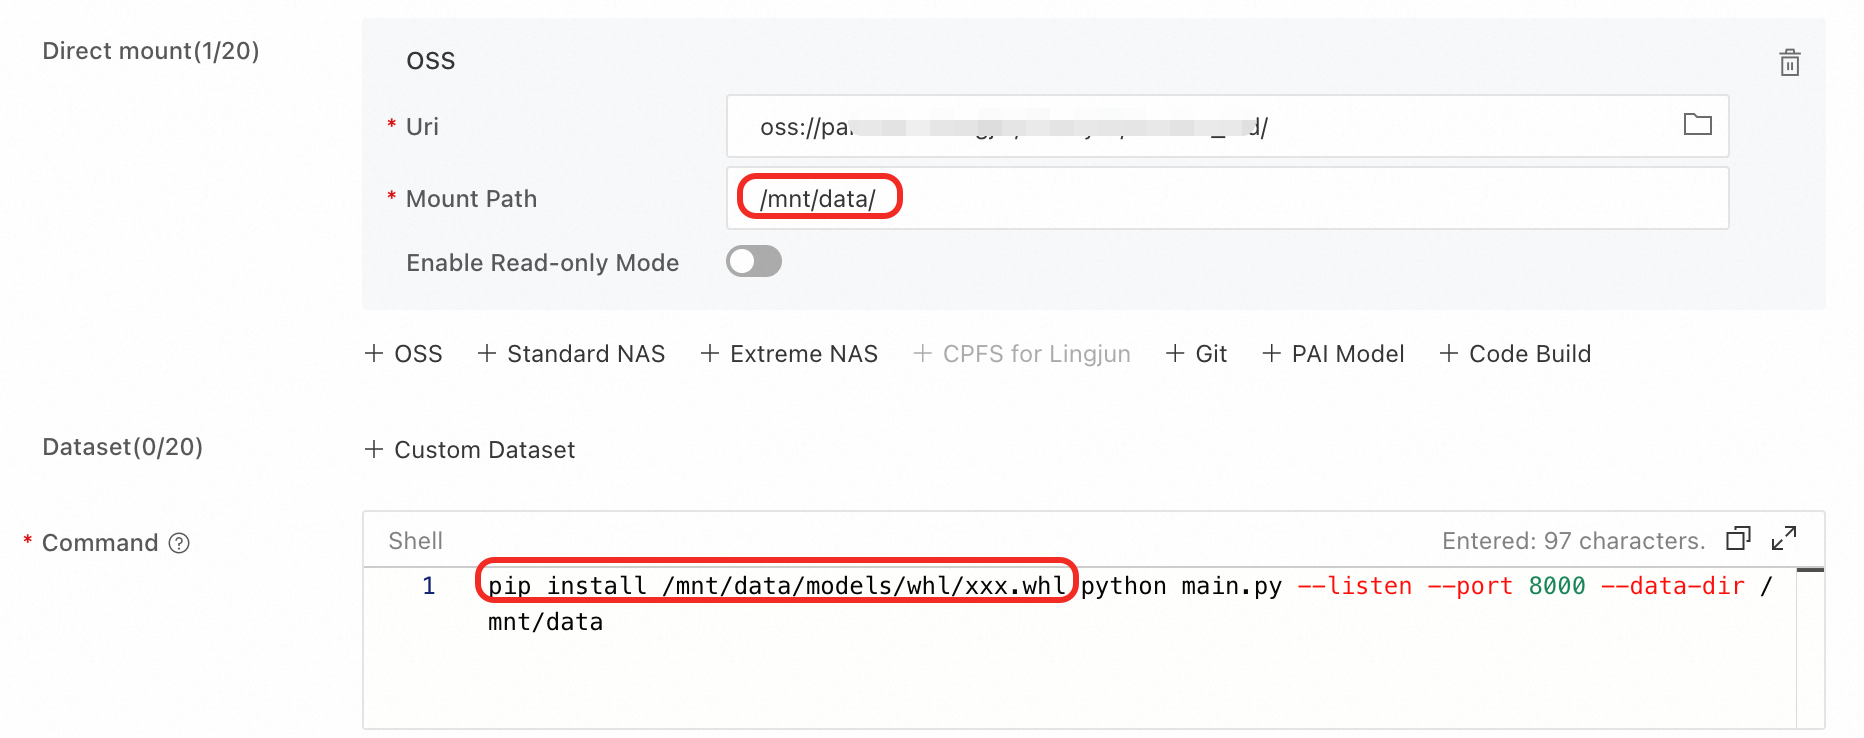
2. How do I update the image version and keep installed custom models?
You cannot update ComfyUI images for the Serverless version. However, for other versions with mounted OSS or NAS storage, your custom models are retained. This lets you update the Official Image in the service configuration without affecting your custom models. To do so, perform the following steps:
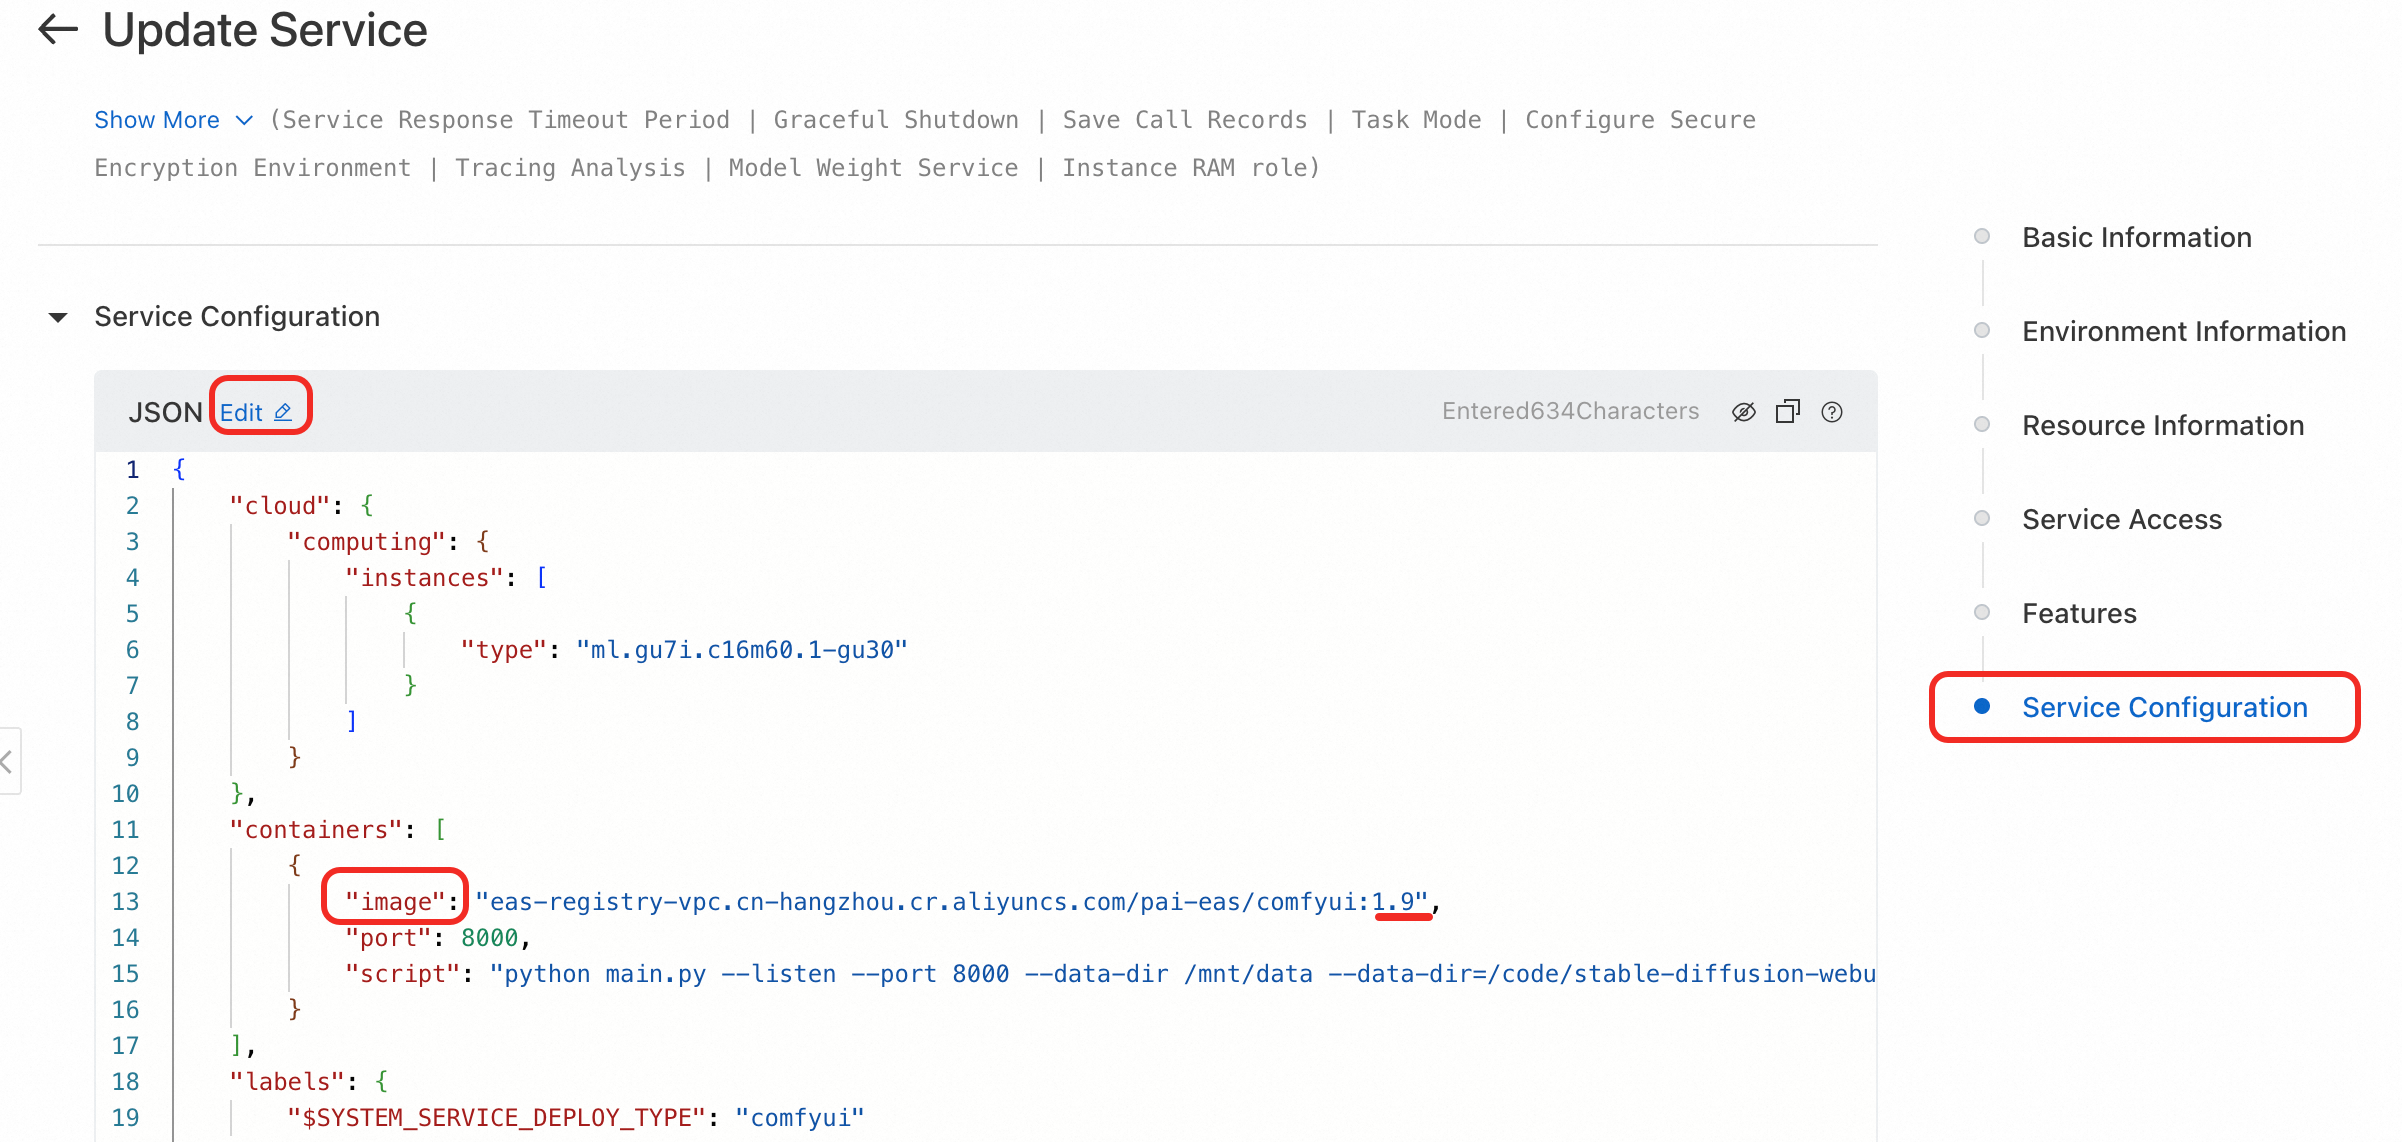
On the service details page, click Update in the upper-right corner.

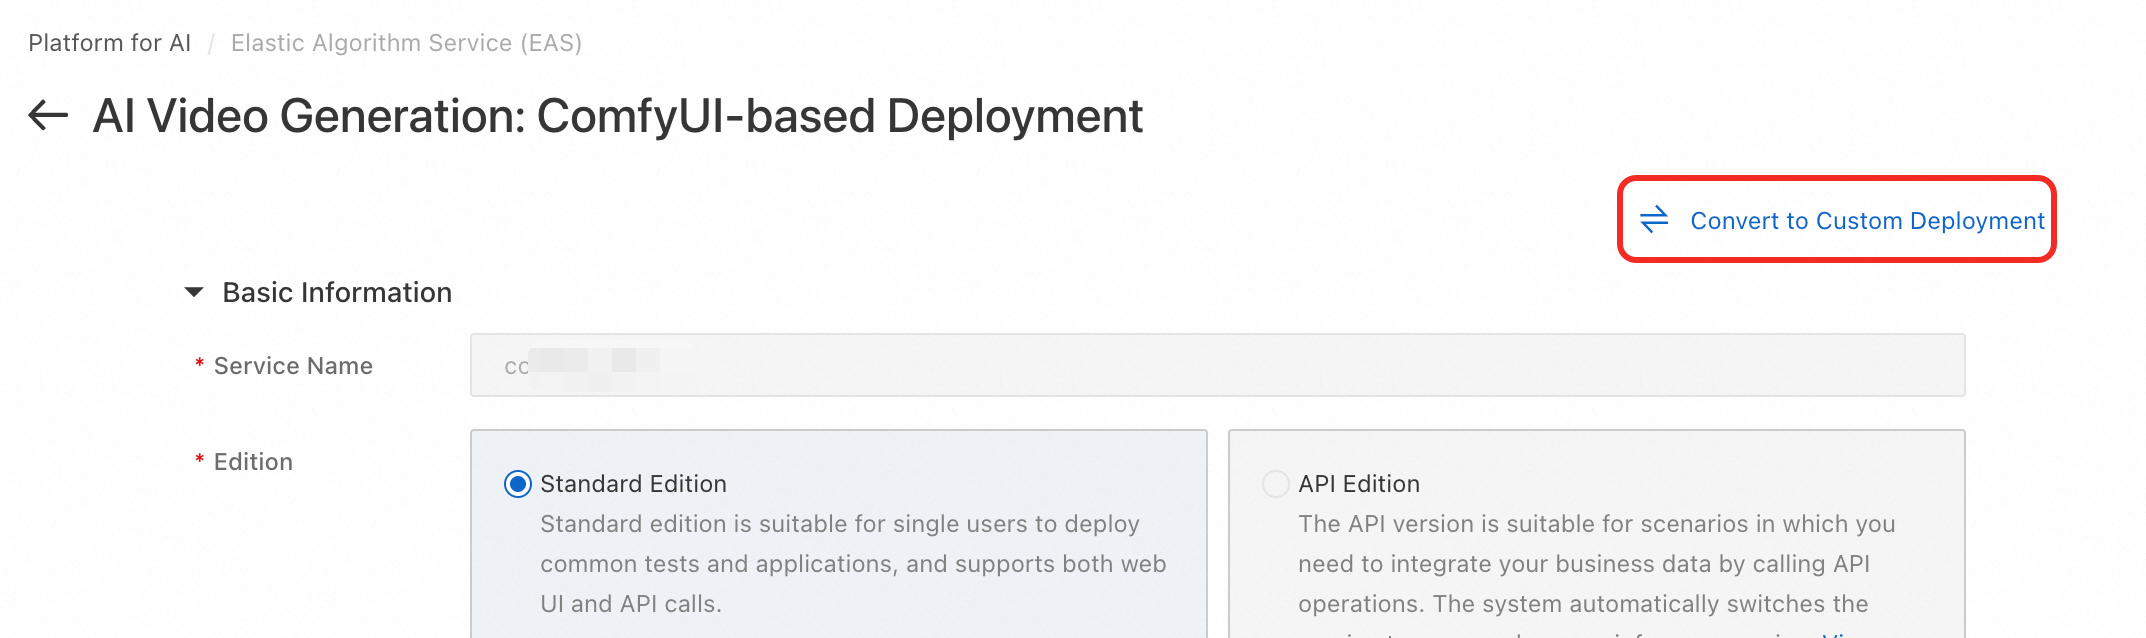
If the service was deployed using the scenario-based method, switch to custom deployment. On the right, click Service Configuration, edit the JSON file, and update the image field of containers. For example, change 1.9 in pai-eas/comfyui:1.9 to the required version.
In the editing window, click Direct Update.
3. Missing dependency libraries in the image
Install the missing dependencies by configuring third-party libraries. The steps are as follows:
On the service details page, click Update in the upper-right corner.
If the service was deployed using the scenario-based method, switch to custom deployment. On the right, click Environment Context. In the More Configurations section, find the third-party library configuration and enter the required dependencies in the specified format.
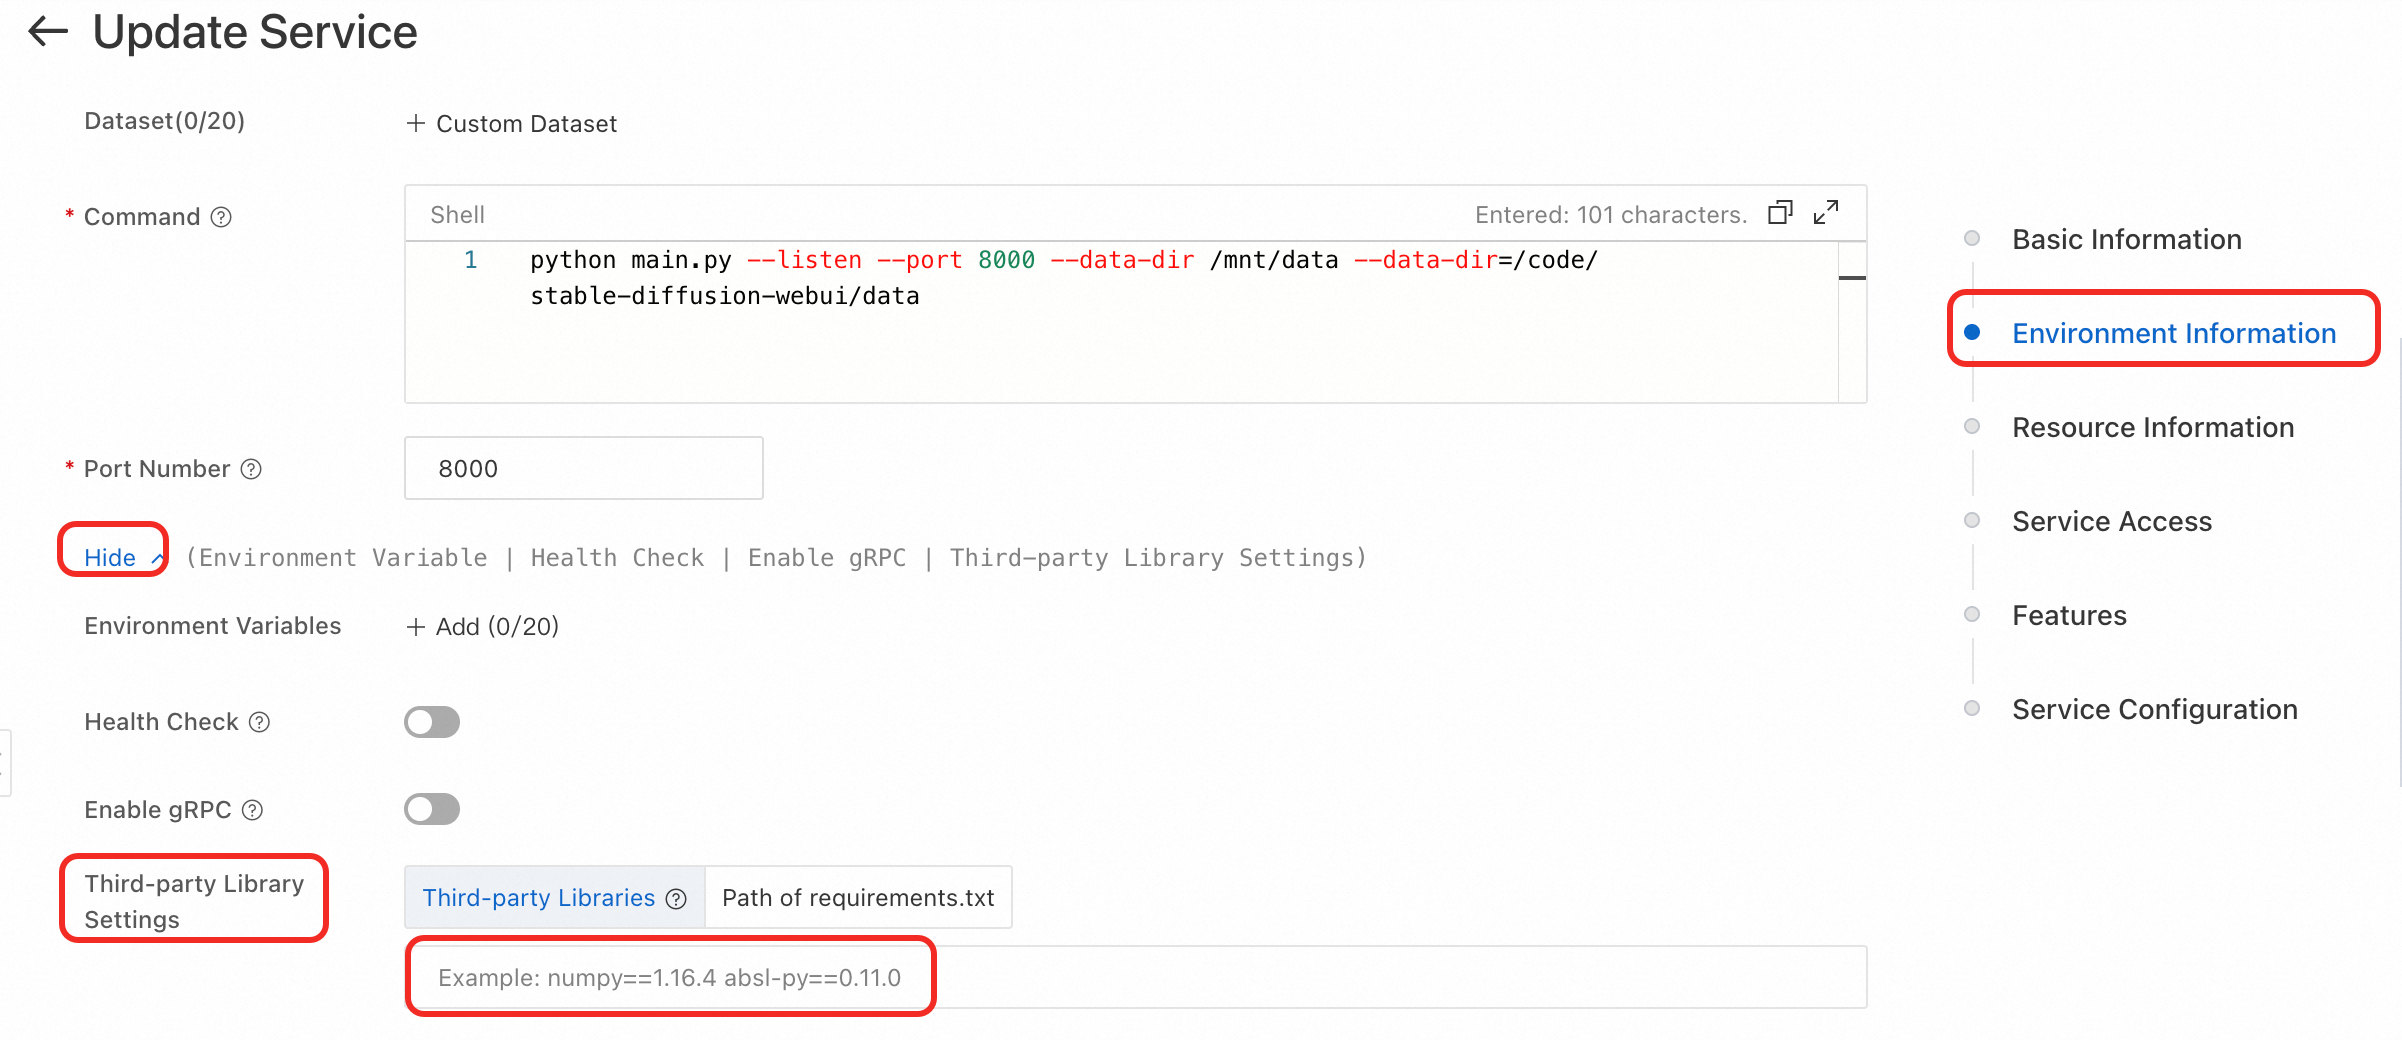
Click the Update button at the bottom of the page to complete the service update.
Runtime exceptions
1. The page freezes or takes too long to refresh
2. The workflow runs halfway and the process restarts
3. RuntimeError: CUDA error: out of memory
4. API call error: "url not found" or "404 page not found"?
5. The service is always in the "Waiting" state or ComfyUI cannot generate images
6. Why does the service stop automatically after running for a period of time?
Others
1. How do I extend the validity period of a logon-free URL?
You can use an API to obtain a logon-free web access link with a specified validity period.
Click the DescribeServiceSignedUrl API link to go to the API page.
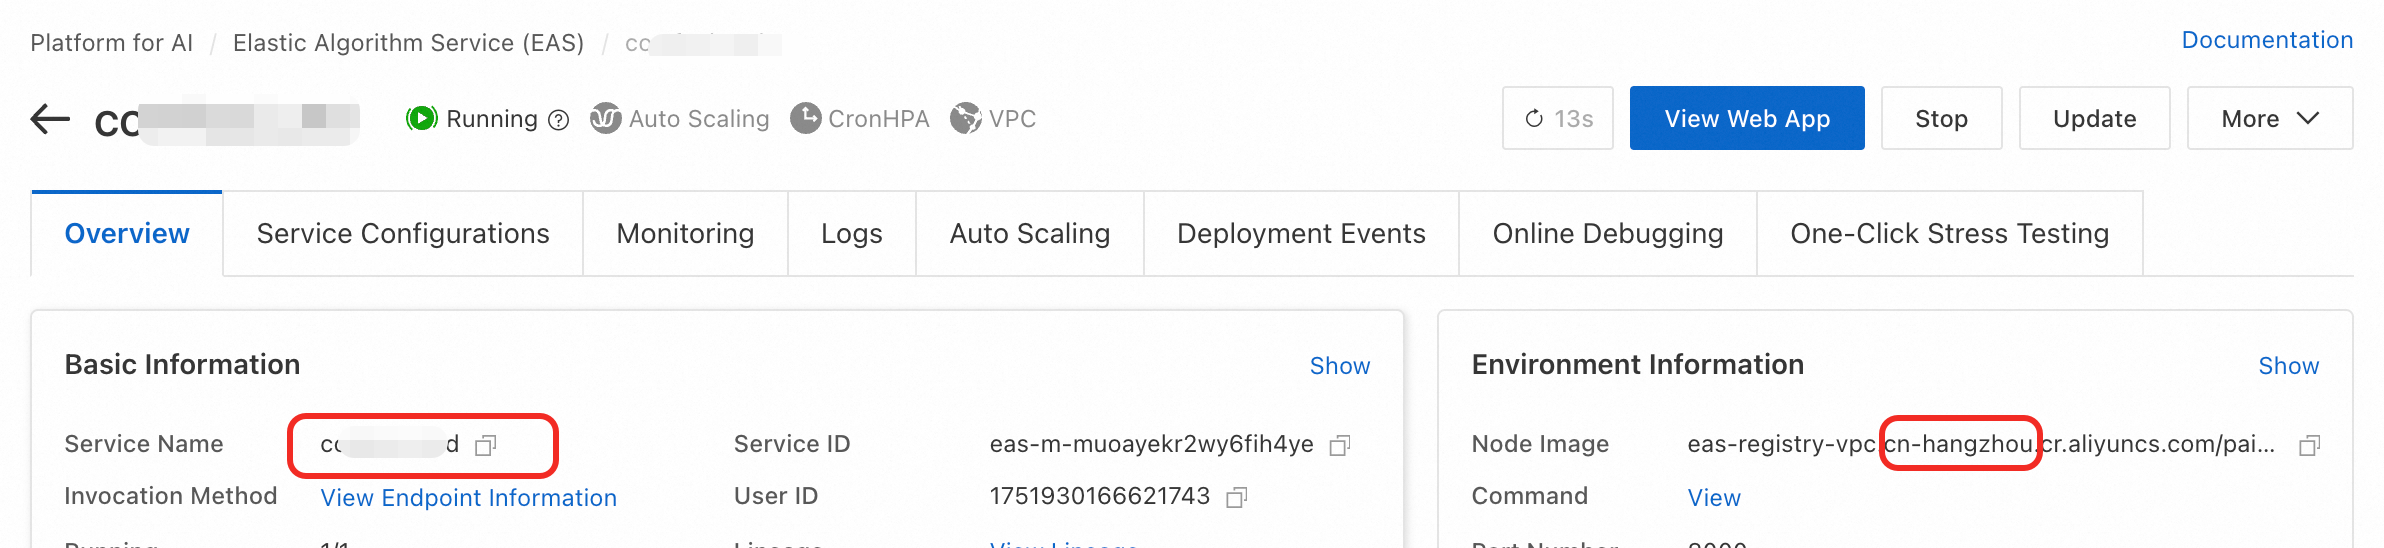
Select the service region.
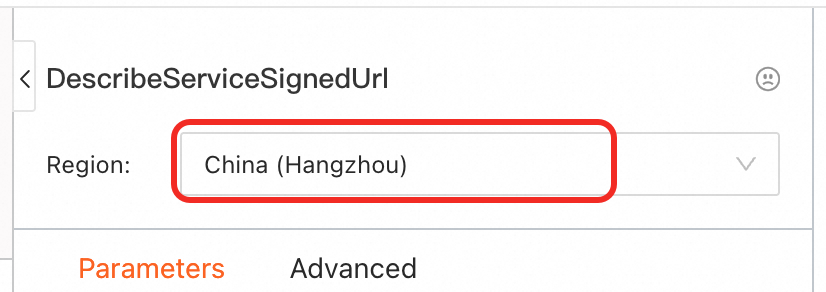
Enter the region where the service is located and the service name. You can obtain this information from the EAS service overview page.
Other parameters are as follows:
Type page type: Select webview from the drop-down list.
Expire time: To set a long validity period, enter 9007199254740991. The current maximum validity period is 12 hours.
Otherwise, enter an integer value in seconds.
Internal whether it is a VPC link: If this is not a VPC call, select false. Otherwise, select true.
Click Initiate Call. The SignedUrl in the response is the logon-free web access link for the service.
2. Acceleration effect of xFormers on image generation speed
3. Main differences between EAS and Function Compute in deploying the ComfyUI Serverless Edition
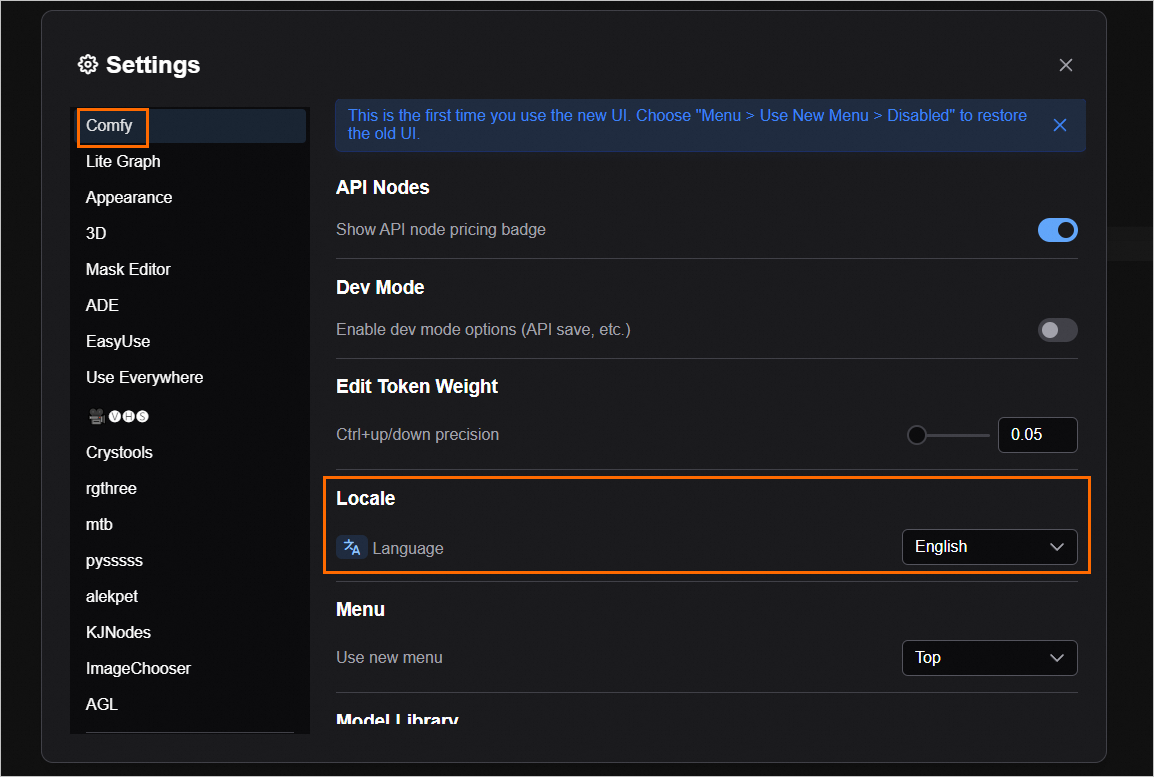
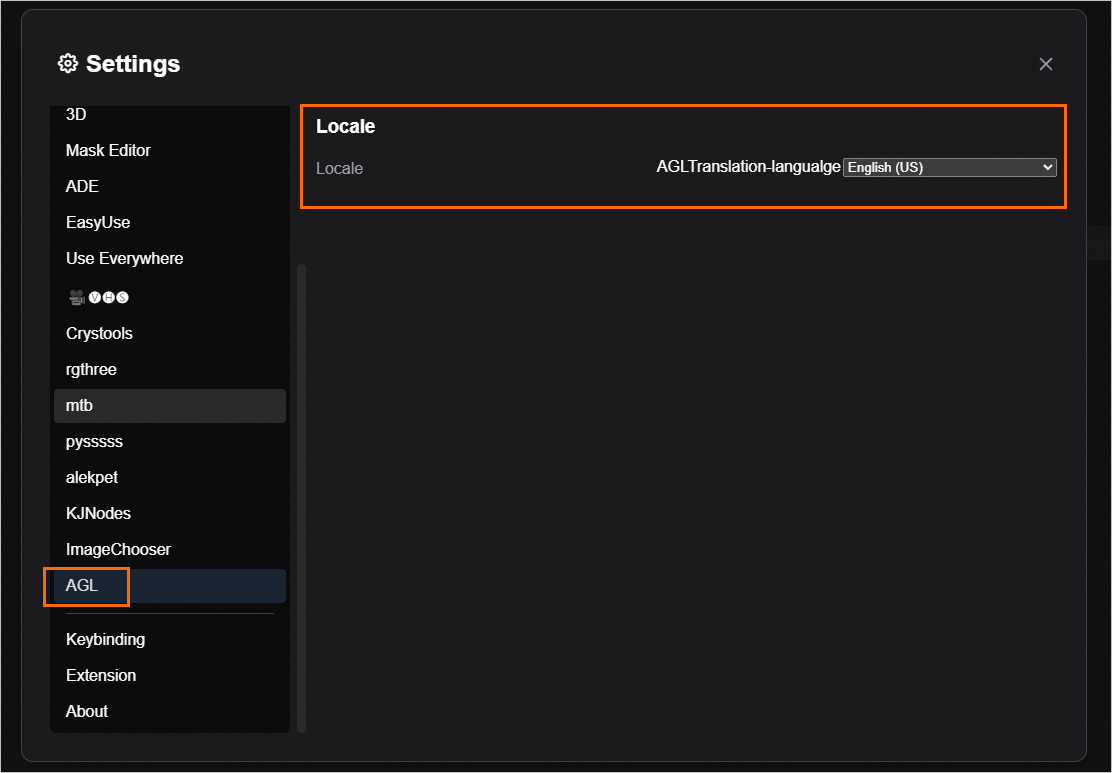
4. How do I switch the default language of the WebUI page?
On the WebUI page, click the settings button
 in the lower-left corner.
In the Settings dialog box, set the language in the following two locations. After you set the parameters, refresh the page.
In the navigation pane on the left, select Comfy. In the region settings on the right, select the destination language.
In the navigation pane on the left, select Language. In the Locale section on the right, select the destination language.
Appendix
Introduction to the working principle of the Cluster Edition service
The following figure shows the implementation principle:

The Cluster Edition service is designed for multi-user scenarios. It decouples the client from backend inference instances, which allows multiple users to share backend inference instances. This improves instance utilization and reduces inference costs.
Each user has an independent backend environment and working directory, which enables efficient GPU sharing and file management.
The proxy manages client processes and inference instances. All user operations are processed in their own processes, and file operations are limited to public and personal directories. This effectively isolates the working directories between users. When a user needs to process a request, the proxy finds an available idle instance from the backend to process the inference request.