PSI measures the distribution difference between two samples to monitor model stability over time or across environments. It helps identify data shift or drift, informing model maintenance and updates.
How it works
PSI measures sample stability. For example, it can determine if a variable's distribution remains stable between two months. A PSI value less than 0.1 indicates an insignificant change, a value between 0.1 and 0.25 indicates a moderate change, and a value greater than 0.25 suggests a significant change that requires attention.
You can visually assess sample stability by plotting the data. Discretize a variable into N bins, calculate the count and proportion of samples in each bin, and then visualize the results in a column chart, as shown in the following figure.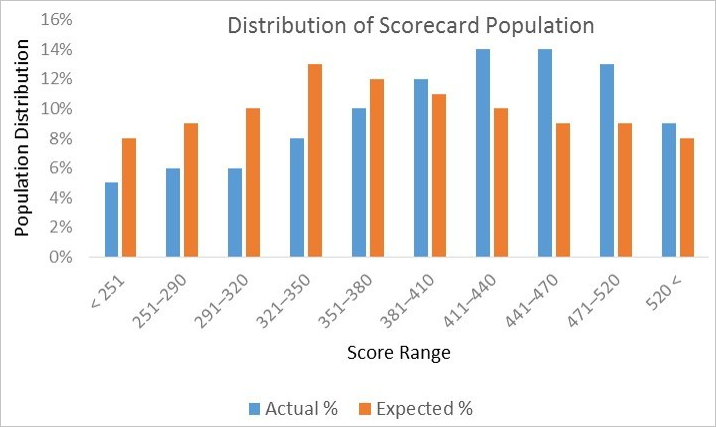 While this method provides an intuitive way to check for drastic changes in a variable across two samples, it is not quantitative and cannot be used for automated stability monitoring. For this, PSI is essential. The formula for calculating PSI is as follows.
Configure the component
Method 1: Use the visual interface
In the Machine Learning Designer pipeline, add the Population Stability Index (PSI) component and configure its parameters in the right-side panel.
|
Parameter type |
Parameter |
Description |
|
Field settings |
Features for PSI calculation |
The feature columns for the PSI calculation. |
|
Tuning |
Cores |
The number of CPU cores to use. The system allocates this resource automatically by default. |
|
Memory Size |
The memory size for each CPU core. The system allocates this resource automatically by default. |
Method 2: Use a PAI command
Use a PAI command to configure the parameters of the Population Stability Index (PSI) component. You can run PAI commands in the SQL Script component. For more information, see SQL Script.
PAI -name psi
-project algo_public
-DinputBaseTableName=psi_base_table
-DinputTestTableName=psi_test_table
-DoutputTableName=psi_bin_table
-DinputBinTableName=pai_index_table
-DfeatureColNames=fea1,fea2,fea3
-Dlifecycle=7|
Parameter |
Required |
Default |
Description |
|
inputBaseTableName |
Yes |
None |
The name of the input base table. The component measures the shift of the test table against this base table. |
|
inputBaseTablePartitions |
No |
All partitions |
The partitions of the input base table. |
|
inputTestTableName |
Yes |
None |
The name of the input test table. The component calculates the shift of this test table relative to the base table. |
|
inputTestTablePartitions |
No |
All partitions |
The partitions of the input test table. |
|
inputBinTableName |
Yes |
None |
The name of the input binning result table. |
|
featureColNames |
No |
All columns |
The feature columns for the PSI calculation. |
|
outputTableName |
Yes |
None |
The name of the output metric table. |
|
lifecycle |
No |
None |
The lifecycle of the output table. |
|
coreNum |
No |
System-allocated |
The number of CPU cores to use. |
|
memSizePerCore |
No |
System-allocated |
The memory size for each CPU core, in MB. |
Example
Before calculating PSI, you must bin the feature data using a binning component. As shown in the following figure, the Population Stability Index (PSI) component is connected to two sample datasets for comparison and a binning component. To run the calculation, you only need to configure the Features for PSI calculation parameter.
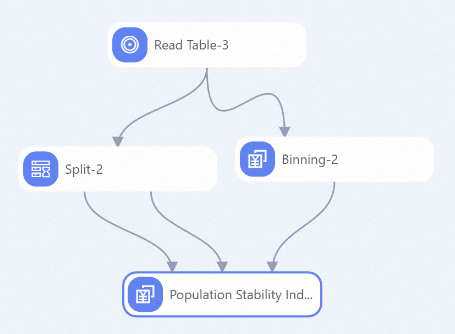
The PSI calculation results are detailed in the model report. The report displays the PSI value and binning details for each feature in an expandable, hierarchical table. The columns are Feature, Bin, Test %, Base %, Test - Base, ln(Test/Base), and PSI. For example, the PSI for the age feature is 0.0475 (containing 7 bins), the PSI for the menopause feature is 0.0588 (containing 6 bins), and the PSI for the tumor_size feature is 0.0409. You can expand each feature row to see the contribution of each bin to the overall PSI.